Introduction
Welcome to the world of modding! If you’re an avid gamer looking to enhance your gaming experience, you’ve come to the right place. One of the best ways to customize and personalize your favorite games is by downloading mods. Mods, short for modifications, are user-created content that can range from simple cosmetic changes to extensive gameplay overhauls.
In this article, we’ll be exploring how to download mods using Nexus Mod Manager. Nexus Mod Manager, or NMM for short, is a popular software tool that simplifies the process of mod installation and management. With NMM, you can easily browse, download, and install mods for a wide variety of games, all from one centralized platform.
If you’re new to modding, don’t worry! We will guide you through the entire process step by step, ensuring that you can navigate the world of mods with ease. By the end of this article, you’ll be equipped with the knowledge and tools necessary to enhance your gaming experience through mods.
Before we dive into the details, it’s important to note that modding can vary depending on the game and the platform you’re playing on. In this article, we’ll focus on using Nexus Mod Manager for PC games. If you’re playing on a different platform or using different modding tools, the process may differ slightly.
Now, without further ado, let’s get started on our modding journey! In the next section, we’ll discuss how to install Nexus Mod Manager and get it set up on your computer.
What is Nexus Mod Manager?
Nexus Mod Manager (NMM) is a powerful and user-friendly software tool used to manage and install mods for various PC games. It acts as a centralized hub where users can browse, download, and organize their mods efficiently.
One of the standout features of Nexus Mod Manager is its vast library of mods. With over a million registered users and thousands of mods available, it offers a wide range of options for gamers looking to customize their gameplay experience. Whether you’re looking for graphical enhancements, new quests, additional weapons, or gameplay tweaks, you’re likely to find it on the Nexus Mods website.
Using Nexus Mod Manager provides several advantages over manually installing mods. Firstly, it simplifies the installation process. With NMM, you can download and install mods with just a few clicks, eliminating the need to manually extract files and copy them to the game directory.
Additionally, Nexus Mod Manager helps to manage and organize your mods effectively. It keeps track of the mods you have installed, allows you to activate or deactivate them as desired, and provides a convenient way to update your mods when new versions are released.
Another notable feature of Nexus Mod Manager is its built-in mod conflict detection. When installing multiple mods, conflicts may arise when two or more mods make changes to the same aspect of the game. NMM alerts you to these conflicts and provides options to resolve them, ensuring a smooth and stable gaming experience.
Aside from its functionality, Nexus Mod Manager also boasts a user-friendly interface, making it accessible to both novice and experienced modders. The interface allows for easy navigation, with tabs for browsing different categories of mods, a search function to find specific mods, and a download manager to keep track of your downloads.
Overall, Nexus Mod Manager is an indispensable tool for anyone interested in modding their favorite PC games. It streamlines the mod installation and management process, provides a vast library of mods to choose from, and offers a user-friendly interface. In the next section, we’ll walk you through the installation process of Nexus Mod Manager, so you can start exploring and installing mods for your favorite games.
Step 1: Installing Nexus Mod Manager
The first step in utilizing Nexus Mod Manager is to install the software on your computer. Follow these simple steps to get started:
- Visit the Nexus Mods website (https://www.nexusmods.com/) using your preferred web browser.
- Click on the “Register” button at the top right corner of the website to create a Nexus Mods account. Fill in the required information, including your username, password, and email address. Verify your account through the email sent to you.
- Once you have created your account, log in to the Nexus Mods website.
- In the top navigation bar, click on the “Files” tab. This will bring you to the mod categories and filters page.
- Scroll down and click on the “Nexus Mod Manager” category. This category contains the latest version of Nexus Mod Manager.
- On the Nexus Mod Manager category page, locate the latest version of the software and click on it to access the download page.
- On the download page, review the file information and click on the “DOWNLOAD (NMM)” button to initiate the download. Save the file to a location on your computer where you can easily access it.
- Once the download is complete, navigate to the location where you saved the file and double-click on it to begin the installation process.
- Follow the on-screen prompts to install Nexus Mod Manager to your computer. Make sure to review and agree to the terms and conditions.
- After the installation is complete, launch Nexus Mod Manager. You may be prompted to associate it with supported file extensions. Choose the desired options based on your preferences.
That’s it! You have successfully installed Nexus Mod Manager on your computer. In the next step, we’ll guide you through the process of creating a Nexus Mods account, which is required to fully utilize the features of NMM.
Step 2: Creating a Nexus Mods Account
In order to fully utilize the features of Nexus Mod Manager (NMM) and access the extensive library of mods on the Nexus Mods website, you will need to create a Nexus Mods account. Follow these steps to create your account:
- Visit the Nexus Mods website (https://www.nexusmods.com/) using your preferred web browser.
- Click on the “Register” button located at the top right corner of the website.
- On the registration page, fill in the required information to create your account. This typically includes choosing a username, providing your email address, and selecting a strong password.
- Complete any additional fields as necessary, such as your date of birth or profile information.
- Review and agree to the terms and conditions, privacy policy, and any other relevant agreements.
- Complete any security verification process, such as solving a CAPTCHA or confirming your email address.
- Check your email inbox for a verification email from Nexus Mods. Click on the verification link provided in the email to confirm your account.
- Once your account is verified, you can log in to Nexus Mods using your credentials.
- Customize your account settings and preferences as desired, such as uploading a profile picture or configuring notification preferences.
With your Nexus Mods account created, you now have access to a variety of features and benefits. These include the ability to endorse mods, post comments, participate in the community forums, and create your own mod collection lists.
Having a Nexus Mods account is essential when using Nexus Mod Manager, as it allows you to download mods directly from the website and utilize the various features and benefits that come with being a registered member.
In the next step, we will guide you through the process of navigating the Nexus Mods website, enabling you to find and download mods for your favorite games.
Step 3: Navigating the Nexus Mods website
Navigating the Nexus Mods website is an important step in finding and downloading mods for your favorite games. Follow these steps to effectively navigate the site:
- Open your preferred web browser and go to the Nexus Mods website (https://www.nexusmods.com/).
- Log in to your Nexus Mods account using your username and password. If you don’t have an account, refer back to Step 2 to create one.
- Once logged in, you will be greeted with the website homepage. Take a moment to familiarize yourself with the layout and various sections of the site.
- From the top navigation bar, you can access different sections of the website such as “Files,” “Mods,” “Games,” and more. Click on the desired section to explore further.
- To search for mods, use the search bar located at the top of the page. Enter keywords related to the type of mod you are looking for (e.g., “graphics overhaul” or “new weapons”) and hit Enter.
- Use the available filters on the “Files” page to narrow down your search results. You can filter by game, category, tags, and more to find mods that best suit your preferences.
- Browse the mod listings and read the descriptions, reviews, and user comments to gather information about the mod’s features, compatibility, and overall quality.
- To learn more about a specific mod, click on its title or thumbnail image to open its mod page. Here, you will find detailed information about the mod, including installation instructions, compatibility notes, and more.
- When you find a mod you want to download, click on the “Download” button to initiate the download process. Some mods may require you to be logged in and endorse the mod before downloading.
- Choose the preferred download option, such as downloading manually or with Nexus Mod Manager. If using NMM, the mod will be added to your download queue within the program.
- Repeat the process for other mods you are interested in, exploring different categories and games to find a variety of mods to enhance your gaming experience.
Navigating the Nexus Mods website is essential for discovering and downloading mods that will enhance your favorite games. By utilizing the search bar, filters, and mod pages, you can find mods that align with your preferences and requirements.
In the next step, we will guide you through the process of choosing and downloading mods from the Nexus Mods website using Nexus Mod Manager.
Step 4: Choosing and Downloading Mods
Now that you’ve familiarized yourself with the Nexus Mods website and how to navigate it, it’s time to choose and download the mods you want to install. Follow these steps:
- Start by searching for mods using the search bar or browsing through the different categories and games available on the Nexus Mods website.
- Read the mod descriptions, user reviews, and comments to gather information about each mod’s features, compatibility, and overall quality.
- Make sure to check the compatibility information provided by the mod author to ensure the mod is compatible with your game version and any other mods you may have installed.
- Once you’ve found a mod you want to download, click on its title or thumbnail image to open its mod page.
- On the mod page, you’ll find detailed information about the mod, including installation instructions, compatibility notes, and any additional requirements.
- Review this information carefully to ensure you understand the installation process and any specific instructions provided by the mod author.
- To download the mod, locate and click on the “Download” button. This will initiate the download process.
- Depending on your browser settings, you may be prompted to choose a location to save the downloaded file. Select an easily accessible location on your computer.
- If you’re using Nexus Mod Manager (NMM), the mod will be automatically added to your download queue within the program. You can then manage the installation and activation of the mod through NMM.
- Repeat these steps for each mod you want to download.
It’s important to note that some mods may require you to be logged in and endorse the mod before downloading. This helps support the mod author and shows appreciation for their work.
Remember to only download mods from trusted sources, such as the Nexus Mods website. This ensures the mods are safe and free from any malicious content that could harm your computer or compromise your game.
In the next step, we will guide you through the process of installing mods using Nexus Mod Manager.
Step 5: Installing Mods with Nexus Mod Manager
Now that you have downloaded your desired mods, it’s time to install them using Nexus Mod Manager (NMM). Follow these steps to install mods with NMM:
- Open Nexus Mod Manager on your computer. If you haven’t already, make sure to install and set up NMM following the steps outlined in Step 1.
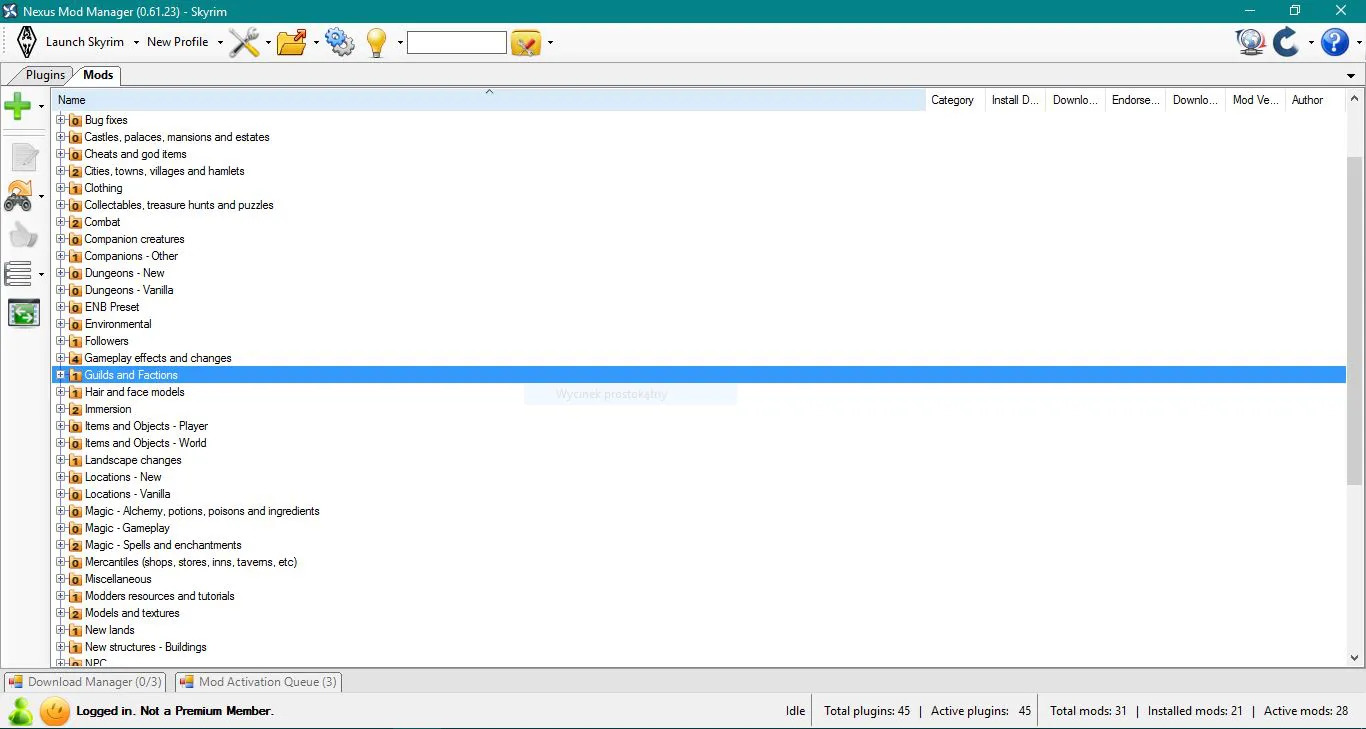
- Once NMM is open, you’ll see the mod management interface. On the left side, you’ll find the list of installed mods, and on the right side, you’ll find the mod details panel.
- Click on the “Mods” tab in the top navigation bar to access your mod list.
- Locate the “Add Mod from File” button, usually located at the top left corner of the NMM interface. Click on it.
- A file explorer window will open. Navigate to the location where you saved the downloaded mod files, select the .zip or .7z file, and click “Open”.
- NMM will now add the mod to your mod list. It will automatically extract the mod files and prepare them for installation.
- Once the installation process is complete, the mod will appear in your mod list with its name, author, and other relevant information.
- To install the mod, simply tick the checkbox next to its name in the mod list. This will activate the mod, and it will be ready to use in your game.
- Repeat these steps for each mod you want to install.
The installation process may slightly vary depending on the mod and its specific requirements. Some mods may require additional steps, such as overwriting existing files or adjusting mod-specific settings.
It’s important to carefully read any installation instructions or mod-specific documentation provided by the mod author. This will ensure a smooth installation process and prevent any conflicts or issues with other installed mods.
In the next step, we will discuss how to activate and manage your installed mods in Nexus Mod Manager.
Step 6: Activating and Managing Mods in Nexus Mod Manager
Now that you have installed mods using Nexus Mod Manager (NMM), it’s time to activate and manage them. Follow these steps to effectively manage your mods using NMM:
- Open Nexus Mod Manager on your computer if it’s not already open.
- Click on the “Mods” tab in the top navigation bar to access your mod list.
- In the mod list, you’ll see the names of the installed mods. To activate a mod, simply tick the checkbox next to its name.
- Activated mods will be marked with a green checkmark, indicating that they are ready for use in your game.
- To deactivate a mod, uncheck the checkbox next to its name. Deactivated mods will have the checkbox empty and will not be used in your game until reactivated.
- To change the load order of mods, click and drag the mod’s name in the list. The load order determines the priority of mods and can affect their functionality.
- Some mods may have additional settings or options that can be managed through NMM. To access these settings, click on the mod’s name in the list, and the mod details panel will open on the right side of the NMM interface.
- In the mod details panel, you may find additional options such as compatibility patches, configuration settings, or other mod-specific features. Follow any instructions provided by the mod author to adjust these settings as desired.
- Regularly check for updates to your mods. In the mod list, NMM will indicate if an update is available for a mod with a notification badge or a message. To update a mod, click on the notification or right-click on the mod’s name and select “Check for Updates” or “Update Mod”.
- It’s important to manage your mods carefully to avoid conflicts or issues. Reviewing mod compatibility and testing your game after making changes can help ensure a stable gaming experience.
By activating, deactivating, and managing your mods in Nexus Mod Manager, you have control over which mods are being used in your game and how they are functioning. This can help you customize your gaming experience to your preferences and ensure compatibility between different mods.
In the next step, we will guide you through the process of updating mods using Nexus Mod Manager.
Step 7: Updating Mods with Nexus Mod Manager
Keeping your mods up to date is crucial to ensure compatibility, resolve bugs, and take advantage of new features. With Nexus Mod Manager (NMM), updating mods is a simple process. Follow these steps to update your mods:
- Open Nexus Mod Manager on your computer.
- Click on the “Mods” tab in the top navigation bar to access your mod list.
- In the mod list, look for mods that have an update available. NMM will indicate this with a notification badge or a message next to the mod’s name.
- To check for updates for a specific mod, right-click on its name and select “Check for Updates” or “Update Mod”.
- If there are updates available, NMM will display them in a pop-up window or a separate tab within the program.
- Review the available updates and their descriptions to understand what changes and improvements they bring.
- Select the updates you want to install and click on the “Update” or “Install” button.
- NMM will proceed to download and install the updates for the selected mods.
- Once the installation is complete, the updated mods will be ready to use in your game.
- After updating mods, it’s a good practice to review the mod’s description and any provided instructions for post-update configurations or compatibility patches.
- Repeat these steps periodically to ensure your mods are always up to date.
Regularly updating your mods not only improves their performance but also ensures that they are compatible with the latest game versions and other mods you may have installed. Staying up to date will help to avoid any potential conflicts or issues and provide the best modding experience.
It’s worth noting that some mods may require you to uninstall the old version before installing the update. Make sure to read the update instructions provided by the mod author to ensure a smooth update process.
In the next step, we will discuss common issues that can arise during the modding process and how to troubleshoot them effectively.
Step 8: Troubleshooting Common Issues
While modding your game using Nexus Mod Manager (NMM) can be a rewarding experience, you may encounter some common issues along the way. Here are some troubleshooting steps to help you resolve these issues:
- Mod conflicts: If you experience crashes, glitches, or unexpected behavior in your game, it might be due to mod conflicts. Disable mods one by one to identify the conflicting mod and adjust load order if needed.
- Outdated mods: Using outdated mods can cause compatibility issues, bugs, or even crashes. Check for any available updates for your mods in NMM and regularly update them to the latest versions.
- Missing or corrupt mod files: If a mod isn’t functioning properly, it may be due to missing or corrupted files. Verify the integrity of the mod’s files through NMM and reinstall the mod if necessary.
- Incompatible mods: Some mods may not be compatible with each other or with the game version you’re using. Always read mod descriptions and compatibility information to avoid issues. Disable or replace incompatible mods accordingly.
- Load order issues: The order in which mods load can affect their functionality. Adjust the load order in NMM to resolve conflicts and ensure mods work together harmoniously. Refer to mod documentation for any load order recommendations.
- Gaps in mod installation: If you unexpectedly see missing textures or features in your game, it might be due to a gap in mod installation. Reinstall the problematic mod and ensure all required files are properly installed.
- Mod dependencies: Some mods require additional files or mods to function correctly. Make sure to carefully read the mod’s description for any specific requirements and ensure all dependencies are installed.
- Game updates: Updates released by the game developers can sometimes cause compatibility issues with mods. Check for updates to both your game and mods, and if needed, wait for mod authors to release compatibility patches before updating your game.
- Insufficient system resources: Running too many mods simultaneously or using resource-intensive mods can strain your computer’s resources. If you experience performance issues or crashes, consider reducing the number of active mods or upgrading your hardware.
- Corrupted Nexus Mod Manager files: If NMM is not functioning properly, it might be due to corrupted files. Try reinstalling NMM to resolve any software-related issues and ensure you have the latest version installed.
Remember, modding can sometimes be a trial-and-error process. Patience and careful troubleshooting can help you overcome common issues and create a stable and enjoyable modded gaming experience.
If you encounter persistent issues that you are unable to resolve, consider seeking help from the modding community or the Nexus Mods support forum. The community is a valuable resource and can provide assistance and guidance to troubleshoot any problems you may be facing.
With these troubleshooting steps in mind, you’re now ready to tackle any common issues that may arise during your modding journey.
Conclusion
Congratulations! You have successfully learned how to download, install, activate, manage, and update mods using Nexus Mod Manager (NMM). By following these steps, you can now customize and enhance your gaming experience with a variety of user-created content.
Nexus Mod Manager provides a user-friendly platform for modding your favorite games. Its extensive library of mods, easy installation process, and intuitive interface make it a valuable tool for gamers seeking to personalize their gameplay.
Throughout this guide, we covered the essential steps of modding with NMM. You learned how to install NMM on your computer, create a Nexus Mods account, navigate the Nexus Mods website, choose and download mods, install and activate mods using NMM, manage and update your mods, and troubleshoot common issues that may arise along the way.
Remember to always read mod descriptions, check for updates, and ensure compatibility between different mods and your game version. Being mindful of these considerations will help you create a stable and enjoyable modded gaming experience.
Modding opens up a world of possibilities, allowing you to tailor your games to your preferences, explore new content, and breathe new life into old favorites. So, go ahead and unleash your creativity by experimenting with different mods and discover a whole new dimension to your gaming adventures.
Enjoy the journey and happy modding!