Introduction
Welcome to the world of Minecraft VR on the Oculus Quest 2, where you can dive into the immersive and exciting virtual reality experience of one of the most popular games of all time. With the combination of the Oculus Quest 2’s impressive hardware and the enchanting world of Minecraft, you’re in for an unforgettable adventure.
Minecraft VR allows you to step into the game like never before, making you feel like you’re truly part of its blocky universe. From exploring vast landscapes to building intricate structures, interacting with creatures, and battling dangerous mobs, the possibilities are endless in Minecraft VR.
However, before you can embark on your virtual journey, there are a few steps you need to follow to download Minecraft VR on your Oculus Quest 2. Don’t worry, though, we’ll guide you through the process so you can start playing in no time.
In this guide, we’ll walk you through the requirements and step-by-step instructions to install Minecraft VR on your Oculus Quest 2 using SideQuest, a platform that allows you to install third-party applications on your device. By the end of this guide, you’ll have Minecraft VR up and running on your Oculus Quest 2, ready to explore and create in the incredible world of Minecraft.
So, let’s get started on this exciting journey to bring Minecraft to life in virtual reality on your Oculus Quest 2. Get your headset ready and let’s dive in!
Requirements
Before you can download Minecraft VR on your Oculus Quest 2, it’s important to ensure that you meet the necessary requirements. Here’s what you’ll need:
- Oculus Quest 2: You will need an Oculus Quest 2 virtual reality headset. This powerful device provides an immersive VR experience and allows you to play games like Minecraft VR.
- Computer: You will need a computer to install SideQuest and manage your Oculus Quest 2. Make sure your computer meets the minimum system requirements for SideQuest and has a USB port to connect your headset.
- USB Cable: You will need a USB cable to connect your Oculus Quest 2 to your computer. Make sure the cable is compatible and capable of data transfer.
- Developer Account: You will need to set up a free developer account with Oculus to enable Developer Mode on your Oculus Quest 2.
- Internet Connection: A stable internet connection is required to download the necessary software and files for SideQuest and Minecraft VR.
Once you have the above requirements in place, you’re ready to proceed with the installation process. Ensure that your Oculus Quest 2 is fully charged before you begin, as the installation process may take some time.
Now that you have everything you need, let’s move on to the step-by-step instructions on how to install Minecraft VR on your Oculus Quest 2 using SideQuest. Get ready to embark on an incredible virtual reality journey in the blocky world of Minecraft!
Step 1: Enable Developer Mode on the Oculus Quest 2
Before you can install Minecraft VR on your Oculus Quest 2 using SideQuest, you need to enable Developer Mode on your device. Developer Mode allows you to access and install third-party applications on your Oculus Quest 2. Don’t worry, enabling Developer Mode is a simple process. Follow the steps below:
- On your computer, go to the Oculus Developer Dashboard and sign in with your Oculus account.
- Click on “My Organization” in the top menu and select “Create New Organization”. You can provide any name for your organization, as this step is required to enable Developer Mode.
- Once your organization is created, go to the “Devices” tab in the top menu. Here, click on “Register Device” and enter a name for your Oculus Quest 2.
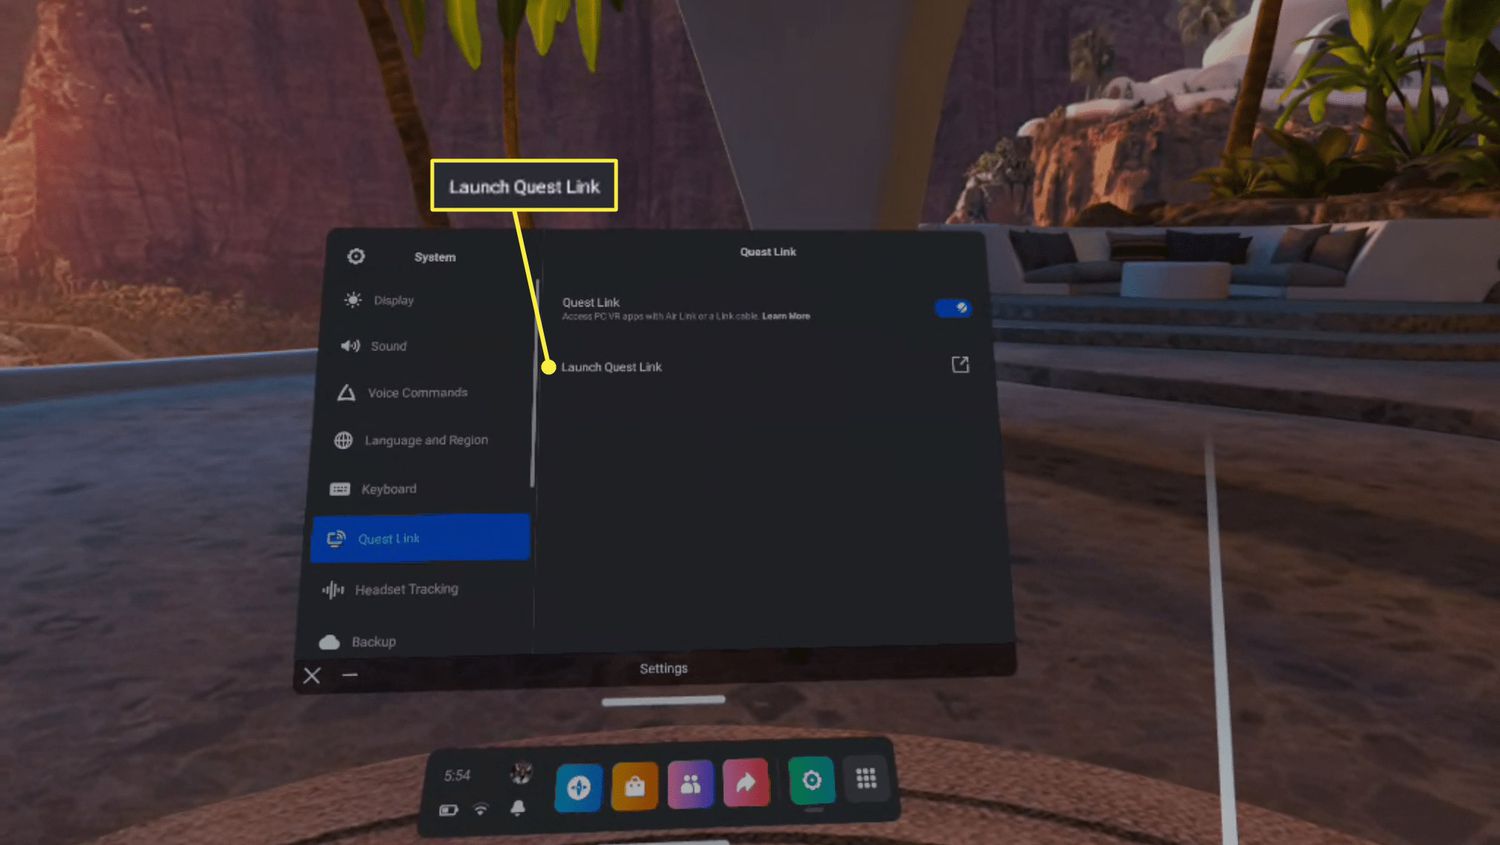
- Put your Oculus Quest 2 headset on and navigate to the “Settings” menu.
- Select “Device” on the left-hand side and then scroll down to find “Developer Mode”.
- Toggle the switch to enable Developer Mode. You may be prompted to enter the PIN of your Oculus Quest 2.
That’s it! You have successfully enabled Developer Mode on your Oculus Quest 2. This step is necessary to proceed with the installation of Minecraft VR via SideQuest. Make sure to keep your headset connected to your computer throughout the installation process.
Now that Developer Mode is enabled, let’s move on to the next step: installing SideQuest on your computer.
Step 2: Install SideQuest on Your Computer
In order to install Minecraft VR on your Oculus Quest 2, you’ll need to use a tool called SideQuest. SideQuest is a platform that enables you to install third-party applications on your Oculus Quest 2 headset. Follow these steps to install SideQuest on your computer:
- Visit the official SideQuest website at https://sidequestvr.com/ on your computer’s web browser.
- Look for the “Download” button on the website, usually located at the top right corner, and click on it to start the downloading process.
- Once the download is complete, locate the installer file on your computer and double-click on it to run the installation process.
- Follow the on-screen prompts to complete the installation of SideQuest. Make sure to read and accept any terms and conditions during the setup process.
- After the installation is finished, launch SideQuest on your computer. You may be prompted to sign in with your Oculus account. Sign in using the same account that is linked to your Oculus Quest 2.
Congratulations! You have successfully installed SideQuest on your computer. This application will allow you to manage and install Minecraft VR and other third-party applications on your Oculus Quest 2.
Now that SideQuest is installed, the next step is to connect your Oculus Quest 2 headset to your computer. This will enable you to transfer the Minecraft VR files and install them onto your device. Let’s proceed to the next step.
Step 3: Connect Oculus Quest 2 to Your Computer
In order to install Minecraft VR on your Oculus Quest 2 using SideQuest, you’ll need to establish a connection between your Oculus Quest 2 headset and your computer. Follow these steps to connect your devices:
- Using a compatible USB cable, connect your Oculus Quest 2 headset to an available USB port on your computer. Make sure the cable is securely plugged in on both ends.
- Put on your Oculus Quest 2 headset and navigate to the “Settings” menu.
- Select the “Device” tab on the left-hand side and then scroll down to find the “USB” option.
- Click on the “USB” option to access the USB settings.
- Choose the “File Transfer” or “PTP” (Picture Transfer Protocol) option to enable file transfer between your Oculus Quest 2 and computer.
- On your computer, launch SideQuest if it’s not already open. It should detect your connected Oculus Quest 2 automatically.
Once your Oculus Quest 2 is connected to your computer and recognized by SideQuest, you’re ready to move on to the next step: downloading the Minecraft VR APK file.
Keep the USB connection between your devices intact throughout the installation process to ensure a smooth transfer of files. Now, let’s proceed to the next step and download the Minecraft VR APK file.
Step 4: Download Minecraft VR APK
In this step, we will download the Minecraft VR APK file, which is the installation package for the game. Follow the instructions below to download the Minecraft VR APK:
- Ensure that your Oculus Quest 2 is still connected to your computer via USB, and that SideQuest is open on your computer.
- In the SideQuest application on your computer, click on the “Browse” menu option located at the top.
- Use the search bar to search for “Minecraft VR” and wait for the results to appear.
- Click on the “Minecraft VR” search result to access the Minecraft VR page on SideQuest.
- On the Minecraft VR page, click on the “Download APK” button to start the download process.
- Wait for the APK file to finish downloading. The download speed may vary depending on your internet connection.
Once the download is complete, you now have the Minecraft VR APK file ready for installation. Let’s move on to the next step to install Minecraft VR on your Oculus Quest 2 using SideQuest.
Note: It’s important to only download Minecraft VR from trusted sources such as SideQuest to ensure the safety of your device and the legitimacy of the application. Avoid downloading APK files from unknown or unreliable sources.
Now that you have downloaded the Minecraft VR APK, let’s proceed to the next step and install it on your Oculus Quest 2.
Step 5: Install Minecraft VR on Oculus Quest 2 via SideQuest
Now that you have the Minecraft VR APK file downloaded, it’s time to install the game on your Oculus Quest 2 using SideQuest. Follow the steps below:
- Make sure your Oculus Quest 2 is still connected to your computer via USB, and that SideQuest is open on your computer.
- In the SideQuest application on your computer, click on the “My Apps” menu option located at the top.
- Locate the Minecraft VR APK file you downloaded earlier from the list of installed apps.
- Click on the “Install APK” button next to the Minecraft VR APK file.
- Wait for SideQuest to install Minecraft VR on your Oculus Quest 2. This process may take a few minutes.
- Once the installation is complete, you will see a notification indicating that Minecraft VR has been successfully installed.
That’s it! You have successfully installed Minecraft VR on your Oculus Quest 2 using SideQuest. The game is now ready to be played in virtual reality on your headset.
Before you launch Minecraft VR, make sure to disconnect your Oculus Quest 2 from the USB cable and put on your headset. You can now immerse yourself in the blocky world of Minecraft and explore, build, and survive in virtual reality.
If you encounter any issues during the installation process, please refer to the troubleshooting tips section at the end of this guide. Otherwise, continue to the next step to launch and enjoy Minecraft VR on your Oculus Quest 2.
Step 6: Launch and Enjoy Minecraft VR on Oculus Quest 2
Now that Minecraft VR is installed on your Oculus Quest 2, it’s time to launch the game and start your virtual reality adventure. Follow these steps to launch and enjoy Minecraft VR on your Oculus Quest 2:
- Ensure that your Oculus Quest 2 is fully charged and ready for use.
- Put on your Oculus Quest 2 headset.
- In the main menu of your Oculus Quest 2, navigate to the “Library” section.
- Scroll through the list of available applications and locate the Minecraft VR icon.
- Select the Minecraft VR icon and click on it to launch the game.
- Follow any on-screen prompts or instructions to set up your Minecraft VR experience, such as adjusting your play area and controller settings.
- Once you have completed the setup, you will be transported into the mesmerizing world of Minecraft VR.
Now, let your imagination run wild as you explore, build, and interact with the blocky landscapes and creatures of Minecraft in virtual reality. Use your Oculus Quest 2 controllers to mine resources, construct elaborate structures, battle mobs, and embark on thrilling adventures.
Whether you choose to embark on a solo journey or invite friends to join you in multiplayer mode, Minecraft VR on Oculus Quest 2 offers a truly immersive and unforgettable gaming experience.
Enjoy the immersive world of Minecraft brought to life in virtual reality on your Oculus Quest 2 headset. Let your creativity soar and have a blast in this virtual sandbox like never before!
If you encounter any issues during gameplay or have any questions, don’t hesitate to explore the resources available on the official Minecraft and Oculus support websites. They offer a wealth of information and solutions to common problems.
Now, go ahead and start your epic journey in Minecraft VR on your Oculus Quest 2. Have fun and enjoy the marvelous possibilities that await you in the blocky world of Minecraft!
Troubleshooting Tips
While installing and playing Minecraft VR on your Oculus Quest 2 is an exciting experience, you may encounter some challenges along the way. Here are a few troubleshooting tips to help you overcome common issues:
- Connection Issues: If you are unable to establish a USB connection between your Oculus Quest 2 and computer, try using a different USB cable or USB port. Ensure that the cable is securely connected on both ends.
- Developer Mode Issues: If you are having trouble enabling Developer Mode on your Oculus Quest 2, double-check that you have a valid Oculus developer account and follow the instructions provided in Step 1 carefully. Restarting your Oculus Quest 2 and computer can also help resolve certain issues.
- Installation Issues: If SideQuest is not recognizing or installing Minecraft VR, ensure that you have downloaded the correct APK file and that it is located in the appropriate folder on your computer. You may need to uninstall and reinstall SideQuest to resolve any installation-related problems.
- Incompatibility Issues: It’s important to note that not all APK files available on SideQuest may be compatible with your Oculus Quest 2. Check for compatibility information and user reviews before downloading and installing any third-party applications.
- Performance Issues: If you experience lag or performance issues while playing Minecraft VR, ensure that your Oculus Quest 2 is running the latest firmware and software updates. Adjusting in-game graphics settings and closing any background applications on your computer can also help improve performance.
- General Support: If you encounter any other issues or have specific questions related to Minecraft VR or your Oculus Quest 2, refer to the official support resources provided by Minecraft and Oculus. Their documentation and community forums offer helpful solutions and guidance.
Remember to always approach troubleshooting with patience and a systematic approach. If one solution doesn’t work, try another until you find the resolution that works for you.
With these troubleshooting tips, you should be able to overcome common challenges and enjoy a smooth Minecraft VR experience on your Oculus Quest 2.
If you need additional assistance or support, don’t hesitate to reach out to the Minecraft and Oculus communities. They are filled with knowledgeable users and enthusiasts who are often eager to help.
Now, dive back into the captivating virtual world of Minecraft VR and let your creativity shine!
Conclusion
Congratulations! You have successfully learned how to download and install Minecraft VR on your Oculus Quest 2. By following the step-by-step instructions, you can now enjoy the immersive and exciting world of Minecraft in virtual reality.
From enabling Developer Mode on your Oculus Quest 2 to installing SideQuest on your computer, connecting your headset, downloading the Minecraft VR APK, and finally launching the game, you have overcome the necessary steps to bring Minecraft to life in a whole new way.
With Minecraft VR, you can explore vast landscapes, build impressive structures, interact with fascinating creatures, and embark on thrilling adventures—all in virtual reality. The combination of Oculus Quest 2’s powerful hardware and the enchanting world of Minecraft creates an unforgettable gaming experience.
Remember to troubleshoot any issues you may encounter using the troubleshooting tips provided. And, as always, refer to the official support resources and communities for further assistance and guidance.
Now, it’s time to put on your Oculus Quest 2 headset, launch Minecraft VR, and let your creativity soar. Create, explore, and have a fantastic time in the blocky world of Minecraft in virtual reality!