Introduction
Google Photos is a popular cloud storage service provided by Google that allows users to store, organize, and share their photos and videos. It offers a myriad of useful features, including the ability to access your media files from any device with an internet connection. However, there may be times when you want to download your Google Photos to your computer for various reasons, such as creating backups or editing them with specialized software.
In this article, we will guide you through the step-by-step process of downloading Google Photos to your computer. Whether you’re using a Windows PC or a Mac, the process is relatively straightforward and can be accomplished in just a few minutes. We will provide detailed instructions and tips to ensure a smooth and hassle-free experience.
Before we begin, it’s important to note that the process may vary slightly depending on the device and operating system you are using. However, the core steps remain the same, and we will highlight any differences as we go along. So let’s dive right in and learn how to download your precious memories stored in Google Photos to your computer!
Step 1: Open the Google Photos website
The first step in downloading your Google Photos to your computer is to open the Google Photos website. You can do this by launching your preferred web browser and typing “photos.google.com” in the address bar. Press Enter to go to the website.
If you are already signed in to your Google account, you will be directed to the Google Photos homepage. If you are not signed in, you will be prompted to enter your Google account credentials. Simply enter your email address or phone number associated with your Google account, followed by your password, and click on the “Next” button to sign in.
If you don’t have a Google account, you will need to create one before proceeding. Click on the “Create account” link and follow the instructions to set up your account.
Once you are signed in to your Google account and on the Google Photos homepage, you are ready to move on to the next step.
Step 2: Sign in to your Google account
In order to access and download your Google Photos, you need to sign in to your Google account. This step ensures that only you have the authorization to view and manage your personal media files.
If you are already signed in to your Google account, you can skip this step and proceed to the next one. However, if you are not signed in, follow these simple instructions:
- Go to the Google Photos website by opening your preferred web browser and typing “photos.google.com” in the address bar. Press Enter to navigate to the website.
- You will be directed to the Google Photos homepage. Click on the “Sign in” button located at the top-right corner of the page.
- A sign-in page will appear, prompting you to enter your Google account credentials. Enter your email address or phone number associated with your Google account, followed by your password.
- After entering your credentials, click on the “Next” button to proceed.
- In case you have set up two-factor authentication for your Google account, follow the additional steps to complete the sign-in process.
Once you have successfully signed in to your Google account, you are ready to move on to the next step and start downloading your Google Photos to your computer.
Step 3: Select the photos you want to download
Now that you’re signed in to your Google account and on the Google Photos website, it’s time to choose the specific photos you want to download to your computer. Follow these steps:
- On the Google Photos homepage, you will see all of your uploaded photos and albums organized in a grid-like view. Take a moment to browse through your collection and locate the photos you wish to download.
- To select individual photos, simply click on each photo you want to download. You will notice that a blue checkmark will appear on the selected photos to indicate that they are chosen.
- If you want to select multiple photos at once, you can use the Shift key. Click on the first photo you want to select, then hold down the Shift key on your keyboard and click on the last photo. This will select all the photos in between as well.
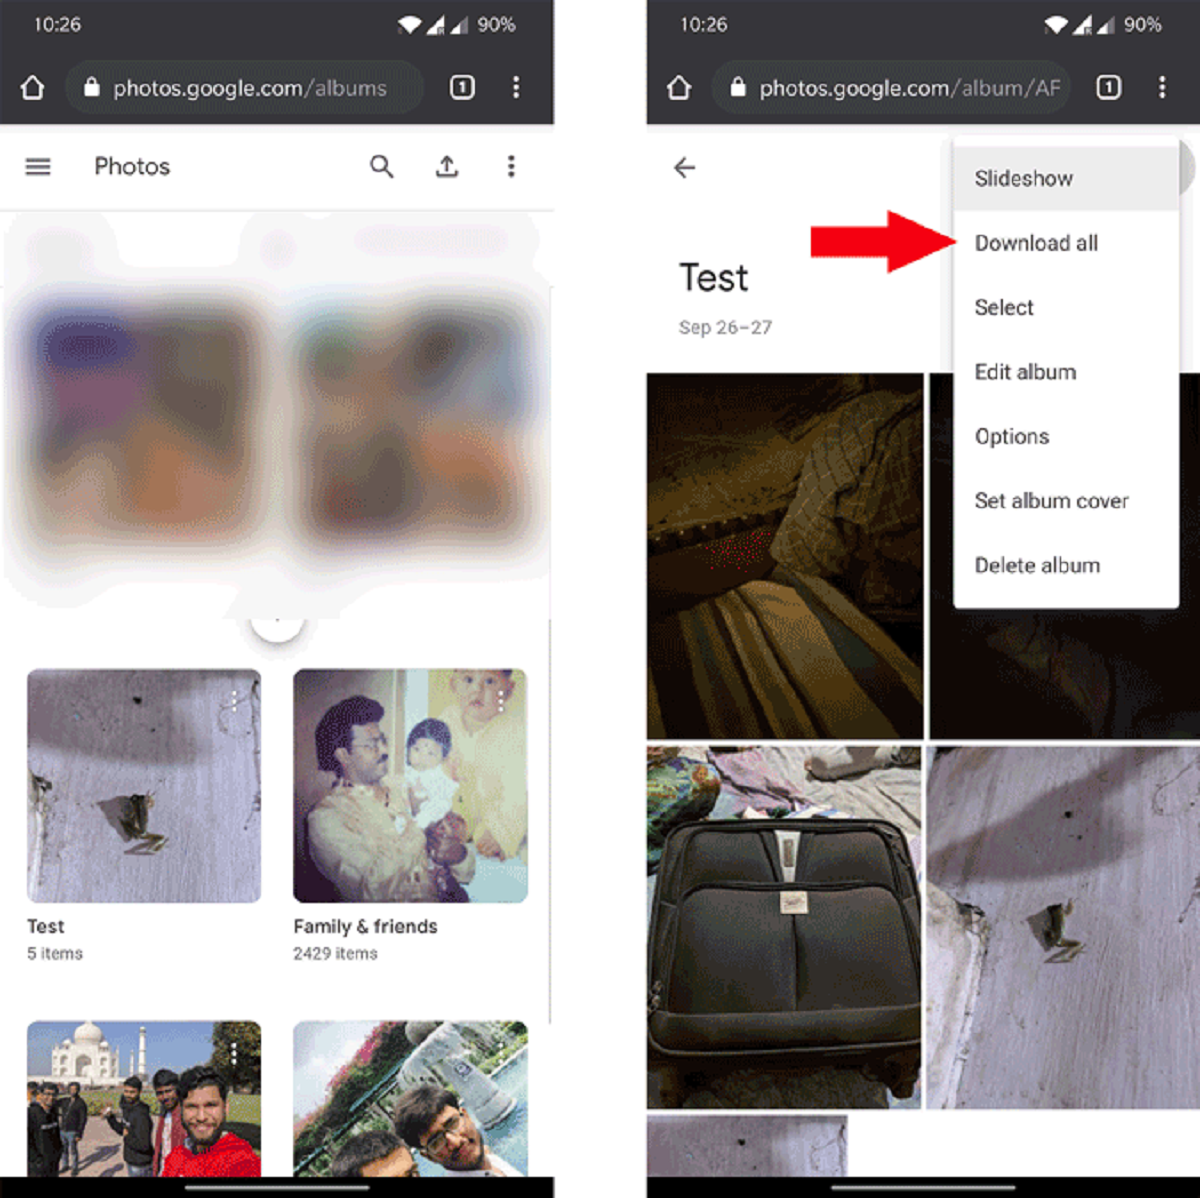
- If you prefer to select all the photos in a particular album, click on the album name to open it. Once inside the album, click on the three-dot menu icon located at the top-right corner of the page. From the dropdown menu, select “Select all.” This will automatically select all the photos within that album.
- If you want to deselect a photo, simply click on it again to remove the blue checkmark.
Take your time to carefully choose the photos you want to download. Once you have made your selections, you can proceed to the next step to initiate the download process.
Step 4: Click on the three-dot menu icon
After selecting the photos you want to download, it’s time to access the options menu to initiate the download process. Follow these simple steps:
- In the Google Photos interface, locate the three-dot menu icon located at the top-right corner of the page. This icon represents additional options and settings for the selected photos.
- Click on the three-dot menu icon to expand the dropdown menu.
- A menu will appear with various options to choose from. These options allow you to perform different actions on your selected photos.
- Among the available options, select the one that says “Download.” This option will allow you to download the selected photos to your computer.
By clicking on the three-dot menu icon and selecting the “Download” option, you are one step closer to having your precious memories saved on your computer’s storage.
Note that the specific location and appearance of the three-dot menu icon may vary slightly depending on the device or browser you are using. However, it is typically located in the top-right corner of the Google Photos interface and easily identifiable.
Once you have clicked on the three-dot menu icon and selected the “Download” option, you are ready to proceed to the next step and choose the download location on your computer.
Step 5: Choose the “Download” option
After clicking on the three-dot menu icon, a dropdown menu will appear with various options for your selected photos. Among these options, choose the “Download” option to begin the download process. Follow these steps:
- Click on the “Download” option from the dropdown menu. This action will prompt Google Photos to package and prepare the selected photos for download.
- Depending on the number and size of the photos you have selected, it may take a few moments for Google Photos to process and prepare the download. You may see a progress indicator or a prompt informing you that the download is in progress.
- It’s important to note that Google Photos may generate multiple files or a compressed ZIP archive if you have selected a large number of photos. This is done to make the download process more efficient and convenient.
- Once the processing is complete, a prompt will appear asking you to choose the download location on your computer. This is where the selected photos will be saved.
- Click on the “Choose Folder” or “Save” button, depending on your operating system, to specify the location where you want to save the downloaded photos. You may choose an existing folder or create a new one to organize your downloads.
- After selecting the download location, Google Photos will start downloading the selected photos to your computer. A progress bar or indicator will show the status of the download.
Be patient while the download process completes, especially if you have selected a large number of photos or have a slow internet connection. Once the download is finished, your selected Google Photos will be safely stored on your computer, ready for you to access and enjoy offline.
Now that you have chosen the “Download” option and specified the download location, you can proceed to the final steps to complete the download process and have your Google Photos readily available on your computer.
Step 6: Select the download location on your computer
After choosing the “Download” option, Google Photos will prompt you to select the download location on your computer. This step allows you to decide where the downloaded photos will be saved. Follow these steps:
- Once you click on the “Download” option, a prompt will appear asking you to choose the download location.
- Click on the “Choose Folder” or “Save” button, depending on your operating system, to open the file explorer or finder window.
- In the file explorer or finder window, navigate to the location where you want to save the downloaded photos. You can choose an existing folder or create a new one for better organization.
- Select the desired folder by clicking on it. You may also double-click on the folder to open it.
- After selecting the folder, click on the “OK” or “Save” button to confirm your choice.
By selecting the appropriate download location, you are ensuring that the downloaded photos will be saved in the desired folder on your computer. This allows for easier access and organization of your downloaded Google Photos.
It’s worth noting that the steps to select the download location may vary slightly depending on the operating system and browser you are using. However, the core process remains the same. Simply choose the folder or directory where you want to store your downloaded photos.
Once you have successfully selected the download location, you are all set to proceed to the final step and start the actual download process.
Step 7: Start the download process
After selecting the download location for your Google Photos, it’s time to initiate the download process. This step will save your chosen photos to the specified location on your computer. Follow these simple steps:
- Once you have selected the download location, click on the “OK” or “Save” button to confirm your choice.
- Google Photos will now start downloading the selected photos to your computer. A progress bar or indicator may appear to show the status of the download.
- The time it takes to complete the download process will depend on factors such as the size of the photos and your internet connection speed. If you have selected a large number of photos or have a slow connection, it may take some time to download all the files.
- During the download process, you can track the progress and see how many photos have been successfully downloaded.
- Once the download is complete, you will find the downloaded photos in the specified folder on your computer. You can now access and enjoy your Google Photos offline at any time.
It’s important to ensure that the download process is uninterrupted. Avoid closing the browser window or turning off your computer while the download is in progress. Doing so may interrupt the process and prevent all the selected photos from being downloaded.
Once the download process is finished, you can safely disconnect from the Google Photos website and access the downloaded photos directly from your computer.
Congratulations! You have successfully completed the download process and now have your cherished Google Photos saved on your computer for easy access and offline enjoyment.
Conclusion
Downloading your Google Photos to your computer provides you with a convenient way to access and preserve your precious memories offline. By following the step-by-step instructions outlined in this guide, you can swiftly and easily download your desired photos from Google Photos.
We started by opening the Google Photos website and signing in to our Google account. Then, we selected the specific photos we wanted to download and clicked on the three-dot menu icon to access the options menu. From there, we chose the “Download” option and selected the download location on our computer.
Lastly, we initiated the download process, allowing Google Photos to package and transfer the selected photos to our specified location. Once the download was complete, we were able to access and enjoy our Google Photos offline whenever we desired.
Remember, the steps outlined in this guide may vary slightly depending on the device, operating system, and web browser you are using. However, the core process remains the same, ensuring that you can successfully download your Google Photos to your computer regardless of your setup.
By downloading your Google Photos to your computer, you gain an extra layer of security and accessibility for your treasured memories. Whether you want to create backups, edit them with specialized software, or simply enjoy viewing them offline, having your photos stored on your computer provides peace of mind and convenience.
So, don’t hesitate to download your Google Photos and start enjoying the benefits of having your memories readily available on your computer!