Why Change the Download Location on Your Mac?
The default download location on a Mac is typically set to the Downloads folder. While this is convenient, it can quickly lead to a cluttered desktop and a storage space filled with unnecessary files. Changing the download location allows you to organize your files more efficiently and helps you locate downloaded items easily.
There are several reasons why you might want to change the download location on your Mac:
- Storage Management: By changing the download location, you can ensure that your primary storage space remains uncluttered and reserved for important files and applications.
- Organization: Creating separate folders for different types of files or specific projects can make it easier to find and manage downloaded content.
- Backup: If you regularly backup your Mac, you may want to change the download location to a folder that is included in your backup routine, ensuring that your downloaded files are backed up along with the rest of your important data.
- Privacy and Security: Changing the download location can help enhance your privacy and security by preventing others from accidentally accessing or deleting your downloaded files.
No matter what your reason may be, changing the download location on your Mac is a simple and effective way to streamline your workflow and maintain a more organized digital environment.
Step 1: Open the Finder
To change the download location on your Mac, you’ll need to start by opening the Finder:
- Click on the Finder icon in the Dock, which is typically located at the bottom of your screen. The Finder icon resembles a blue face.
- If the Finder icon is not in the Dock, you can also access it by clicking on the desktop to make sure you are in the Finder, and then clicking on “Finder” in the top menu bar, next to the Apple logo.
Once you have opened the Finder, you’ll be ready to proceed to the next step in changing the download location on your Mac.
Opening the Finder is the essential first step, as it is the primary tool for navigating and managing files and folders on your Mac. Whether you’re looking to change the download location or perform any other file-related tasks, the Finder will be your go-to application.
Step 2: Access the Preferences
Once you have opened the Finder on your Mac, the next step is to access the Preferences. The Preferences menu allows you to customize various settings and options in relation to the Finder and your system.
To access the Preferences menu, follow these steps:
- Click on the “Finder” option in the top menu bar, next to the Apple logo.
- A drop-down menu will appear. From the drop-down menu, select “Preferences.”
Alternatively, you can use the keyboard shortcut “Command + ,” (comma) to quickly open the Preferences menu.
By accessing the Preferences menu, you gain access to a wide range of customization options for your Finder. These options include changing the default Finder view, enabling or disabling certain features, and, most importantly for our purpose, changing the download location.
Once you have opened the Preferences menu, you’re ready to move on to the next step of changing the download location on your Mac.
Step 3: Go to the “General” Tab
After accessing the Preferences menu in the Finder, the next step is to navigate to the “General” tab. This tab contains various general settings for the Finder, including the option to change the download location.
To go to the “General” tab, follow these steps:
- In the Preferences window, you will see a row of tabs at the top. Click on the “General” tab.
Upon selecting the “General” tab, you will see a list of options that you can customize according to your preferences.
It is worth exploring the other settings available in the “General” tab, as you may find additional options that can improve your overall workflow and user experience. However, for the purpose of changing the download location, the next steps will focus specifically on this aspect.
Once you have successfully navigated to the “General” tab, you are ready to proceed to the next step of changing the download location on your Mac.
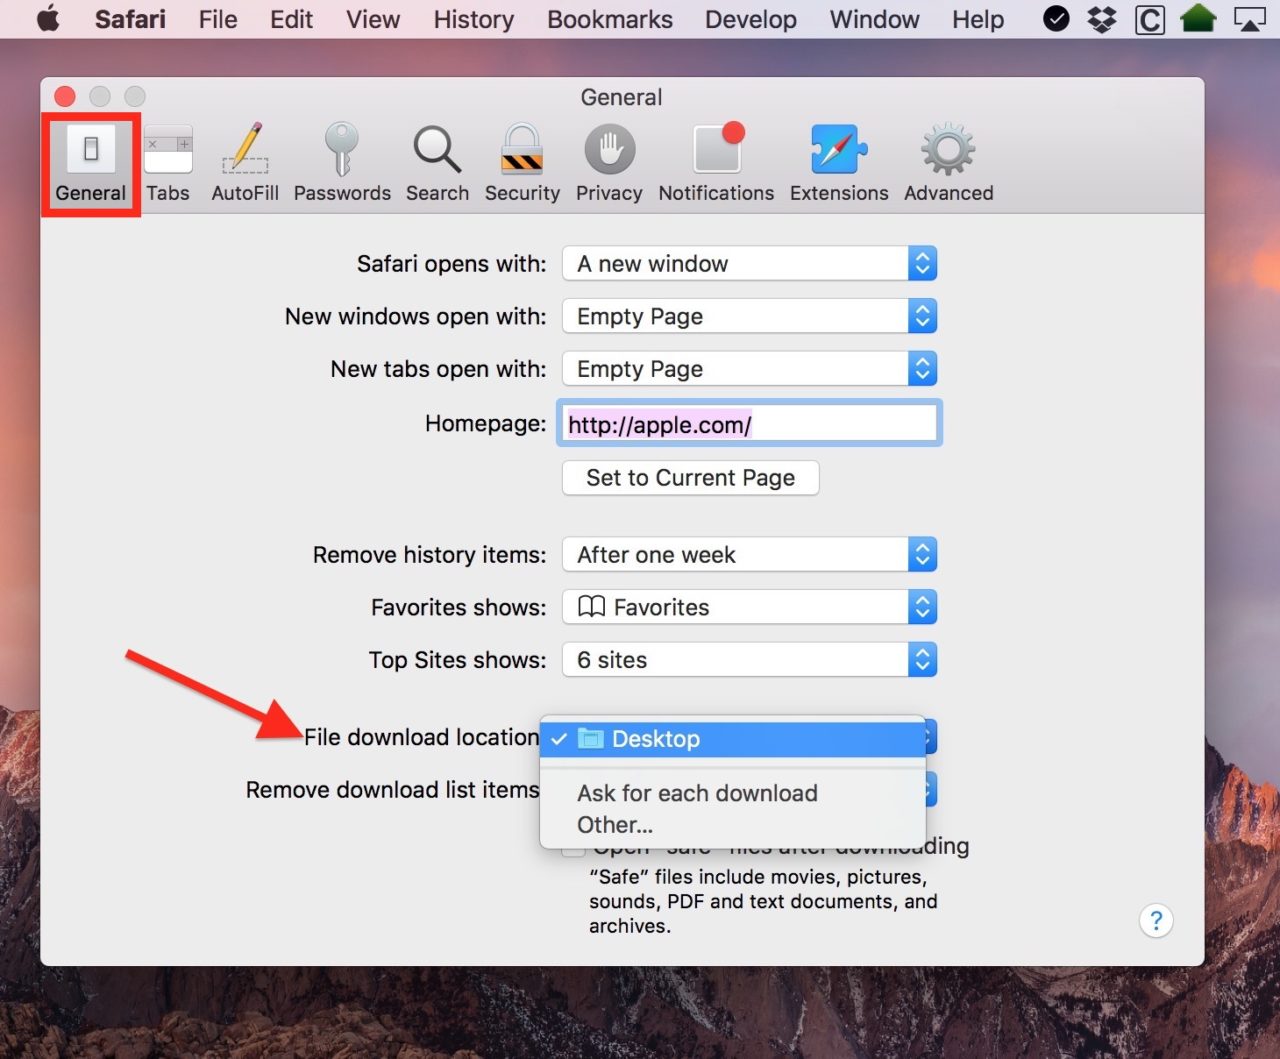
Step 4: Change the Download Location
Now that you’re on the “General” tab in the Finder Preferences window, you can proceed to change the download location. This step allows you to specify the folder where downloaded files will be saved on your Mac.
Follow these steps to change the download location:
- Locate the option labeled “Downloads folder” or “Save downloaded files to.”
- Click on the drop-down menu next to the option.
- A list of available locations will appear. Choose the desired folder or location where you want your downloads to be saved.
By selecting a specific location, you can better organize your downloaded files according to your preferences. You can choose to save files to the desktop, a specific folder, or even an external storage device.
It’s important to remember that changing the download location will only affect future downloads. Any files that have already been downloaded and are stored in the previous location will remain there unless you manually move them.
Once you have successfully changed the download location to your desired folder, you are ready to move on to the next step of confirming the changes.
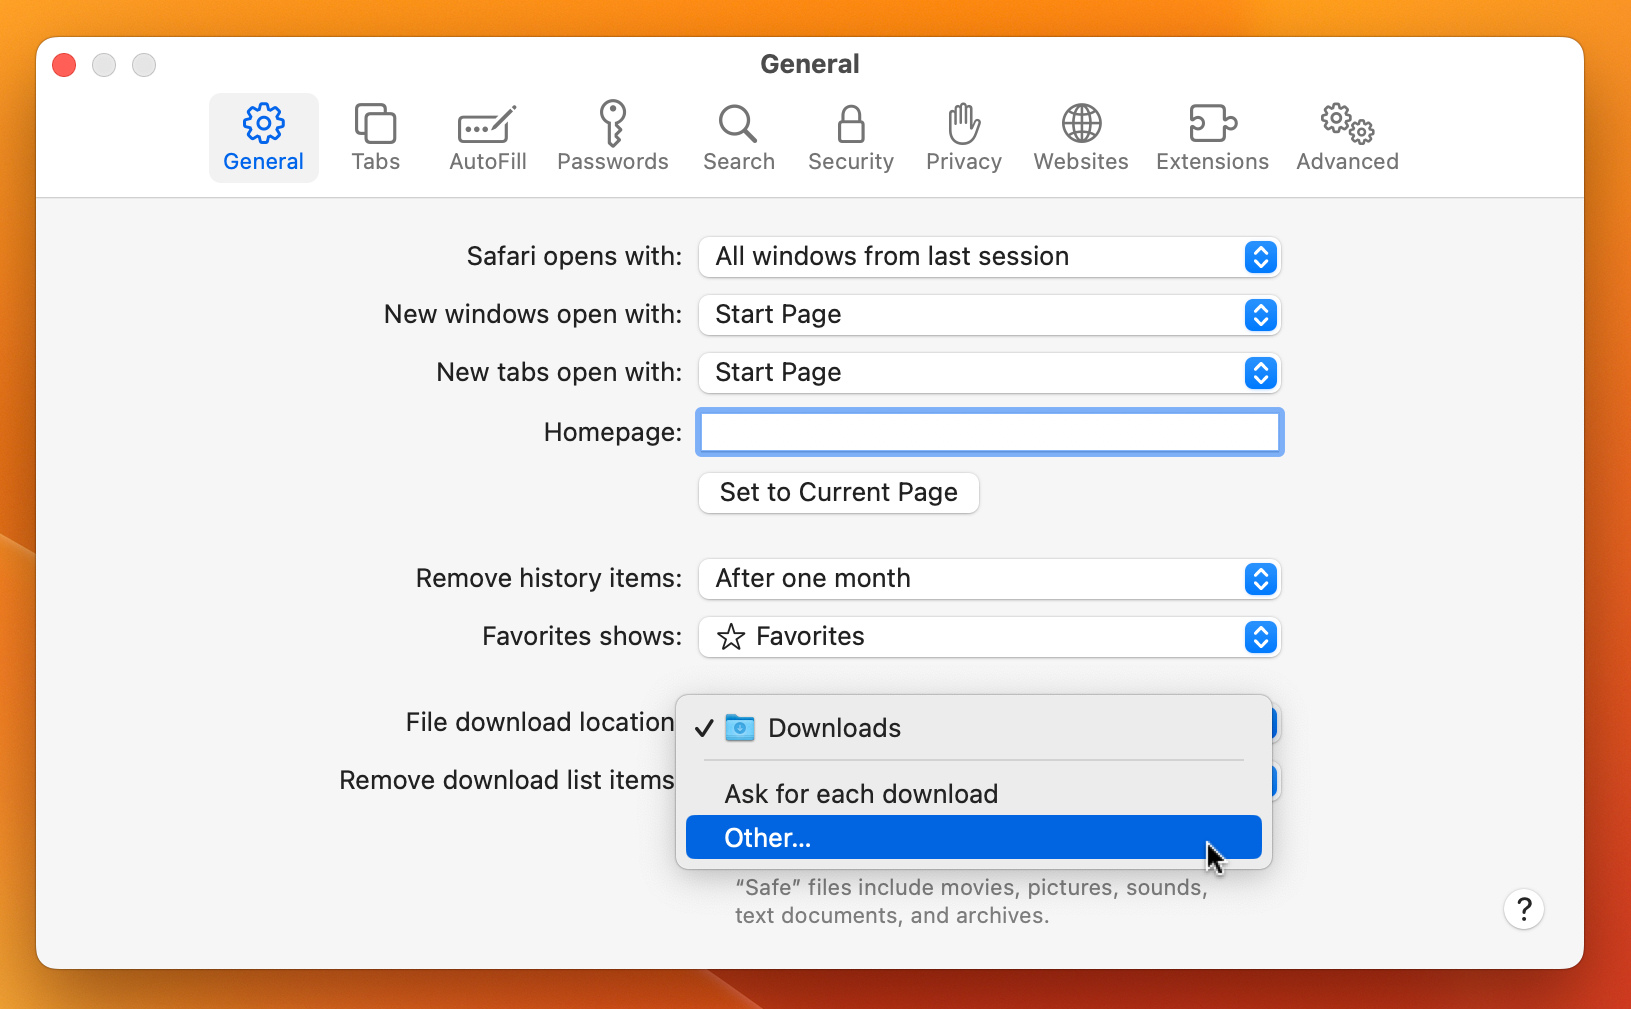
Step 5: Choose a New Download Location
After selecting the option to change the download location in the Finder Preferences, you can now choose a new location where your downloaded files will be saved. This step allows you to specify a folder or directory on your Mac.
Follow these steps to choose a new download location:
- Click on the drop-down menu next to the “Downloads folder” or “Save downloaded files to” option.
- Browse through the available locations or directories on your Mac.
- Select the desired folder or location by clicking on it.
When choosing a new download location, it’s important to consider your organizational preferences. You may opt to create a dedicated folder specifically for downloads, or you can select an existing folder where you prefer to store your downloaded files.
Remember that the goal is to have a location that is easily accessible and helps you keep your files organized. Having a designated folder for downloads can save you time searching for files and prevent your desktop or primary storage space from becoming cluttered.
Once you have chosen a new download location, you are now ready to move on to the next step of confirming the changes.
Step 6: Confirm the Changes
After selecting a new download location in the Finder Preferences, it’s important to confirm the changes you’ve made. This step ensures that your Mac will save downloaded files to the newly chosen location.
Follow these steps to confirm the changes:
- Double-check that the selected download location is the desired folder or directory where you want your files to be saved.
- If you are satisfied with the selection, close the Finder Preferences window by clicking the red close button in the top-left corner.
Once you have confirmed the changes, your Mac will now use the specified download location for all future downloads. Any files that you download from this point onward will be automatically saved to the newly chosen location.
It’s important to note that previously downloaded files will still remain in their original location. If you wish to move them to the new download location, you will need to do so manually.
By confirming the changes and closing the Preferences window, you have successfully set your new download location on your Mac. Now, when you download files, they will automatically be saved to the designated folder or directory.
Step 7: Start Downloading Files to the New Location
Now that you’ve successfully changed the download location on your Mac, you can start downloading files directly to the new specified location. This step ensures that all your future downloads are saved in the folder or directory you have set.
Follow these steps to begin downloading files to the new location:
- Open your preferred web browser or any other applications that allow you to download files.
- Navigate to a website or source from where you want to download a file.
- Click on the download link or button for the desired file.
- Choose to save or download the file when prompted.
By default, your Mac will now save the downloaded file to the new download location you have previously set. You will notice that the file will no longer appear in your old downloads folder or any other previous locations.
By consistently downloading files to the new location, you can maintain a more organized and efficient downloading process. It helps you easily locate and manage your downloaded files in a centralized location.
Remember, you can always change the download location again in the Finder Preferences if you prefer a different folder or directory in the future.
Now that you’re familiar with the steps, you can confidently start downloading files directly to the new location on your Mac.
Tip: Set a Custom Download Location for Specific Browsers
In addition to changing the default download location on your Mac, you can also set a custom download location for specific web browsers. This allows you to have different download folders for each browser, further enhancing organization and convenience.
Follow these steps to set a custom download location for specific browsers:
For Google Chrome:
- Open Google Chrome.
- Click on the three-dot menu icon in the top-right corner of the browser window.
- Select “Settings” from the dropdown menu.
- Scroll down and click on “Advanced” to expand the advanced settings.
- Under the “Downloads” section, click on “Change” to select a new download location.
- Choose the desired folder or directory where you want your Chrome downloads to be saved.
For Mozilla Firefox:
- Open Mozilla Firefox.
- Click on the three-line menu icon in the top-right corner of the browser window.
- Select “Options” from the dropdown menu.
- In the left sidebar, click on “General.”
- In the “Downloads” section, click on “Browse” to choose a custom download location.
- Select the desired folder or directory where you want your Firefox downloads to be saved.
By customizing the download locations for specific browsers, you can streamline your workflow even further. For example, you can save work-related files to one folder in Chrome and personal files to another folder in Firefox.
Remember to adjust the settings in each browser individually to ensure that files are being saved to the correct download locations.
Setting custom download locations for specific browsers gives you more control over where files are saved, making it easier to manage and locate them in the future.
Conclusion
Changing the download location on your Mac can greatly enhance your organization and productivity when it comes to managing downloaded files. By following the step-by-step process outlined in this guide, you can easily customize the download location to suit your needs.
We discussed the importance of changing the download location, including benefits such as storage management, organization, backup, privacy, and security. These reasons highlight the value of having a designated folder or directory for downloads.
The steps covered in this guide, from opening the Finder to accessing the Preferences and choosing a new download location, ensure that you can easily make the necessary changes to your Mac’s settings. We also provided a bonus tip on setting custom download locations for specific browsers, allowing for even greater customization.
By changing the download location and organizing your files, you can maintain a clutter-free desktop, locate downloaded items more efficiently, and have a streamlined workflow. Remember to confirm the changes and start downloading files to the new location for the best result.
Now that you have the knowledge and tools to change the download location on your Mac, take advantage of this feature to optimize your file management and create a more organized digital environment.