Introduction
Welcome to this guide on how to change download settings on a Mac. Download settings allow you to customize various aspects of your downloading experience, such as the download location, default download folder, notifications, permissions, and more. By adjusting these settings to suit your preferences, you can optimize your workflow and effectively manage your downloaded files.
Changing download settings is particularly useful for individuals who frequently download files, whether it’s documents, images, or applications. With the ability to control where downloads are saved, receive notifications, and automate the process, you can streamline your workflow and ensure files are organized as desired. Whether you are a seasoned Mac user or new to the platform, this guide will walk you through the process step-by-step.
As you follow this guide, it’s important to note that the exact steps may vary slightly depending on the version of macOS you are running. However, the core concepts and settings remain the same across most versions. Now, let’s dive into the details of changing download settings on your Mac.
Accessing the Download Settings
To begin changing your download settings on a Mac, you’ll first need to access the necessary options. Follow the steps below to access your download settings:
- Click on the Apple menu at the top-left corner of your screen.
- From the drop-down menu, select “System Preferences.”
- In the System Preferences window, locate and click on the “General” icon.
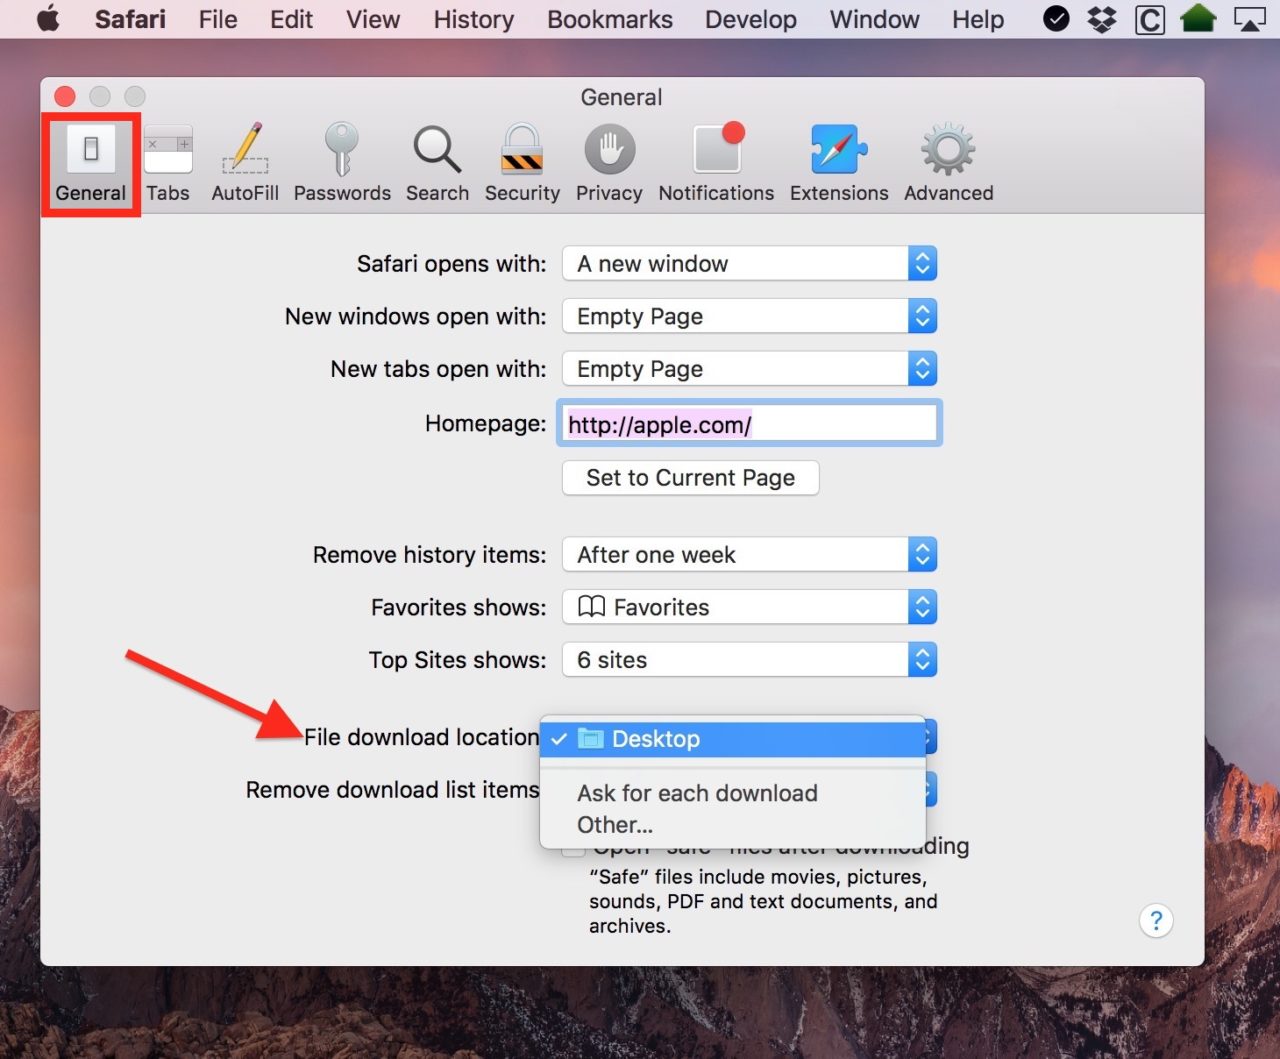
- Within the General settings, you will see a section labeled “Downloads.”
- Click on the dropdown menu next to “Save downloaded files to” to access the available options for your download location.
- Here, you can choose the default location for all downloaded files or select a specific folder.
- Additionally, you can adjust the settings for items downloaded from the internet, such as whether to prompt for each download or to disable the prompt entirely.
Accessing the download settings is the first step towards customizing your downloading experience on a Mac. By following these steps, you can easily access the necessary options to modify the default download location and other related settings. With this foundation, you can now proceed to adjust the various aspects of your download settings to better suit your needs.
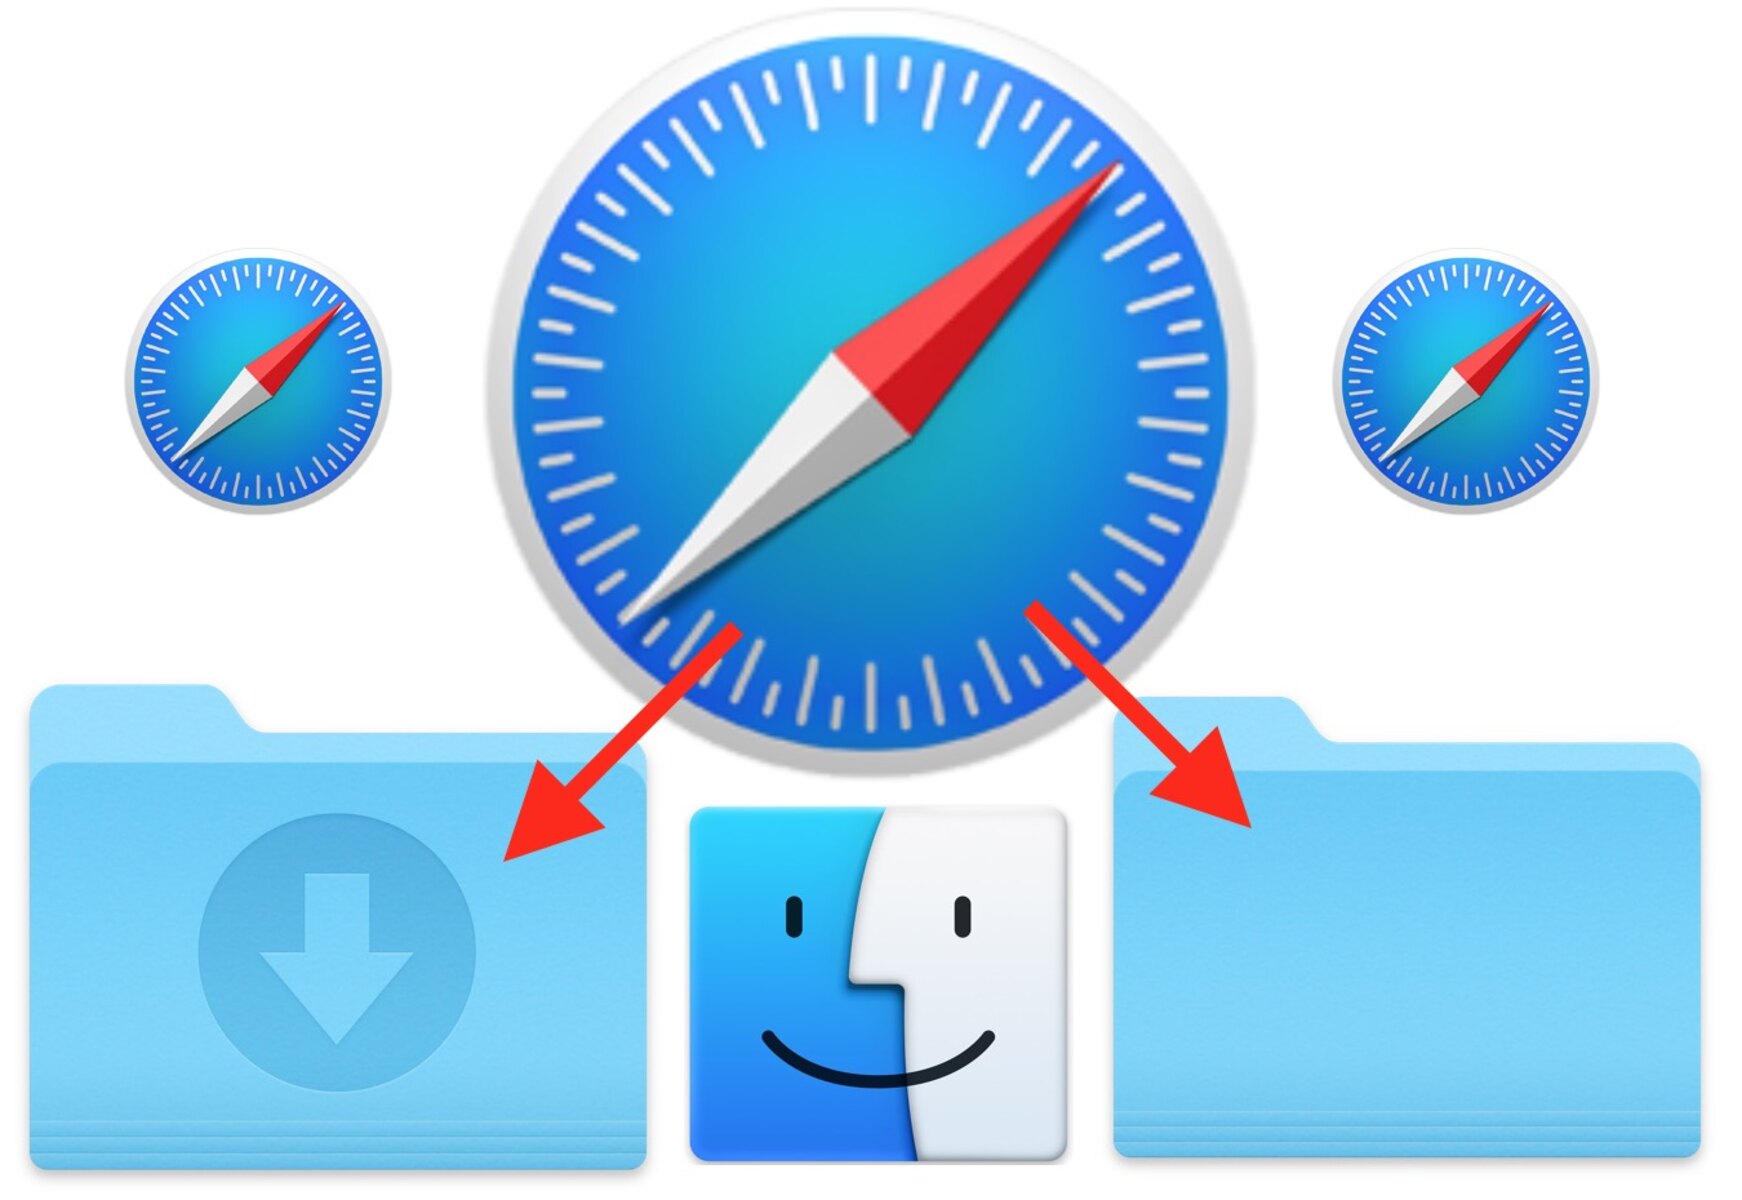
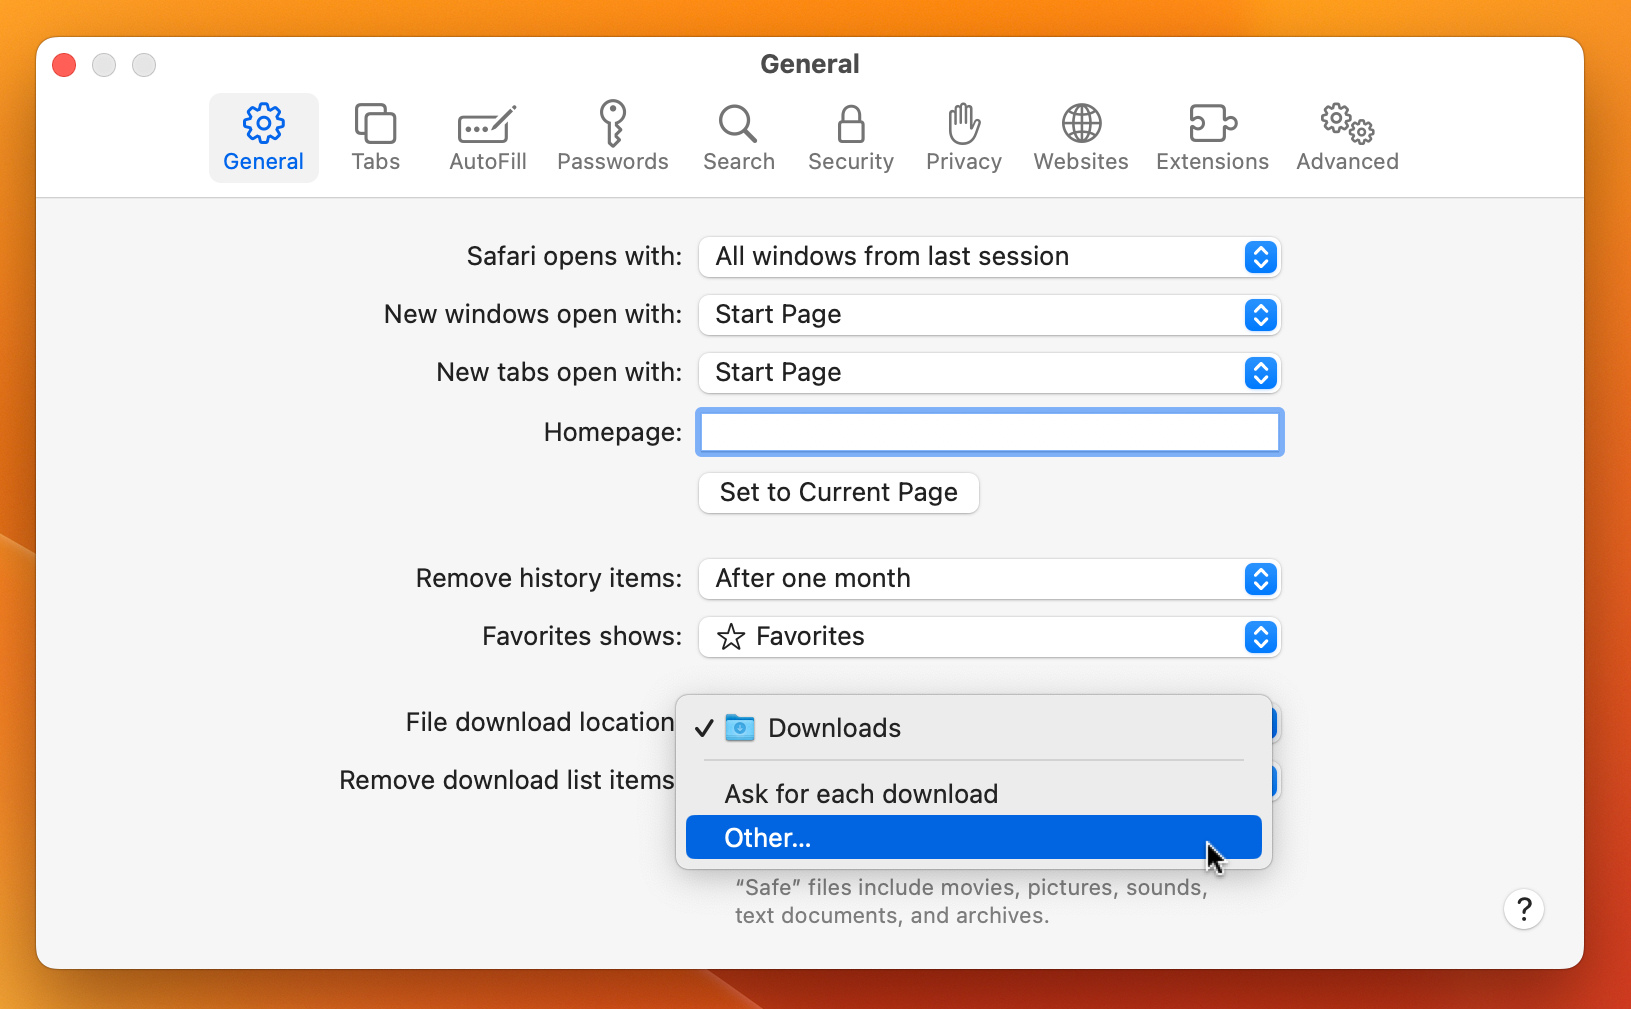
Changing the Download Location
By default, when you download files on a Mac, they are saved in the Downloads folder. However, you have the flexibility to change the download location to a different folder or even an external storage device. To change the download location, follow these steps:
- Access the download settings as described in the previous section.
- In the “Save downloaded files to” dropdown menu, choose “Other…”
- A Finder window will open, allowing you to navigate and select the desired folder or location where you want your downloads to be saved.
- Select the folder or location and click on “Open.”
Once you have selected a new download location, all future downloads will be saved in that location. It’s important to choose a location that is easily accessible and organized according to your preferences.
By changing the download location, you can ensure that all your downloaded files are stored in a specific folder or external drive of your choosing. This can be particularly useful if you want to keep your downloads separate from other files or if you have limited space on your main drive and want to store downloads on an external device.
Remember, you can always go back to the download settings and change the location again if needed. Experiment with various locations until you find the setup that works best for you and your workflow.
Modifying the Default Download Folder
Modifying the default download folder allows you to automatically save downloaded files to a specific folder of your choice. This can be helpful in keeping your downloads organized and easily accessible. Follow the steps below to modify the default download folder:
- Access the download settings as mentioned previously.
- Click on the “Open in Finder” button next to the current default download location.
- A Finder window will open, displaying the current default download folder.
- Create a new folder or choose an existing folder where you want to set as the new default download folder.
- Once you have selected or created the desired folder, close the Finder window.
- In the download settings, click on the “Change Folder” button.
- A dialog box will appear. Navigate to the folder you selected or created earlier, and click on “Choose.”
By modifying the default download folder, any files you download in the future will automatically be saved to the new folder. This can save you time and effort as you won’t need to manually specify a location for each download.
It’s worth mentioning that you can always change the default download folder again if needed. This flexibility allows you to adapt your download settings based on evolving preferences and organizational needs.
By proactively modifying the default download folder, you can maintain a well-structured and easily accessible collection of downloaded files, making it more convenient to find and manage them.
Adjusting Download Notifications
Download notifications are a useful way to stay informed about the progress and completion of your downloads. By adjusting these settings, you can control how and when notifications appear on your Mac. Follow the steps below to adjust download notifications:
- Access the download settings as explained earlier.
- Locate the “When download begins” option.
- Click on the dropdown menu next to it to view the available notification options.
- You can choose to have a notification display when a download begins, or you can disable the notification entirely.
- Similarly, you can adjust the “When download completes” option to determine if you want to be notified when a download finishes.
- Once you have made your desired selections, close the download settings.
By adjusting the download notification settings, you can customize how and when you receive notifications about your downloads. This can be particularly useful if you want to stay informed about the progress of important downloads or if you prefer a more streamlined and unobtrusive downloading experience.
Remember, the download notifications can be adjusted at any time, allowing you to fine-tune your preferences as needed. Play around with these settings to find the balance that suits your workflow and keeps you updated without being overwhelming.
It’s worth noting that specific applications, such as web browsers, may have their own notification settings for downloads. So, be sure to explore the settings within those applications to tailor the notifications according to your preferences.
Setting Download Permissions
Download permissions allow you to control the level of access and security for downloaded files on your Mac. By setting download permissions, you can ensure that your system remains protected from potentially harmful files. Follow the steps below to set download permissions:
- Access the download settings in the System Preferences as mentioned earlier.
- Locate the “Allow apps downloaded from” section.
- You will see three options: “App Store,” “App Store and identified developers,” and “Anywhere.”
- If you choose “App Store,” your Mac will only allow apps downloaded from the official Mac App Store.
- If you choose “App Store and identified developers,” your Mac will permit apps from the App Store and those identified by Apple as trusted developers.
- If you choose “Anywhere,” your Mac will allow apps from any source, which may increase the risk of downloading potentially malicious software.
By adjusting the download permissions, you can strike a balance between convenience and security. If you prefer to only download and install apps from trusted sources, it is recommended to choose “App Store” or “App Store and identified developers.” This helps protect your system from unauthorized or potentially harmful apps.
It’s important to note that starting with macOS Sierra, Apple has default security settings that restrict users from installing apps from unidentified developers. However, by changing the permission settings, you can override this restriction if needed.
Exercise caution when setting the download permissions to “Anywhere” as it may potentially expose your Mac to security risks. It’s generally advisable to only download and install apps from trusted sources to minimize the risk of malware or other nefarious software.
Regularly reviewing and adjusting download permissions can help maintain a secure computing environment while allowing you to install legitimate apps as necessary.
Enabling Automatic Downloads
Automatic downloads can streamline your workflow by allowing certain types of content to be downloaded automatically on your Mac. This feature can be especially useful for keeping your important content up to date. Follow these steps to enable automatic downloads:
- Access the download settings in the System Preferences as mentioned earlier.
- Check the box next to the types of content you want to enable automatic downloads for. These may include updates for macOS, App Store apps, or other types of content depending on your preferences and installed software.
Enabling automatic downloads ensures that your Mac stays updated with the latest software versions and content without requiring manual intervention. For instance, if you enable automatic updates for macOS, your system will download and install the latest updates in the background, keeping your Mac secure and up to date.
Automatic downloads can also apply to App Store apps, which will be updated automatically without user intervention. This helps keep your apps running smoothly with the latest features and bug fixes.
It’s worth noting that not all types of content can be automatically downloaded and updated. Some applications or software may require manual downloads or installations. However, by enabling automatic downloads for eligible content, you can ensure a more seamless and efficient updating process for your Mac.
Regularly reviewing and adjusting your automatic download settings can help ensure that your system and applications are always up to date, maximizing both performance and security.
Managing Downloaded Files
Once you have customized your download settings on your Mac, it’s essential to efficiently manage the files you download. Proper management ensures that your downloaded files are organized, easy to find, and don’t clutter up your storage space. Here are some tips for managing downloaded files:
- Create Folders: Consider creating specific folders for different types of downloads, such as Documents, Images, or Applications. This will help keep your files organized and make them easier to locate when needed.
- Delete Unwanted Files: Regularly review your downloaded files and delete any unnecessary or redundant ones. This will help free up storage space and keep your system running smoothly.
- Sort and Rename Files: Use file naming conventions and sorting options to arrange your downloaded files in a logical and consistent manner. This will make it easier to find files based on their names, sizes, or creation dates.
- Backup Your Downloads: Consider backing up your downloaded files to an external storage device or a cloud-based storage service. This will ensure that you have a copy of your important files in case of any accidental deletion or system failure.
- Organize Browser Downloads: Most web browsers have their own download managers. Utilize these features to monitor and track your downloads more efficiently. You can often access your browser’s download manager by pressing Ctrl+J or navigating to the “Downloads” section within the browser settings.
- Utilize Tags or Labels: Some operating systems allow you to add tags or labels to your files, making it easier to search and categorize them based on specific criteria.
By implementing these strategies, you can effectively manage your downloaded files and maintain an organized digital workspace. This will save you time in locating important files and prevent clutter from accumulating on your Mac.
Remember to regularly review and declutter your downloaded files. This ensures that your storage space is optimized and keeps your system running smoothly.
Adopting good file management habits will not only enhance your productivity but also contribute to a more streamlined and organized digital experience on your Mac.
Conclusion
Customizing your download settings on a Mac can greatly enhance your downloading experience and help you stay organized. By following the steps outlined in this guide, you can change various aspects of your download settings, such as the download location, default folder, notifications, permissions, and more.
Whether you want to save downloads to a specific folder, enable automatic downloads, adjust notification preferences, or manage file permissions, taking control of your download settings allows you to personalize your Mac to suit your unique requirements.
Remember to regularly review and adjust these settings based on your evolving needs. By optimizing your download settings, you can streamline your workflow, protect your system from potentially harmful files, and maintain an organized digital workspace.
Efficiently managing your downloaded files, such as creating and organizing folders, deleting unnecessary files, and backing up your downloads, further enhances your Mac experience. By implementing these file management strategies, you can easily locate files, free up storage space, and ensure important files are safely stored.
Take the time to explore and customize your download settings to align with your preferences and workflow. By doing so, you can make the most of your Mac’s capabilities and enjoy a smooth and efficient downloading experience.
Keep in mind that the steps and options mentioned in this guide may vary slightly depending on the version of macOS you are using. As you navigate through your Mac’s settings, refer to the specific documentation or support resources for your macOS version for more accurate guidance.
Now, armed with the knowledge gained from this guide, you can confidently modify and manage your download settings on your Mac to optimize your workflow and digital organization.