Introduction
Are you facing the pesky issue of a stuck or unresponsive key on your non-mechanical keyboard? Fret not, as the solution may be simpler than you think. With a few basic tools and a little know-how, you can easily remove and clean the key, restoring your keyboard to its optimal functionality. Whether it's a sticky "A" key or an unresponsive space bar, this guide will walk you through the step-by-step process of safely removing and reattaching keys on your non-mechanical keyboard.
A non-mechanical keyboard, also known as a membrane keyboard, is a common type of keyboard found in laptops and desktop computers. Unlike mechanical keyboards, which have individual switches for each key, non-mechanical keyboards use a membrane beneath the keys to register keystrokes. While these keyboards are generally more affordable and quieter, they can be prone to issues such as keys getting stuck or becoming unresponsive.
Before you begin the key removal process, it's important to exercise caution and patience. While the steps are relatively straightforward, it's crucial to handle the keyboard and its components delicately to avoid causing damage. By following this guide, you can effectively address minor keyboard issues and potentially extend the lifespan of your non-mechanical keyboard.
Now, let's dive into the step-by-step process of removing a key from your non-mechanical keyboard and restoring it to its optimal condition. With a few simple tools and a gentle touch, you'll soon be typing away without any keyboard woes.
Step 1: Gather the Necessary Tools
Before embarking on the key removal process, it’s essential to gather the appropriate tools to ensure a smooth and efficient procedure. Here’s what you’ll need:
- Flathead screwdriver or keycap puller: This tool will allow you to safely pry the key from the keyboard without causing damage to the surrounding keys or the keyboard itself. A flathead screwdriver with a thin tip or a specialized keycap puller is ideal for this task.
- Cotton swabs: These will be used to clean the key and the keyboard’s surface once the key has been removed. They are effective for gently wiping away any debris or dust that may be causing the key to malfunction.
- Isopropyl alcohol: A small amount of isopropyl alcohol (commonly known as rubbing alcohol) can be used to clean the key and the keyboard’s surface. It helps to dissolve and remove stubborn residues that may be affecting the key’s performance.
- Microfiber cloth: This lint-free cloth is perfect for drying and polishing the key and the keyboard after cleaning. It ensures that no lint or debris is left behind, maintaining a pristine keyboard surface.
By having these tools at your disposal, you’ll be well-prepared to tackle the key removal process with confidence. These common household items are readily available and will enable you to address the issue at hand effectively.
Step 2: Prepare the Keyboard
Before proceeding with the key removal, it’s important to prepare the keyboard to ensure a safe and successful process. Follow these steps to get the keyboard ready for the next stage:
- Power off the computer: To avoid any accidental keystrokes or system disruptions, shut down the computer or disconnect the keyboard if it’s a standalone peripheral. This precautionary measure ensures that the keyboard remains inactive during the key removal and cleaning process.
- Clean the surrounding area: Use a gentle cleaning cloth to remove any visible dust, debris, or surface grime around the key you intend to remove. This step prevents external particles from falling into the keyboard during the key removal process, reducing the risk of further complications.
- Identify the key’s attachment mechanism: Take a moment to observe and understand how the key is attached to the keyboard. Non-mechanical keyboards typically use a scissor-switch or a similar mechanism to secure the keys. This knowledge will be valuable when it comes time to reattach the key after cleaning.
By taking these preparatory steps, you’ll create a conducive environment for safely removing and cleaning the key. Ensuring that the keyboard is powered off and free from external debris minimizes the likelihood of accidental damage and allows for a more focused and effective key removal process.
Step 3: Remove the Key
Now that you’ve prepared the keyboard and gathered the necessary tools, it’s time to proceed with removing the problematic key. Follow these steps to safely detach the key from your non-mechanical keyboard:
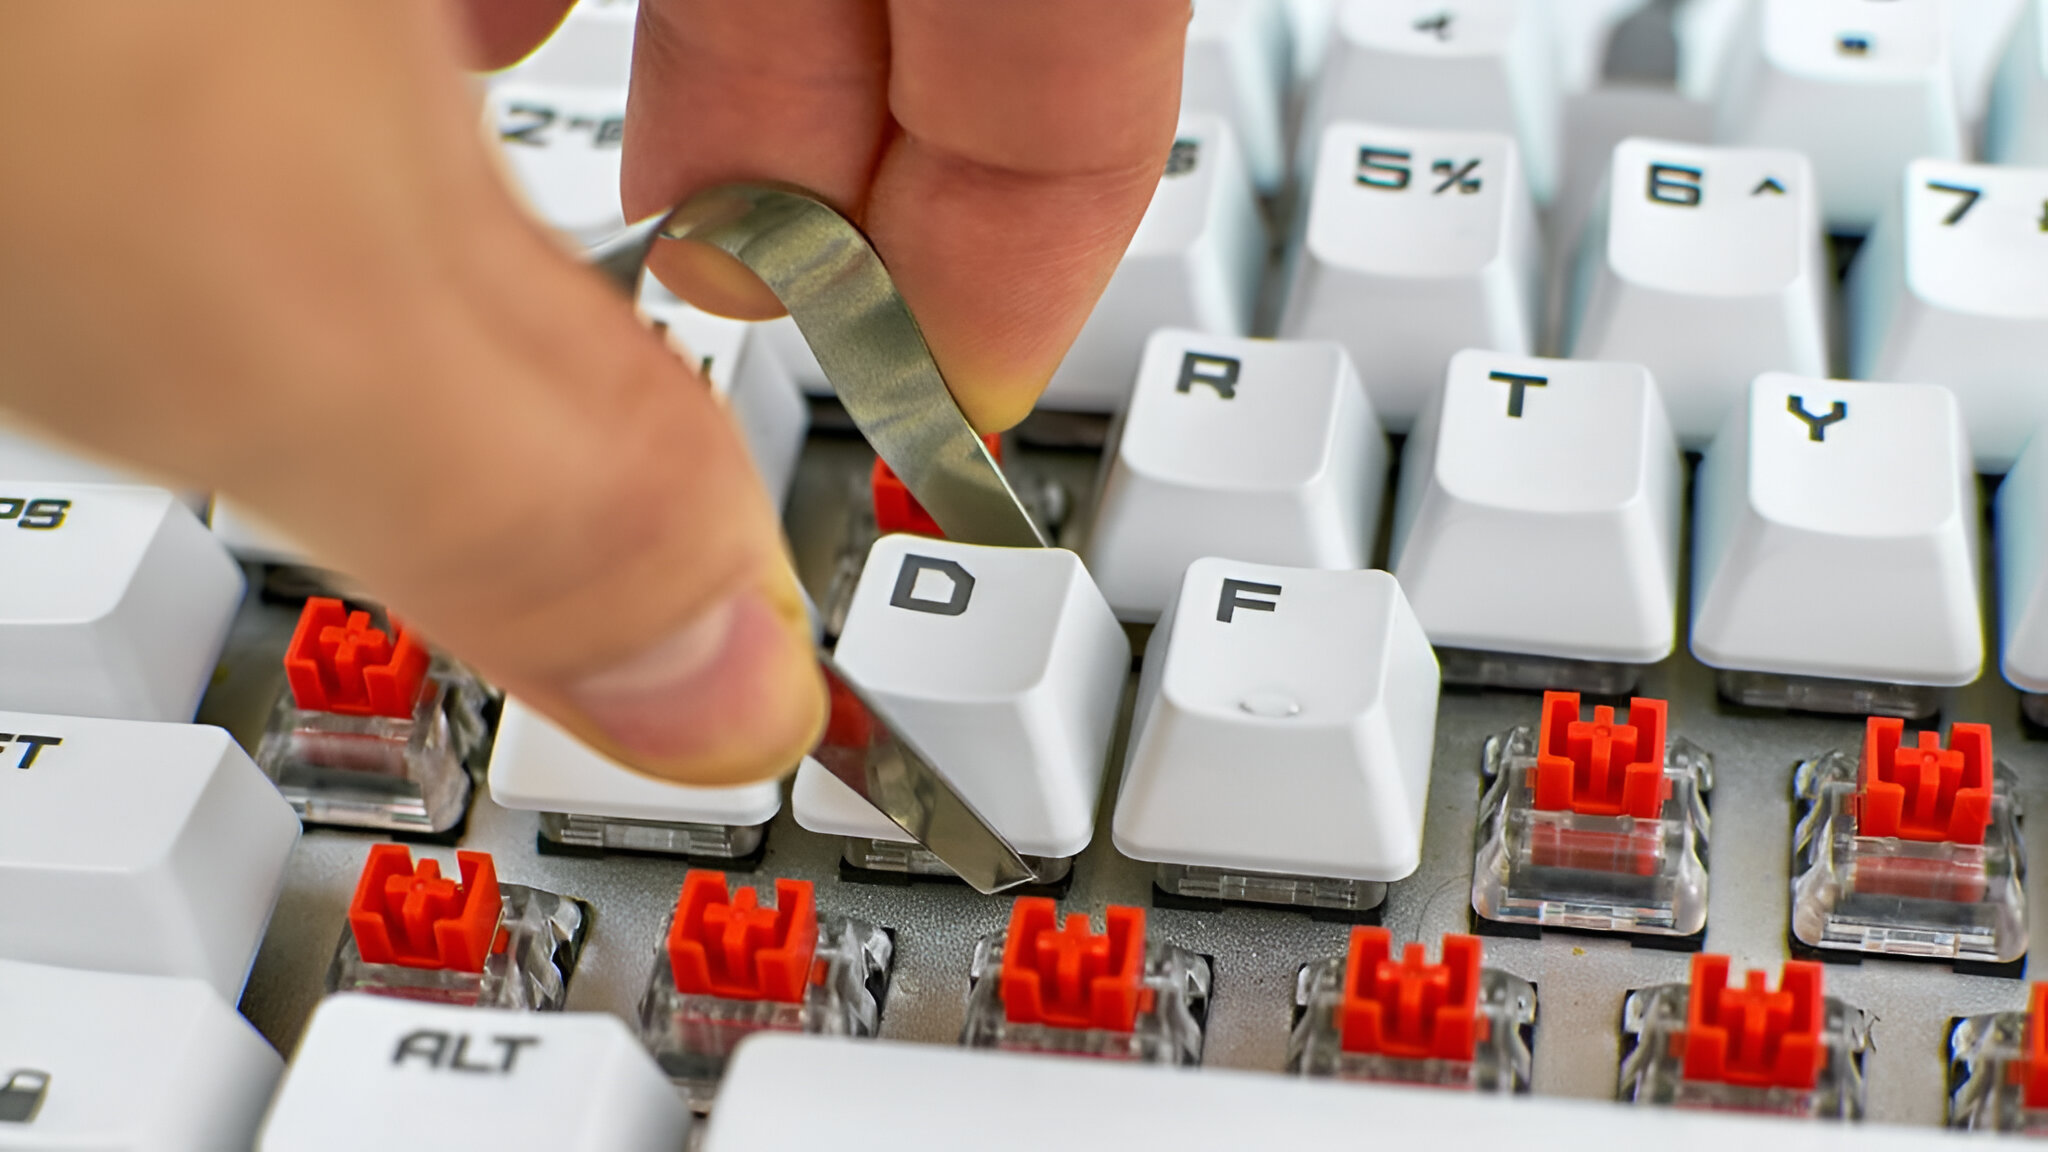
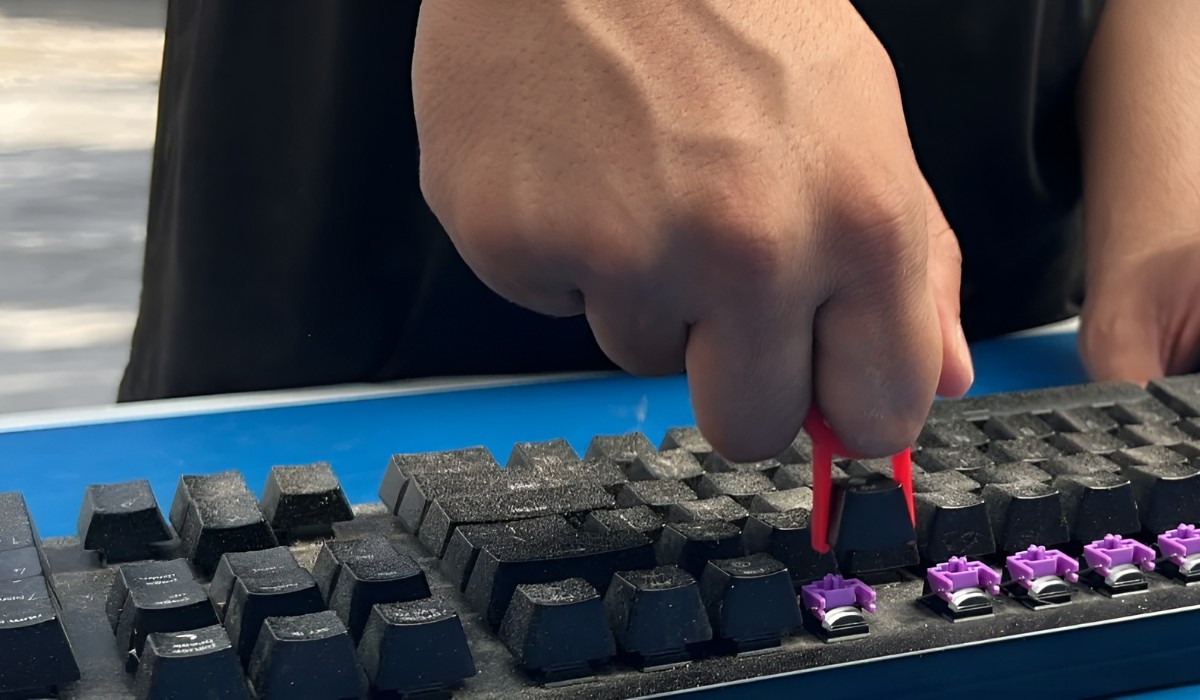
- Position the tool: Using a flathead screwdriver or a keycap puller, carefully position the tool beneath the key you wish to remove. Ensure that the tool is positioned evenly to avoid applying excessive force to one side of the key, which could result in breakage.
- Apply gentle pressure: With the tool in place, exert gentle and even pressure to lift the key from its housing. It’s important to avoid sudden or forceful movements, as this could damage the key or the keyboard’s underlying membrane.
- Release the key: As you apply pressure, you should feel the key begin to detach from the keyboard. Continue to apply gentle pressure until the key pops off. Be patient and proceed slowly to prevent any damage to the key or the keyboard.
- Set the key aside: Once the key is removed, place it in a safe and clean area to prepare for the cleaning process. Take care not to misplace or damage the key during this step.
By following these steps diligently, you can safely remove the key from your non-mechanical keyboard without causing any harm to the keyboard or the detached key. Patience and precision are key during this process, ensuring that the keyboard remains intact and ready for the next phase of cleaning and maintenance.
Step 4: Clean the Key and Keyboard
With the key successfully removed, it’s time to address any accumulated debris or residue that may be affecting the key’s performance. Follow these steps to thoroughly clean both the key and the keyboard’s surface:
- Inspect the key: Examine the underside of the removed key and the area where it was situated on the keyboard. Look for any visible debris, dust, or sticky residues that may be impeding the key’s functionality.
- Clean the key: Using a cotton swab lightly moistened with isopropyl alcohol, gently wipe the underside of the key to remove any grime or residue. Take care to avoid saturating the key with the alcohol, as excessive moisture can lead to damage.
- Clean the keyboard surface: Similarly, use a clean cotton swab lightly moistened with isopropyl alcohol to carefully clean the area on the keyboard where the key was situated. Wipe away any visible debris or residue, ensuring that the surface is clean and dry before reattaching the key.
- Dry and polish: After cleaning, use a microfiber cloth to dry the key and the keyboard’s surface thoroughly. Gently polish the key and the surrounding area to ensure that no moisture or lint remains, leaving a pristine and dry surface.
By meticulously cleaning both the key and the keyboard’s surface, you can effectively address any underlying issues that may have been causing the key to malfunction. Removing debris and residues can significantly improve the key’s responsiveness and restore the keyboard to optimal functionality.
Step 5: Reattach the Key
With the key and keyboard surface thoroughly cleaned, it’s time to reattach the key to its original position. Follow these steps to securely reassemble the key on your non-mechanical keyboard:
- Align the key: Position the key over its designated location on the keyboard, ensuring that it aligns correctly with the surrounding keys. Take note of the attachment mechanism, such as the scissor-switch, to guide the key into place.
- Apply gentle pressure: Once the key is aligned, apply gentle and even pressure to press it back into position. Avoid using excessive force, as the key should fit snugly without requiring significant pressure to reattach.
- Test the key: After reattaching the key, test its responsiveness by pressing it multiple times. Ensure that it registers keystrokes accurately and returns to its original position after each press. This step confirms that the key is securely reattached and functioning as intended.
By following these steps carefully, you can effectively reattach the key to your non-mechanical keyboard, restoring it to its optimal state. The key should sit securely in place and function smoothly, allowing you to resume typing without any hindrances.
Conclusion
Congratulations! By successfully removing, cleaning, and reattaching the key on your non-mechanical keyboard, you’ve taken a proactive step towards maintaining the functionality and longevity of your keyboard. This simple yet effective maintenance process can address common issues such as sticky or unresponsive keys, allowing you to enjoy a seamless typing experience once more.
It’s important to remember that patience and attention to detail are key when handling delicate electronic components like keyboard keys. By following the step-by-step guide provided, you’ve not only resolved a specific issue with your keyboard but also gained valuable insight into its internal mechanisms.
Regular maintenance and cleaning of your non-mechanical keyboard can prevent future issues and extend its lifespan. By incorporating these simple maintenance tasks into your routine, you can ensure that your keyboard remains in optimal condition for years to come.
Remember, the key removal and cleaning process outlined in this guide is applicable to individual keys on non-mechanical keyboards. If you encounter persistent issues with multiple keys or overall keyboard functionality, it may be advisable to seek professional assistance or consider a keyboard replacement.
By taking proactive steps to maintain and care for your non-mechanical keyboard, you can continue to enjoy a reliable and responsive typing experience, free from the frustrations of malfunctioning keys.