Introduction
How to Fix a Stuck Key on a Mechanical Keyboard
Are you experiencing the frustration of a stuck key on your mechanical keyboard? Don't worry; you're not alone. Mechanical keyboards are prized for their tactile feedback and durability, but occasionally, a key may become stuck, impeding your typing experience. However, with the right approach, you can resolve this issue and restore your keyboard to its optimal functionality.
In this comprehensive guide, we will explore the various methods for fixing a stuck key on a mechanical keyboard. Whether it's due to debris accumulation, lack of lubrication, or a faulty key switch, we'll walk you through the troubleshooting steps to address the problem effectively. By following these instructions, you can breathe new life into your keyboard and regain the smooth, responsive keystrokes that make mechanical keyboards a favorite among enthusiasts.
So, if you're ready to bid farewell to the frustration of a stuck key and rediscover the joy of typing on your mechanical keyboard, let's dive into the solutions that will help you get your keyboard back in prime condition.
Identifying the Stuck Key
Identifying the Stuck Key on Your Mechanical Keyboard
Before delving into the solutions, it’s crucial to accurately identify the specific key that is causing the issue. A stuck key can manifest in various ways, such as unresponsiveness, inconsistent actuation, or physical obstruction. Here’s how you can pinpoint the problematic key:
1. Visual Inspection
Begin by visually examining the keyboard for any keys that appear misaligned or obstructed. Look for any signs of physical damage, such as a bent or warped keycap, which could be impeding the key’s movement.
2. Key Actuation Test
To determine if a key is consistently registering keystrokes, open a text editor and press the key multiple times. Observe if the key consistently produces characters on the screen or if it intermittently fails to register input.
3. Key Feels Stiff or Unresponsive
If a key feels stiff or unresponsive when pressed, it may indicate an internal obstruction or lack of proper actuation. Take note of keys that exhibit these characteristics, as they may require specific troubleshooting steps.
4. Use Keyboard Testing Software
Utilize keyboard testing software that displays real-time key presses and releases. This can help identify any irregularities in the key’s behavior, providing valuable insight into the nature of the issue.
5. Observe LED Indicators
If your mechanical keyboard features LED indicators for key presses, pay attention to any anomalies in the LED feedback when pressing the affected key. Inconsistent or erratic LED behavior can signal a key-related malfunction.
By carefully assessing the behavior and physical condition of the keys, you can effectively pinpoint the stuck key that requires attention. Once you’ve identified the problematic key, you can proceed with the appropriate troubleshooting steps to address the issue and restore your keyboard’s functionality.
Cleaning the Stuck Key
When a key on your mechanical keyboard becomes stuck, debris and dust accumulation are common culprits. Cleaning the affected key and its surrounding components can often alleviate the issue and restore smooth key operation. Here’s a step-by-step guide for effectively cleaning a stuck key:
1. Gather Cleaning Supplies
Before proceeding, gather the necessary cleaning supplies, including compressed air, a keycap puller, a soft bristle brush, and isopropyl alcohol. These tools will enable you to thoroughly clean the key and its underlying mechanisms.
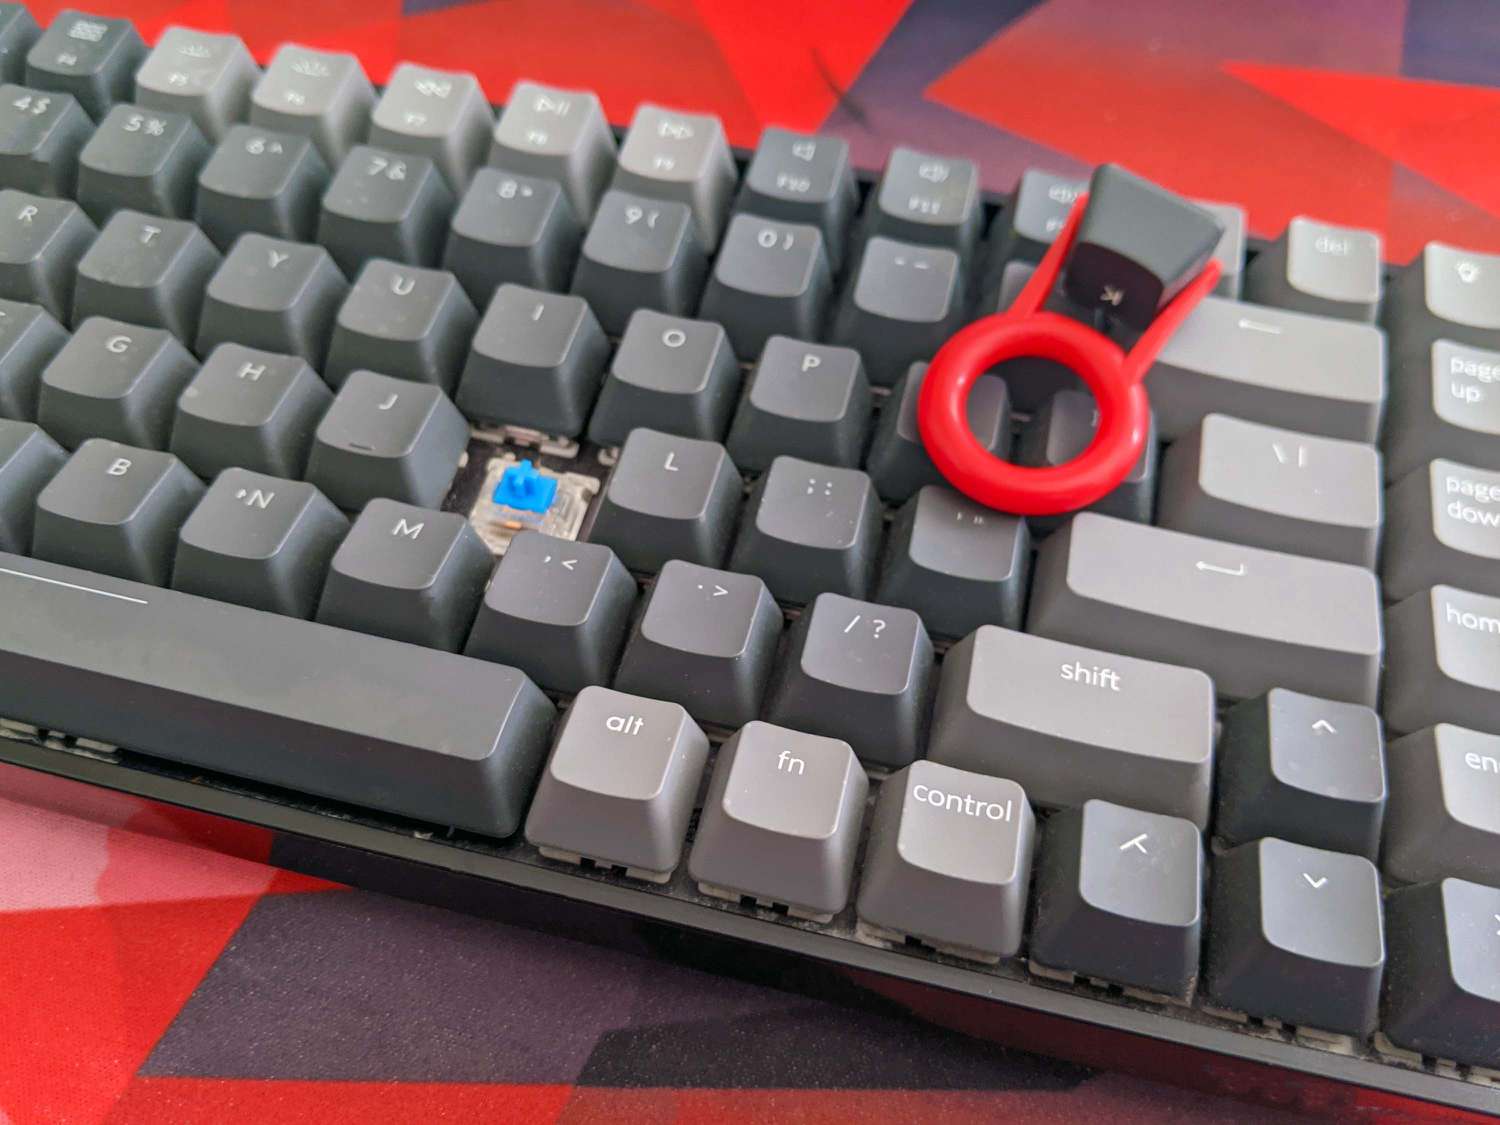
2. Remove the Keycap
Use a keycap puller to gently remove the stuck keycap from the keyboard switch. Exercise caution to avoid damaging the keycap or the switch underneath. Once removed, set the keycap aside for cleaning.
3. Clear Debris and Dust
Use compressed air to blow away any visible debris and dust from the exposed switch. Direct the airflow at different angles to dislodge stubborn particles that may be affecting the key’s movement and actuation.
4. Clean the Keycap
Dampen a soft bristle brush with isopropyl alcohol and gently clean the underside and sides of the keycap. Pay close attention to any accumulated grime or residue, ensuring that the keycap is thoroughly cleaned and free of obstructions.
5. Inspect the Switch
Carefully examine the exposed switch for any foreign particles or residue that may be impeding its function. If necessary, use compressed air and a soft brush to remove any contaminants from the switch housing and contact points.
6. Reassemble the Keycap
Once the keycap and switch are clean and free of debris, carefully reattach the keycap to the switch, ensuring that it is properly aligned and securely seated. Apply gentle pressure to snap the keycap back into place.
By meticulously cleaning the stuck key and its components, you can effectively eliminate the effects of debris and dust accumulation, restoring the key’s responsiveness and ensuring smooth, consistent operation. This proactive maintenance approach can help prevent future instances of keys becoming stuck due to environmental contaminants.
Lubricating the Stuck Key
When a mechanical keyboard key becomes stuck, insufficient lubrication within the key switch may be the underlying cause. By applying the appropriate lubricant, you can enhance the key’s movement and minimize friction, thereby resolving the issue. Here’s a detailed guide on lubricating a stuck key:
1. Select the Correct Lubricant
Choose a high-quality synthetic lubricant specifically designed for mechanical keyboard switches. Avoid using petroleum-based products, as they can attract dust and potentially damage the switch over time. Popular lubricants for keyboard switches include PTFE-based and silicone-based options.
2. Remove the Keycap
Using a keycap puller, carefully remove the stuck keycap to access the switch underneath. Handle the keycap with care to avoid causing any damage during the removal process.
3. Apply Lubricant to the Switch
With a small applicator or brush, apply a minimal amount of the chosen lubricant to the key switch’s contact points and slider mechanisms. Ensure that the lubricant is evenly distributed and that excess lubricant is avoided, as an overabundance can lead to undesirable key behavior.
4. Actuate the Key
After applying the lubricant, gently actuate the key multiple times to facilitate the distribution of the lubricant within the switch. This helps ensure that the lubricant reaches all necessary areas, promoting smoother key movement and reducing friction.
5. Reattach the Keycap
Once the lubrication process is complete, carefully reattach the keycap to the switch, ensuring that it is properly aligned and securely seated. Apply gentle pressure to snap the keycap back into place, taking care not to dislodge the lubricant during reassembly.
6. Test the Key
Test the lubricated key to assess its responsiveness and smoothness of operation. Verify that the key no longer exhibits the symptoms of being stuck and that the lubrication has effectively improved its tactile feedback.
By properly lubricating the stuck key, you can mitigate the effects of friction and enhance the overall performance of the key switch. This proactive maintenance approach can prolong the longevity of your mechanical keyboard and contribute to a more satisfying typing experience.
Adjusting the Key Switch
When a key on your mechanical keyboard becomes stuck, it may be necessary to make adjustments to the key switch to restore its proper functionality. This process involves fine-tuning the switch’s components to ensure smooth and consistent key actuation. Here’s a comprehensive guide on adjusting a stuck key switch:
1. Assess the Key’s Actuation
Before proceeding with adjustments, evaluate the key’s actuation to identify any irregularities. Take note of the key’s responsiveness, actuation force, and any noticeable resistance or inconsistency during key presses.
2. Access the Switch Mechanism
Using a keycap puller, carefully remove the stuck keycap to gain access to the switch mechanism. Handle the keycap with care to prevent damage during the removal process.
3. Inspect the Switch Components
Thoroughly examine the switch components, including the spring, stem, and housing, for any signs of misalignment, damage, or foreign debris. Address any visible issues that may be impeding the key’s movement and actuation.
4. Adjust Actuation Force
If the key requires excessive force to actuate or feels resistant, consider adjusting the spring tension to achieve the desired actuation force. This can be accomplished by carefully stretching or compressing the spring to modify its resistance.
5. Align the Stem and Housing
Ensure that the stem and housing of the switch are properly aligned to facilitate smooth key movement. Any misalignment can lead to binding and hinder the key’s operation. Make precise adjustments to realign the components as needed.
6. Test Key Actuation
After making adjustments to the key switch, reattach the keycap and test the key’s actuation. Verify that the key now operates smoothly, requiring an appropriate actuation force and exhibiting consistent behavior during key presses.
By meticulously adjusting the key switch’s components, you can address the underlying factors contributing to the stuck key, ensuring that it operates optimally and delivers a satisfying typing experience. This proactive approach to maintenance can prolong the lifespan of your mechanical keyboard and prevent future instances of keys becoming stuck.
Replacing the Key Switch
When traditional troubleshooting methods fail to resolve a stuck key on your mechanical keyboard, replacing the key switch may be the most effective solution. This process involves removing the malfunctioning switch and installing a new one to restore the key’s functionality. Here’s a detailed guide on replacing a stuck key switch:
1. Acquire a Replacement Switch
Obtain a compatible replacement switch that matches the specifications and design of the malfunctioning switch. Ensure that the replacement switch is from a reputable manufacturer and is designed for use with your keyboard model.
2. Prepare the Work Area
Create a clean and well-lit workspace to perform the switch replacement. Gather the necessary tools, including a soldering iron, desoldering pump or wick, keycap puller, and any additional components required for the replacement process.
3. Remove the Keycap and Switch
Using a keycap puller, carefully remove the stuck keycap to access the malfunctioning switch. Next, desolder the defective switch from the keyboard PCB using a soldering iron and desoldering pump or wick, ensuring that the switch is fully detached from the circuit board.
4. Install the Replacement Switch
Position the replacement switch in the vacant switch socket on the keyboard PCB, aligning it correctly with the switch housing and contact points. Ensure that the replacement switch is securely seated and flush with the PCB to facilitate proper soldering.
5. Solder the Replacement Switch
Using a soldering iron, carefully solder the replacement switch’s contact points to the corresponding pads on the keyboard PCB. Exercise caution to achieve clean and reliable solder joints, ensuring the switch is electrically and mechanically secure.
6. Test the Replaced Key
After soldering the replacement switch, reattach the keycap and test the replaced key to confirm its proper functionality. Verify that the key operates smoothly and consistently, registering keystrokes without any issues.
By replacing the stuck key switch with a new, properly functioning component, you can effectively resolve persistent issues and restore the keyboard’s optimal performance. This meticulous approach to repair ensures that the keyboard continues to deliver reliable and responsive keystrokes, enhancing the overall typing experience.
Conclusion
Addressing a stuck key on a mechanical keyboard requires a systematic approach to troubleshooting and maintenance. By identifying the specific key causing the issue and implementing targeted solutions, you can effectively restore the keyboard’s optimal functionality and enjoy a seamless typing experience. Whether it’s through cleaning, lubricating, adjusting, or replacing the key switch, each method plays a crucial role in resolving the issue and preventing future occurrences of stuck keys.
Regular maintenance and proactive care for your mechanical keyboard can significantly extend its lifespan and ensure consistent performance. By keeping the keyboard clean, well-lubricated, and properly adjusted, you can mitigate the effects of wear and environmental factors, preserving the tactile feedback and responsiveness that make mechanical keyboards a popular choice among enthusiasts.
It’s important to approach troubleshooting with patience and attention to detail, as each key plays a vital role in the overall functionality of the keyboard. By following the guidelines outlined in this comprehensive guide, you can effectively address stuck keys and maintain your mechanical keyboard in optimal condition for an enhanced typing experience.
Remember that if you encounter persistent issues with a stuck key despite your best efforts, seeking professional assistance from a qualified technician or the keyboard’s manufacturer may provide additional insights and solutions to resolve the issue.
With the knowledge and techniques gained from this guide, you can confidently tackle stuck key issues on your mechanical keyboard, ensuring that it continues to deliver the exceptional performance and tactile satisfaction that enthusiasts have come to cherish.