Introduction
Have you ever experienced a keyboard that makes an annoying noise when you’re typing? It can be extremely frustrating, especially if you spend a significant amount of time working or gaming on your computer. Not only is the noise distracting, but it can also be a cause of concern if you’re worried about the functionality of your keyboard.
Keyboard noise can be caused by a variety of factors, from dirty or stuck keys to loose key caps or poor keyboard quality. It can also be a result of your typing technique. Understanding the common causes of keyboard noise can help you troubleshoot the issue and find a solution.
In this article, we will explore the main reasons why your keyboard might be making noise when typing and provide some troubleshooting tips to help you resolve the issue. By the end of this article, you will have a better understanding of what might be causing the noise and possible actions you can take to fix it.
Common Causes of Keyboard Noise
There are several common causes that can contribute to the noise your keyboard makes when you type. Let’s take a closer look at each of these causes:
- Dirty or Stuck Keys: Over time, dust, dirt, and crumbs can accumulate between the keys, causing them to become sticky or difficult to press. This can result in a clicking or squeaking sound when typing.
- Loose Key Caps: Key caps are the plastic covers that sit on top of the switches beneath them. If they become loose or misaligned, they can produce a rattling noise when you type.
- Mechanical Key Switches: Mechanical keyboards are known for their satisfying tactile feedback, but they can also generate noise. The switches beneath each key can produce a clicking sound when pressed, especially if they are not properly lubricated.
- Poor Keyboard Quality: Cheap or low-quality keyboards may not have effective noise-dampening mechanisms, leading to louder typing sounds. These keyboards are often made of thinner plastic or have poor construction, allowing more vibrations to transfer noise to the surface.
- Improper Typing Technique: The way you type can also contribute to keyboard noise. If you tend to type with excessive force or hit the keys at an angle, it can amplify the noise generated by the keys and switches.
Now that we understand the common causes of keyboard noise, let’s move on to the troubleshooting steps you can take to address the issue.
Dirty or Stuck Keys
One of the most common causes of keyboard noise is dirty or stuck keys. Over time, dust, debris, and even food particles can find their way into the gaps between the keys, causing them to become sticky or difficult to press. This can result in a clicking or squeaking sound when typing.
To address this issue, you can start by cleaning your keyboard. Here are the steps to follow:
- Turn off your computer: Before you begin cleaning, make sure to turn off your computer or disconnect your keyboard. This will prevent any accidental key presses or damage while cleaning.
- Remove the key caps: Gently remove the key caps from your keyboard. You can use a keycap puller or carefully pry them off with a flat tool like a small screwdriver. Be cautious not to apply too much force to avoid damaging the keys or switches.
- Clean the keys: Once the key caps are removed, you can clean them using a damp cloth or cotton swabs dipped in a mild cleaning solution. Make sure to remove any dirt, debris, or sticky residue from the keys.
- Clean the keyboard surface: Use compressed air or a small brush to clean the surface of the keyboard. Pay extra attention to the gaps between the keys, as this is where most of the debris tends to accumulate.
- Dry and reassemble: Ensure that both the key caps and the keyboard surface are thoroughly dry before reassembling the keys. Once dry, carefully place each key cap back onto its corresponding switch, applying gentle pressure until it snaps into place.
If any keys are still sticky or difficult to press after cleaning, you may need to seek professional help or consider replacing the affected keys or the entire keyboard.
By regularly cleaning your keyboard and keeping it free from dirt and debris, you can reduce the likelihood of keys getting stuck and minimize the noise when typing.
Loose Key Caps
Another common cause of keyboard noise is loose key caps. Key caps are the plastic covers that sit on top of the switches beneath them. If they become loose or misaligned, they can produce a rattling noise when you type.
To address this issue, you can try reattaching the loose key caps using the following steps:
- Turn off your computer: As a precautionary measure, turn off your computer or disconnect your keyboard to avoid any accidental key presses during the process.
- Identify the loose key caps: Take a closer look at your keyboard and identify the keys that are rattling or appear to be loose. These are the key caps that need to be reattached.
- Remove the key caps: Gently remove the loose key caps from your keyboard. You can use a keycap puller or a flat tool such as a small screwdriver. Try to lift the key caps straight up to prevent any damage to the switches.
- Inspect the switches: While you have the key caps removed, take a moment to inspect the switches beneath them. Look for any signs of damage or misalignment that may be contributing to the key caps being loose.
- Reattach the key caps: Align the loose key caps with the corresponding switches and gently press them down until you hear a satisfying click. Ensure that each key cap is securely attached and does not wobble or rattle when touched.
If you find that some key caps are too damaged or cannot be securely reattached, you may need to consider replacing them. Many keyboard manufacturers offer replacement key cap sets or individual key caps that can be easily installed.
By ensuring that your key caps are properly attached, you can eliminate the rattling noise and improve the overall typing experience.
Mechanical Key Switches
Mechanical keyboards are known for their satisfying tactile feedback and durability. However, the mechanical key switches can also be a potential source of keyboard noise. These switches are responsible for registering each keystroke and can produce a clicking sound when pressed, especially if they are not properly lubricated.
If you have a mechanical keyboard and are experiencing excessive noise when typing, here are some steps you can take to address the issue:
- Check for dust and debris: Dust and debris can interfere with the smooth movement of the key switches, leading to increased noise. Use compressed air or a small brush to clean the switches and remove any particles that may have accumulated.
- Lubricate the switches: Mechanical switches can benefit from periodic lubrication to reduce friction and noise. Apply a small amount of switch lubricant specifically designed for mechanical keyboards. Be sure to follow the manufacturer’s instructions and use only the recommended lubricant type.
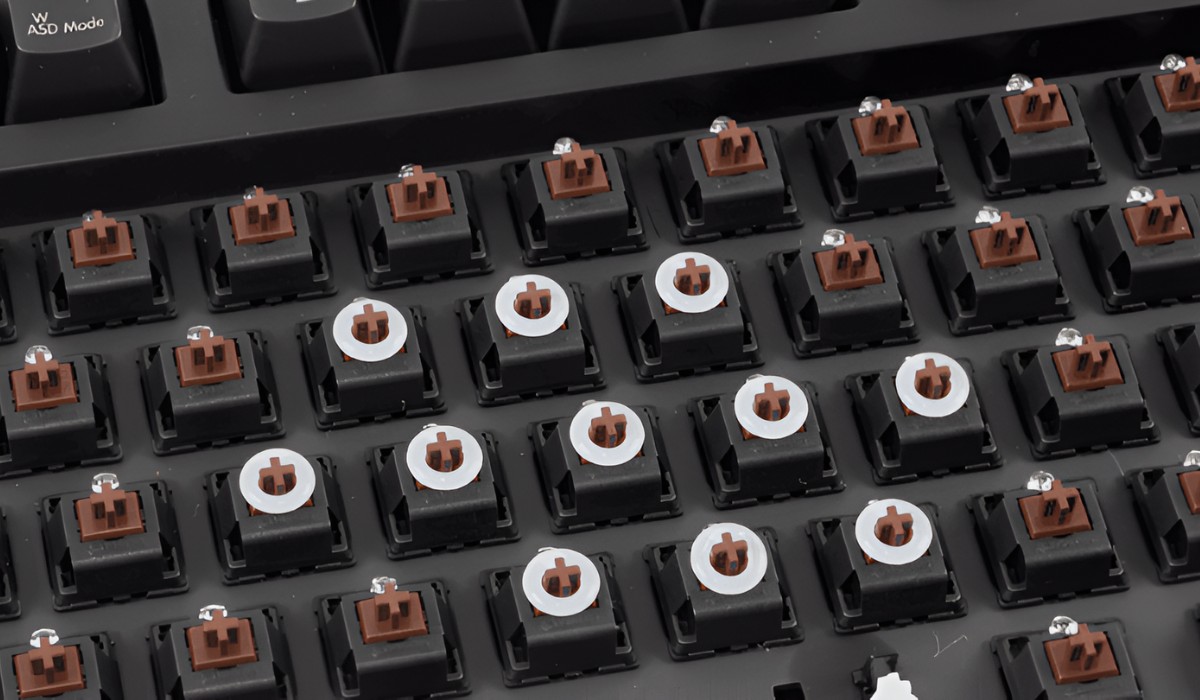
- Consider switch dampeners: Switch dampeners are small rubber rings or O-rings that can be placed on the stems of the key switches to dampen the sound and reduce the noise produced when the keys bottom out. These dampeners can be easily installed and can have a noticeable impact on noise reduction.
- Experiment with different keycap materials: Changing the keycap material can also have an effect on the noise produced by the keyboard. Some keycap materials, such as PBT (polybutylene terephthalate), are denser and can absorb more sound than ABS (acrylonitrile butadiene styrene), resulting in quieter typing.
Each mechanical keyboard and switch type may respond differently to these methods, so it’s important to experiment and find the optimal combination that works for you. Keep in mind that excessive lubrication or using the wrong lubricant can negatively affect the performance of your switches, so proceed with caution and follow the manufacturer’s guidelines.
By properly maintaining and lubricating your mechanical keyboard switches, you can minimize the noise and enjoy a quieter typing experience.
Poor Keyboard Quality
The quality of your keyboard can also contribute to the amount of noise it produces during typing. Cheap or low-quality keyboards often lack effective noise-dampening mechanisms, resulting in louder and more pronounced typing sounds.
If you suspect that poor keyboard quality is the cause of the excessive noise, here are a few steps you can take to address the issue:
- Upgrade to a higher-quality keyboard: Consider investing in a higher-quality keyboard that is specifically designed to minimize noise. Look for keyboards with features such as noise-dampening foam, rubberized keycaps, or low-profile mechanical switches, which can help reduce the noise produced during typing.
- Read reviews and do research: Before purchasing a new keyboard, it’s a good idea to read product reviews and do some research to ensure that the keyboard you choose has a reputation for being quiet and well-built. Look for keyboards that have received positive feedback regarding their noise levels and overall quality.
- Consider silent or low-noise switches: Some keyboards come with specialized switches that are designed to be quieter than traditional mechanical switches. These switches typically have enhanced noise-dampening features to minimize the sound produced when typing.
- Use a keyboard mat or dampening material: Placing a keyboard mat or dampening material, such as a silicone or foam pad, underneath your keyboard can help absorb vibrations and reduce the noise transmitted to your desk or work surface.
By upgrading to a higher-quality keyboard or implementing noise-reducing measures, you can significantly improve the typing experience and minimize the noise produced by a poor-quality keyboard.
Improper Typing Technique
Believe it or not, your own typing technique can contribute to the noise your keyboard makes. If you tend to type with excessive force, hit the keys at an angle, or bottom out the keys too forcefully, it can amplify the noise generated by the keys and switches.
Here are some tips to help you improve your typing technique and reduce keyboard noise:
- Type with a lighter touch: One of the most effective ways to reduce keyboard noise is to type with a lighter touch. Instead of exerting excessive force on the keys, try to press them gently and let the switches do the work. This can significantly reduce the noise produced by bottoming out the keys.
- Position your fingers correctly: Make sure your fingers are properly positioned and resting on the home row keys (ASDF for the left hand and JKL; for the right hand). This allows for more efficient and accurate typing, reducing the need to hit the keys at awkward angles.
- Practice proper finger placement: Instead of using your entire finger to press a key, focus on using the pads of your fingertips. This allows for more controlled and precise typing and can help minimize excess noise.
- Consider using a typing aid or software: There are typing aids and software programs available that can help you improve your typing technique and reduce excessive force when pressing the keys. These tools can provide feedback and guidance to help you develop a lighter touch and reduce keyboard noise.
By being mindful of your typing technique and making small adjustments, you can significantly reduce the noise produced by your keyboard. Not only will this make your typing experience quieter, but it can also help improve your typing speed and accuracy.
Troubleshooting the Noise Issue
Now that we’ve explored the common causes of keyboard noise, let’s move on to troubleshooting steps you can take to address the issue. Keep in mind that not all methods may work for every situation, so feel free to try different approaches until you find a solution that works for you.
- Cleaning the Keyboard: If your keyboard is accumulating dust, dirt, or debris, regular cleaning can help reduce noise. Use a damp cloth or cotton swabs to clean the keycaps and surfaces between the keys. Be careful not to use excessive moisture, and ensure that the keyboard is completely dry before reconnecting it.
- Reattaching Loose Key Caps: If you notice any loose or misaligned key caps, gently remove them and reattach them properly. Make sure they click into place and do not wobble when pressed. In some cases, you may need to replace damaged or broken key caps.
- Lubricating Mechanical Key Switches: If your keyboard has mechanical switches and they are not properly lubricated, they can produce noise when pressed. Follow the manufacturer’s guidelines and use a designated switch lubricant to reduce friction and noise.
- Upgrading to a Higher-Quality Keyboard: If you have a low-quality or membrane keyboard that is inherently noisy, consider investing in a higher-quality keyboard with noise-dampening features. Look for keyboards specifically designed to reduce noise, such as those with rubberized keycaps or low-noise switches.
- Correcting Typing Technique: Improper typing technique, such as typing with excessive force, can amplify keyboard noise. Practice typing with a lighter touch, position your fingers correctly on the home row, and use the pads of your fingertips to press the keys instead of slamming them down.
By following these troubleshooting steps, you can significantly reduce keyboard noise and enjoy a quieter and more comfortable typing experience.
Cleaning the Keyboard
One of the first steps to troubleshoot a noisy keyboard is to clean it. Over time, dust, dirt, and debris can accumulate between the keys, causing them to become sticky or difficult to press. This buildup can contribute to the noise you hear when typing.
Here’s how you can clean your keyboard effectively:
- Turn off your computer: Before you begin cleaning, make sure to turn off your computer or disconnect your keyboard. This will prevent any accidental key presses or damage while cleaning.
- Remove the keycaps: Gently remove the keycaps from your keyboard. You can use a keycap puller or carefully pry them off with a flat tool like a small screwdriver. Be cautious not to apply too much force to avoid damaging the keys or switches.
- Clean the keycaps: Once the keycaps are removed, clean them using a damp cloth or cotton swabs dipped in a mild cleaning solution. Make sure to remove any dirt, debris, or sticky residue from the keycaps.
- Clean the keyboard surface: Use compressed air or a small brush to clean the surface of the keyboard. Pay extra attention to the gaps between the keys, as this is where most of the debris tends to accumulate. You can also use a clean, dry cloth to wipe the surface.
- Dry and reassemble: Ensure that both the keycaps and the keyboard surface are thoroughly dry before reassembling the keycaps. Once dry, carefully place each keycap back onto its corresponding switch, applying gentle pressure until it snaps into place.
If there are particularly stubborn stains or sticky residue on the keycaps or keyboard surface, you can use a mixture of equal parts water and isopropyl alcohol for a more thorough cleaning. However, make sure to gently wipe and dry the components to prevent any damage.
Regularly cleaning your keyboard can help maintain its performance and reduce the noise caused by debris or buildup. Consider incorporating keyboard cleaning into your routine maintenance to keep your typing experience smooth and quiet.
Reattaching Loose Key Caps
Another common cause of keyboard noise is loose or misaligned key caps. Key caps are the plastic covers that sit on top of the switches beneath them. When these key caps become loose, they can rattle or wobble, resulting in an annoying typing experience and increased noise.
If you notice any key caps on your keyboard that are loose or misaligned, here’s how you can reattach them:
- Turn off your computer: As a safety precaution, turn off your computer or disconnect your keyboard to avoid any accidental key presses while reattaching the key caps.
- Identify the loose key caps: Take a close look at your keyboard and identify the key caps that are loose or misaligned. These are the key caps that need to be reattached.
- Remove the key caps: Gently lift the loose key caps from the keyboard. You can use a keycap puller or carefully pry them off with a flat tool, such as a small screwdriver. Be cautious not to apply too much force, as you don’t want to damage the keys or switches.
- Inspect the switches: While the key caps are removed, take a moment to inspect the switches beneath them. Look for any signs of damage or misalignment that may be contributing to the key caps becoming loose.
- Reattach the key caps: Line up the loose key caps with the corresponding switches and gently press them down until you hear a satisfying click. Make sure each key cap is securely attached and does not wobble or rattle when touched.
It’s important to note that if you find any key caps that are cracked or broken during the reattachment process, they will need to be replaced. Many keyboard manufacturers offer replacement key cap sets or individual key caps that can be easily purchased and installed.
By reattaching the loose key caps on your keyboard, you can reduce the noise caused by rattling or wobbling keys and restore a more stable and enjoyable typing experience.
Lubricating Mechanical Key Switches
If you have a mechanical keyboard and are experiencing noise when typing, it may be due to insufficient lubrication on the key switches. Mechanical switches rely on smooth movement and proper lubrication to function properly and quietly. Over time, the lubrication on the switches can wear off, leading to increased friction and noise.
Here’s how you can lubricate your mechanical key switches:
- Turn off your computer: It’s essential to turn off your computer or disconnect your keyboard before applying any lubrication to prevent accidents or damage.
- Choose the right lubricant: Select a lubricant that is specifically designed for mechanical keyboards. It’s crucial to use the correct lubricant to avoid damaging the switches or affecting their performance. Different switch types may require different lubricants, so refer to the manufacturer’s guidelines or consult a keyboard enthusiast community for recommendations.
- Apply the lubricant: Apply a small amount of lubricant to each switch using a brush or precision applicator. Be sure to distribute it evenly and sparingly to avoid excess lubrication, which can cause switches to become mushy or unresponsive. Focus on the slider mechanism and the points of contact within the switch.
- Press the switches: After applying the lubricant, press each switch multiple times to ensure the lubricant is evenly distributed and properly seated within the switch housing. This helps break in the lubricant and improves smoothness and quietness.
- Wipe away any excess: Use a clean cloth or cotton swab to remove any excess lubricant that may have seeped onto the keycaps or other parts of the keyboard. Excess lubricant can attract dust and debris, potentially causing more problems in the long run.
Keep in mind that not all switches require lubrication, and some switches come pre-lubricated from the factory. It’s best to research your particular switch type and model before attempting to lubricate it. Additionally, over-lubricating can negatively affect the switch’s feel and performance, so always apply lubricant sparingly.
By properly lubricating your mechanical key switches, you can reduce friction, minimize noise, and restore smooth, quiet typing to your mechanical keyboard.
Upgrading to a Higher-Quality Keyboard
If you’ve tried troubleshooting methods and are still unsatisfied with the noise produced by your keyboard, it may be time to consider upgrading to a higher-quality keyboard. Cheap or low-quality keyboards often lack effective noise-dampening mechanisms, leading to louder typing sounds and a less pleasant typing experience.
Here are some reasons why upgrading to a higher-quality keyboard can be beneficial:
- Noise-dampening features: High-quality keyboards often incorporate noise-dampening features to reduce the sound produced when typing. This can include rubberized keycaps, foam padding, or advanced switch designs that minimize acoustic output.
- Improved build quality: Higher-quality keyboards are often made with more robust materials and superior construction techniques. This results in a more solid and durable keyboard that is less likely to transmit vibrations and create noise.
- Enhanced typing experience: With upgraded keyboards, you can experience improved key travel, more satisfying tactile feedback, and better overall typing comfort. These factors can enhance your productivity and enjoyment, making the investment worthwhile.
- Customization options: Many high-quality keyboards offer customization options, such as adjustable key actuation points, macro programmability, and customizable RGB lighting. These features allow you to tailor the keyboard to your personal preferences and create a unique typing experience.
When looking to upgrade your keyboard, consider reputable brands known for producing high-quality keyboards with excellent noise reduction capabilities. Read product reviews and consider trying out different keyboards in person, if possible, to determine which one suits your needs and preferences.
While higher-quality keyboards may come at a higher price point, the investment can pay off in terms of durability, typing comfort, and reduced noise. If you spend significant time typing or gaming, a high-quality keyboard can greatly enhance your overall experience.
Correcting Typing Technique
Believe it or not, your own typing technique can contribute to the noise your keyboard makes. If you tend to type with excessive force, hit the keys at an angle, or bottom out the keys too forcefully, it can amplify the noise generated by the keys and switches.
Here are some tips to help you improve your typing technique and reduce keyboard noise:
- Type with a lighter touch: One of the most effective ways to reduce keyboard noise is to type with a lighter touch. Instead of exerting excessive force on the keys, try to press them gently and let the switches do the work. This can significantly reduce the noise produced by bottoming out the keys.
- Position your fingers correctly: Make sure your fingers are properly positioned and resting on the home row keys (ASDF for the left hand and JKL; for the right hand). This allows for more efficient and accurate typing, reducing the need to hit the keys at awkward angles.
- Practice proper finger placement: Instead of using your entire finger to press a key, focus on using the pads of your fingertips. This allows for more controlled and precise typing and can help minimize excess noise.
- Consider using a typing aid or software: There are typing aids and software programs available that can help you improve your typing technique and reduce excessive force when pressing the keys. These tools can provide feedback and guidance to help you develop a lighter touch and reduce keyboard noise.
It’s important to be aware of your typing habits and consciously make an effort to improve your technique. Practice typing with a lighter touch, paying attention to your finger placement and the force you exert on the keys. Over time, with practice and mindfulness, you can develop a more refined and quieter typing style.
Remember that it may take some time to break old habits and develop new ones. Be patient with yourself and give yourself time to adjust and improve your typing technique. With consistent effort, you can significantly reduce keyboard noise and create a quieter and more pleasant typing experience for yourself and those around you.
Conclusion
Keyboard noise can be a nuisance, but by identifying the common causes and implementing troubleshooting steps, you can reduce the noise and enjoy a quieter typing experience.
We explored several common causes of keyboard noise, including dirty or stuck keys, loose key caps, mechanical key switches, poor keyboard quality, and improper typing technique. Each of these factors can contribute to the noise your keyboard produces when typing.
If you’re experiencing keyboard noise, try cleaning the keyboard to remove any dirt or debris. Reattaching loose key caps can also help eliminate rattling or wobbling keys. Lubricating mechanical key switches can provide smoother movement and reduce friction, resulting in quieter typing. In some cases, upgrading to a higher-quality keyboard can significantly reduce noise levels, thanks to noise-dampening features and improved build quality. Lastly, paying attention to your typing technique and practicing a lighter touch can also minimize keyboard noise.
Remember that not all solutions may apply to your specific situation, so feel free to experiment and find the best combination that works for you. The goal is to create a typing experience that is not only productive but also comfortable and quiet.
By troubleshooting the noise issue and implementing these steps, you can achieve a quieter keyboard and enjoy a more peaceful typing environment. So, go ahead, take action, and reclaim your quiet and enjoyable typing experience!