Introduction
Welcome to Splitwise, the ultimate app for easy bill management and expense tracking. If you often find yourself struggling to keep track of shared expenses with friends, roommates, or colleagues, Splitwise is here to simplify and streamline the process. With Splitwise, you can effortlessly split bills, keep a tab on who owes what, and stay on top of your finances.
Splitwise is available as a mobile app for both iOS and Android devices, making it convenient to use on the go. Whether you’re organizing a group trip, splitting rent with your roommates, or sharing expenses for a dinner out, Splitwise has got you covered.
In this article, we will guide you through the step-by-step process of adding a bill in Splitwise. By following these instructions, you’ll be able to easily record and manage your shared expenses, ensuring that everyone pays their fair share.
So, without further ado, let’s dive into the world of Splitwise and learn how to add a bill!
Step 1: Download and Install Splitwise App
To get started with Splitwise, the first thing you need to do is download and install the Splitwise app on your smartphone. Splitwise is available for free on both the App Store for iOS devices and the Google Play Store for Android devices.
To download and install the Splitwise app, follow these simple steps:
- Open the App Store or Google Play Store on your smartphone.
- Search for “Splitwise” in the search bar.
- Tap on the Splitwise app from the search results.
- Tap the “Install” or “Get” button to begin the installation process.
- Wait for the app to download and install on your device. This may take a few moments, depending on your internet connection.
- Once the installation is complete, you’ll find the Splitwise app icon on your home screen or app drawer.
Now that you have successfully downloaded and installed the Splitwise app, you’re ready to set up your account and start managing your bills and expenses effortlessly. Proceed to the next step to learn how to create a Splitwise account.
Step 2: Set Up a Splitwise Account
Before you can start using Splitwise to manage your bills and expenses, you’ll need to set up an account. Setting up a Splitwise account is quick and easy. Just follow these steps:
- Open the Splitwise app on your smartphone.
- Tap on the “Sign Up” or “Create Account” button to begin.
- Enter your email address or phone number and tap “Next”.
- Create a strong and secure password for your account.
- You can also choose to sign up using your Google or Facebook account for a quicker registration process.
- Read and accept the terms of service and privacy policy.
- Tap on the “Sign Up” or “Create Account” button to complete the registration.
Once you have successfully set up your Splitwise account, you’ll have access to all the features and functionalities of the app. You can now proceed to the next step to learn how to create a new group in Splitwise.
Step 3: Creating a New Group
Creating a new group in Splitwise allows you to organize and manage bills and expenses with specific individuals. This is especially useful when you’re sharing expenses with a particular group of people, such as roommates, travel companions, or colleagues. Follow these steps to create a new group:
- Open the Splitwise app on your smartphone.
- Tap on the “Groups” tab at the bottom of the screen.
- Tap on the “New Group” button, usually represented by a plus (+) icon.
- Give your group a name that accurately represents the shared expenses.
- Invite participants to the group by adding their email addresses or phone numbers.
- Optionally, you can also set the group’s privacy settings to either private or public. In a private group, only invited members can view and contribute to the expenses.
- Tap on the “Create” or “Save” button to create the group.
Once the group is created, you can easily add bills and expenses that will be shared among the group members. Now that you have successfully created a group, let’s move on to the next step to learn how to add a new bill to the group.
Step 4: Adding a New Bill
Now that you have created a group in Splitwise, you can start adding bills and expenses. Follow these steps to add a new bill:
- Open the Splitwise app on your smartphone.
- Tap on the group in which you want to add the bill.
- On the group page, you’ll find a “Add a Bill” or “+” button. Tap on it.
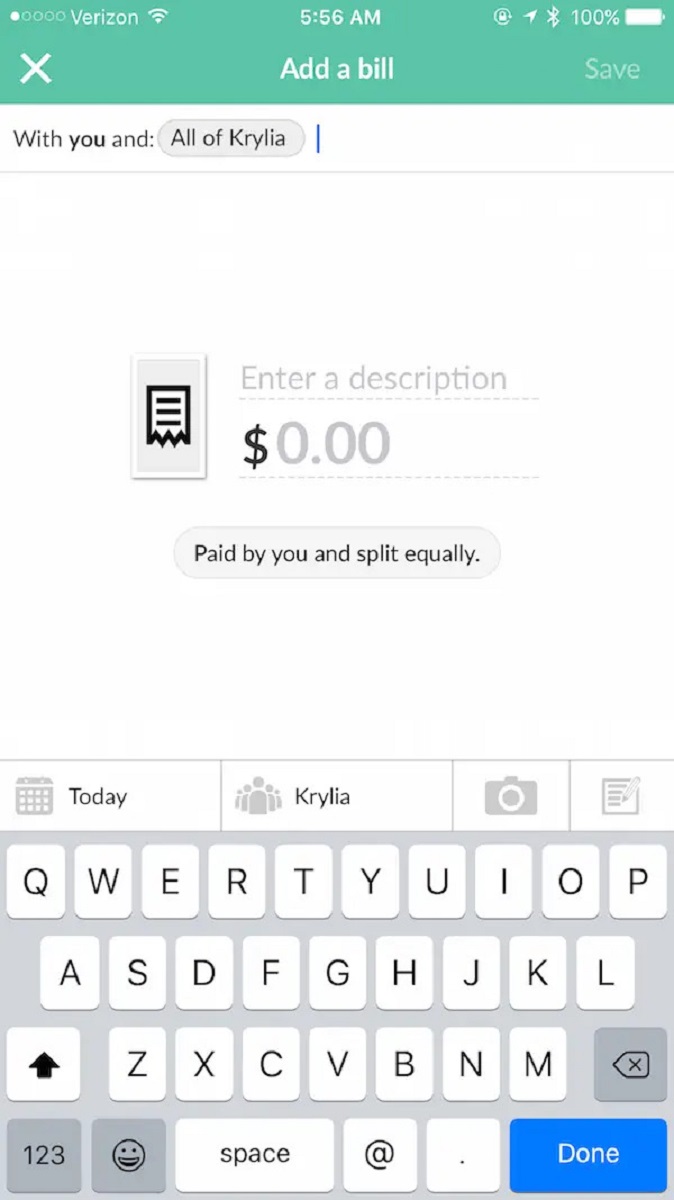
- Enter the details of the bill, such as the bill name, total amount, and date.
- You can also choose to split the bill equally among all participants or manually specify the amount each person owes.
- Specify whether the bill is for a specific category, such as groceries, rent, utilities, or any custom category.
- Optionally, you can add additional information, such as any notes, attachments, or memos related to the bill.
- Tap on the “Save” or “Done” button to add the bill.
By adding the bill, Splitwise will automatically calculate and update the individual balances of each participant based on their share of the bill. This ensures that everyone has a clear view of their oweing and can keep track of their expenses accurately. Now that you have added a new bill, let’s move on to the next step to learn how to select the participants for the bill.
Step 5: Selecting Participants
After adding a new bill in Splitwise, it’s important to specify the participants who are involved in that particular expense. This helps in accurately splitting and tracking the expenses among the group members. Follow these steps to select participants for a bill:
- Open the Splitwise app on your smartphone.
- Go to the group in which you added the bill.
- Tap on the specific bill to edit or view its details.
- On the bill page, you’ll find an option to select participants. Tap on it.
- A list of group members will be displayed. Select the individuals who are involved in that particular expense.
- If all group members are involved, you can choose the “Select All” option.
- Tap on the “Save” or “Done” button to save the selected participants.
By selecting the participants for a bill, Splitwise ensures that only those individuals are responsible for paying their respective portions. It simplifies the process of splitting expenses and keeps track of each person’s share. Now that you have selected the participants, let’s move on to the next step to learn how to enter the bill details.
Step 6: Entering Bill Details
Once you have selected the participants for a bill in Splitwise, it’s time to enter the specific details of the expense. This includes providing information about the bill itself, such as the name, amount, date, and any additional notes. Follow these steps to enter the bill details:
- Open the Splitwise app on your smartphone.
- Navigate to the group where you added the bill.
- Tap on the specific bill to edit or view its details.
- You will find fields to enter the bill name, total amount, and date of the expense. Fill in these details accordingly.
- If there are any additional notes or comments related to the bill, you can enter them in the provided section.
- Make sure to double-check the accuracy of the bill details before proceeding.
- Tap on the “Save” or “Done” button to save the entered bill details.
By entering the bill details accurately, Splitwise ensures that everyone has a clear understanding of the expense and can keep track of their respective shares. Now that you have entered the bill details, let’s move on to the next step to learn how to split the bill among the participants.
Step 7: Splitting the Bill
Now that you have entered the details of the bill in Splitwise, it’s time to split the expense among the participants. Splitwise offers various options for splitting the bill, ensuring that each individual’s share is calculated accurately. Follow these steps to split the bill:
- Open the Splitwise app on your smartphone.
- Go to the group where you added the bill.
- Tap on the specific bill to edit or view its details.
- Scroll down to the section where the splitting options are available.
- Choose the appropriate splitting method based on your preference and the nature of the expense.
- You can select “Split Equally” to divide the bill equally among all participants, or manually specify the amount each person owes by selecting “Split by Exact Amounts”.
- Alternatively, Splitwise also offers options such as “Split by Percentages”, “Split by Shares”, and “Split Unequally” for more precise divisions.
- Once you have selected the desired splitting method, Splitwise will automatically calculate and distribute the amounts accordingly.
- Review the split bill amounts to ensure they are accurate.
- Tap on the “Save” or “Done” button to save the splitting details.
By splitting the bill in Splitwise, you can ensure that each participant knows their exact share and can easily keep track of their respective expenses. Now that you have split the bill among the participants, let’s move on to the next step to learn how to add any notes or attachments to the bill.
Step 8: Adding Notes or Attachments
Adding notes or attachments to a bill in Splitwise can provide additional context and details about the expense. This can be helpful for participants to understand the bill better or to keep important information related to the expense. Follow these steps to add notes or attachments to a bill:
- Open the Splitwise app on your smartphone.
- Navigate to the group where you added the bill.
- Tap on the specific bill to edit or view its details.
- Scroll down to the section where you can add notes or attachments.
- Tap on the “Add Notes” or “Add Attachments” option, depending on what you want to include.
- If you want to add notes, enter any relevant information or comments regarding the bill.
- If you want to attach files, such as receipts or invoices, you can either take a photo using your device’s camera or choose from existing files.
- Review the notes or attachments to ensure they are accurate and relevant.
- Tap on the “Save” or “Done” button to save the added notes or attachments.
By adding notes or attachments to a bill in Splitwise, you can provide more detailed information or evidence of the expense, making it easier for participants to reference and understand. Now that you have added any necessary notes or attachments, let’s proceed to the final step to learn how to submit and finalize the bill.
Step 9: Submitting and Finalizing the Bill
After adding all the necessary details, splitting the bill, and adding any notes or attachments, it’s time to submit and finalize the bill in Splitwise. Follow these steps to complete this process:
- Open the Splitwise app on your smartphone.
- Go to the group where you added the bill.
- Tap on the specific bill to edit or view its details.
- Review all the entered information, including the bill details, splitting method, and any added notes or attachments.
- If everything looks correct, tap on the “Submit” or “Finalize” button.
- Confirm your action to submit and finalize the bill.
By submitting and finalizing the bill, you are essentially marking it as complete and no further changes can be made to the bill details or splitting. This helps in maintaining a record of the expense and ensures that all participants have a clear view of the finalized bill. You can always refer back to the bill in Splitwise for reference or to settle any outstanding balances. Congratulations! You have now successfully added, split, and finalized a bill in Splitwise.