Introduction
Welcome to the exciting world of acoustic guitar playing! Whether you’ve just picked up a guitar for the first time or have been playing for a while, this article will guide you on your journey to becoming a skilled guitarist. The acoustic guitar is a versatile instrument that can be used to play a wide range of musical styles, from folk and country to rock and pop. Learning to play the guitar can be a rewarding and fulfilling experience, as it allows you to express yourself creatively and connect with others through music.
Before we dive into the specifics of playing the acoustic guitar, it’s important to develop a basic understanding of the instrument itself. Acoustic guitars are typically made of wood and feature a hollow body, which produces a rich and resonant sound. They have six strings that are tuned to different pitches, and playing the guitar involves using your fingers to press down on the strings at different positions to create different notes.
Throughout this article, we will cover various aspects of acoustic guitar playing, including tuning the guitar, mastering essential chords, strumming techniques, fingerpicking patterns, reading guitar tabs, and practicing effectively. We will also provide you with a list of popular songs that are perfect for beginners to practice.
While learning to play the guitar may seem daunting at first, remember that practice and patience are key. Rome wasn’t built in a day, and neither is guitar playing mastery. Take your time to absorb and practice each technique, and soon enough, you’ll be playing your favorite songs with confidence and enthusiasm.
This article is designed to provide you with a solid foundation in acoustic guitar playing, and it is important to remember that there is always more to learn. As you progress on your musical journey, you may discover new genres, techniques, and styles that capture your interest. There is a wealth of online resources available to further your learning, and we will provide some recommendations at the end of this article. So, grab your guitar, get ready to strum, and let’s embark on this exciting adventure together!
Getting to Know Your Acoustic Guitar
Before you can start playing the acoustic guitar, it’s important to familiarize yourself with its parts and how they work together. This knowledge will not only enhance your understanding of the instrument but also help you maintain it in good condition. Let’s dive into the key components of an acoustic guitar:
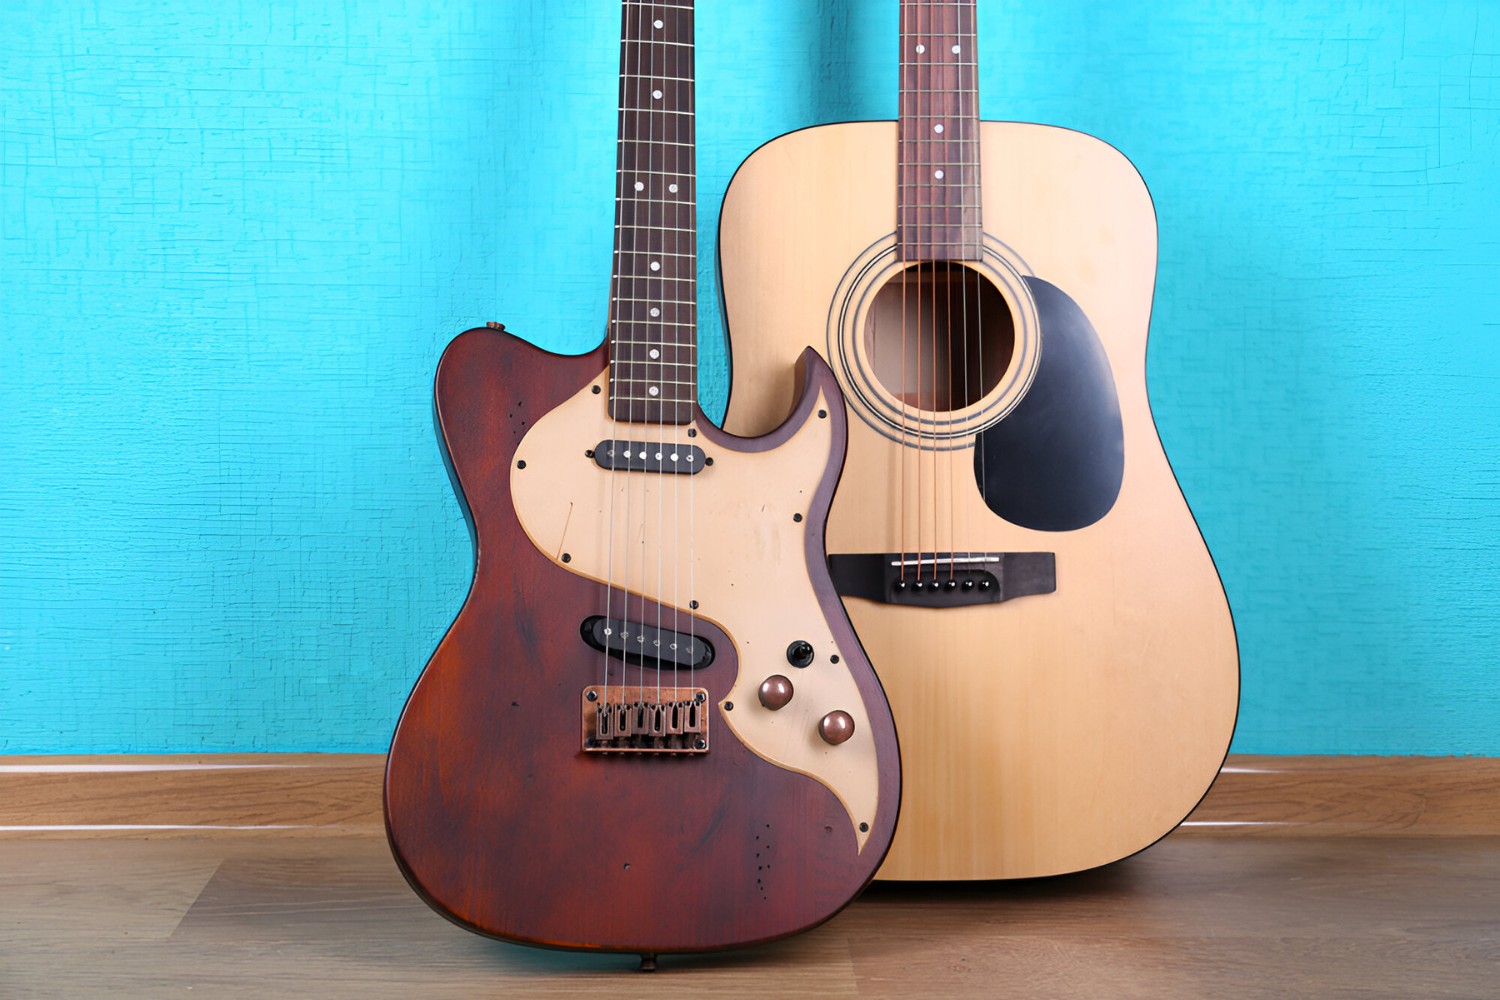
1. Body: The body is the main part of the guitar and is typically made from different types of wood, such as spruce, mahogany, or rosewood. The shape and size of the body influence the sound produced by the guitar. Common body shapes include dreadnought, concert, auditorium, and parlor.
2. Soundhole: Located on the top of the body, the soundhole allows the sound to resonate and escape from the guitar. It contributes to the volume and tone of the instrument.
3. Neck: The neck is the long, slender part of the guitar that houses the frets and fingerboard. It connects to the body at the guitar’s body joint, also known as the neck joint.
4. Frets and Fingerboard: Frets are the metal strips embedded in the fingerboard, which is usually made of wood. Pressing down on the strings against the appropriate frets produces different notes and pitches.
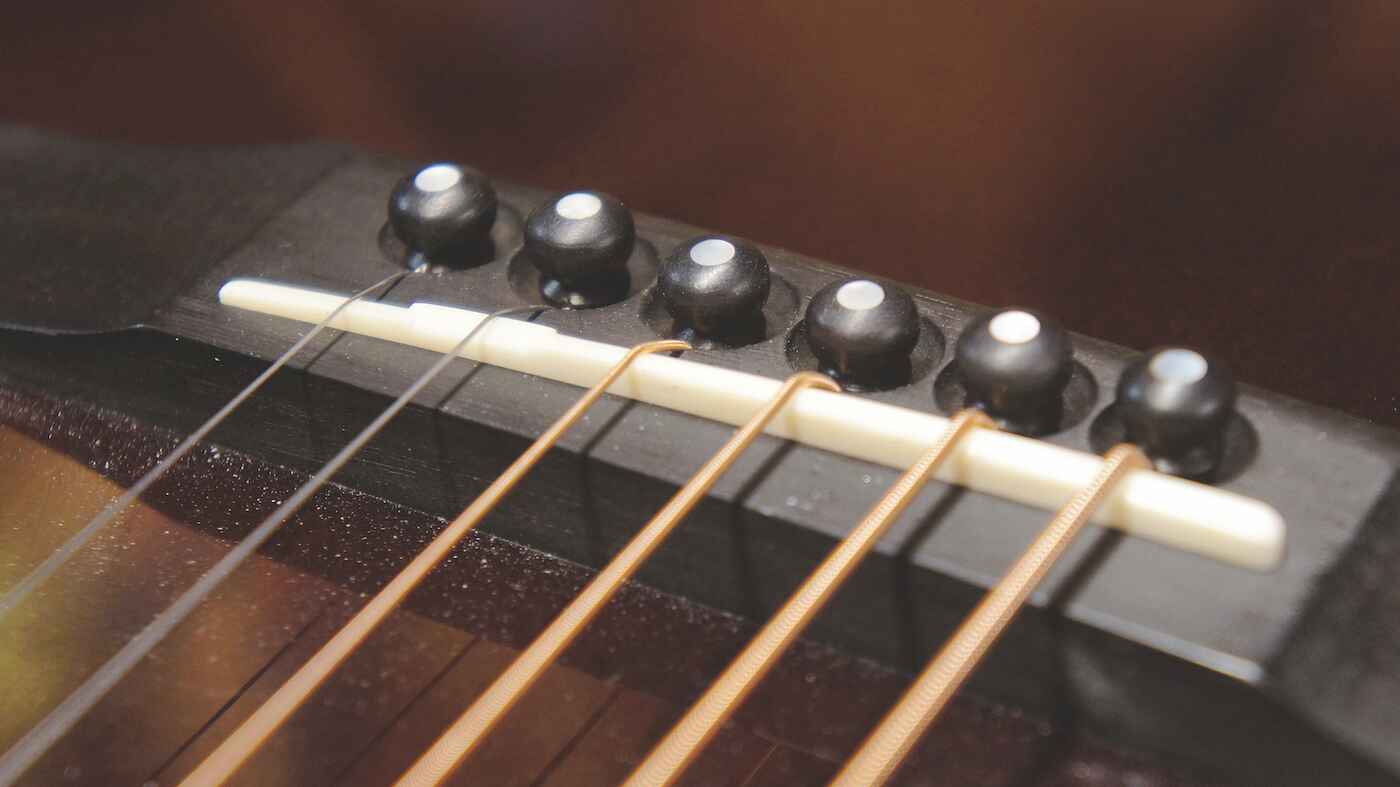
5. Headstock: The headstock is located at the end of the neck and contains the tuning pegs. These pegs, also known as machine heads or tuners, allow you to adjust the tension of each string, determining their pitch.
6. Strings: Acoustic guitars typically have six strings, commonly tuned to E-A-D-G-B-E from the thickest to the thinnest string. They can be made of steel or nylon. Thinner strings produce higher-pitched notes, while thicker strings produce lower-pitched notes.
Now that you are familiar with the main components of an acoustic guitar, it’s time to get comfortable holding the instrument. Sit with a straight back and rest the guitar on your right leg if you are right-handed (left leg for left-handed players). Place your forearm on the guitar’s body and position your hand comfortably around the neck.
Remember, taking the time to familiarize yourself with your guitar’s anatomy will greatly benefit your playing. It will give you a deeper understanding of how the instrument works and enable you to make any necessary adjustments or repairs. So, get to know your acoustic guitar inside and out, and let’s move on to the next step in your guitar playing journey!
Understanding Guitar Strings and Tuning
Guitar strings and tuning are fundamental aspects of playing the acoustic guitar. Understanding how strings work and how to keep your guitar in tune is essential for producing clear, harmonious sounds. Let’s dive into the world of guitar strings and tuning:
1. Types of Guitar Strings: Acoustic guitars typically use steel or nylon strings. Steel strings produce a bright, crisp sound and are commonly used in genres like rock, pop, and country. Nylon strings, also known as classical or Spanish guitar strings, offer a warm, mellow sound and are used in classical and folk music.
2. String Order and Tuning: Standard tuning for an acoustic guitar is E-A-D-G-B-E, starting from the thickest string (low E) to the thinnest string (high E). Remember, this is the standard tuning, but you can experiment with alternate tunings to achieve unique sounds and play specific songs or styles.
3. Tuning Methods: There are a few different methods you can use to tune your guitar:
- Tuning by Ear: With this method, you tune the strings to match the sound of other reference pitches, such as a piano or another tuned guitar. This method requires a good ear for pitch and can be challenging for beginners.
- Tuning with a Tuner: Using an electronic tuner is highly recommended for beginners. These small devices detect the pitch played and indicate whether the string is in tune or needs adjustment. Simply pluck each string and adjust the tuning pegs until the tuner indicates the correct pitch.
- Tuning with Online Apps or Websites: If you don’t have access to a tuner, numerous online apps and websites offer free guitar tuners. These tools use your device’s microphone to detect the pitch and guide you in tuning each string.
4. Regular Tuning Maintenance: It’s important to tune your guitar regularly, as strings can go out of tune due to temperature changes, playing, or simply over time. Make it a habit to check your tuning before every practice session or performance to ensure your guitar sounds its best.
Remember, tuning your guitar accurately is crucial for creating pleasant, in-tune music. Take your time to learn the string names, practice tuning, and always check your tuning regularly. With a well-tuned guitar, you’ll be ready to move on to the next step in your guitar playing journey!
Essential Guitar Chords for Beginners
Learning essential guitar chords is a foundational step for any aspiring guitarist. Chords are groups of notes played together, forming the backbone of countless songs. By mastering a few basic chords, you’ll be able to play a wide range of songs in various genres. Let’s explore some essential guitar chords for beginners:
1. Open Chords: Open chords are played in the first few frets of the guitar and utilize open strings. Here are some common open chords:
- C Major: Place your first finger on the B string, 1st fret. Strum from the A string.
- A Minor: Position your second finger on the D string, 2nd fret. Strum all strings except the low E string.
- G Major: Place your third finger on the low E string, 3rd fret. Strum from the low E string.
- E Major: Position your second and third fingers on the A and D strings, 2nd fret. Strum from the low E string.
- D Major: Place your first finger on the G string, 2nd fret, and your second finger on the high E string, 2nd fret. Strum from the D string.
2. Barre Chords: Barre chords involve placing a finger across all strings on a particular fret. These chords can be moved up and down the neck, allowing you to play in different keys. Here are two common barre chords:
- F Major: Use your index finger to bar all strings at the 1st fret and place your other fingers accordingly.
- B Minor: Bar all strings with your index finger at the 2nd fret and position your other fingers as needed.
3. Power Chords: Power chords are used in rock, punk, and metal genres and are played with just two or three notes. They create a powerful and driving sound. Here is an example:
- A5 Power Chord: Place your first finger on the A string, 5th fret, and your third finger on the D and G strings, both on the 7th fret. Strum from the A string.
These are just a few of the essential guitar chords for beginners. Practice switching between chords and strumming them with a comfortable rhythm. Remember to start slow and gradually increase your speed as you become more comfortable. Regular practice will help build muscle memory and enable you to transition smoothly between chords.
As you progress, you’ll also encounter barre chords in different positions and more complex chord shapes. But by mastering these essential chords, you’ll have a solid foundation to build upon and start playing your favorite songs in no time!
Strumming Techniques and Rhythm
Once you’ve become comfortable with playing chords, it’s time to focus on your strumming techniques and rhythm. Strumming is the act of brushing or plucking the strings with a pick or your fingers to produce sound. Rhythm refers to the timing and pattern in which you strum the guitar. By mastering different strumming techniques and developing a sense of rhythm, you’ll add dynamics and life to your playing. Let’s explore strumming techniques and rhythm:
1. Downstrokes and Upstrokes: The two main strumming directions are downstrokes and upstrokes. Downstrokes involve strumming the strings while moving the pick or your fingers downward. Upstrokes are the opposite, strumming the strings while moving the pick or your fingers upward. Practice strumming comfortably in both directions, ensuring a consistent sound and rhythm.
2. Strumming Patterns: Strumming patterns are specific sequences of downstrokes and upstrokes that create rhythm in your playing. Beginners can start with simple patterns such as “down, down, up, up, down” (also known as the “basic strum pattern”) or “down, up, down, up.” Experiment with different patterns and find ones that complement the songs you’re playing.
3. Dynamics: Dynamics refer to the variation in volume and intensity of your strumming. Experiment with playing softly (pianissimo) and gradually increasing the volume (crescendo) or starting loud and decreasing the volume (diminuendo). These variations in dynamics add expressiveness and interest to your playing.
4. Palm Muting: Palm muting is a technique used to create a muted or staccato sound. To palm mute, lightly rest the edge of your picking hand’s palm on the strings near the bridge while strumming. This technique is commonly used in rock, punk, and metal genres to create a percussive effect.
5. Strumming Patterns for Different Styles: Each music style has its own unique strumming patterns. For example, folk music often incorporates simple downstrokes in a consistent rhythm, while reggae music utilizes off-beat upstrokes. Explore different genres and study their characteristic strumming patterns to expand your repertoire.
It’s important to start slow and focus on accuracy as you practice your strumming. Use a metronome or drum machine to develop a sense of timing and maintain a steady rhythm. Gradually increase the speed as you become more comfortable and proficient.
Don’t forget to listen to recordings of your favorite songs and pay attention to the strumming patterns and dynamics used. Try to replicate the rhythm and feel of the original recordings, and eventually, you’ll be able to develop your unique strumming style.
Remember, mastering strumming techniques and rhythm is an ongoing process that requires practice and dedication. Take your time and enjoy the journey as you unlock the potential to create beautiful music with your acoustic guitar!
Basic Fingerpicking Patterns
Fingerpicking is a technique that allows you to play individual notes or chords using your fingers instead of a pick. It adds depth, complexity, and a sense of melody to your guitar playing. Developing basic fingerpicking patterns will enhance your versatility as a guitarist and open up a world of possibilities. Let’s explore some fundamental fingerpicking patterns:
1. Travis Picking: Travis picking is a common fingerpicking pattern used in folk, country, and blues music. It involves alternating between the thumb and fingers to create a rhythmic bass line and melody simultaneously. Start with the following steps:
- Place your thumb on the 4th, 5th, or 6th string (E, A, or D string).
- Use your index, middle, and ring fingers to pluck the higher strings (G, B, and high E strings) in a pattern. You can start with the index finger on the G string, middle finger on the B string, and ring finger on the high E string.
- Practice slowly and gradually increase your speed, ensuring a steady rhythm between the thumb and fingers.
2. Pima Pattern: The Pima pattern is another widely used fingerpicking technique. It involves assigning each finger a designated string to pluck. Here’s the breakdown:
- P – Pluck the 4th (D) string with your thumb.
- I – Pluck the 3rd (G) string with your index finger.
- M – Pluck the 2nd (B) string with your middle finger.
- A – Pluck the 1st (high E) string with your ring finger.
Practice moving systematically through the strings, maintaining a consistent rhythm. Once you feel comfortable, try incorporating chords and melodies into your fingerpicking to create more complex arrangements.
3. Arpeggios: Arpeggios involve playing the individual notes of a chord in a sequence, creating a flowing and melodic sound. Start by playing a basic chord, and then pluck the strings individually from lowest to highest or vice versa. Experiment with different finger combinations and rhythmic patterns to create your unique arpeggios.
Remember, fingerpicking requires patience and practice to develop the coordination and dexterity needed to execute the patterns smoothly. Start slowly and gradually increase your speed as you become more comfortable. It’s essential to focus on accuracy and maintaining a steady rhythm.
Listen to recordings of fingerstyle guitarists to gain inspiration and insight into different fingerpicking styles. Study their techniques and try to incorporate them into your practice routine. As you become more proficient, you can explore more advanced fingerpicking patterns and even create your fingerstyle arrangements.
Enjoy the journey of discovering the beautiful world of fingerpicking and the unique sounds you can create with your acoustic guitar!
Learning to Read Guitar Tabs
Guitar tabs, or tablature, are a popular form of notation used by guitarists to visually represent songs and music. Unlike traditional sheet music, guitar tabs provide a simplified representation of the guitar fretboard, making it easier to learn songs and play them on the guitar. Let’s dive into the basics of reading guitar tabs:
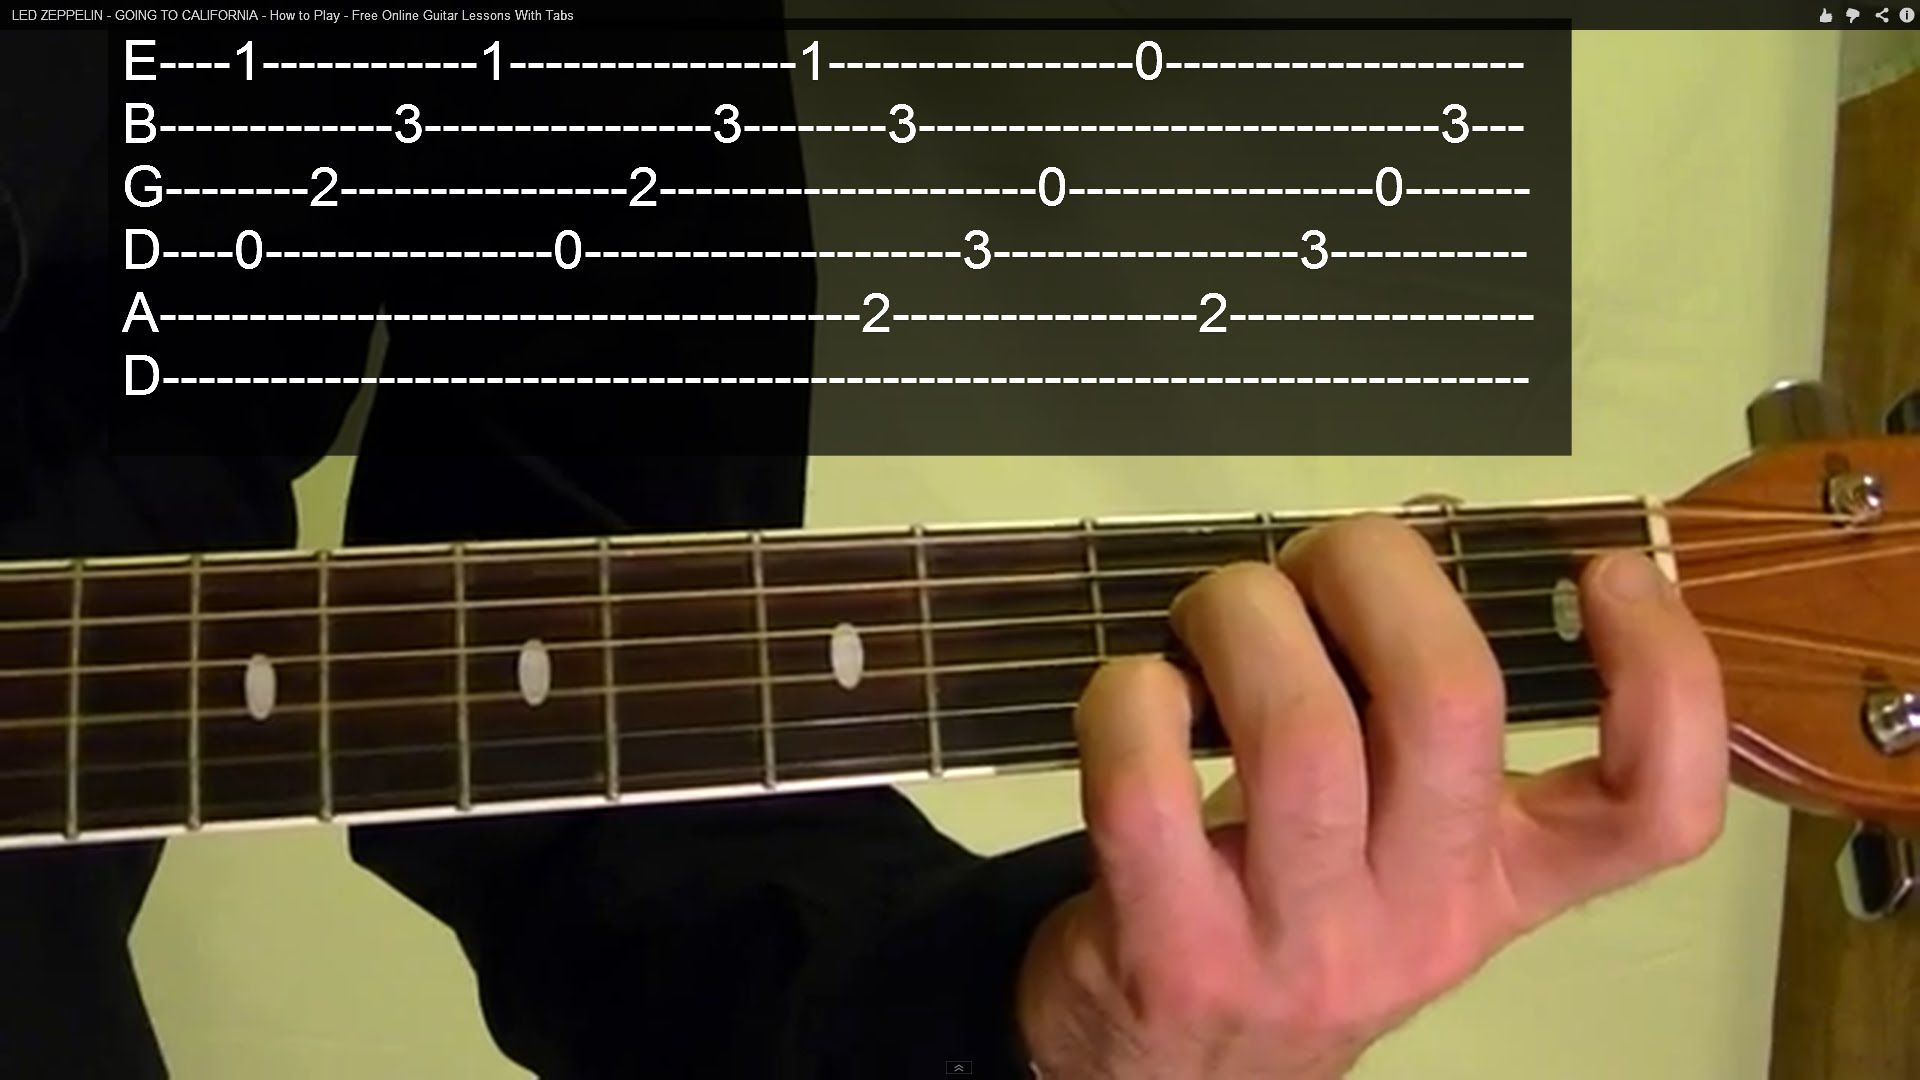
1. Structure of Guitar Tabs: Guitar tabs consist of horizontal lines representing the guitar strings, and numbers placed on these lines indicate which fret to play on that particular string. The top line represents the thinnest string (high E), while the bottom line represents the thickest string (low E).
2. Fret Numbers: Fret numbers on guitar tabs indicate the position where you should place your finger to produce the desired note. The number 0 signifies an open string, played without placing your finger on any fret. Numbers higher than 0 indicate the fret number where you should press down on that string.
3. String Plucking Direction: Some tabs may have additional symbols or letters to indicate the direction of plucking or picking. For example, a downward arrow (↘) indicates a downward strum or picking, and an upward arrow (↗) indicates an upward strum or picking. These symbols provide guidance on how to play the notes.
4. Timing and Rhythm: Guitar tabs typically don’t provide specific information about timing and rhythm. To understand the rhythm of a song, you can listen to the original recording or refer to other resources that provide rhythm notation, such as sheet music or chord charts.
5. Chords in Guitar Tabs: Chords are often represented in guitar tabs by a series of numbers stacked vertically. Each number indicates the fret to press on the corresponding string. For example, the tab for a C major chord may look like this:
e|---0---|
B|---1---|
G|---0---|
D|---2---|
A|---3---|
E|---x---|
This tab indicates that you need to play the third fret on the A string, second fret on the D string, first fret on the B string, and open (unfretted) strings for the rest.
Remember, guitar tabs are a valuable resource for learning songs, but they may not always capture the finer details of rhythm and timing. Supplement your tab reading with your ears by listening to the original recordings to ensure accuracy in your playing.
As you become more familiar with guitar tabs, you’ll develop a better understanding of how to read them quickly and efficiently. Practice reading different tabs and gradually build up your repertoire of songs.
Utilize online resources or apps that provide a vast collection of guitar tabs for songs in various genres. This will allow you to explore different artists and expand your musical horizons.
Enjoy the process of learning to read guitar tabs and dive into the world of songs and melodies that you can play on your acoustic guitar!
Popular Songs for Beginners
One of the most exciting aspects of learning to play the acoustic guitar is being able to strum and sing along to popular songs. Fortunately, there are plenty of songs that are ideal for beginners, allowing you to practice your chords, strumming, and fingerpicking techniques. Here are a few popular songs that are perfect for beginners to start playing:
1. “Wonderwall” by Oasis: This iconic song features simple open chords and a memorable strumming pattern. It’s a crowd-pleaser and a great way to practice your strumming accuracy.
2. “Horse with No Name” by America: This classic tune uses only two chords throughout the entire song (Em and D6/9). It’s an excellent choice for beginners looking to build their chord transitioning skills.
3. “Knockin’ on Heaven’s Door” by Bob Dylan: This timeless song uses basic chords (G, D, Am, and C) and a straightforward strumming pattern. It’s a fantastic song for practicing your chord changes and developing a solid sense of rhythm.
4. “Stand by Me” by Ben E. King: This soulful classic involves a simple four-chord progression (C, Am, F, G) that repeats throughout the song. It’s an excellent opportunity to work on your strumming and singing simultaneously.
5. “House of the Rising Sun” by The Animals: This folk-inspired tune combines a fingerpicking pattern with basic open chords (Am, C, D, F, and E). It’s a captivating song that allows you to practice your fingerpicking skills and chord transitions.
6. “Let It Be” by The Beatles: This iconic ballad features straightforward open chords (C, G, Am, F), making it accessible for beginners. It’s a great choice for practicing both strumming and singing.
7. “Country Roads” by John Denver: This beloved folk-country anthem involves simple open chords (G, Em, D, and C). It’s a crowd-pleasing sing-along song that’s perfect for strumming and singing around a campfire.
Remember, the key to learning these songs and any others is to start slow and focus on accuracy. Take your time to master the chords and strumming patterns, and gradually increase your speed as you become more comfortable.
As you progress, you can challenge yourself by learning more complex songs and exploring different genres. The important thing is to enjoy the process and have fun while playing these popular songs!
Tips for Practicing Effectively
Practicing is an essential part of improving your skills as an acoustic guitarist. To make the most of your practice sessions, it’s important to approach them with focus, discipline, and a strategic mindset. Here are some tips to help you practice effectively:
1. Set Specific Goals: Determine what you want to achieve in each practice session. Whether it’s mastering a new chord, improving your strumming technique, or learning a particular song, setting specific goals helps you stay focused and motivated.
2. Establish a Routine: Consistency is key when it comes to practicing. Establish a regular practice routine that works for you, whether it’s daily, a few times a week, or whatever fits your schedule. Consistent practice will yield more significant progress over time.
3. Warm Up: Begin each practice session with warm-up exercises to loosen up your fingers and prepare your muscles. This can include simple finger stretches, chromatic finger exercises, or playing scales up and down the fretboard.
4. Break It Down: When learning a new song or a challenging technique, break it down into smaller parts. Practice each section slowly and accurately before gradually increasing your speed. Once you have mastered each part, piece them together to play the entire song or perform the complete technique.
5. Use a Metronome: A metronome is a valuable tool for developing accurate timing and rhythm. Practice with a metronome to keep your playing in time and gradually increase the tempo as you improve.
6. Record Yourself: Recording your practice sessions allows you to listen back and objectively evaluate your playing. It helps identify areas that need improvement and provides a benchmark to track your progress over time.
7. Focus on Problem Areas: Identify the challenging aspects of your playing and dedicate specific practice time to those areas. Whether it’s difficult chord transitions, complex fingerpicking patterns, or tricky strumming techniques, spending focused time on problem areas will help you overcome them more effectively.
8. Take Breaks: Practice sessions can be mentally and physically demanding. Take short breaks to rest and recharge so that you can maintain focus throughout your practice session.
9. Practice with a Purpose: Don’t just mindlessly strum or play through songs. Practice with intention and actively engage with the material you are working on. Concentrate on technique, accuracy, and musicality to make the most of your practice time.
10. Stay Motivated: Keeping your motivation and enthusiasm high is crucial for consistent practice. Set long-term goals, celebrate small milestones, and reward yourself when you achieve them. Seek inspiration from other guitarists, attend concerts, or find a guitar community for support and encouragement.
Remember, effective practice is about quality over quantity. Even short, focused practice sessions can yield great results. Embrace the process, be patient with yourself, and enjoy the journey of improving your skills as a guitarist!
Maintaining Your Acoustic Guitar
Taking care of your acoustic guitar is essential for preserving its playability, sound quality, and longevity. Regular maintenance ensures that your instrument stays in optimum condition. Here are some tips for effectively maintaining your acoustic guitar:
1. Keep it Clean: Wipe down your guitar after every use to remove dirt, sweat, and grime. Use a soft cloth or a guitar-specific cleaning product. Avoid applying any liquid directly to the guitar; instead, dampen the cloth slightly for cleaning.
2. Use Humidity Control: Acoustic guitars are sensitive to changes in humidity, which can cause the wood to warp or crack. Store your guitar in a humidity-controlled environment, ideally between 40-50% humidity. Consider using a guitar humidifier or dehumidifier, especially in extreme climates.
3. Protect from Extreme Temperatures and Sunlight: Avoid exposing your guitar to extreme heat or cold, such as leaving it in a car on a hot day or near a heater. Additionally, prolonged exposure to direct sunlight can damage the finish and the wood. Store your guitar in a temperature-controlled area.
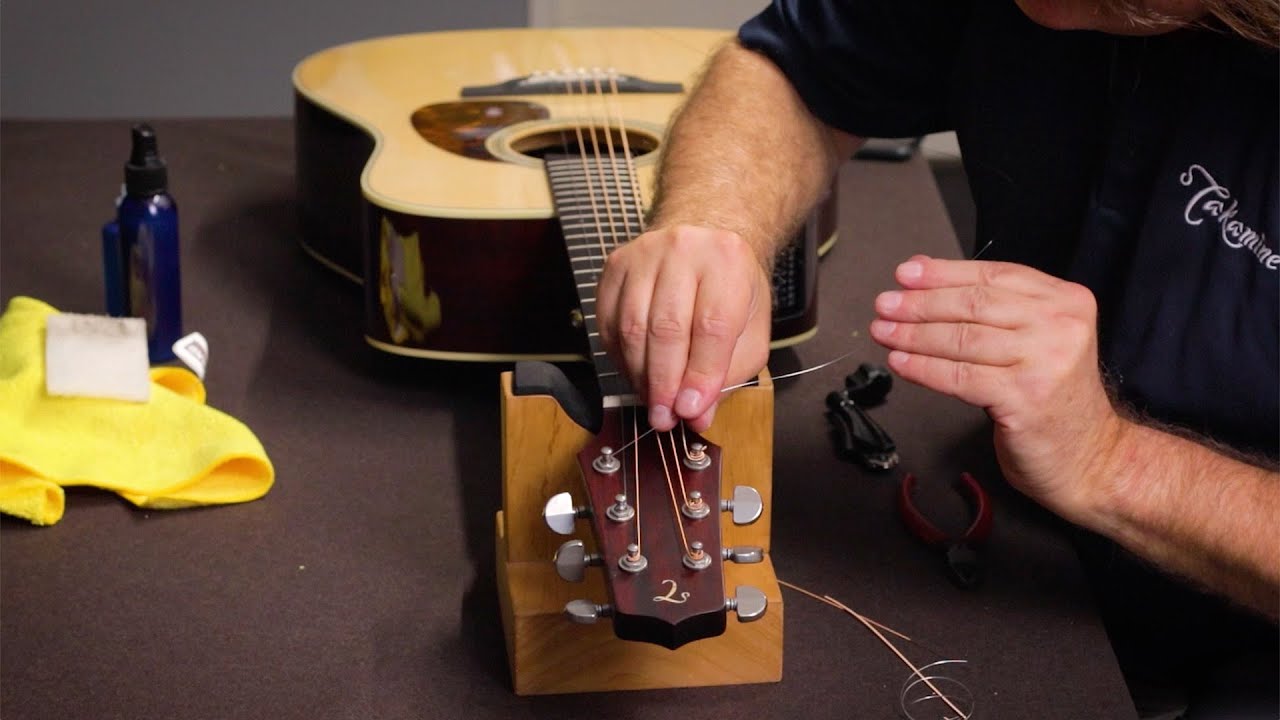
4. Change Strings Regularly: Strings lose their tone and intonation over time due to dirt buildup and natural wear. Change your guitar strings regularly, approximately every 1-3 months, or whenever they start to sound dull or feel gritty. This will help maintain good playability and sound quality.
5. Adjust the Truss Rod if Needed: The truss rod is a metal rod inside the neck of the guitar that helps counteract the tension of the strings. If you notice significant changes in the neck’s curvature or experience high string action, consult a professional guitar technician to adjust the truss rod properly.
6. Keep Hardware in Good Condition: Regularly inspect the hardware on your guitar, such as the tuners, bridge, and saddle. Lubricate any moving parts with a small amount of guitar-specific lubricant, if necessary. Check for loose screws or other signs of damage and have them repaired promptly.
7. Use a Proper Gig Bag or Case: Invest in a high-quality gig bag or hardshell case to protect your guitar during transport and storage. Ensure that there is adequate padding inside to prevent any potential damage from bumps or falls.
8. Get Regular Professional Maintenance: Though you can handle basic maintenance, it’s beneficial to have your guitar professionally set up and inspected annually or as needed. An experienced technician can adjust the action, intonation, and other critical elements to optimize your guitar’s playability.
9. Be Gentle When Handling: When picking up or playing your guitar, handle it with care. Avoid excessive force or pressure on the neck, body, or headstock. Treat your guitar as a delicate instrument that requires gentle handling to avoid unnecessary stress or damage.
10. Play your Guitar Regularly: Lastly, playing your guitar regularly keeps it in good shape. The vibrations from playing help keep the wood and components healthy. Plus, regular playing improves your skills and musicality.
By following these maintenance tips and treating your acoustic guitar with proper care and attention, you’ll ensure its longevity and continue to enjoy its beautiful sound for years to come.
Recommended Online Resources for Further Learning
As you continue your journey of learning to play the acoustic guitar, there are numerous online resources available to enhance your skills, expand your knowledge, and connect with a vibrant community of guitarists. Here are some recommended online resources for further learning:
1. YouTube: YouTube is a treasure trove of guitar tutorials, lessons, and performances. You can find channels dedicated to teaching guitar techniques, chord progressions, song tutorials, and even full courses by renowned guitarists. Explore channels like JustinGuitar, Marty Music, and GuitarLessons.com to get started.
2. Online Lesson Platforms: Websites like Guitar Tricks, JamPlay, and Fender Play offer structured lesson programs for guitarists of all levels. These platforms provide a comprehensive range of video lessons, practice exercises, and interactive tools to enhance your learning experience.
3. Guitar Forums and Communities: Joining online guitar forums and communities is a great way to connect with fellow guitar enthusiasts, seek advice, and share your progress. Websites like Ultimate Guitar, Reddit’s r/Guitar community, and The Acoustic Guitar Forum provide platforms for discussions, song sharing, and valuable insights from experienced players.
4. Music Theory Websites: Understanding music theory is essential for advancing your guitar playing skills. Websites like musictheory.net and teoria.com offer comprehensive lessons and exercises on topics such as scales, chords, rhythm, and notation, helping you to develop a solid theoretical foundation.
5. Guitar Apps: Utilize guitar apps on your smartphone or tablet to enhance your learning experience. Apps like Yousician, Ultimate Guitar Tabs, and GuitarTuna provide interactive lessons, chord libraries, song tabs, tuners, and more, all at your fingertips.
6. Online Sheet Music Libraries: Websites like musescore.com and sheetmusicplus.com offer a vast collection of sheet music for guitar players. You can find tabs, chords, lead sheets, and full transcriptions of songs across various genres, allowing you to expand your repertoire and challenge yourself with new material.
7. Online Guitar Communities: Social media platforms like Instagram and Facebook host numerous guitar-related communities and pages where you can find inspiration, connect with other guitarists, and discover new techniques and styles. Follow guitarists, music schools, and guitar brands to stay updated with the latest trends in guitar playing.
8. Podcasts and Guitar Blogs: Tune into guitar-oriented podcasts like “The Guitar Hour” or “Guitar Geekery” to listen to interviews, discussions, and tips from expert guitarists. Additionally, there are many guitar blogs and websites, such as GuitarWorld and Premier Guitar, that feature articles, reviews, and tutorials to keep you informed and inspired.
9. Online Guitar Courses: Renowned guitarists and teachers offer online courses that cover a wide range of topics and skill levels. Websites like Udemy, Coursera, and TrueFire provide access to courses taught by professionals in various styles and genres.
10. Online Guitar Tab Databases: Websites like ultimate-guitar.com and songsterr.com offer vast databases of guitar tabs and chords for a wide variety of songs. Whether you’re looking for popular hits or deep cuts, these websites provide accurate transcriptions to help you learn and play your favorite songs.
These online resources offer a wealth of information, tutorials, and inspiration to support your guitar learning journey. Explore different platforms, find what resonates with you, and continue to expand your skills and musicality through these valuable online resources!
Conclusion
Congratulations on embarking on your journey to learn the acoustic guitar! By following the tips and utilizing the recommended online resources in this article, you’ll be well-equipped to develop your skills, improve your technique, and expand your musical repertoire.
Remember that learning to play the guitar is a process that requires patience, dedication, and consistent practice. Be sure to set specific goals, establish a routine, and practice with purpose. Take advantage of the various online resources available to enhance your learning experience and connect with a supportive community of guitarists.
As you navigate through the different sections of this article, from getting to know your guitar, understanding chords and strumming techniques, to reading guitar tabs and maintaining your instrument, embrace the learning process and enjoy the music-making journey.
Continue to push yourself out of your comfort zone, explore new genres and techniques, and challenge yourself with new songs. Remember that progress may not always be linear, but with persistence, you’ll see improvement over time.
Keep in mind that while online resources can provide valuable guidance, it’s equally important to seek offline opportunities to play with other musicians, attend concerts, and even take lessons from skilled guitar instructors. This real-world experience will further enrich your musicality and provide practical insights into the art of guitar playing.
So, grab your acoustic guitar, practice regularly, and enjoy the wonderful journey of becoming a skilled guitarist. Whether you aspire to play for your own enjoyment or dream of performing in front of an audience, the acoustic guitar has the power to bring joy, creativity, and a sense of fulfillment into your life.
Remember, you have the potential to create beautiful music with your acoustic guitar. Embrace the challenges, celebrate the milestones, and never stop exploring the vast possibilities that lie ahead on your musical journey.