Introduction
Welcome to this step-by-step guide on how to repair a crack on an acoustic guitar. As a guitar enthusiast, you know how distressing it can be to discover a crack on your beloved instrument. Cracks not only affect the aesthetics but can also impact the guitar’s structural integrity and sound quality. However, fret not! With some patience, basic tools, and the right techniques, you can fix the crack and restore your guitar to its former glory.
Before we dive into the repair process, it’s important to mention that repairing a crack requires some level of skill and experience. If you’re not comfortable with DIY repairs or if the crack is severe, it’s best to seek professional assistance from a luthier. However, if you’re confident in your abilities, this guide will provide you with the necessary steps to tackle minor to moderate cracks.
In this article, we will walk you through the entire repair process, from assessing the damage to the finishing touches. We’ll cover the materials you’ll need, the steps to fix the crack, and additional tips to ensure a successful repair.
Before we get started, keep in mind that each crack is unique, and the specific steps and techniques may vary depending on the location and severity of the damage. It’s important to approach the repair process with patience, attention to detail, and a steady hand. So, without further ado, let’s jump into repairing that crack and getting your guitar back in top shape!
Materials Needed
Before you begin the repair process, it’s important to gather all the necessary materials and tools. Having everything prepared in advance will ensure a smooth and efficient repair. Here are the materials you’ll need:
- Wood glue: Look for a high-quality wood glue that is specifically designed for instrument repairs. Make sure it’s suitable for the type of wood used in your guitar.
- Sanding materials: Prepare a range of sandpapers with different grits (e.g., 120, 220, and 320 grit) for smoothing and refinishing the repaired area.
- Clamps: You’ll need clamps to hold the cracked area together while the glue dries. Choose clamps that are appropriate in size for your guitar.
- Shop towels or rags: These will come in handy for cleaning and wiping away excess glue during the repair process.
- Masking tape: Use masking tape to protect the surrounding areas of the crack during the repair and prevent any accidental scratches or damage.
- Small brush or applicator: This will be needed to evenly spread the wood glue along the crack.
- Fine-tip syringe (optional): If the crack is narrow and difficult to access, a fine-tip syringe can help inject the glue into the crack more precisely.
- Microfiber cloth: Use a soft microfiber cloth to wipe down the guitar and remove any debris or dust before and after the repair.
- Finishing materials: Depending on the finish of your guitar, you may need materials such as clear lacquer, stain, or polish for the final touch-up after the repair is complete.
It’s essential to have these materials readily available before starting the repair process. Having everything at hand will minimize interruptions and ensure you can complete the repair smoothly. Remember to work in a clean, well-lit area and take your time to execute each step with precision and care.
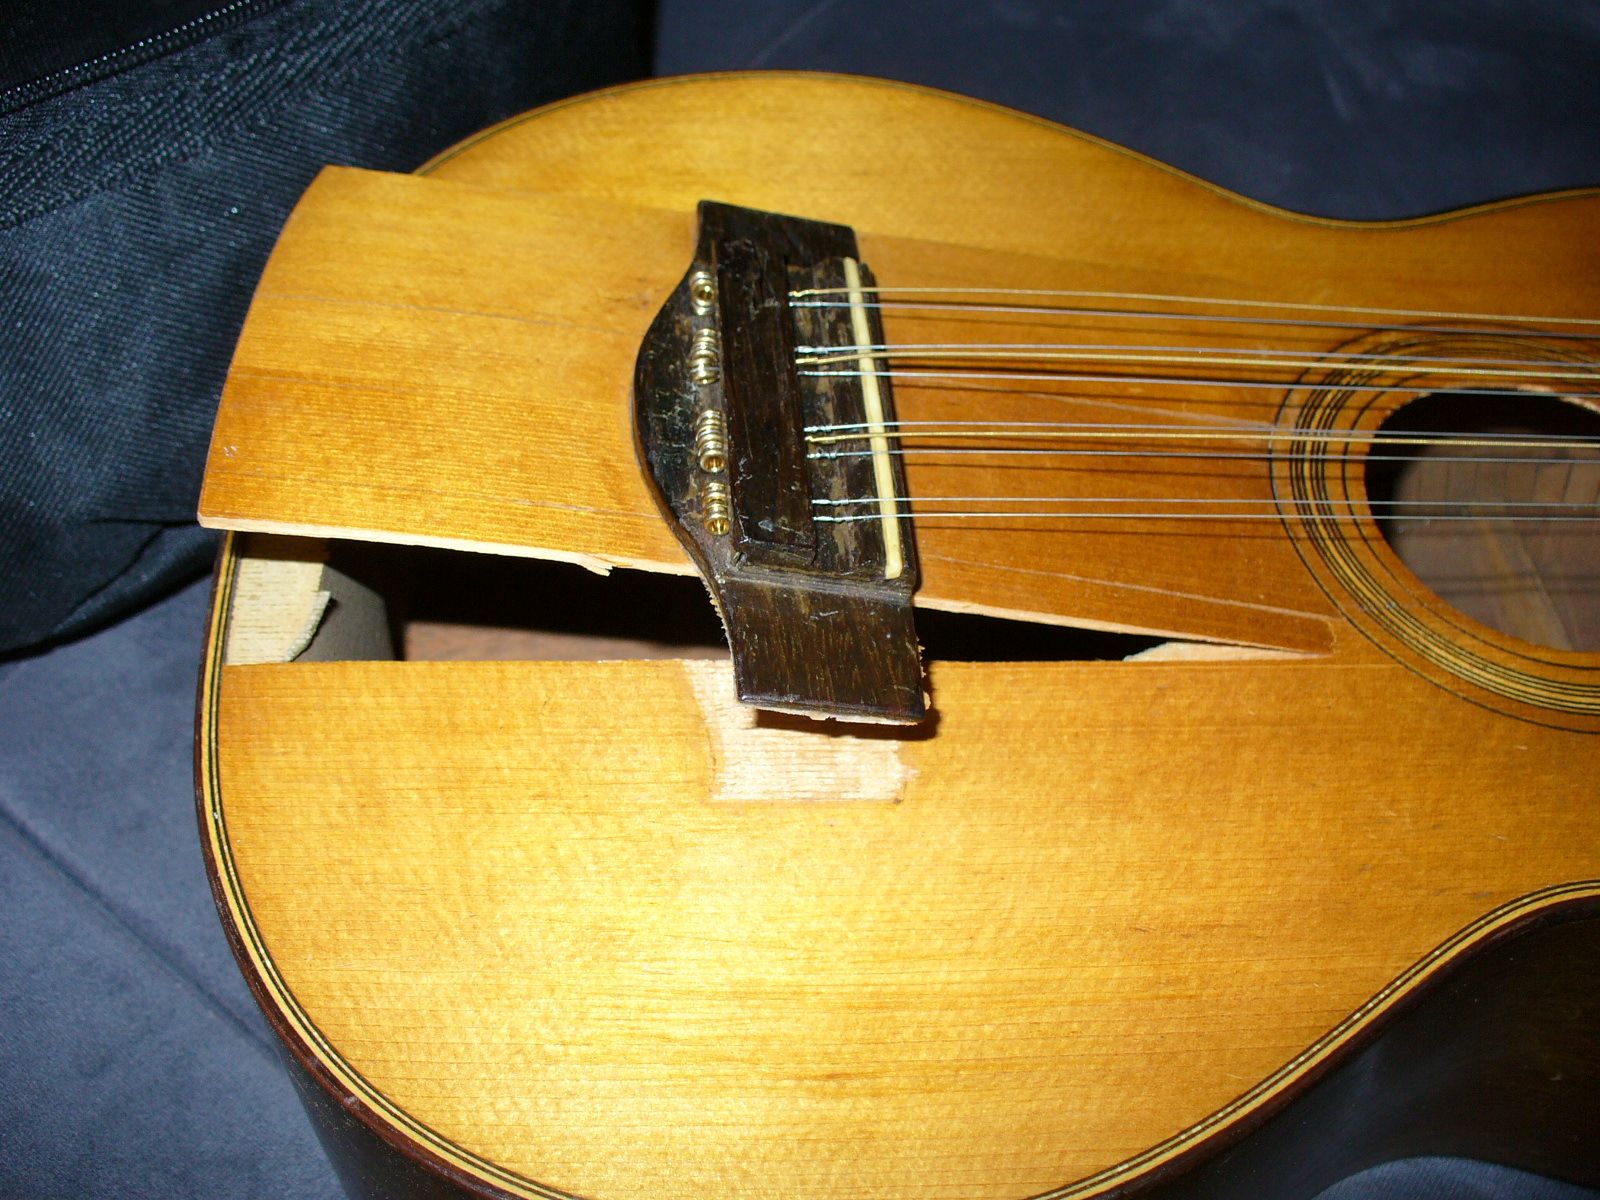
Step 1: Assess the Damage
The first step in repairing a crack on your acoustic guitar is to carefully assess the damage. By thoroughly examining the crack, you’ll determine the severity and extent of the repair required. Here’s how to assess the damage:
- Inspect the crack: Use a flashlight and examine the crack closely. Determine if it’s a surface crack or if it extends through the wood. Pay attention to the length and width of the crack as well.
- Identify the location: Note the specific area of the crack on the guitar. Is it on the top (soundboard), back, or sides of the instrument? The location may impact the repair method.
- Check for loose braces: Gentle tapping around the crack may reveal any loose braces inside the guitar body. Loose braces can contribute to crack formation and should be addressed during the repair process.
- Assess the stability: Determine if the crack is stable or if it’s actively growing or spreading. A stable crack is generally easier to repair, while active cracks may require additional steps.
- Note any additional damage: Take note of any other damage or issues, such as loose binding, chips, or dents, that may need attention during the repair.
Assessing the damage allows you to plan the appropriate repair method and gather the necessary materials. Keep in mind that certain cracks may require professional repair if they are severe or if you’re unsure of your ability to fix them. If you’re confident that the crack is manageable, proceed to the next steps for repairing your acoustic guitar.
Step 2: Gather the Necessary Tools
Once you have assessed the damage to your acoustic guitar, it’s time to gather the necessary tools to complete the repair. Having the right tools on hand will ensure that you can work efficiently and effectively. Here are the tools you’ll need:
- Clamps: Select clamps that are appropriate for the size of the crack and that can provide even pressure along the repair area.
- Sanding Materials: Prepare a range of sandpapers with varying grits, including coarse to fine grits, to smooth the repaired area.
- Wood Glue: Choose a high-quality wood glue that is specifically designed for instrument repairs. Ensure that the glue is suitable for the type of wood used in your guitar.
- Masking Tape: Use masking tape to protect the surrounding areas of the crack during the repair process and to prevent any accidental damage.
- Screwdriver or Allen Wrench: Depending on your guitar’s design, you may need a screwdriver or Allen wrench to remove the strings and bridge for better access to the crack.
- Fine-Tip Syringe (Optional): If the crack is narrow or deep, a fine-tip syringe can be helpful for injecting the wood glue precisely into the crack.
- Microfiber Cloth: Use a soft microfiber cloth to clean and wipe down the guitar before and after the repair, removing any debris or dust.
- Shop Towels or Rags: Have shop towels or rags on hand to clean up any excess glue that may spill during the repair process.
Taking the time to gather all the necessary tools in advance will save you from interruptions during the repair. Make sure your workspace is well-organized and easily accessible, allowing for smooth and efficient progress. With the right tools at your disposal, you’ll be well-prepared to move on to the next steps of repairing your acoustic guitar.
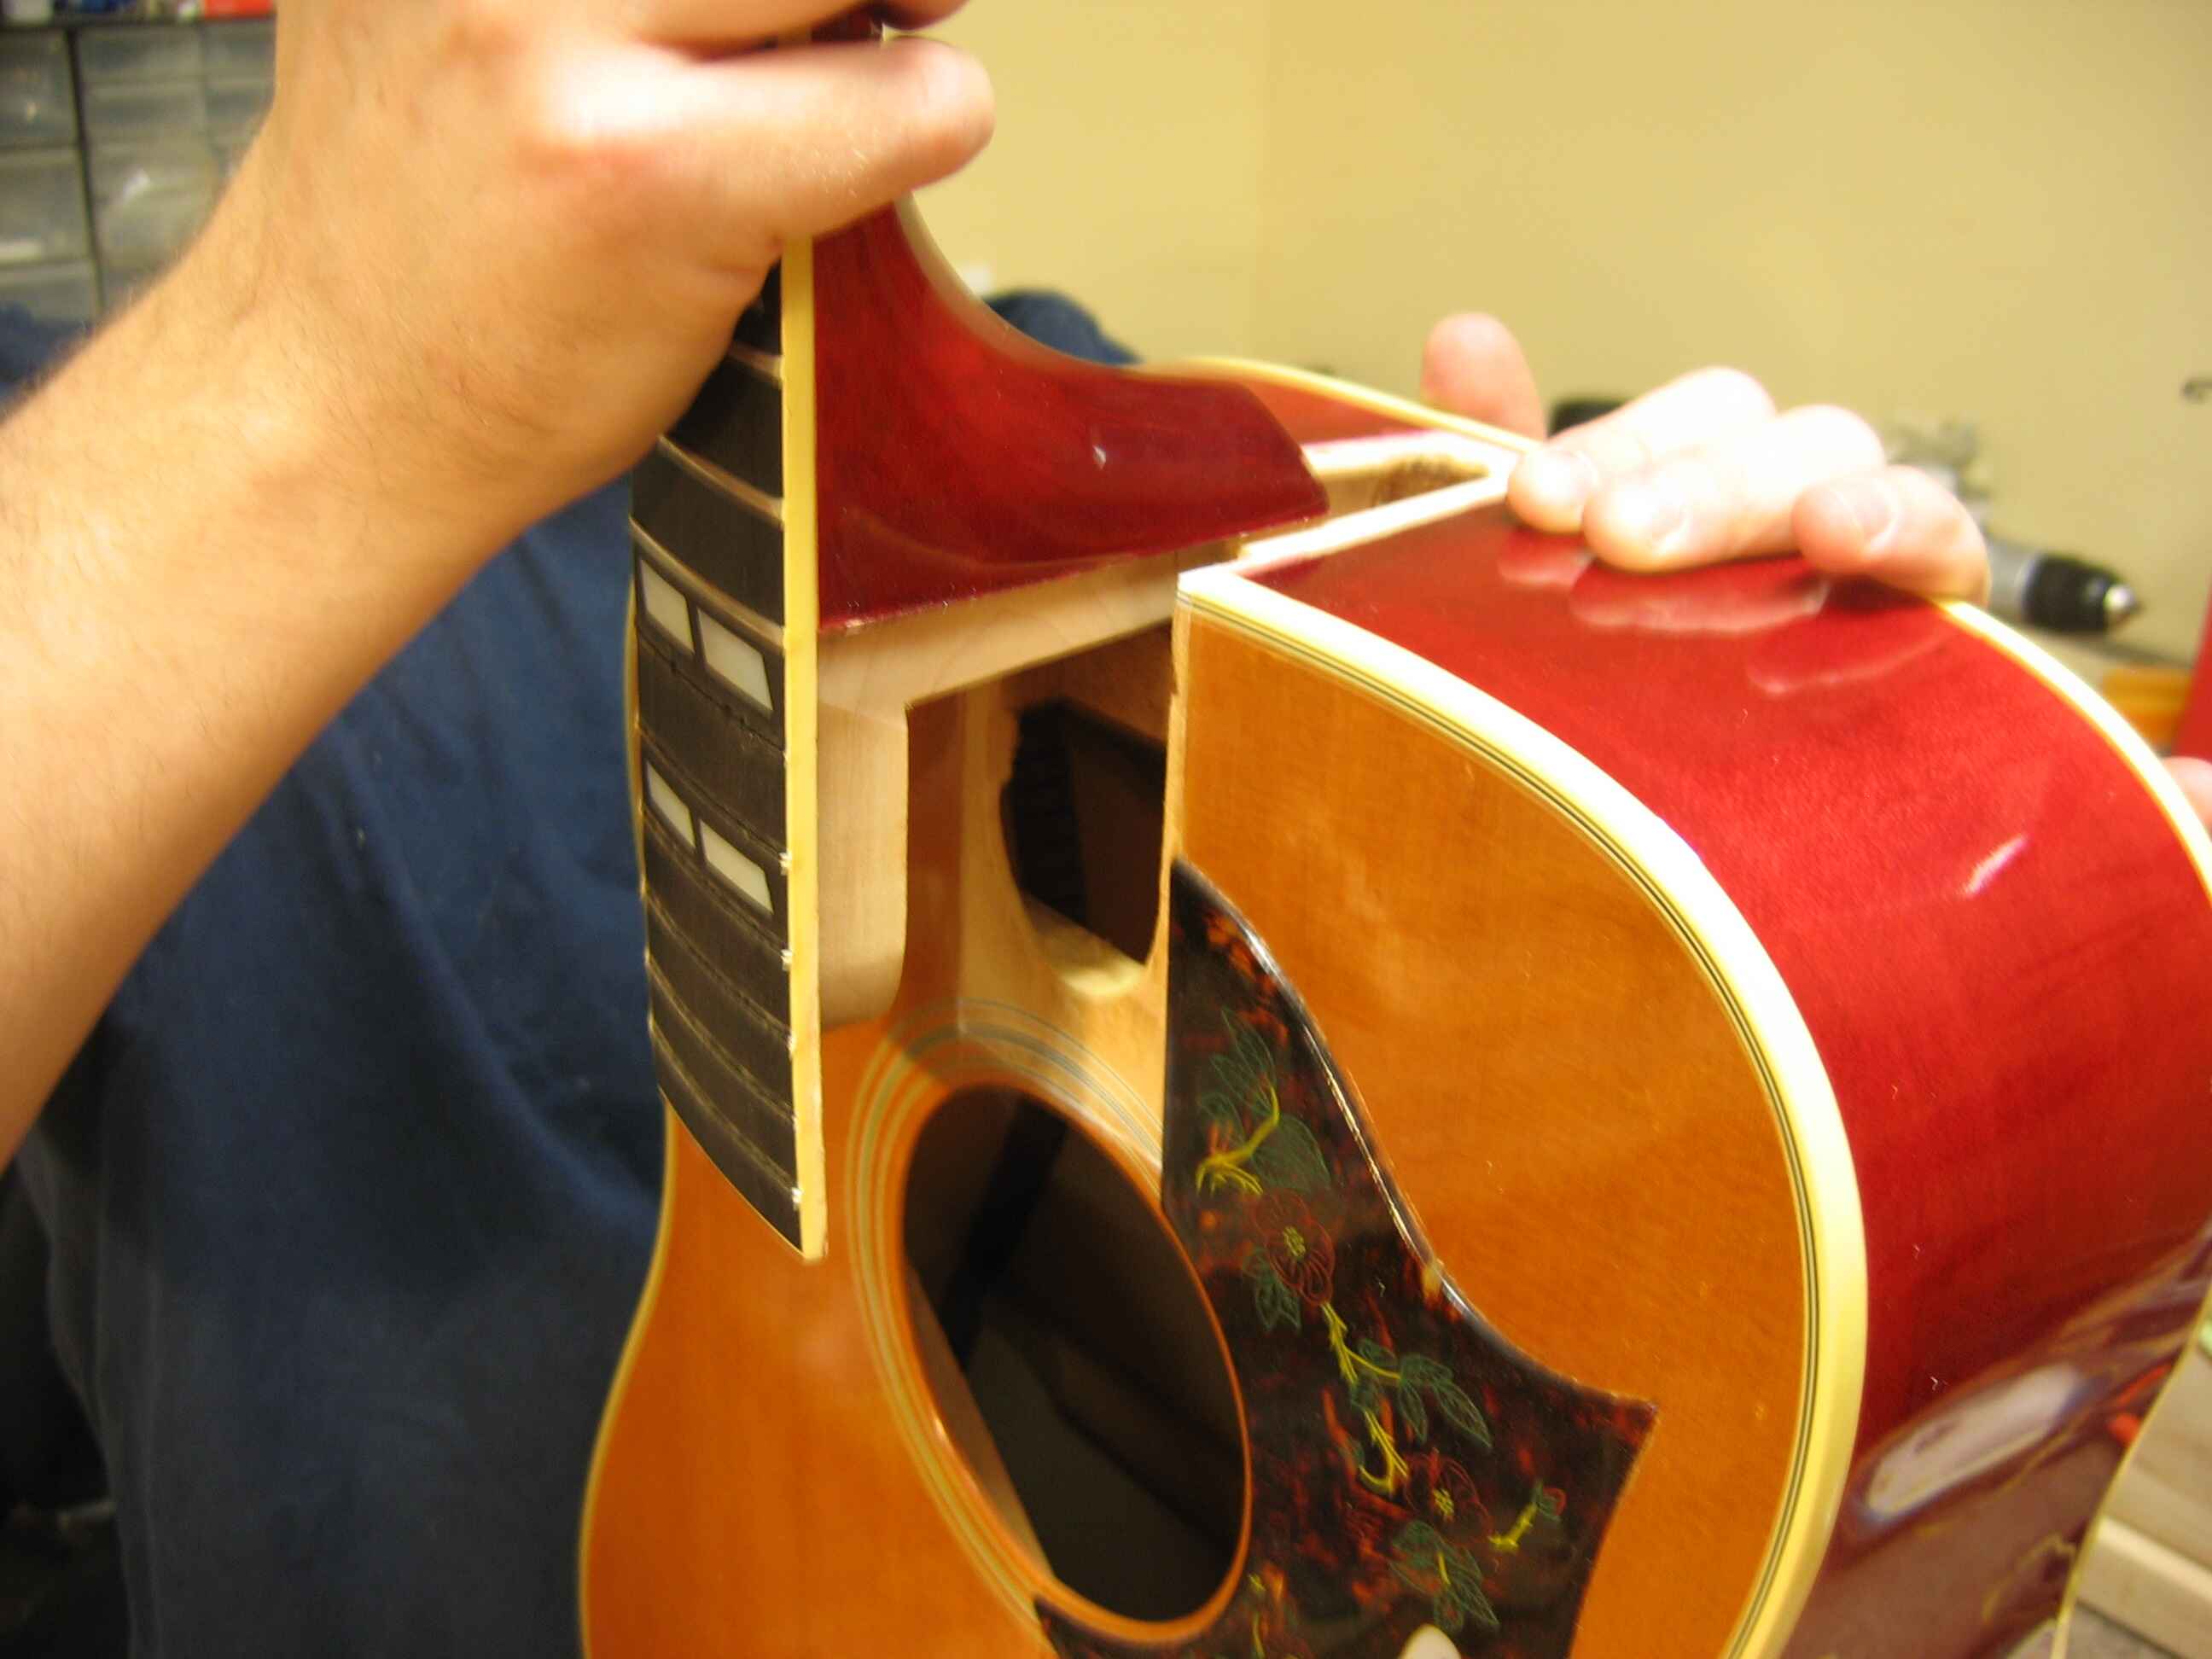
Step 3: Remove Strings and Bridge if Necessary
Before you can begin repairing the crack on your acoustic guitar, it may be necessary to remove the strings and bridge. By doing so, you’ll have better access to the crack for a more effective repair. Here’s how to proceed:
- Loosen the strings: Start by loosening the tension of all the strings on your guitar. You can do this by turning the tuning pegs counterclockwise until the strings are slack.
- Remove the bridge pins: On many acoustic guitars, the strings are held in place by bridge pins. Use a guitar peg winder or a bridge pin puller to carefully remove each bridge pin, releasing the strings from the bridge.
- Detach the strings from the tuning pegs: Once the bridge pins are removed, gently unwind the strings from the tuning pegs, paying attention to keep them organized and preventing any damage or tangles.
- Set aside the strings: Place the removed strings in a safe and designated spot to avoid misplacing or tangling them. You can coil and secure them with a rubber band for convenience.
- Remove the bridge (if necessary): In some cases, the crack may extend near the bridge, or the crack repair method may require bridge removal. If this is necessary, refer to your guitar’s manual or consult a professional for guidance on safely removing the bridge.
Removing the strings and bridge (if required) will ensure unobstructed access to the cracked area, allowing you to perform the repair more effectively. Remember to handle the guitar with care throughout this process to avoid any accidental damage. With the strings and bridge removed, you’re now ready to move on to the next steps of the repair process.
Step 4: Clean and Prep the Crack
After removing the strings and bridge, it’s important to clean and prep the crack on your acoustic guitar before proceeding with the repair. This step ensures that the repair area is free from dust, debris, and any contaminants that may affect the bonding of the wood glue. Here’s how to clean and prep the crack:
- Remove any loose debris: Use a soft brush or compressed air to gently remove any loose debris or dust that may be present in or around the crack.
- Clean the crack: Dampen a clean microfiber cloth with a small amount of water or naphtha and gently wipe along the length of the crack to remove any dirt or residue. Avoid using excessive moisture, as dampening the wood for an extended period can be detrimental.
- Dry the crack: Allow the crack to air dry completely before proceeding. Ensure that no moisture remains in the crack or surrounding areas, as it can negatively affect the adhesion of the wood glue.
- Sand the crack edges (if necessary): If the crack has rough or uneven edges, use sandpaper with a fine grit to gently smooth and even out the edges. Be careful not to widen the crack or sand too aggressively, as it can weaken the surrounding wood.
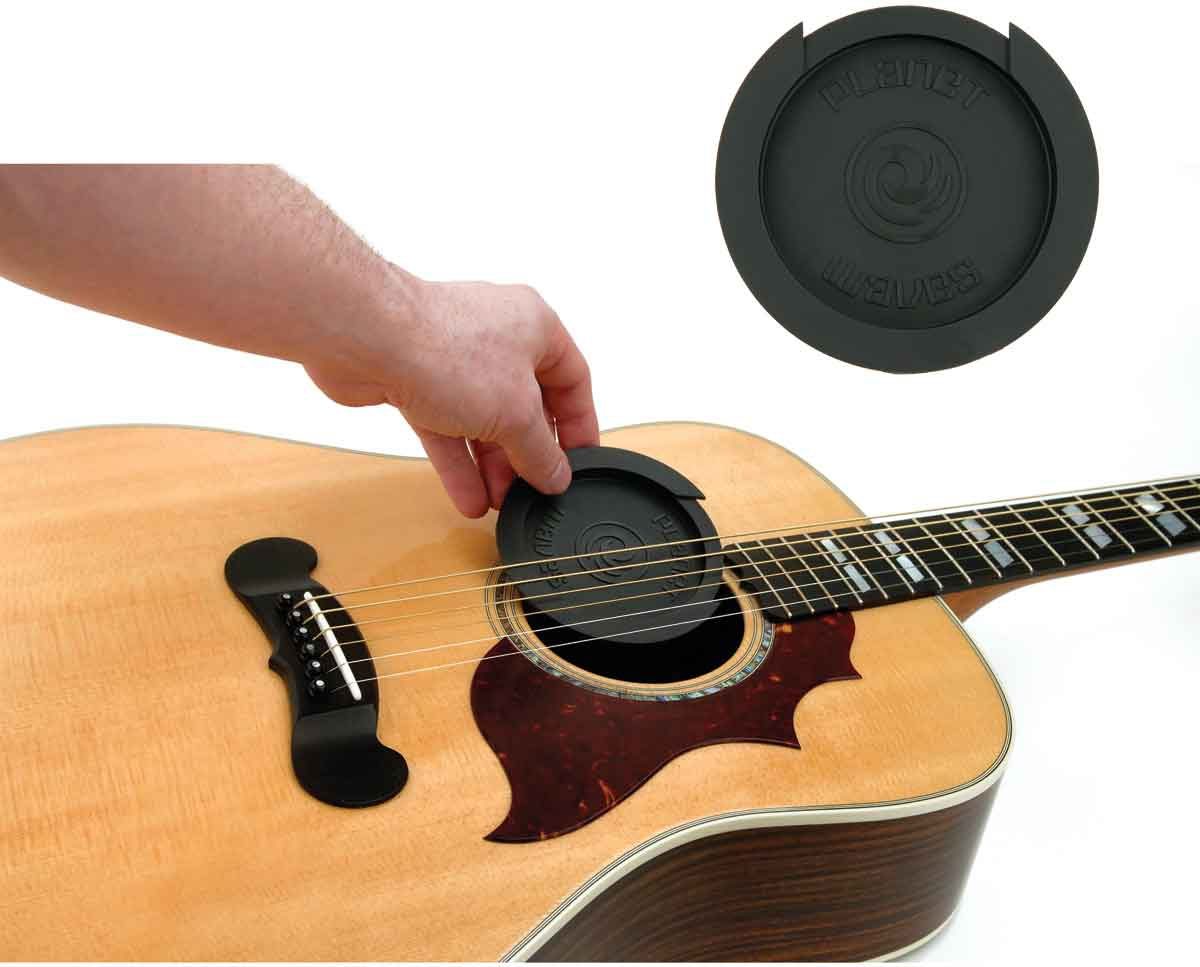
- Cover the soundhole (if necessary): If the crack is on the top (soundboard) and extends near the soundhole, cover the soundhole with a piece of cardboard or plastic wrap to prevent any debris or excess glue from falling inside during the repair.
Properly cleaning and prepping the crack ensures a clean surface for the wood glue to adhere to and enhances the overall success of the repair. Take your time during this step to ensure thorough cleaning and drying. With the crack cleaned and prepped, you’re now ready to move on to applying the wood glue and repairing the crack.
Step 5: Apply Wood Glue to the Crack
Once the crack on your acoustic guitar is clean and prepped, it’s time to apply the wood glue. The wood glue will bond and stabilize the cracked area, ensuring a strong and durable repair. Here’s how to apply the wood glue:
- Choose the right wood glue: Select a high-quality wood glue that is specifically designed for instrument repairs. Look for a glue that is suitable for the type of wood used in your guitar.
- Apply a small amount of wood glue: Squeeze a small amount of wood glue onto a disposable surface or onto a clean applicator brush. Note that a little goes a long way – you don’t want to use too much glue, as it can seep out and create a messy repair.
- Spread the glue along the crack: Using a clean brush or a fine-tip syringe, carefully spread the wood glue along the entire length of the crack. Ensure that the glue is evenly distributed and fills in the cracked area completely.
- Avoid excess glue: Be cautious not to apply too much glue, as excess glue can create a messy appearance and make it more challenging to clean up later on. Focus on achieving a thin, even layer of glue to minimize cleanup.
During this step, it’s crucial to work with precision and care to ensure the wood glue is applied thoroughly and evenly along the crack. Take your time to spread the glue and ensure it fills the entire crack for a strong bond. Once the wood glue is applied, you’re ready to proceed to the next step of clamping and securing the crack in place.
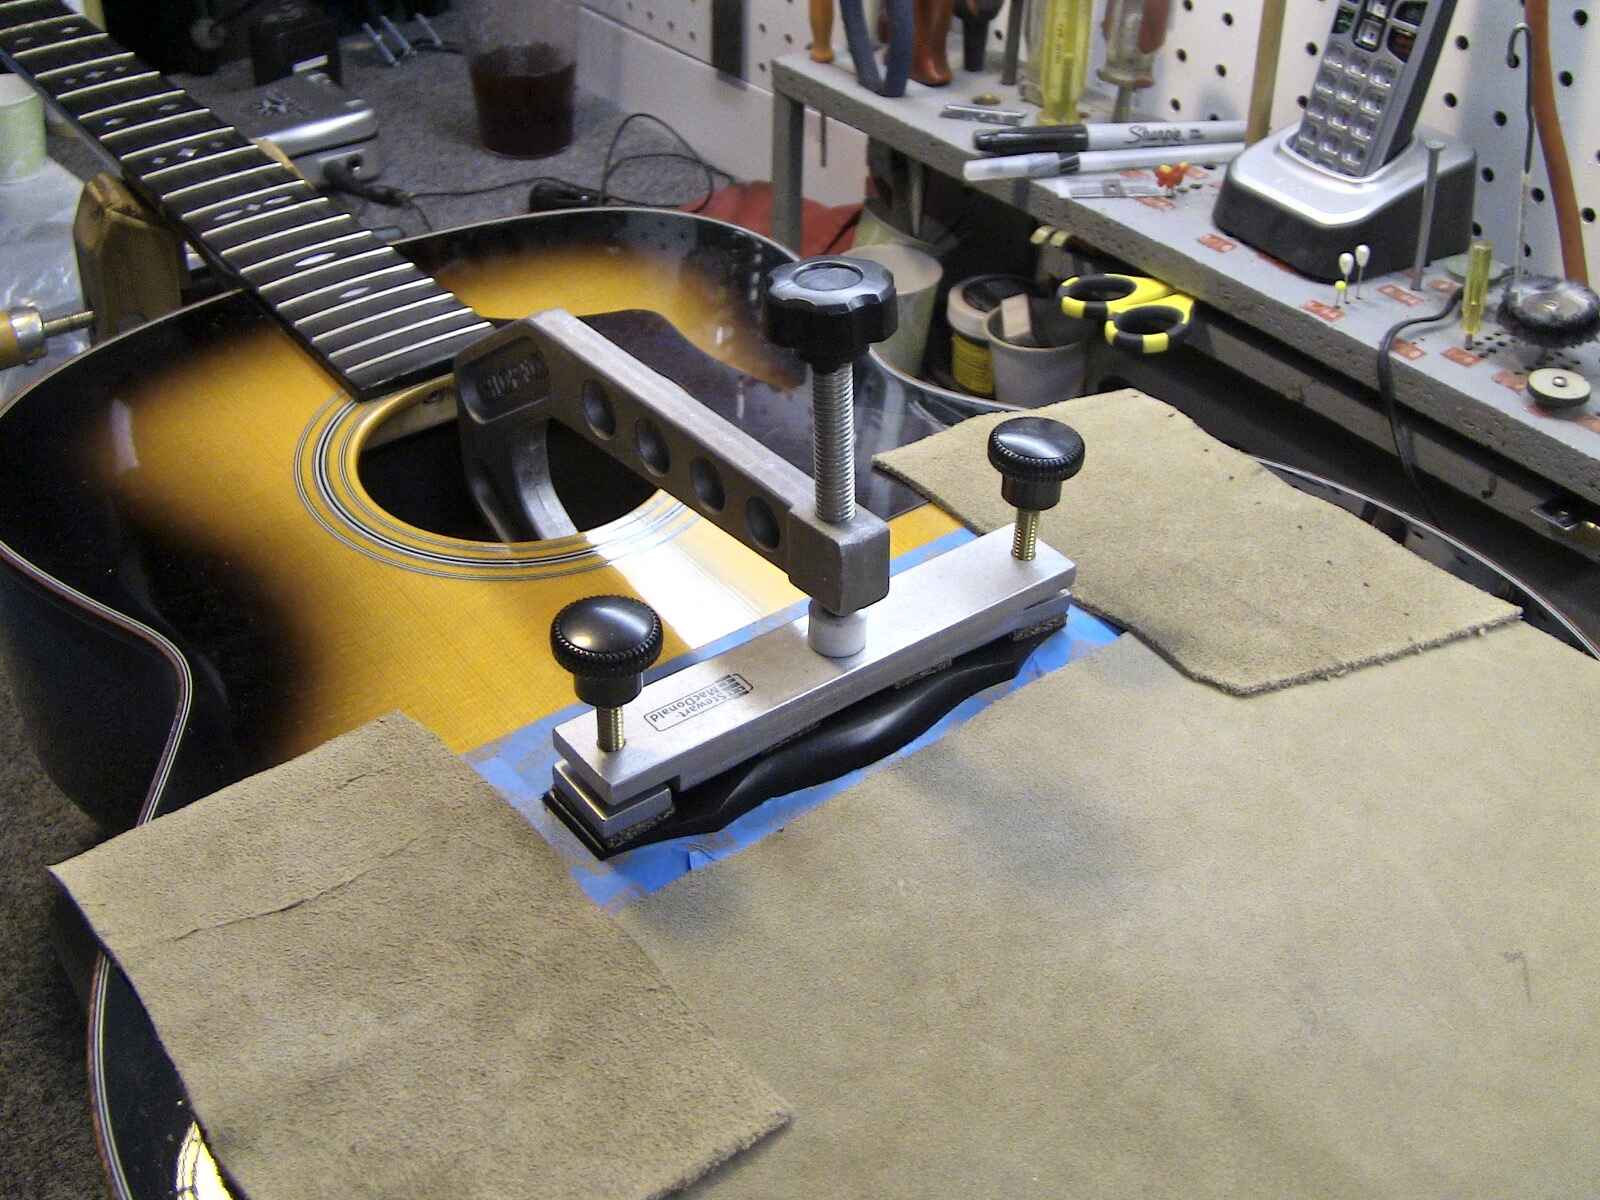
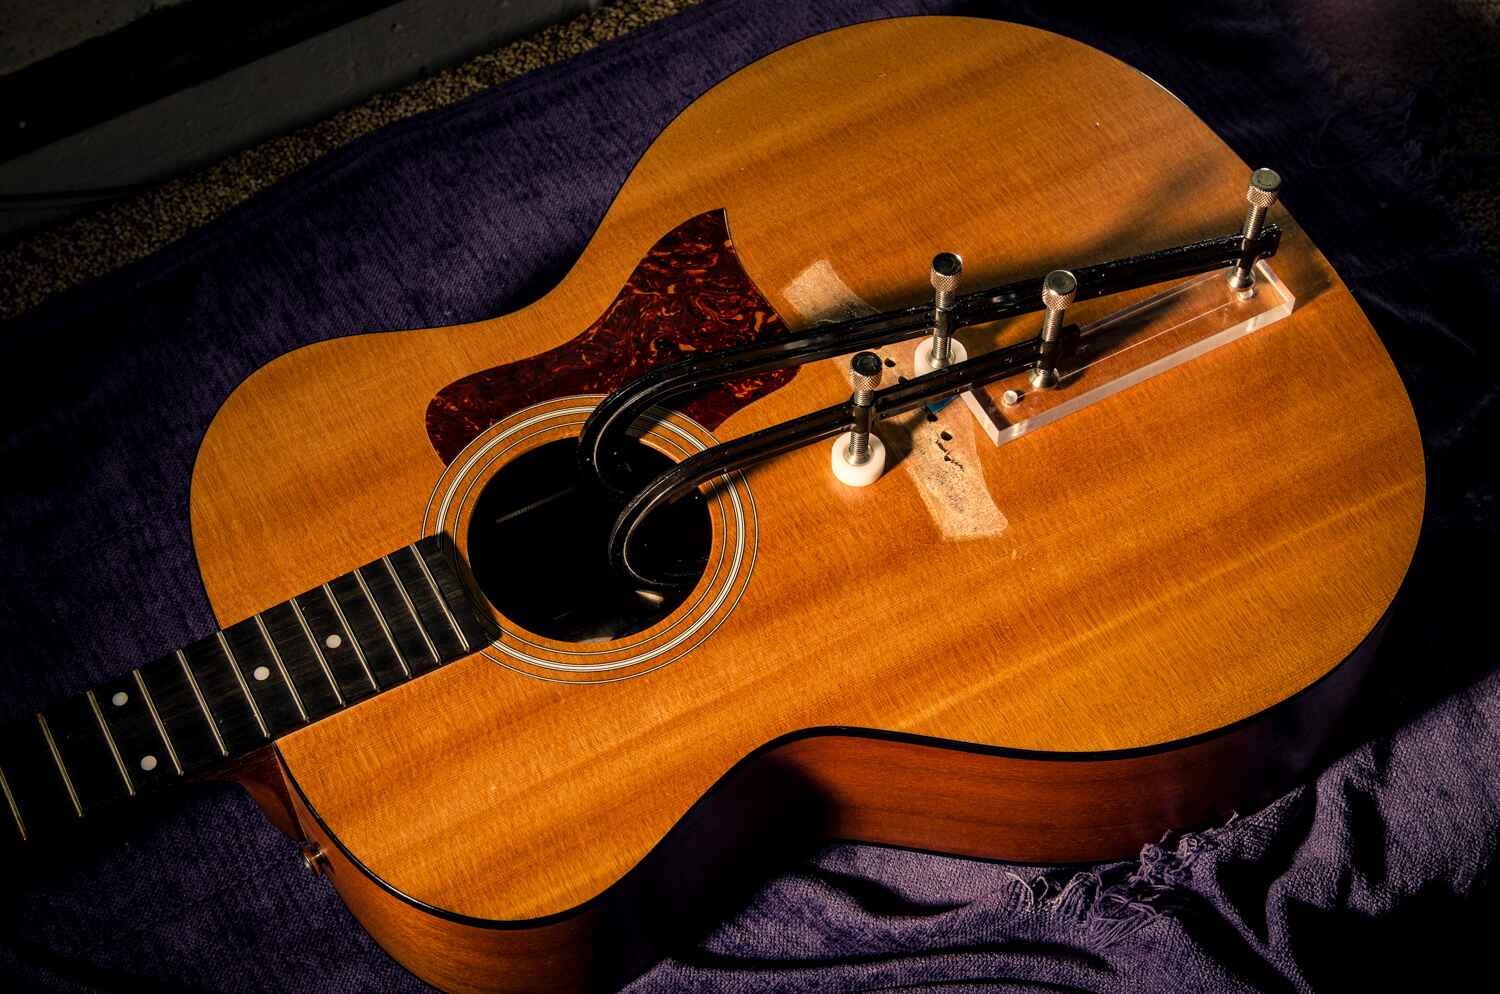
Step 6: Clamp and Secure the Crack
After applying the wood glue to the crack on your acoustic guitar, it’s time to clamp and secure the crack in place. This step ensures that the wood glue bonds properly and that the crack is held firmly together during the drying process. Here’s how to clamp and secure the crack:
- Prepare the clamps: If you’re using traditional clamps, make sure they are clean and free from any dust or debris. If necessary, protect the guitar’s surface by placing padding or soft cloth between the clamps and the guitar.
- Position the clamps: Position the clamps strategically along the crack, ensuring that they have even pressure along the entire length of the crack. Place the clamps on both sides of the crack and adjust them to bring the separated wood pieces back together.
- Tighten the clamps: Begin tightening the clamps gradually, applying even pressure to bring the separated wood together. Be careful not to overtighten the clamps, as it can cause damage to the guitar or squeeze out excess glue.
- Check alignment: As you tighten the clamps, keep an eye on the alignment of the crack. Make any necessary adjustments to ensure that the crack is closing evenly and that the wood pieces are aligning correctly.
- Wipe away excess glue: Take a clean shop towel or damp cloth and carefully wipe away any excess glue that seeps out from the crack. Removing excess glue now will make the cleanup process easier once the repair has dried.
Clamping and securing the crack is a crucial step in the repair process, as it ensures that the wood glue can bond successfully and that the crack is held in place during drying. Take your time to position the clamps correctly and tighten them gradually to avoid any unnecessary damage. With the crack clamped and secured, allow sufficient drying time before moving on to the next steps of the repair process.
Step 7: Allow Sufficient Drying Time
After clamping and securing the cracked area on your acoustic guitar, it’s essential to allow sufficient drying time for the wood glue to bond and set. Rushing this step may compromise the integrity of the repair and lead to poor results. Here’s what you need to do:
- Follow the manufacturer’s instructions: Different wood glues have varying drying times, so it’s important to refer to the instructions provided by the glue manufacturer. Typically, wood glue requires at least 24 hours to fully dry and cure.
- Create optimal drying conditions: Place your guitar in a well-ventilated area with moderate temperature and humidity. Extreme environments can affect the drying process and compromise the repair. Use caution to avoid exposing your guitar to any potential hazards.
- Avoid disturbing the clamped area: Once the crack is clamped, it’s crucial to avoid any movement or disruption that may compromise the alignment. Be careful not to accidentally bump, touch, or remove the clamps before the glue is fully dried.
- Be patient: Give the wood glue ample time to bond and set. Rushing the drying process can result in a weak repair that may require rework. It’s better to wait a bit longer and ensure the repair is dry before moving on to the next steps.
During the drying period, it’s a good idea to keep an eye on the repaired area and periodically inspect it for any signs of glue seepage or movement. If you notice any issues, such as gaps or misalignment, you may need to address them before the glue is fully dried. Allow patience and sufficient drying time to ensure a successful and durable repair.
Step 8: Remove Clamps and Excess Glue
Once the wood glue has dried and set, it’s time to remove the clamps and clean up any excess glue that may have seeped out during the repair process. Removing the clamps and excess glue will reveal the repaired crack and allow you to assess the quality of the repair. Here’s how to proceed:
- Release the clamps: Begin by gradually loosening and releasing the clamps. Be gentle and cautious to avoid any sudden movements that might cause damage to the repaired area.
- Inspect the repaired crack: Take a close look at the repaired crack. Assess the alignment and stability of the repair. Look for any gaps or inconsistencies that may require further attention.
- Remove excess glue: Using a clean and damp cloth, carefully wipe away any excess glue that has seeped out of the crack during the drying process. Be thorough, but avoid applying too much pressure that might damage the surrounding wood.
- Let the excess glue fully dry: Allow any wiped-away excess glue to fully dry before proceeding to the final steps of sanding and finishing the repair. This will ensure the excess glue doesn’t interfere with the next stages of the process.
Removing the clamps and cleaning up the excess glue is an important step in the repair process. It allows you to assess the quality of the repair and make any necessary adjustments before moving on. Take your time during this step to ensure that the repaired crack looks clean and neat, ready for the next stages of refinement.
Step 9: Sand and Finish the Repair
After removing the clamps and excess glue, it’s time to sand and finish the repaired area. Sanding the repair will help smooth out any unevenness and blend the repaired crack with the surrounding wood. Here’s how to proceed with this step:
- Gather sanding materials: Prepare a range of sandpapers with varying grits, starting from a coarse grit (e.g., 120) and progressing to finer grits (e.g., 220 and 320). You may also use a sanding block or a sanding sponge to assist in the process.
- Sand the repaired area: Begin with the coarsest sandpaper and gently sand along the repaired crack. Use long and even strokes, moving in the direction of the grain. Gradually switch to finer grits as you progress, ensuring each previous grit’s scratches are smoothed out.
- Blend the repair: Sand around the repaired area, feathering the edges to achieve a smooth transition between the repaired crack and the surrounding wood. This will help blend the repair with the rest of the guitar’s surface.
- Clean the sanded area: After sanding, wipe away any dust or debris with a clean cloth or brush. This will ensure a clean surface for the finishing process.
- Finish the repaired area: Apply the appropriate finish to the repaired area, matching the existing finish of your guitar. This may involve applying clear lacquer, stain, or polish. Follow the manufacturer’s instructions for proper application and drying time.
- Blend the finish: Once the finish has dried, blend the repaired area with the rest of the guitar’s surface by buffing or polishing. This will create a uniform appearance and seamlessly integrate the repair.
Sanding and finishing the repair area is crucial for achieving a seamless result. Take your time during this step and pay attention to detail to ensure a smooth and professional finish. With the sanding and finishing complete, you’re now ready for the final steps of reattaching the bridge and strings.
Step 10: Reattach the Bridge and Strings
With the crack repaired, sanded, and finished, it’s time to reattach the bridge and strings to your acoustic guitar. This step will bring your instrument back to its playable state. Here’s how to proceed:
- Prepare the bridge: Ensure that the bridge is clean and free from any dust or debris. Examine it for any damage or wear that may require attention.
- Align the bridge: Carefully align the bridge with the corresponding position on the guitar’s body. Pay attention to the bridge’s orientation, making sure it is correctly positioned.
- Secure the bridge: Once aligned, apply pressure to the bridge, firmly pressing it onto the guitar body. The tension of the strings will further secure the bridge in place, ensuring stability during play.
- Replace the bridge pins: Insert the bridge pins back into their respective holes, making sure they are seated securely. This will hold the strings in place and maintain the proper tension.
- Reattach the strings: Start by threading the end of each string through the corresponding bridge pin hole. Pull the string taut and insert the pins securely to hold the strings in place.
- Tighten the strings: Begin tightening the strings gradually by turning the tuning pegs. Use a tuner to ensure proper pitch and tension as you bring the strings back to their desired tuning.
- Stretch and settle the strings: After reattaching the strings, gently stretch and settle them by pulling them away from the guitar body. This helps to stabilize the tuning and allows the strings to adjust to their new position.
Reattaching the bridge and strings is the final step in the repair process. Take your time to ensure that the bridge is aligned properly and securely attached. As you tune the guitar, monitor the string tension and make any necessary adjustments to achieve the desired sound and playability. Once the bridge and strings are reattached, your acoustic guitar is ready to be played once again!
Additional Tips and Considerations
Repairing a crack on an acoustic guitar can be a delicate and intricate process. Here are some additional tips and considerations to keep in mind to ensure a successful repair:
- Consult a professional if needed: If you’re unsure about the severity of the crack or don’t have experience with instrument repairs, it’s always best to seek guidance from a professional luthier. They can assess the damage and provide expert advice on the appropriate repair method.
- Take precautions when removing and reattaching parts: When removing the strings and bridge, handle them with care to avoid damage. Similarly, when reattaching these components, ensure proper alignment and secure fastening to prevent any issues during play.
- Consider humidity control: Acoustic guitars are susceptible to changes in humidity, which can cause wood to expand and contract. Using a humidifier or dehumidifier can help maintain optimal humidity levels and minimize the risk of future cracks.
- Regularly inspect and maintain your guitar: Regularly check your guitar for any signs of damage, such as cracks or loose braces. Take preventive measures to keep your instrument in good condition, such as proper storage, regular cleaning, and maintaining stable humidity levels.
- Practice patience and attention to detail: Repairing a crack on an acoustic guitar requires patience, precision, and attention to detail. Take your time at each step, ensuring proper alignment, even application of glue, and careful finishing to achieve excellent results.
Remember that every guitar repair situation is unique, and the methods described in this guide may need to be adapted depending on the specific circumstances. If you’re unsure or uncomfortable with any step of the repair process, it’s always best to seek professional assistance to avoid causing further damage to your instrument.
By following these additional tips and considerations, you can increase the chances of achieving a successful repair and preserving the lifespan of your acoustic guitar.
Conclusion
Repairing a crack on an acoustic guitar can be a challenging yet rewarding endeavor. By following the step-by-step guide outlined in this article and considering the additional tips provided, you can effectively restore your instrument’s functionality and aesthetic appeal. Taking the time to assess the damage, gather the necessary tools, clean and prep the crack, apply wood glue, clamp and secure the crack, and allow sufficient drying time are essential for a successful repair.
Throughout the process, it’s crucial to exercise patience, attention to detail, and care. Being cautious when removing and reattaching parts, maintaining proper humidity levels, regularly inspecting your guitar for damage, and seeking professional assistance when needed will help ensure long-term instrument health.
Remember, every repair situation is unique, so adapt the techniques outlined in this guide based on your specific guitar and crack. If you’re uncertain or uncomfortable with any step, it’s always better to seek professional guidance than risk causing further damage.
By following these guidelines and treating your guitar with care, you can extend its lifespan and continue making beautiful music. So, embrace the challenge, save that beloved acoustic guitar from its crack, and enjoy the satisfaction of restoring your instrument to its former glory.