Introduction
Acoustic guitars are beloved for their warm, resonant tones and beautiful craftsmanship. However, even the most meticulously cared-for instruments can fall victim to the occasional crack or split in the guitar top. While this can be distressing for any guitarist, the good news is that many cracks in acoustic guitar tops can be effectively repaired with the right tools, materials, and techniques.
Repairing a crack in an acoustic guitar top is a delicate process that requires patience, precision, and a steady hand. Whether the crack is the result of a sudden impact, changes in humidity, or simply the natural aging of the wood, addressing it promptly can prevent further damage and preserve the integrity of the instrument.
In this guide, we will walk you through the step-by-step process of fixing a crack in an acoustic guitar top, from assessing the damage and gathering the necessary materials to gluing, clamping, and finishing the repair. By following these instructions and taking your time to execute each step with care, you can restore your guitar’s appearance and sound, allowing you to continue making music with confidence and pride in your beautifully restored instrument.
Assessing the Damage
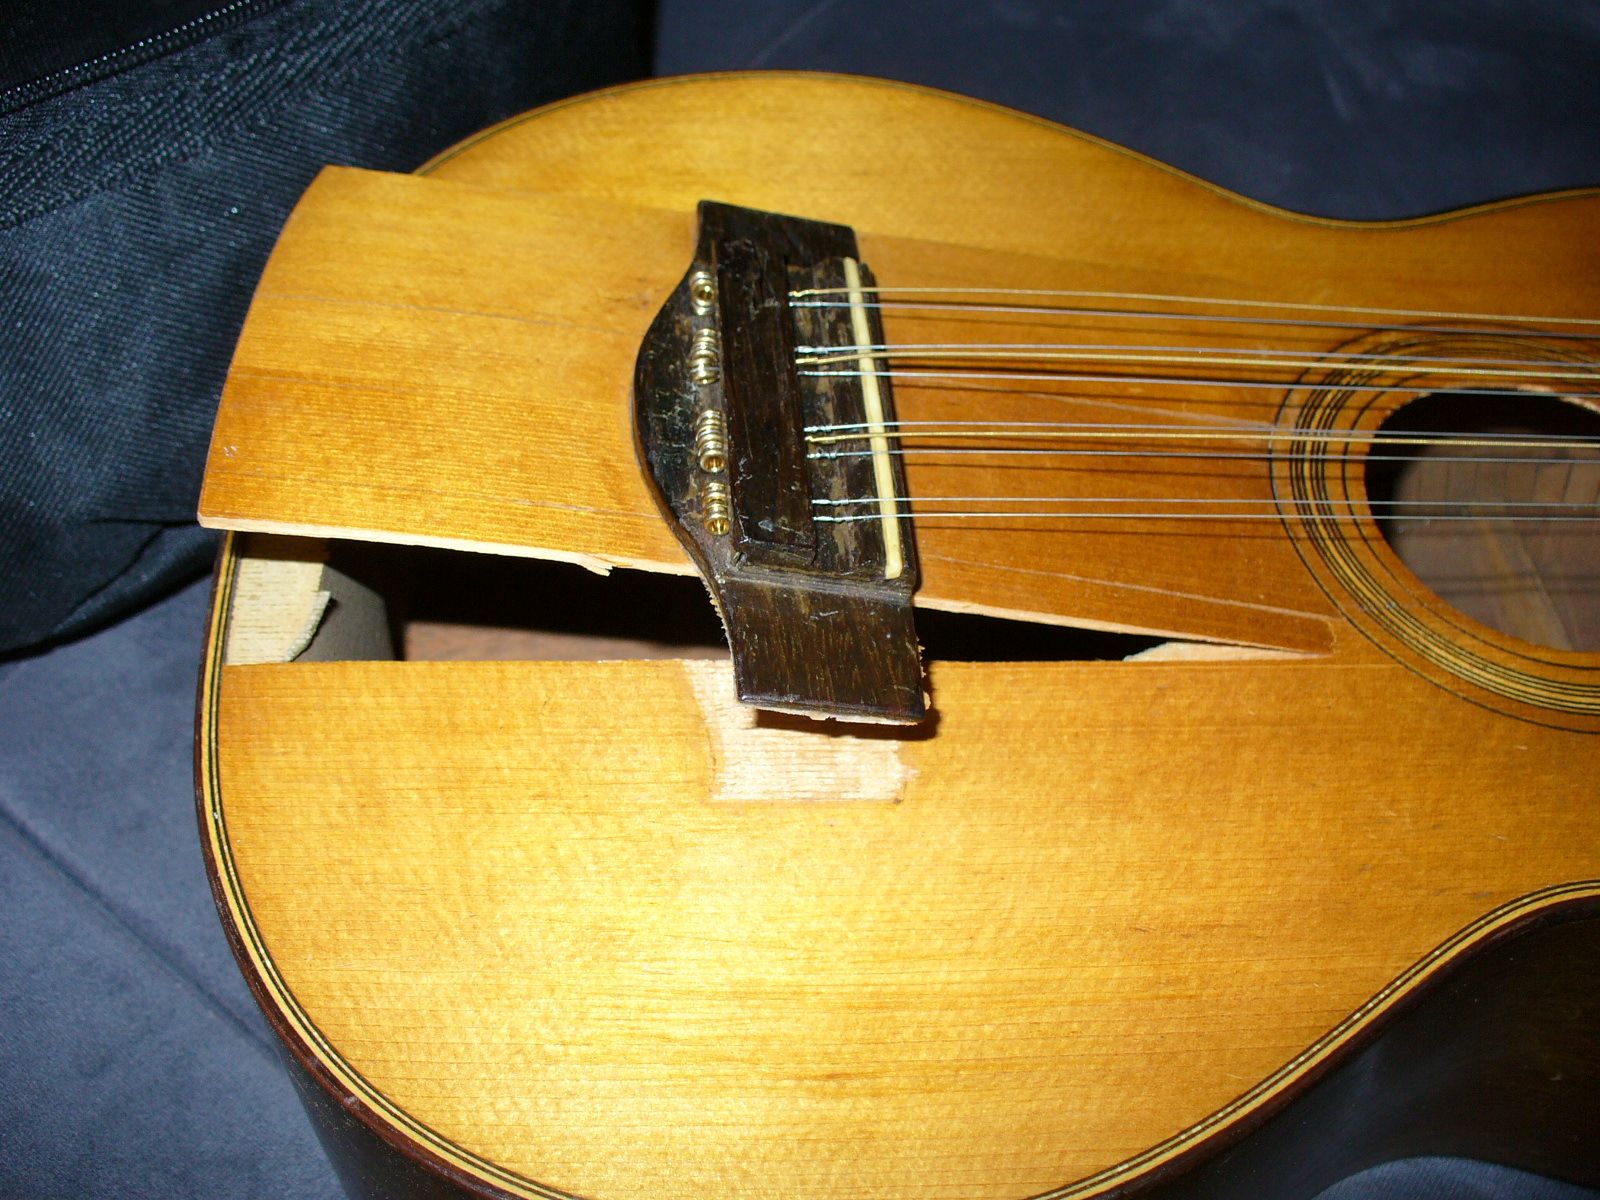
Before embarking on the repair process, it’s crucial to thoroughly assess the nature and extent of the crack in the acoustic guitar top. This initial evaluation will inform the approach you take and help you determine the best course of action for restoring the instrument.
Begin by carefully examining the crack, noting its location, length, and width. Is the crack situated near the edge of the soundhole, along the grain, or in a particularly vulnerable area of the guitar top? Understanding the specific characteristics of the crack will guide your decisions as you proceed with the repair.
Next, consider the depth of the crack. Is it a surface-level split, or does it extend deeper into the wood? A shallow crack may require less invasive repair methods, while a deeper fissure could necessitate more extensive measures to ensure a durable and seamless fix.
Additionally, take note of any debris or loose fragments within the crack. Clearing out any foreign matter before beginning the repair process will help ensure that the adhesive can bond effectively and that the crack can be fully sealed.
Finally, evaluate the stability of the surrounding wood. Are there any other signs of damage, such as warping or weakening of the top near the crack? Understanding the overall condition of the guitar top will enable you to anticipate any additional steps that may be needed to reinforce the area and prevent future issues.
By thoroughly assessing the damage, you can gain a comprehensive understanding of the crack’s characteristics and the condition of the surrounding wood. Armed with this knowledge, you will be well-equipped to proceed with the repair process, confident in your ability to address the issue effectively and restore your acoustic guitar to its former glory.
Gathering the Necessary Materials
Before commencing the repair of a crack in an acoustic guitar top, it’s essential to assemble the required materials. Having the right tools and supplies at hand will streamline the repair process and ensure that you can work efficiently and effectively.
The following materials are typically needed for repairing a crack in an acoustic guitar top:
- Woodworking Glue: Opt for a high-quality woodworking glue that is specifically formulated for bonding wood. Titebond Original or similar aliphatic resin glues are popular choices for guitar repairs due to their strength and suitability for acoustic instruments.
- Clamps: Select a set of clamps that are appropriate for the size of the crack and the curvature of the guitar top. Spring clamps, bar clamps, or specialized luthier clamps may be used to exert gentle, even pressure during the gluing process.
- Masking Tape: This will be used to secure the crack and prevent excess glue from spreading onto the guitar’s surface during the repair.
- Sandpaper or Sanding Block: Prepare a range of grits, from coarse to fine, to sand the repaired area and achieve a smooth, seamless finish.
- Stiff Paper or Plastic: This material can be used to create a small spatula for applying glue into the crack.
- Protective Gloves: Gloves will shield your hands from the glue and ensure a clean, professional finish.
- Clean Cloth: Have a soft, lint-free cloth on hand for wiping away excess glue and cleaning the guitar top.
- Work Area Protection: Lay down a protective covering for your work surface, such as a cloth or plastic sheet, to prevent any accidental spills or damage to the area.
By gathering these essential materials before beginning the repair process, you can approach the task with confidence and efficiency, knowing that you have everything you need to execute a successful repair of the crack in your acoustic guitar top.
Preparing the Work Area
Creating a suitable work environment is crucial for ensuring a successful repair of a crack in an acoustic guitar top. By taking the time to prepare the work area thoughtfully, you can minimize the risk of accidents, protect the guitar from potential damage, and set the stage for a focused and effective repair process.
Here are the key steps to prepare your work area:
- Clean and Clear the Workspace: Begin by clearing any clutter from your work surface. Ensure that the area is clean, well-lit, and free from any obstacles that could impede your movement or cause accidents during the repair process.
- Protect the Guitar: Place the guitar on a stable, padded surface to prevent it from shifting or sustaining scratches while you work. Consider using a padded mat or a folded towel to cushion the instrument and hold it securely in place.
- Secure the Crack: If the crack is open or has loose edges, carefully align the pieces and use masking tape to hold them in place. This will ensure that the glue can be applied evenly and that the crack will be properly sealed during the repair.
- Organize Tools and Materials: Lay out your tools and materials within easy reach, keeping them organized and readily accessible. This will allow you to work efficiently and maintain focus during the repair process.
- Ventilation: Ensure that the work area is well-ventilated to disperse any fumes from the woodworking glue. If working in a confined space, consider using a fan or opening windows to promote air circulation.
- Personal Protective Equipment: If the repair involves the use of strong adhesives or solvents, don protective gloves and, if necessary, a mask to shield yourself from any potential irritants.
By diligently preparing the work area, you can create a safe, organized, and conducive environment for repairing the crack in your acoustic guitar top. This thoughtful approach will set the stage for a smooth and focused repair process, allowing you to give your full attention to restoring your instrument with care and precision.
Gluing the Crack
Once the work area is prepared and the necessary materials are at hand, it’s time to begin the crucial step of gluing the crack in the acoustic guitar top. This process requires precision, patience, and a steady hand to ensure that the adhesive bonds effectively and the crack is securely sealed.
Follow these steps to effectively glue the crack in the guitar top:
- Apply the Glue: Use a small spatula made from stiff paper or plastic to apply a thin, even layer of woodworking glue along the entire length of the crack. Ensure that the adhesive penetrates the crack fully, reaching any deeper areas if necessary.
- Remove Excess Glue: Wipe away any excess glue that has spread onto the guitar’s surface using a clean, dry cloth. It’s important to remove any stray adhesive to prevent it from interfering with the clamping process or marring the appearance of the guitar top.
- Secure the Crack: Carefully align the edges of the crack and apply gentle pressure to close the gap. If the crack is particularly wide or difficult to close, consider using small wedges or clamping cauls to ensure a snug fit before proceeding to the next step.
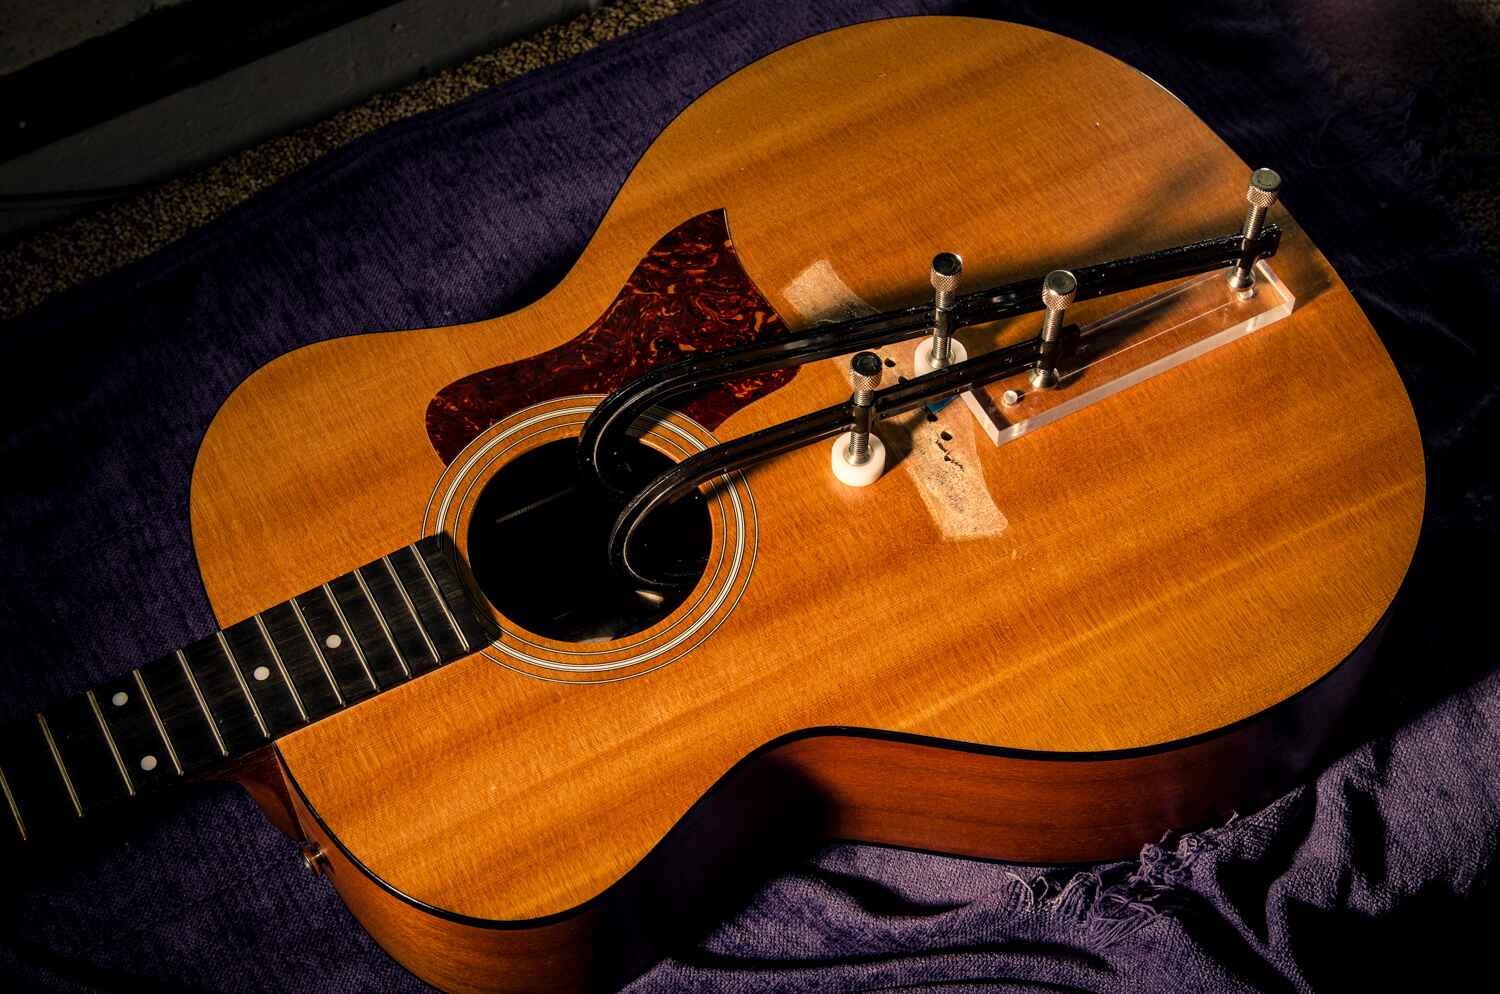
- Clamp the Crack: Once the crack is aligned, use an appropriate set of clamps to exert even pressure along the length of the crack. Position the clamps carefully to avoid causing damage to the guitar top and ensure that the crack remains tightly closed during the gluing process.
- Allow the Glue to Cure: Leave the clamps in place for the recommended duration specified by the woodworking glue manufacturer. This will allow the adhesive to cure fully and create a strong, durable bond between the wood surfaces.
By following these steps and taking your time to execute each stage with care, you can effectively glue the crack in your acoustic guitar top, setting the stage for the next phases of the repair process. With the crack securely sealed, you can proceed with confidence, knowing that your meticulous approach will yield a successful restoration of your beloved instrument.
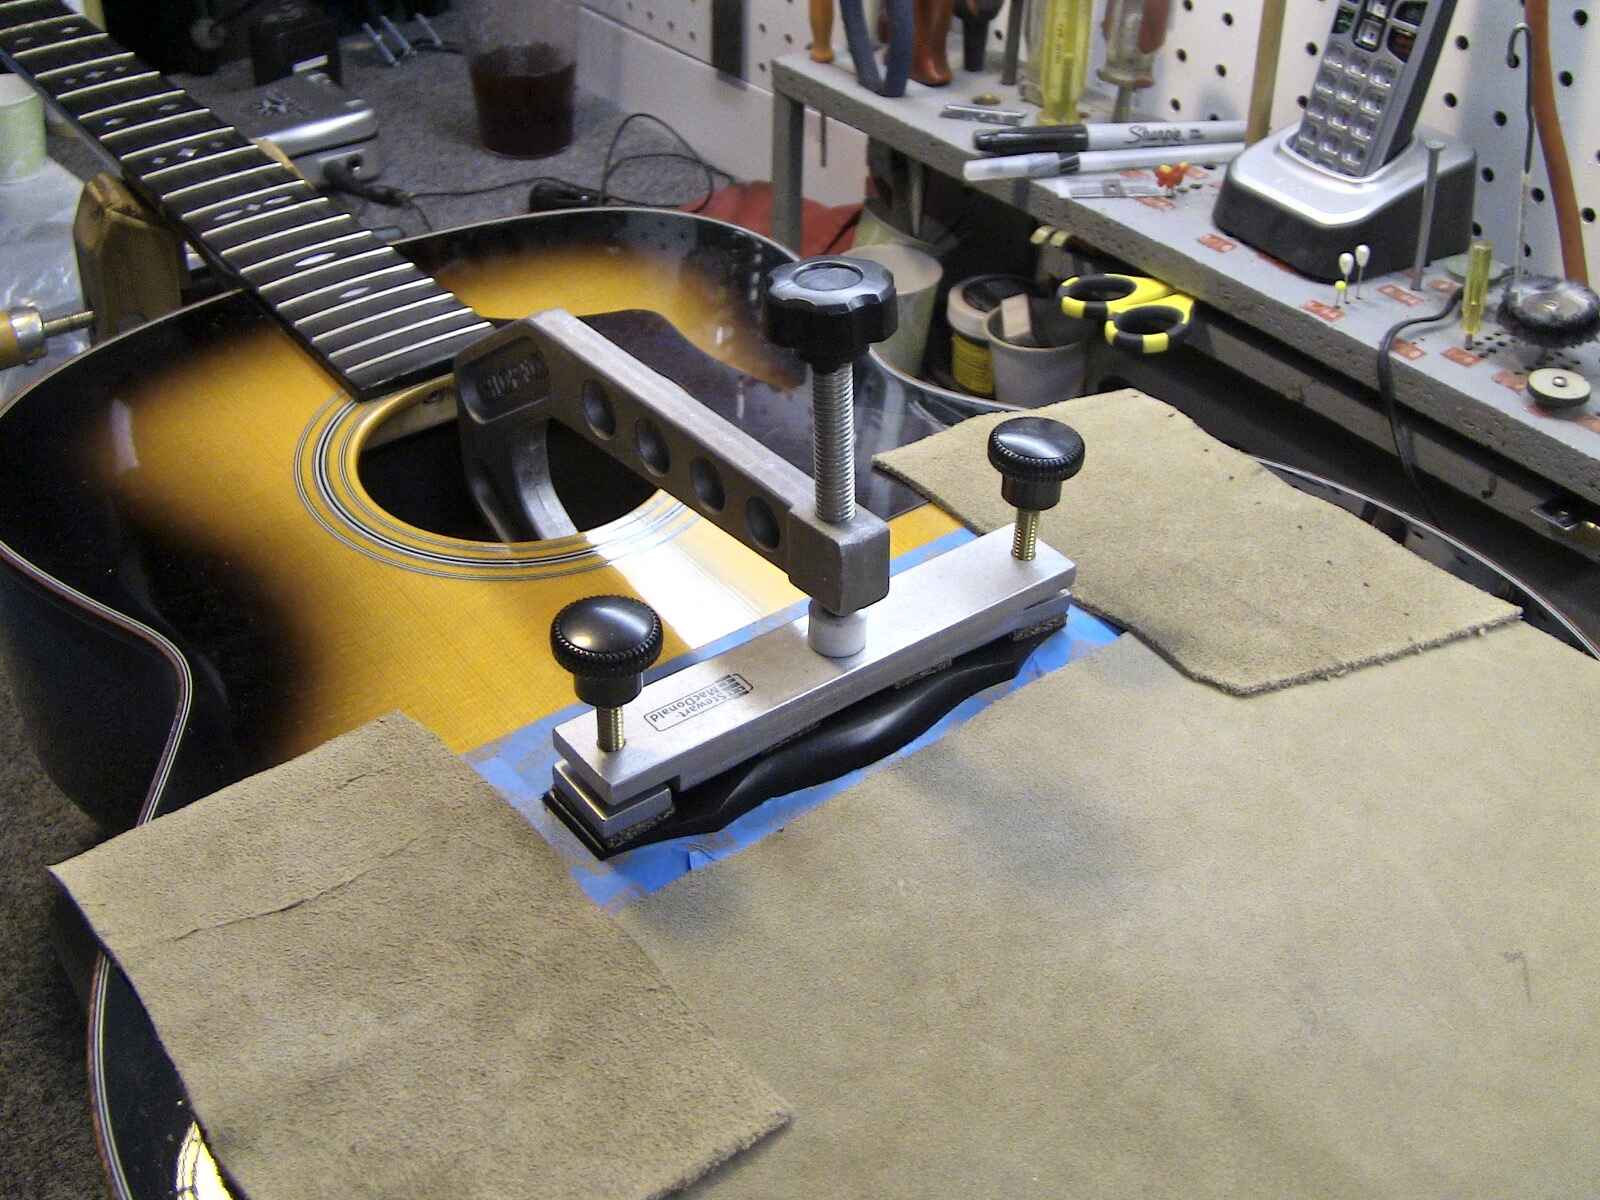
Clamping the Crack
Clamping the crack in an acoustic guitar top is a critical step in the repair process, as it ensures that the glued surfaces are held firmly together, allowing the adhesive to create a strong and seamless bond. Proper clamping is essential for achieving a successful repair and ensuring the structural integrity of the instrument.
Follow these guidelines to effectively clamp the crack in the guitar top:
- Positioning the Clamps: Carefully place the clamps along the length of the crack, ensuring that they are positioned to exert gentle, even pressure on the glued surfaces. Avoid placing the clamps too close to the edges of the crack, as this could cause damage to the delicate wood fibers.
- Using Cauls and Padding: To distribute the clamping pressure evenly and protect the guitar’s surface, consider using clamping cauls or padded blocks between the clamps and the guitar top. These aids can help prevent indentations or marks on the wood while ensuring that the crack remains securely closed during the gluing process.
- Adjusting the Pressure: Gradually tighten the clamps to apply gentle pressure, gradually bringing the crack’s edges into close contact without causing undue stress on the wood. Take care to maintain even pressure along the entire length of the crack, ensuring that the glued surfaces remain in full contact as the adhesive cures.
- Checking for Alignment: Periodically inspect the crack to ensure that the edges remain aligned and that the clamping pressure is maintaining a snug, uniform closure. Make any necessary adjustments to the clamps to address any shifts or misalignments, ensuring that the crack remains securely sealed throughout the curing process.
- Allowing for Curing Time: Leave the clamps in place for the duration recommended by the woodworking glue manufacturer to allow the adhesive to cure fully. Avoid disturbing the clamps or attempting to expedite the curing process, as this could compromise the strength and integrity of the bond.
By following these steps and exercising patience and precision, you can effectively clamp the crack in your acoustic guitar top, setting the stage for a successful and durable repair. With the crack securely held in place, you can proceed with confidence, knowing that your careful approach will yield a fully restored and structurally sound instrument.
Cleaning Up Excess Glue
After the crack in the acoustic guitar top has been glued and clamped, it’s essential to address any excess adhesive that may have spread onto the guitar’s surface during the repair process. Cleaning up the excess glue not only enhances the instrument’s appearance but also ensures that the repair is seamless and professional.
Follow these steps to effectively clean up excess glue from the guitar top:
- Assessing the Glue Residue: Carefully inspect the area around the crack to identify any stray adhesive that may have spread during the gluing and clamping process. Look for smudges, drips, or hardened glue that may have accumulated on the wood surface.
- Scraping and Trimming: If the excess glue has dried and hardened, gently scrape it away using a sharp, flat-edged tool such as a razor blade or a chisel. Take care to avoid scratching or gouging the wood, using light and controlled movements to remove the unwanted adhesive.
- Applying Solvent or Water: For any remaining wet or tacky glue residue, consider using a suitable solvent recommended by the woodworking glue manufacturer to dissolve and remove the adhesive. Alternatively, a damp cloth or sponge can be used to wipe away excess glue that has not fully cured.
- Protecting the Wood: To prevent damage to the guitar top, use a clean, damp cloth to wipe away the solvent or water and any dissolved glue residue. Take care not to oversaturate the wood, and promptly dry the area with a soft, dry cloth to ensure that the moisture is removed completely.
- Final Inspection: Once the excess glue has been removed, inspect the repaired area to ensure that it is clean, smooth, and free from any visible traces of adhesive. Address any remaining residue or imperfections as needed to achieve a pristine finish.
By meticulously cleaning up excess glue and restoring the guitar top to a clean and polished state, you can ensure that the repair of the crack is not only structurally sound but also visually appealing. This attention to detail will result in a professional-quality repair that showcases the beauty and craftsmanship of your acoustic guitar.
Sanding and Finishing
Once the excess glue has been cleaned up and the repaired area is dry, the final steps of sanding and finishing are essential to achieve a seamless and professional restoration of the acoustic guitar top. These processes not only smooth out any remaining imperfections but also contribute to the aesthetic appeal and tactile comfort of the instrument.
Follow these steps to effectively sand and finish the repaired area of the guitar top:
- Sanding the Repaired Area: Begin by sanding the repaired section of the guitar top using a progression of sandpaper grits, starting with a coarser grit and gradually transitioning to finer grits. This process will level the repaired area, remove any excess glue residue, and blend the repair seamlessly with the surrounding wood.
- Ensuring Evenness: Sand the repaired area with light, even pressure, using circular or back-and-forth motions to achieve a consistent and smooth finish. Take care to maintain the curvature and contours of the guitar top, ensuring that the sanded area blends harmoniously with the rest of the surface.
- Protecting the Wood: After sanding, wipe the repaired area with a clean, dry cloth to remove any dust or debris. Inspect the surface to ensure that it is free from imperfections and that the repair seamlessly integrates with the surrounding wood.
- Applying a Finish: If the guitar top has a finish or lacquer, carefully apply a matching finish to the sanded area to restore its luster and protect the wood. Use a small brush or applicator to ensure precise and even coverage, allowing the finish to dry completely according to the manufacturer’s instructions.
- Blending the Finish: To seamlessly blend the newly finished area with the rest of the guitar top, consider lightly buffing the entire surface with a soft cloth or polishing compound. This will ensure a uniform sheen and a consistent appearance across the instrument.
By diligently sanding and finishing the repaired area, you can achieve a flawless and harmonious restoration of the acoustic guitar top, preserving its beauty and integrity. This meticulous attention to detail will result in a repair that seamlessly integrates with the instrument’s aesthetics and ensures a smooth playing experience for years to come.
Conclusion
Repairing a crack in an acoustic guitar top is a labor of love that requires patience, precision, and a deep appreciation for the instrument’s craftsmanship. By following the step-by-step process outlined in this guide, you have taken the essential steps to restore your guitar to its former glory, ensuring that it continues to resonate with beautiful tones and timeless elegance.
From the initial assessment of the damage to the meticulous gluing, clamping, and cleanup processes, each stage of the repair has been a testament to your dedication and care for your instrument. By creating a well-prepared work area, gathering the necessary materials, and executing each step with diligence, you have not only addressed the crack in the guitar top but also strengthened your bond with the instrument through the attentive restoration process.
As you conclude the sanding and finishing phase, take a moment to admire the seamless repair and the renewed beauty of your acoustic guitar. The smooth, polished surface and the meticulous blend of the repaired area with the rest of the top stand as a testament to your commitment to preserving and enhancing the instrument’s craftsmanship.
With the crack securely sealed and the guitar top restored to its full splendor, you can now pick up your beloved instrument with confidence, knowing that your efforts have breathed new life into its timeless allure. As the warm tones resonate once again, may your music carry the echoes of your dedication and care, enriching every note with the pride of a beautifully restored acoustic guitar.
Celebrate this achievement, for it is not merely a repair but a reaffirmation of your connection to the artistry and soul of your acoustic guitar. As you continue to play and create music, may the memory of this restoration process inspire you to cherish and maintain your instrument, ensuring that its enduring beauty and resonant melodies accompany you on your musical journey for years to come.