Introduction
Repairing a bridge on an acoustic guitar is a common maintenance task that guitar enthusiasts often encounter. The bridge is a critical component that transfers the vibrations from the strings to the guitar body, playing a crucial role in the overall sound and playability of the instrument. Over time, bridges can become loose or damaged, affecting the guitar’s tone and causing buzzing or rattling noises.
Fortunately, with some basic tools and a little know-how, you can repair a bridge on an acoustic guitar and restore its functionality and sound quality. This article will guide you through the step-by-step process of repairing a bridge, allowing you to save money on professional repairs and gain valuable insight into the inner workings of your instrument.
Before diving into the repair process, it’s important to ensure that you have the necessary tools and materials on hand. Having the right equipment will make the repair process more efficient and ensure a successful outcome.
Tools and Materials Needed
Before starting the bridge repair process, gather the following tools and materials:
- Hex wrench or screwdrivers (depending on the guitar’s bridge design)
- Clamps
- Guitar polish or cleaner
- Guitar bridge adhesive or epoxy glue
- Sandpaper or a file
- Soft cloth or microfiber towel
- Masking tape
- Small brush or toothbrush
Make sure to choose the appropriate sizes of hex wrenches or screwdrivers that fit the screws or bolts used in your particular guitar model. This will ensure a proper fit and prevent any potential damage to the screws or bridge.
Guitar polish or cleaner is essential for cleaning the guitar body before and after the bridge repair. It helps remove dirt, grime, and residue, providing a clean surface for the adhesive to bond effectively.
When it comes to the adhesive or glue, choose a high-quality guitar bridge adhesive or epoxy specifically designed for this purpose. These adhesives provide strong bonding and are suitable for the stresses and tensions that the bridge will undergo during normal playing.
Sandpaper or a file may be required to shape the new bridge or make adjustments to the guitar body if necessary. Choose a fine-grit sandpaper or a file with a medium coarseness for smooth and precise work.
The soft cloth or microfiber towel is useful for wiping away excess glue and maintaining cleanliness throughout the repair process.
Masking tape can be used to protect the surrounding areas of the guitar body from accidental adhesive or glue spills. Additionally, a small brush or toothbrush can help in applying the adhesive or removing excess glue.
With these tools and materials at your disposal, you are now ready to assess the damage and begin the repair process.
Assessing the Damage
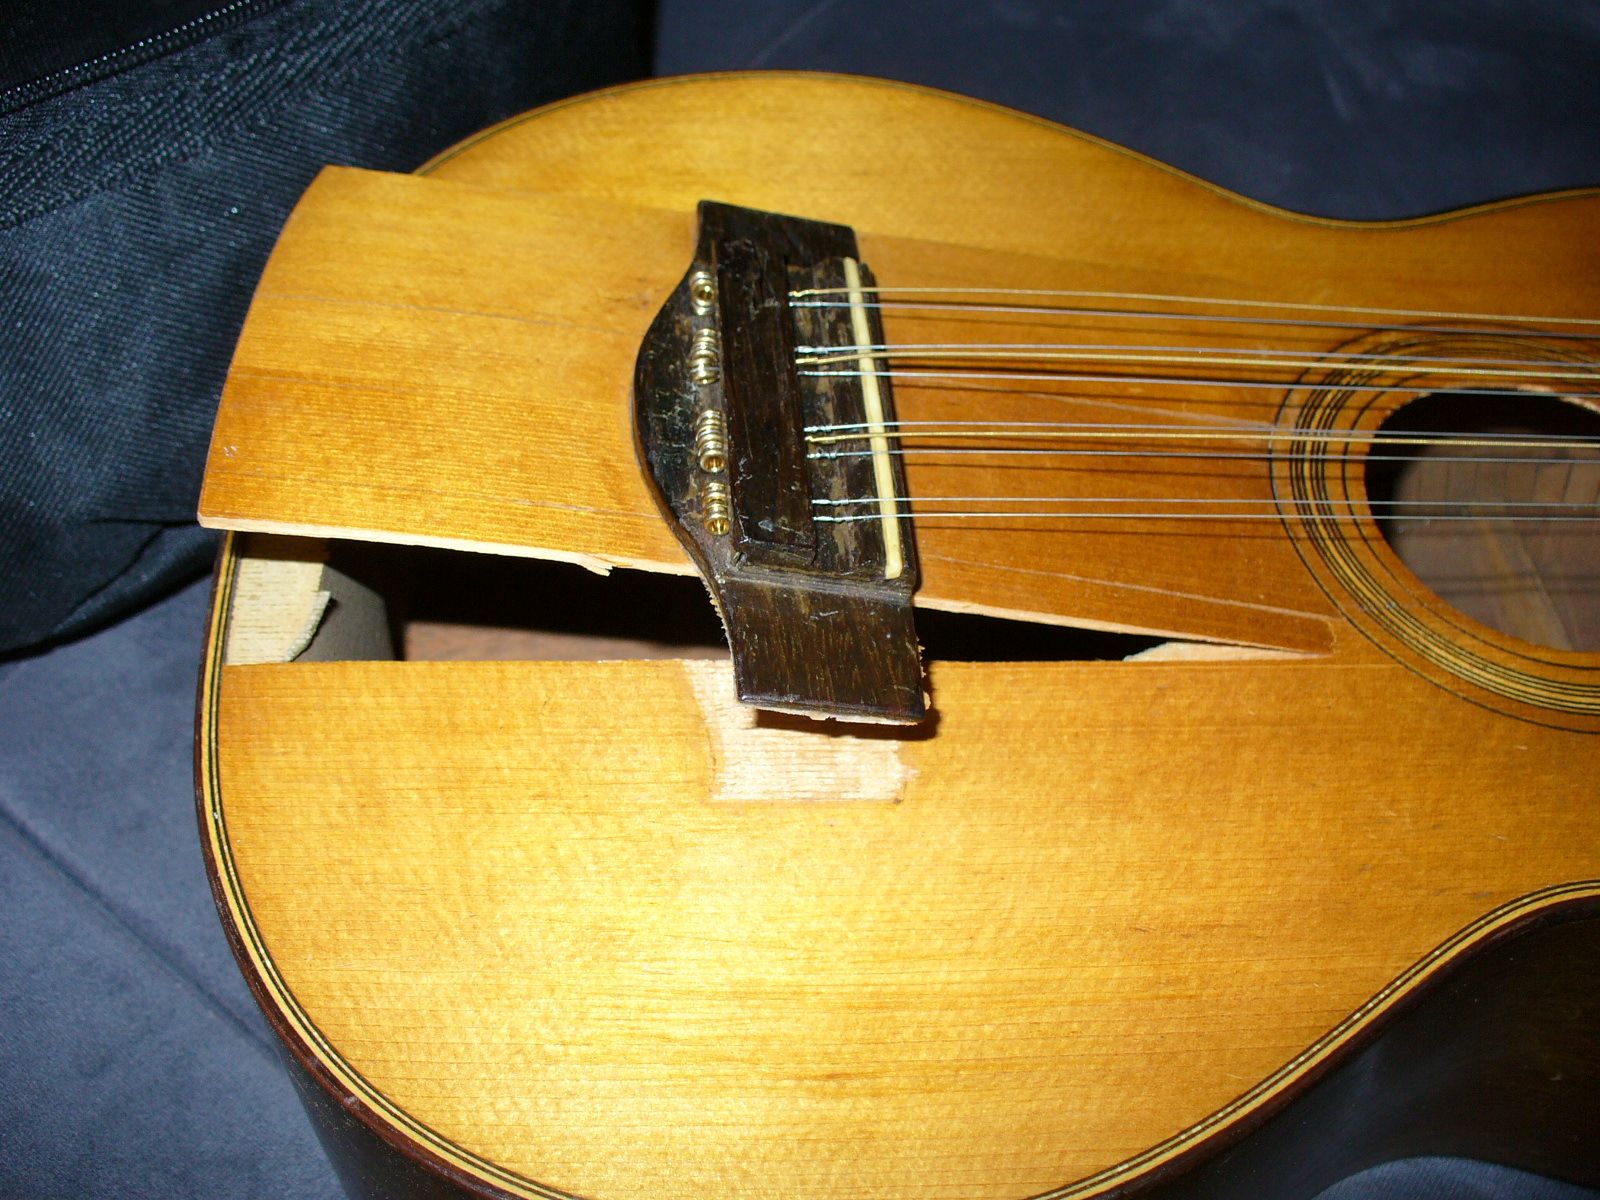
The first step in repairing a bridge on an acoustic guitar is to assess the extent of the damage. This will help you determine the appropriate course of action and ensure that you address all the issues effectively. Here’s how you can assess the damage:
- Inspect the bridge: Carefully examine the bridge for any visible signs of damage, such as cracks, warping, or separation from the body. Look for any loose or broken parts that may need to be repaired or replaced.
- Check for buzzing or rattling: Play each string individually and listen for any buzzing or rattling noises. These can indicate that the bridge is not securely attached or that it has shifted out of its proper position.
- Examine the saddle: Take a close look at the saddle, which is the small piece on the bridge that holds the strings in place. Look for any signs of wear, cracks, or unevenness. A damaged saddle can affect the guitar’s intonation and playability.
- Test the action: The action refers to the height of the strings above the fretboard. Use a ruler or a feeler gauge to measure the distance between the strings and the frets at various points along the fretboard. Uneven or excessively high action may be caused by issues with the bridge.
By thoroughly assessing the damage, you will have a clearer understanding of what needs to be addressed during the repair process. It will help you determine if a simple re-gluing of the bridge is sufficient or if additional repairs or replacements are necessary.
Once you have assessed the damage, you can proceed to the next step of removing the bridge from the guitar.
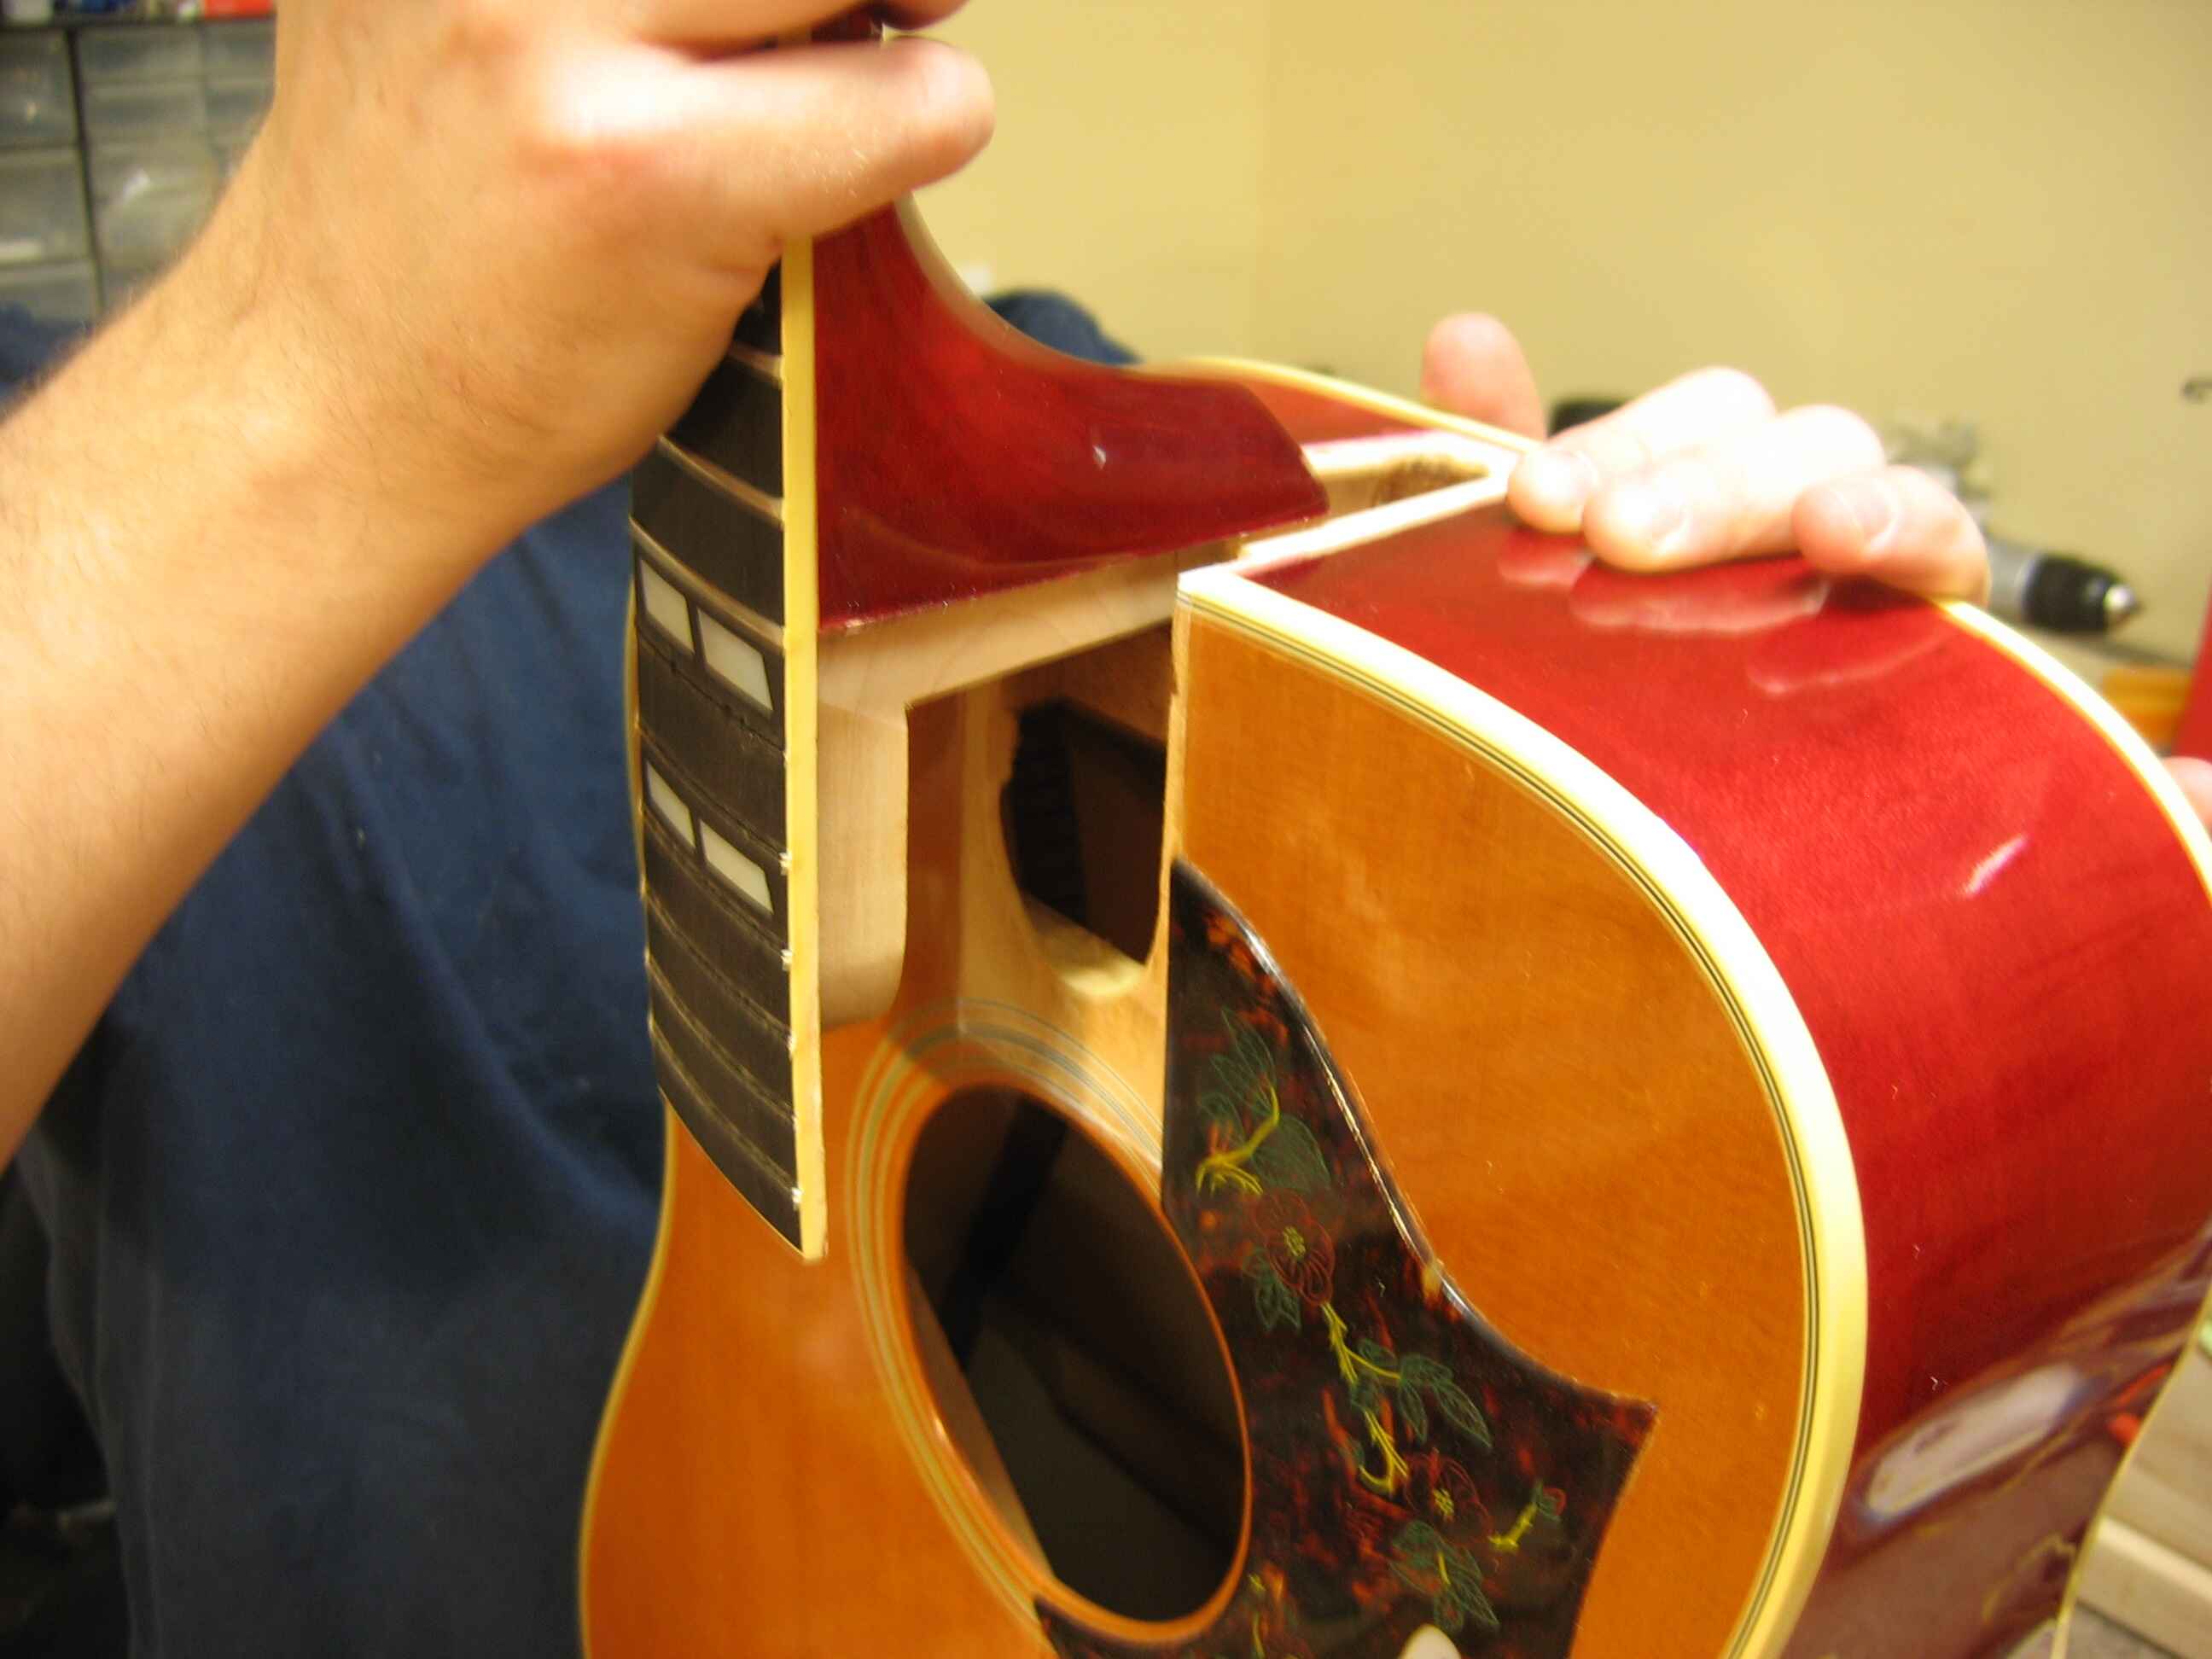
Removing the Bridge
After assessing the damage, the next step in repairing a bridge on an acoustic guitar is to remove the existing bridge. Here are the steps to follow:
- Loosen the strings: Start by loosening the strings until they are no longer under tension. This will prevent any potential damage to the guitar body or the bridge during the removal process.
- Remove the bridge pins: If your guitar has bridge pins, use a bridge pin puller or a pair of pliers to carefully remove them. Gently rock the pin back and forth while applying upward pressure until it comes loose. Place the pins in a safe place where they won’t get lost.
- Apply heat (if necessary): In some cases, the bridge may be firmly glued to the guitar body, making it difficult to remove. If this is the case, use a heat source, such as a hairdryer or a heat gun, to gently warm the bridge. The heat will soften the adhesive and make it easier to remove the bridge.
- Insert a thin spatula or putty knife: Once the adhesive is softened, carefully insert a thin spatula or putty knife between the bridge and the guitar body. Slowly and gently pry the bridge away from the body, applying even pressure to avoid any damage. Work your way around the bridge until it is completely detached.
- Clean the guitar body: With the bridge removed, use a soft cloth or a microfiber towel to clean the guitar body. Remove any residue, dust, or debris that may have accumulated underneath the bridge.
It’s important to exercise caution during the bridge removal process to avoid any damage to the guitar body or the bridge itself. If you encounter any difficulties or the bridge seems stubbornly attached, it’s best to seek professional assistance to prevent any accidental damage.
Once the bridge is successfully removed, you can proceed to the next steps of cleaning the guitar body and preparing the new bridge.
Cleaning the Guitar Body
After removing the bridge, it’s important to clean the guitar body thoroughly before proceeding with the repair. Cleaning the guitar body will remove any dirt, grime, or residue that may have accumulated over time. Here’s how to clean the guitar body:
- Prepare a cleaning solution: Mix a small amount of guitar polish or cleaner with warm water in a bowl or spray bottle. Be sure to follow the manufacturer’s instructions for the proper ratio.
- Dampen a soft cloth or microfiber towel: Dip a soft cloth or microfiber towel into the cleaning solution. Make sure the cloth is damp and not excessively wet.
- Gently wipe the guitar body: Starting from the top of the guitar, wipe the body in a smooth, circular motion. Pay attention to the areas where the bridge was located, as there may be residue or debris left behind.
- Remove stubborn stains: For stubborn stains or grime, lightly scrub the affected areas with a small brush or toothbrush. Use gentle pressure to avoid scratching the guitar’s finish.
- Dry the guitar body: Once you have cleaned the entire body, use a dry, soft cloth to wipe away any excess moisture. Make sure the guitar body is completely dry before proceeding.
Cleaning the guitar body not only improves its appearance but also enhances the surface for the adhesive or glue that will be used to attach the new bridge. Removing any dirt or residue ensures a strong bond and helps prevent any future issues.
With the guitar body now clean, you can move on to the next step of preparing the new bridge for installation.
Preparing the New Bridge
Once the guitar body is clean and ready, it’s time to prepare the new bridge for installation. Whether you are using a replacement bridge or reattaching the existing one, properly preparing the bridge is crucial for a successful repair. Here’s how you can prepare the new bridge:
- Inspect the new bridge: Before proceeding, carefully inspect the new bridge for any imperfections or defects. Check for cracks, warping, or any other issues that may affect its stability or playability.
- Ensure proper fit: Test the fit of the new bridge on the guitar body by placing it in the original position. Check for any gaps or misalignments between the bridge and the guitar body. The bridge should sit flush and snugly against the guitar body.
- If necessary, make adjustments: If the new bridge doesn’t perfectly match the shape or contour of the guitar body, you may need to make some adjustments. Use sandpaper or a file to carefully shape the bridge to ensure a perfect fit. Take your time and be cautious not to remove too much material.
- Check the saddle slot: If the new bridge doesn’t have a pre-cut slot for the saddle, you’ll need to create one. Using the appropriate tools, carefully measure and cut a slot in the bridge that matches the dimensions of the saddle. Take measurements from the old saddle or follow the manufacturer’s instructions if using a replacement saddle.
It’s essential to take your time and exercise patience while preparing the new bridge. Double-check all measurements and adjustments to ensure a proper fit and compatibility with your guitar.
Once the new bridge is prepared and ready, you can move on to the next step of fitting the bridge onto the guitar body.
Fitting the New Bridge on the Guitar
With the new bridge prepared, it’s time to fit it onto the guitar body. Properly fitting the bridge is crucial for optimal sound transfer and stability. Follow these steps to fit the new bridge on the guitar:
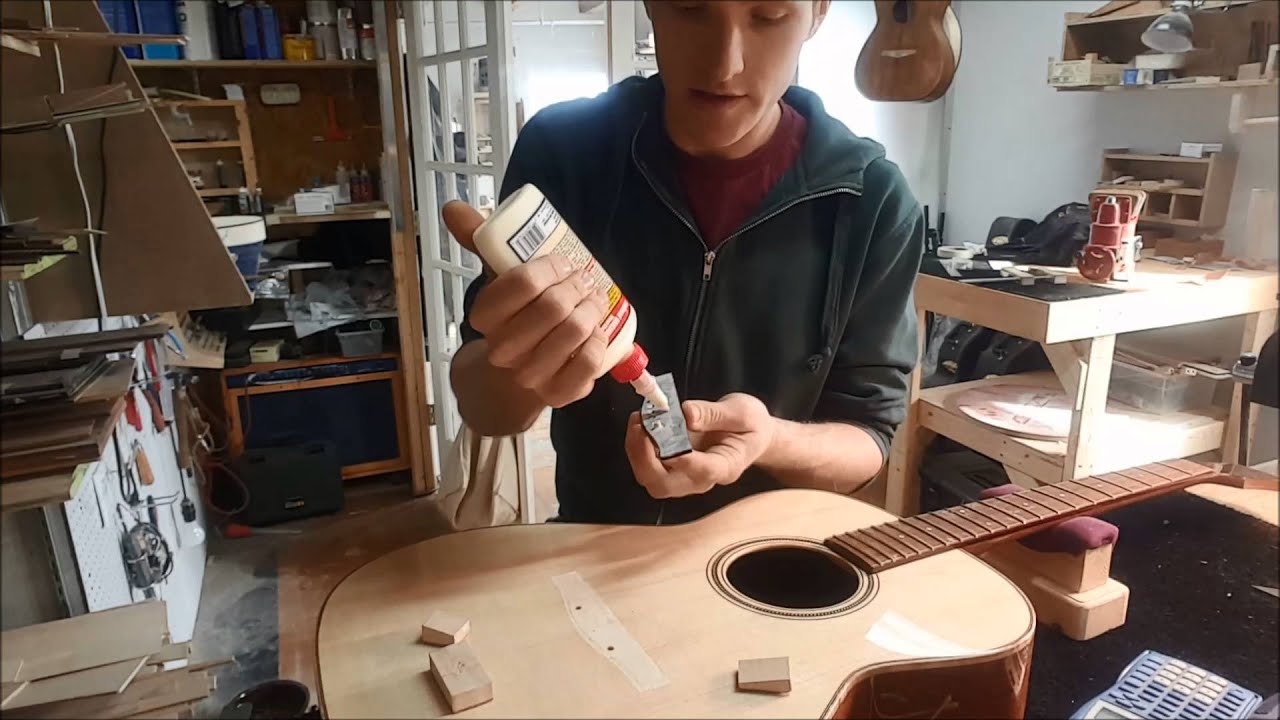
- Apply a thin layer of adhesive: Using a small brush or toothbrush, apply a thin layer of guitar bridge adhesive or epoxy glue on the bottom surface of the bridge. Make sure to spread the adhesive evenly to ensure a secure bond.
- Position the bridge: Carefully align the new bridge with the bridge pin holes and ensure that it fits snugly on the guitar body. Take your time to make sure the bridge is centered and parallel to the fretboard.
- Press the bridge firmly: Once the bridge is properly positioned, apply even pressure on the bridge while pressing it down onto the guitar body. This will help the adhesive spread evenly and create a strong bond between the bridge and the body.
- Verify the alignment: Double-check the alignment of the bridge to ensure it hasn’t shifted during the pressing process. Make necessary adjustments if needed to ensure it’s centered and straight.
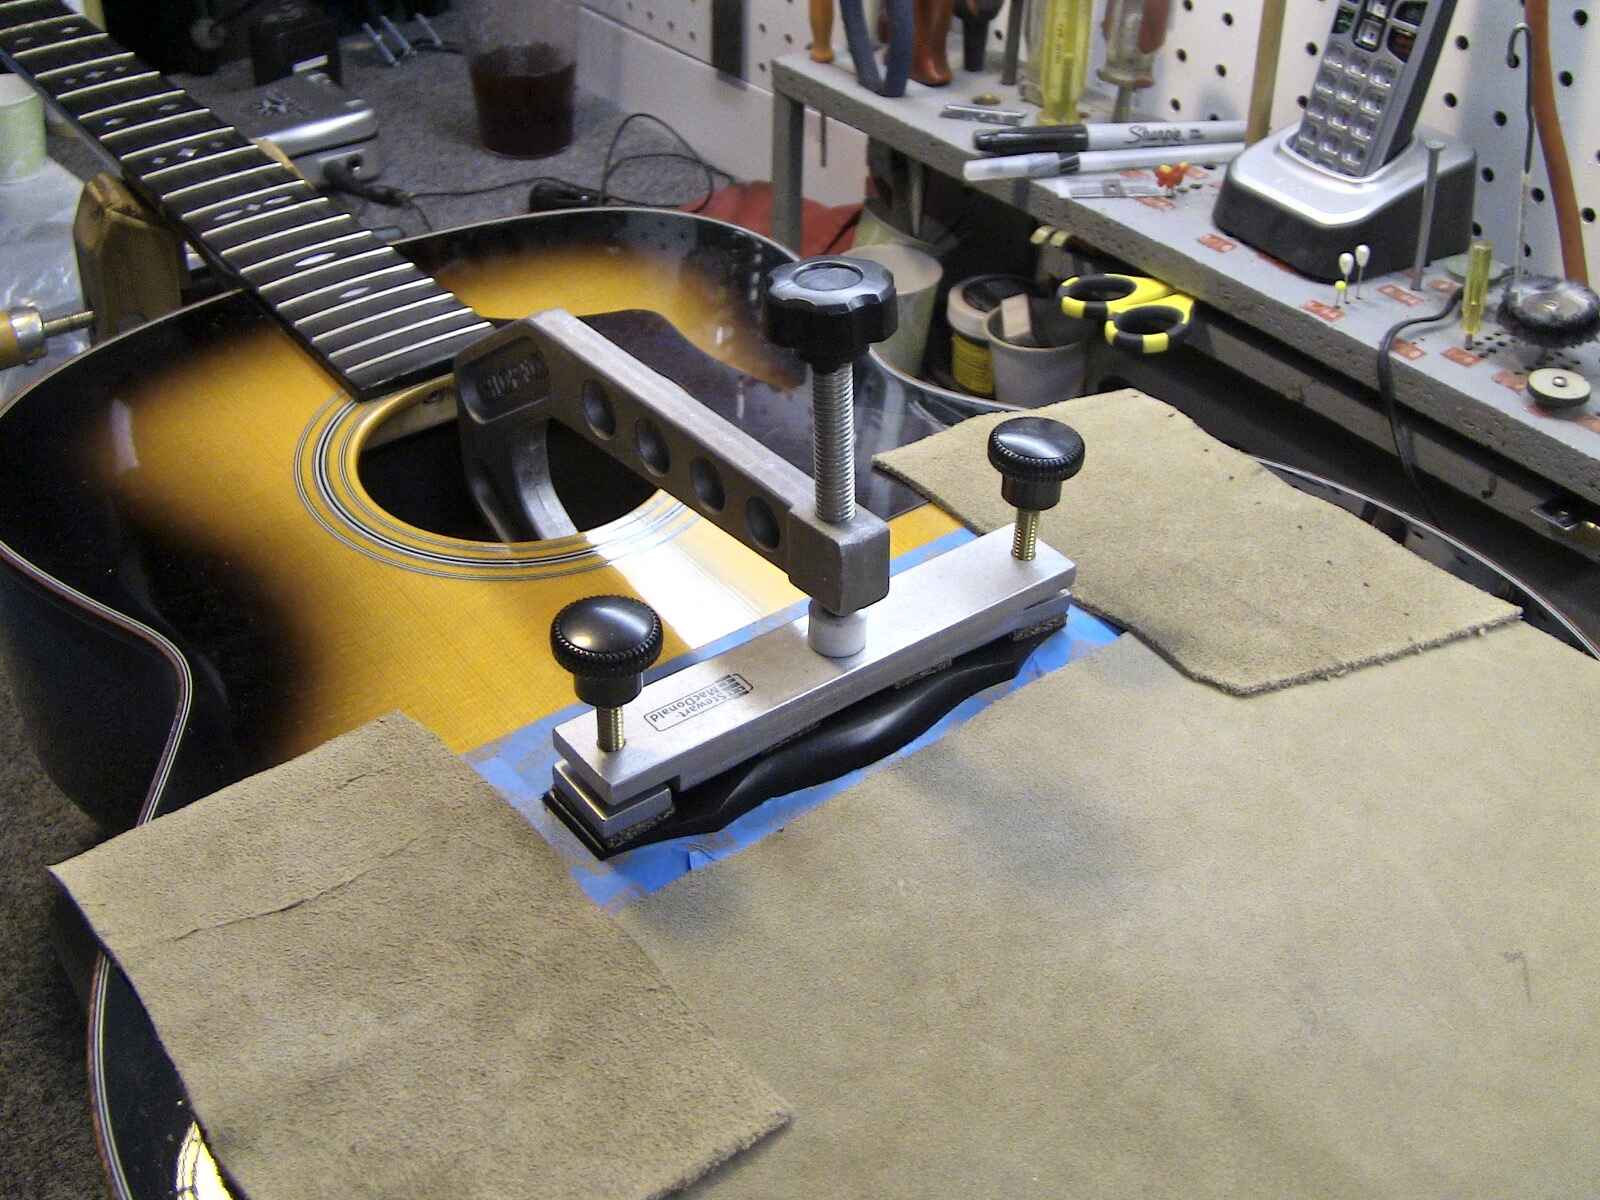
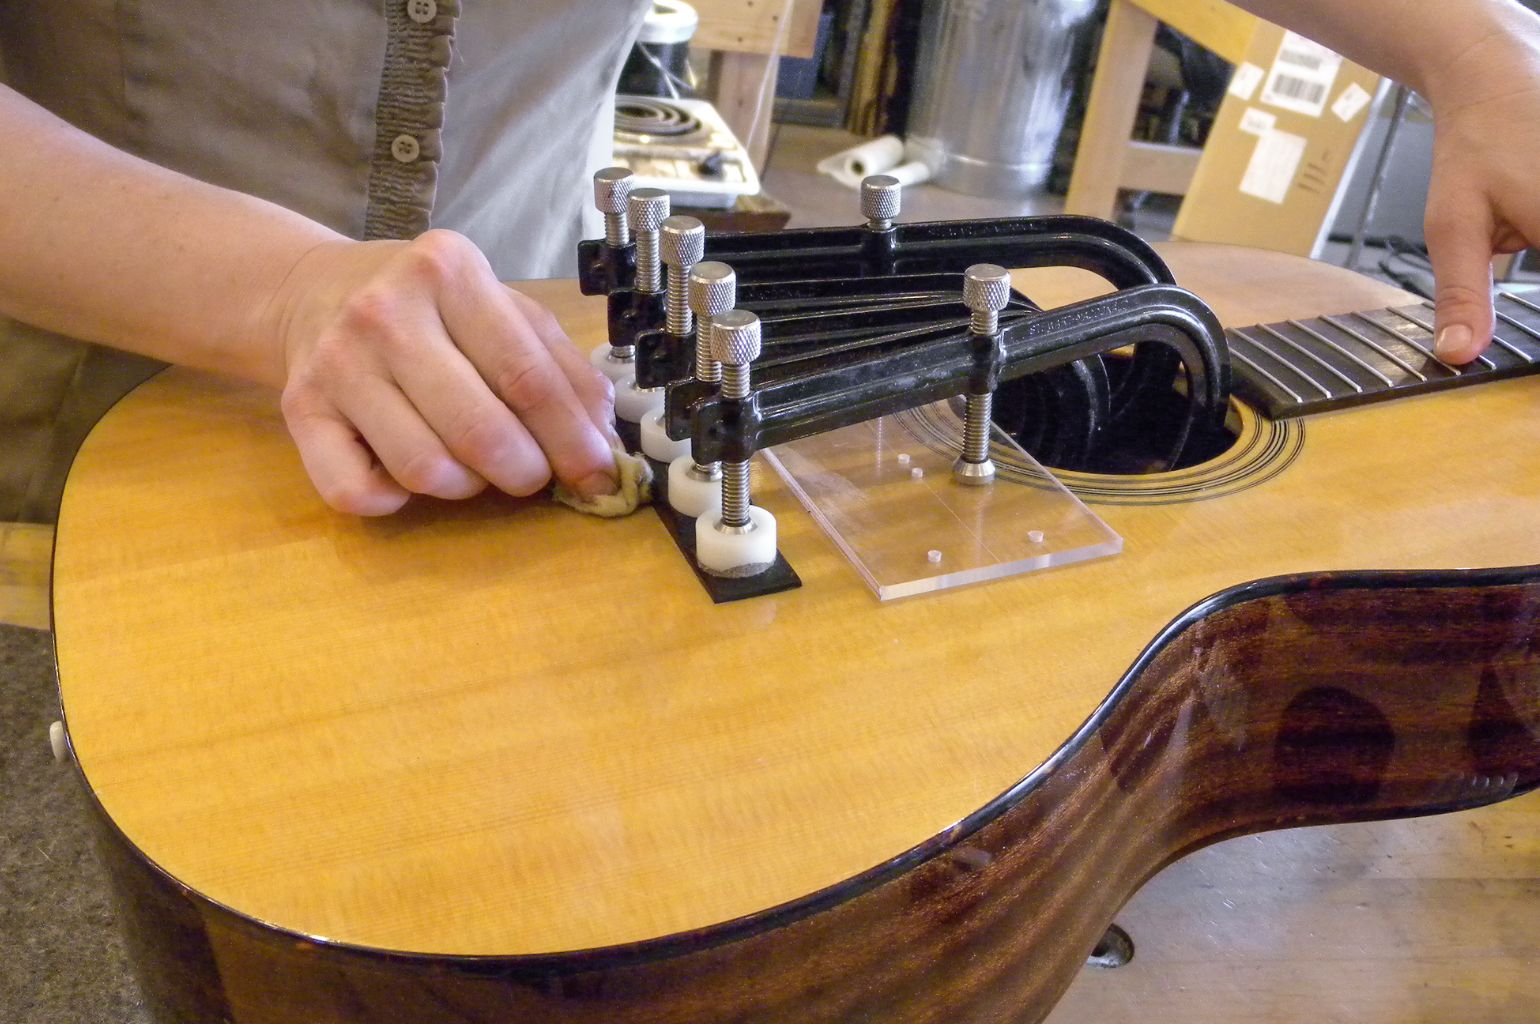
- Secure the bridge: To prevent the bridge from moving while the adhesive cures, place clamps on the bridge wings. Use caution and ensure that the clamps do not put excessive pressure on the guitar body, as this can cause damage.
Allow the adhesive ample time to cure according to the manufacturer’s instructions. This will ensure a strong bond between the bridge and the guitar body. Avoid putting any tension on the strings or moving the guitar during this curing period.
By following these steps, you will properly fit the new bridge onto your guitar, ensuring stability and optimal sound transfer. Once the adhesive has fully cured, you can move on to the next steps of removing excess glue and applying finishing touches.
Gluing the Bridge
Gluing the bridge is a critical step in the process of repairing a bridge on an acoustic guitar. Properly applying the adhesive will ensure a strong and secure bond between the bridge and the guitar body. Here’s a step-by-step guide on how to glue the bridge:
- Prepare the adhesive: Follow the manufacturer’s instructions to prepare the guitar bridge adhesive or epoxy glue. Ensure that you have the right consistency and amount of adhesive for the job.
- Apply the adhesive: Using a small brush or toothbrush, carefully apply the adhesive to the surface of the guitar body where the bridge will be placed. Be sure to spread the adhesive evenly, covering the entire area where the bridge will make contact.
- Apply adhesive to the underside of the bridge: Apply a thin layer of adhesive to the bottom surface of the bridge. Pay attention to the edges and corners, as these areas require sufficient adhesive for a strong bond.
- Position the bridge: Carefully place the bridge onto the adhesive on the guitar body, ensuring that it aligns properly with the bridge pin holes. Apply even pressure to firmly press the bridge into place.
- Secure the bridge: Use clamps or other means to secure the bridge in place while the adhesive cures. Ensure that the clamping pressure is evenly distributed and not too tight, as excessive pressure can damage the guitar body.
- Wipe off excess adhesive: Immediately after securing the bridge, use a clean, damp cloth or sponge to wipe away any excess adhesive that may have squeezed out from under the bridge. Take care to avoid smearing the adhesive or damaging the guitar’s finish.
Once the adhesive has fully cured according to the manufacturer’s instructions, you can proceed with the next step of removing any remaining excess glue.
By following these steps, you will effectively glue the bridge back onto the guitar body, ensuring a strong and secure bond. This will restore the functionality and tone of your acoustic guitar.
Removing Excess Glue
After gluing the bridge onto the guitar body, it’s important to remove any excess glue that may have seeped out during the bonding process. Removing excess glue will not only improve the appearance of the guitar but also prevent any unwanted buildup that could affect the playability and sound quality. Here’s how to remove excess glue:
- Wait for the glue to dry: Before attempting to remove the excess glue, ensure that it has fully dried and cured according to the adhesive manufacturer’s instructions. This typically takes several hours or even overnight, depending on the specific adhesive used.
- Gently scrape off dried glue: Once the glue is completely dry, use a small, flat-edged tool, such as a plastic putty knife or a credit card, to gently scrape off the excess glue. Take care not to press too hard, as this can damage the guitar’s finish.
- Sand down any remaining residue: If there are still traces of dried glue left after scraping, use fine-grit sandpaper to gently sand down the affected areas. Be cautious and use light pressure to avoid scratching the guitar’s finish.
- Inspect and clean the area: After removing the excess glue, closely inspect the area around the bridge to ensure that all residue has been removed. Use a soft cloth or a microfiber towel to wipe away any remaining debris or dust.
- Polish or buff the area: To restore the shine and smoothness of the guitar’s finish, use a guitar polish or cleaner to buff the area around the bridge. Follow the manufacturer’s instructions for the appropriate application method.
By taking the time to remove any excess glue, you will not only improve the aesthetic appearance of the guitar but also ensure that there are no obstructions or uneven surfaces that could affect the playability or sound quality. Properly cleaning and polishing the area will give your repaired guitar a professional and finished look.
With the excess glue removed and the area cleaned, your repaired guitar is almost ready for action. All that’s left to do is add the finishing touches.
Finishing Touches
After successfully repairing the bridge on your acoustic guitar, it’s time to add the finishing touches that will enhance the overall appearance and playability of the instrument. Paying attention to these details will not only make your guitar look great but also ensure that it performs at its best. Here are some finishing touches to consider:
- Trim the strings: If you haven’t done so already, trim the excess length of the guitar strings. Use wire cutters or sharp scissors to cut the strings just above the bridge to ensure a neat and tidy appearance.
- Tune and adjust the guitar: After restringing the guitar, tune it to the desired pitch and check the overall intonation and playability. Make any necessary adjustments to the truss rod, saddle height, or string action to ensure optimal playability and tonality.
- Clean and polish the entire guitar: Take the time to clean and polish the entire guitar, not just the repaired area. Use a soft cloth or microfiber towel along with guitar polish or cleaner to remove any fingerprints, smudges, or dust and give your guitar a beautiful shine.
- Protect the guitar: Consider applying a thin layer of guitar wax or polish to protect the guitar body from scratches and provide additional shine. Follow the manufacturer’s instructions for application and use caution to avoid excess buildup.
- Regular maintenance: Once your guitar is repaired and looking its best, make it a habit to regularly maintain and care for your instrument. This includes regularly cleaning the strings, wiping down the body, and keeping it stored in a suitable case or stand when not in use.
By giving attention to these finishing touches, you’ll not only have a fully repaired guitar but also a well-maintained and aesthetically pleasing instrument. Regular maintenance and care will help prolong the life of your guitar and ensure that it continues to perform at its best.
Now that you’ve completed the finishing touches, take some time to enjoy playing your newly repaired acoustic guitar. Let the beautiful sound and improved playability inspire your musical journey.
Conclusion
Repairing a bridge on an acoustic guitar is a task that can be accomplished with some basic tools, patience, and attention to detail. By following the steps outlined in this guide, you can successfully repair a damaged or loose bridge, restoring the functionality and sound quality of your guitar.
Throughout the process, it is important to assess the damage, remove the bridge carefully, clean the guitar body, prepare the new bridge, glue it securely onto the guitar body, and remove any excess glue. The finishing touches, such as trimming the strings, tuning and adjusting the guitar, and cleaning and polishing the entire instrument, will add the final touches to your repair work.
Remember to always use the appropriate tools and materials, follow safety precautions, and take your time to ensure a proper repair. If you encounter any difficulties or feel uncertain about any step, it is advisable to seek professional help to avoid any accidental damage to your beloved instrument.
By taking care of your acoustic guitar and regularly performing maintenance tasks, including bridge repair when necessary, you extend the life of your instrument and ensure that it continues to produce beautiful sounds for years to come.
So, pick up your repaired guitar, strum those strings, and enjoy the pleasure of playing on an instrument that has been restored to its optimal condition. Happy playing!