Introduction
The iPhone 12 is a remarkable piece of technology that seamlessly integrates into our daily lives, providing connectivity and convenience at our fingertips. One of the essential components of the iPhone 12 is the SIM card, which allows users to connect to their mobile network and access a myriad of services. While the iPhone 12 boasts a sleek and sophisticated design, it's important to know how to safely extract the SIM card when needed. Whether you're switching to a new device or troubleshooting connectivity issues, understanding the proper procedure for removing the SIM card from your iPhone 12 is crucial.
In this guide, we will walk you through the step-by-step process of safely extracting the SIM card from your iPhone 12. By following these instructions, you can ensure that the delicate components of your device remain unharmed while successfully accessing the SIM card tray. With a few simple steps, you'll be able to remove the SIM card from your iPhone 12 with confidence and ease.
It's important to note that the SIM card plays a pivotal role in connecting your iPhone 12 to your mobile network, enabling you to make calls, send messages, and access mobile data. Therefore, handling the SIM card and its tray with care is essential to prevent any damage to the delicate components and maintain the seamless functionality of your device.
Now, let's delve into the process of safely extracting the SIM card from your iPhone 12, ensuring that you can navigate this task with precision and peace of mind.
Step 1: Turn off the iPhone 12
Before embarking on the process of removing the SIM card from your iPhone 12, it is imperative to begin by turning off the device. This initial step serves as a crucial precautionary measure to ensure the safety of both the iPhone 12 and the SIM card during the extraction process.
To power off your iPhone 12, simply press and hold the Side button along with either the Volume Up or Down button until the "slide to power off" slider appears on the screen. Once the slider appears, carefully swipe it from left to right to initiate the shutdown process. It's important to wait for the device to power down completely before proceeding to the next step.
Turning off the iPhone 12 before removing the SIM card serves multiple purposes. Firstly, it minimizes the risk of damaging the SIM card or the SIM card tray due to unexpected movements or vibrations that may occur while handling the device. Additionally, powering off the iPhone 12 ensures that the SIM card is not actively in use during the extraction process, reducing the likelihood of any potential data corruption or disruption to the network connection.
By following this fundamental step of turning off the iPhone 12, you are taking a proactive approach to safeguarding the integrity of your device and the SIM card. This simple yet essential precaution sets the stage for a smooth and secure SIM card extraction process, allowing you to proceed with the subsequent steps confidently and without any unnecessary risks.
Now that you have successfully powered off your iPhone 12, you are ready to move on to the next step in the process of safely extracting the SIM card from your device. With the iPhone 12 powered down, you can proceed with the subsequent steps knowing that you have taken the necessary precautions to ensure a seamless and secure SIM card removal experience.
Step 2: Locate the SIM card tray
Once your iPhone 12 is safely powered off, the next step is to locate the SIM card tray. The SIM card tray on the iPhone 12 is an essential component that securely houses the SIM card and facilitates its seamless integration with the device. To locate the SIM card tray, you will need to identify the specific slot designed to accommodate the SIM card tray on your iPhone 12.
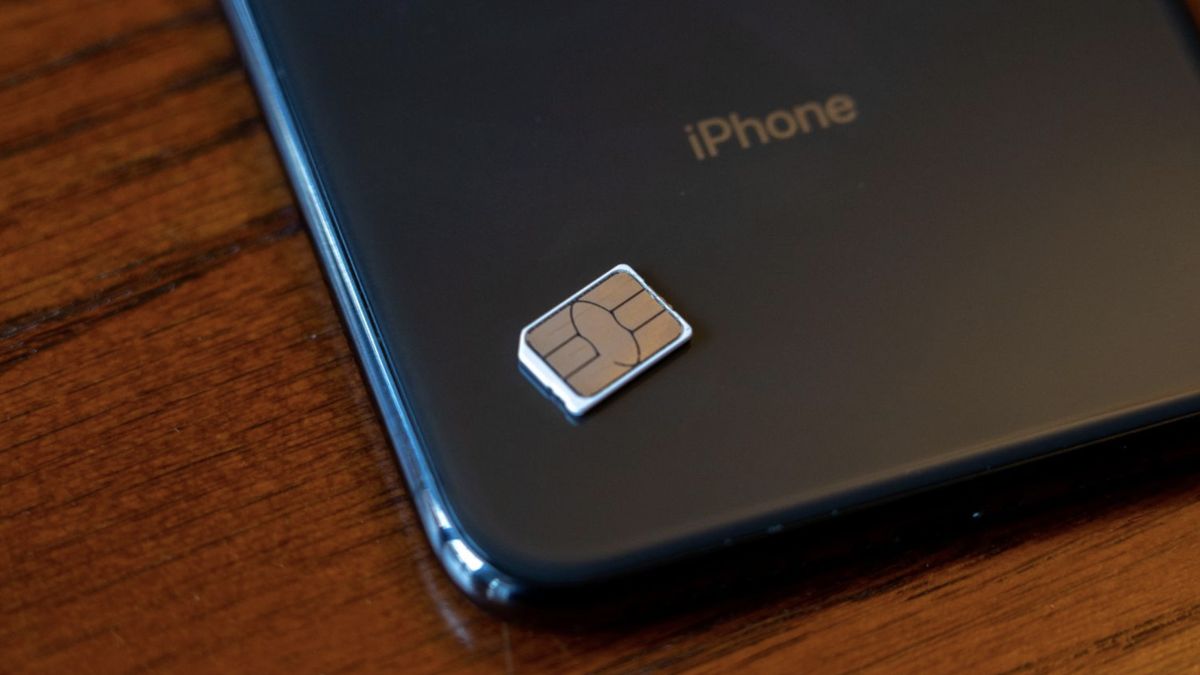
On the right side of the iPhone 12, you will notice a small, recessed pinhole – this is the SIM card tray eject hole. The location of the SIM card tray eject hole may vary slightly depending on the specific model of the iPhone 12, but it is typically positioned along the right edge of the device. This strategically placed pinhole provides access to the SIM card tray, allowing you to initiate the extraction process with precision and ease.
Identifying the SIM card tray eject hole is the first step in locating the SIM card tray, as it serves as the entry point for the SIM eject tool. This specialized tool is designed to safely and effectively release the SIM card tray from its housing, enabling you to access the SIM card without causing any damage to the device.
As you familiarize yourself with the exterior of your iPhone 12, take note of the SIM card tray eject hole's position, ensuring that you can easily access it when the time comes to proceed with the SIM card extraction process. By locating the SIM card tray eject hole, you are setting the stage for the subsequent steps, laying the groundwork for a smooth and successful SIM card removal experience.
With the SIM card tray eject hole identified, you have completed the crucial task of locating the SIM card tray on your iPhone 12. This pivotal step brings you one step closer to safely extracting the SIM card from your device, as you prepare to proceed with the subsequent steps in the extraction process. Your careful attention to detail and precision in locating the SIM card tray eject hole will prove instrumental as you navigate the remaining steps with confidence and ease.
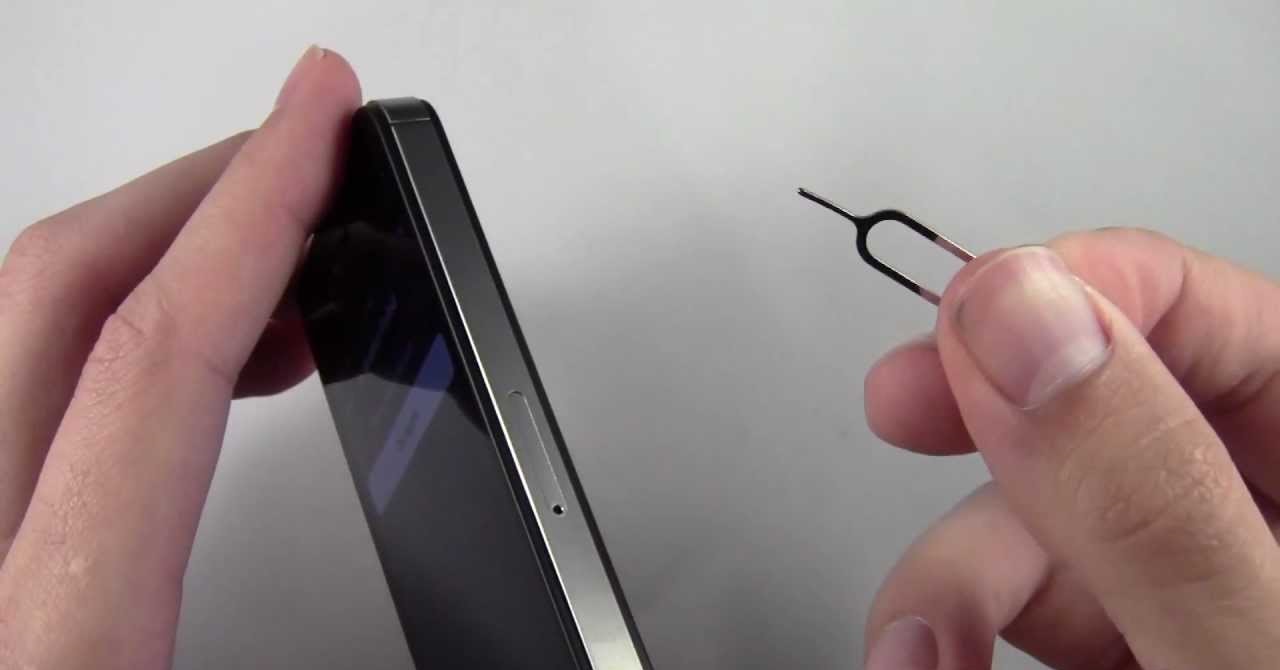
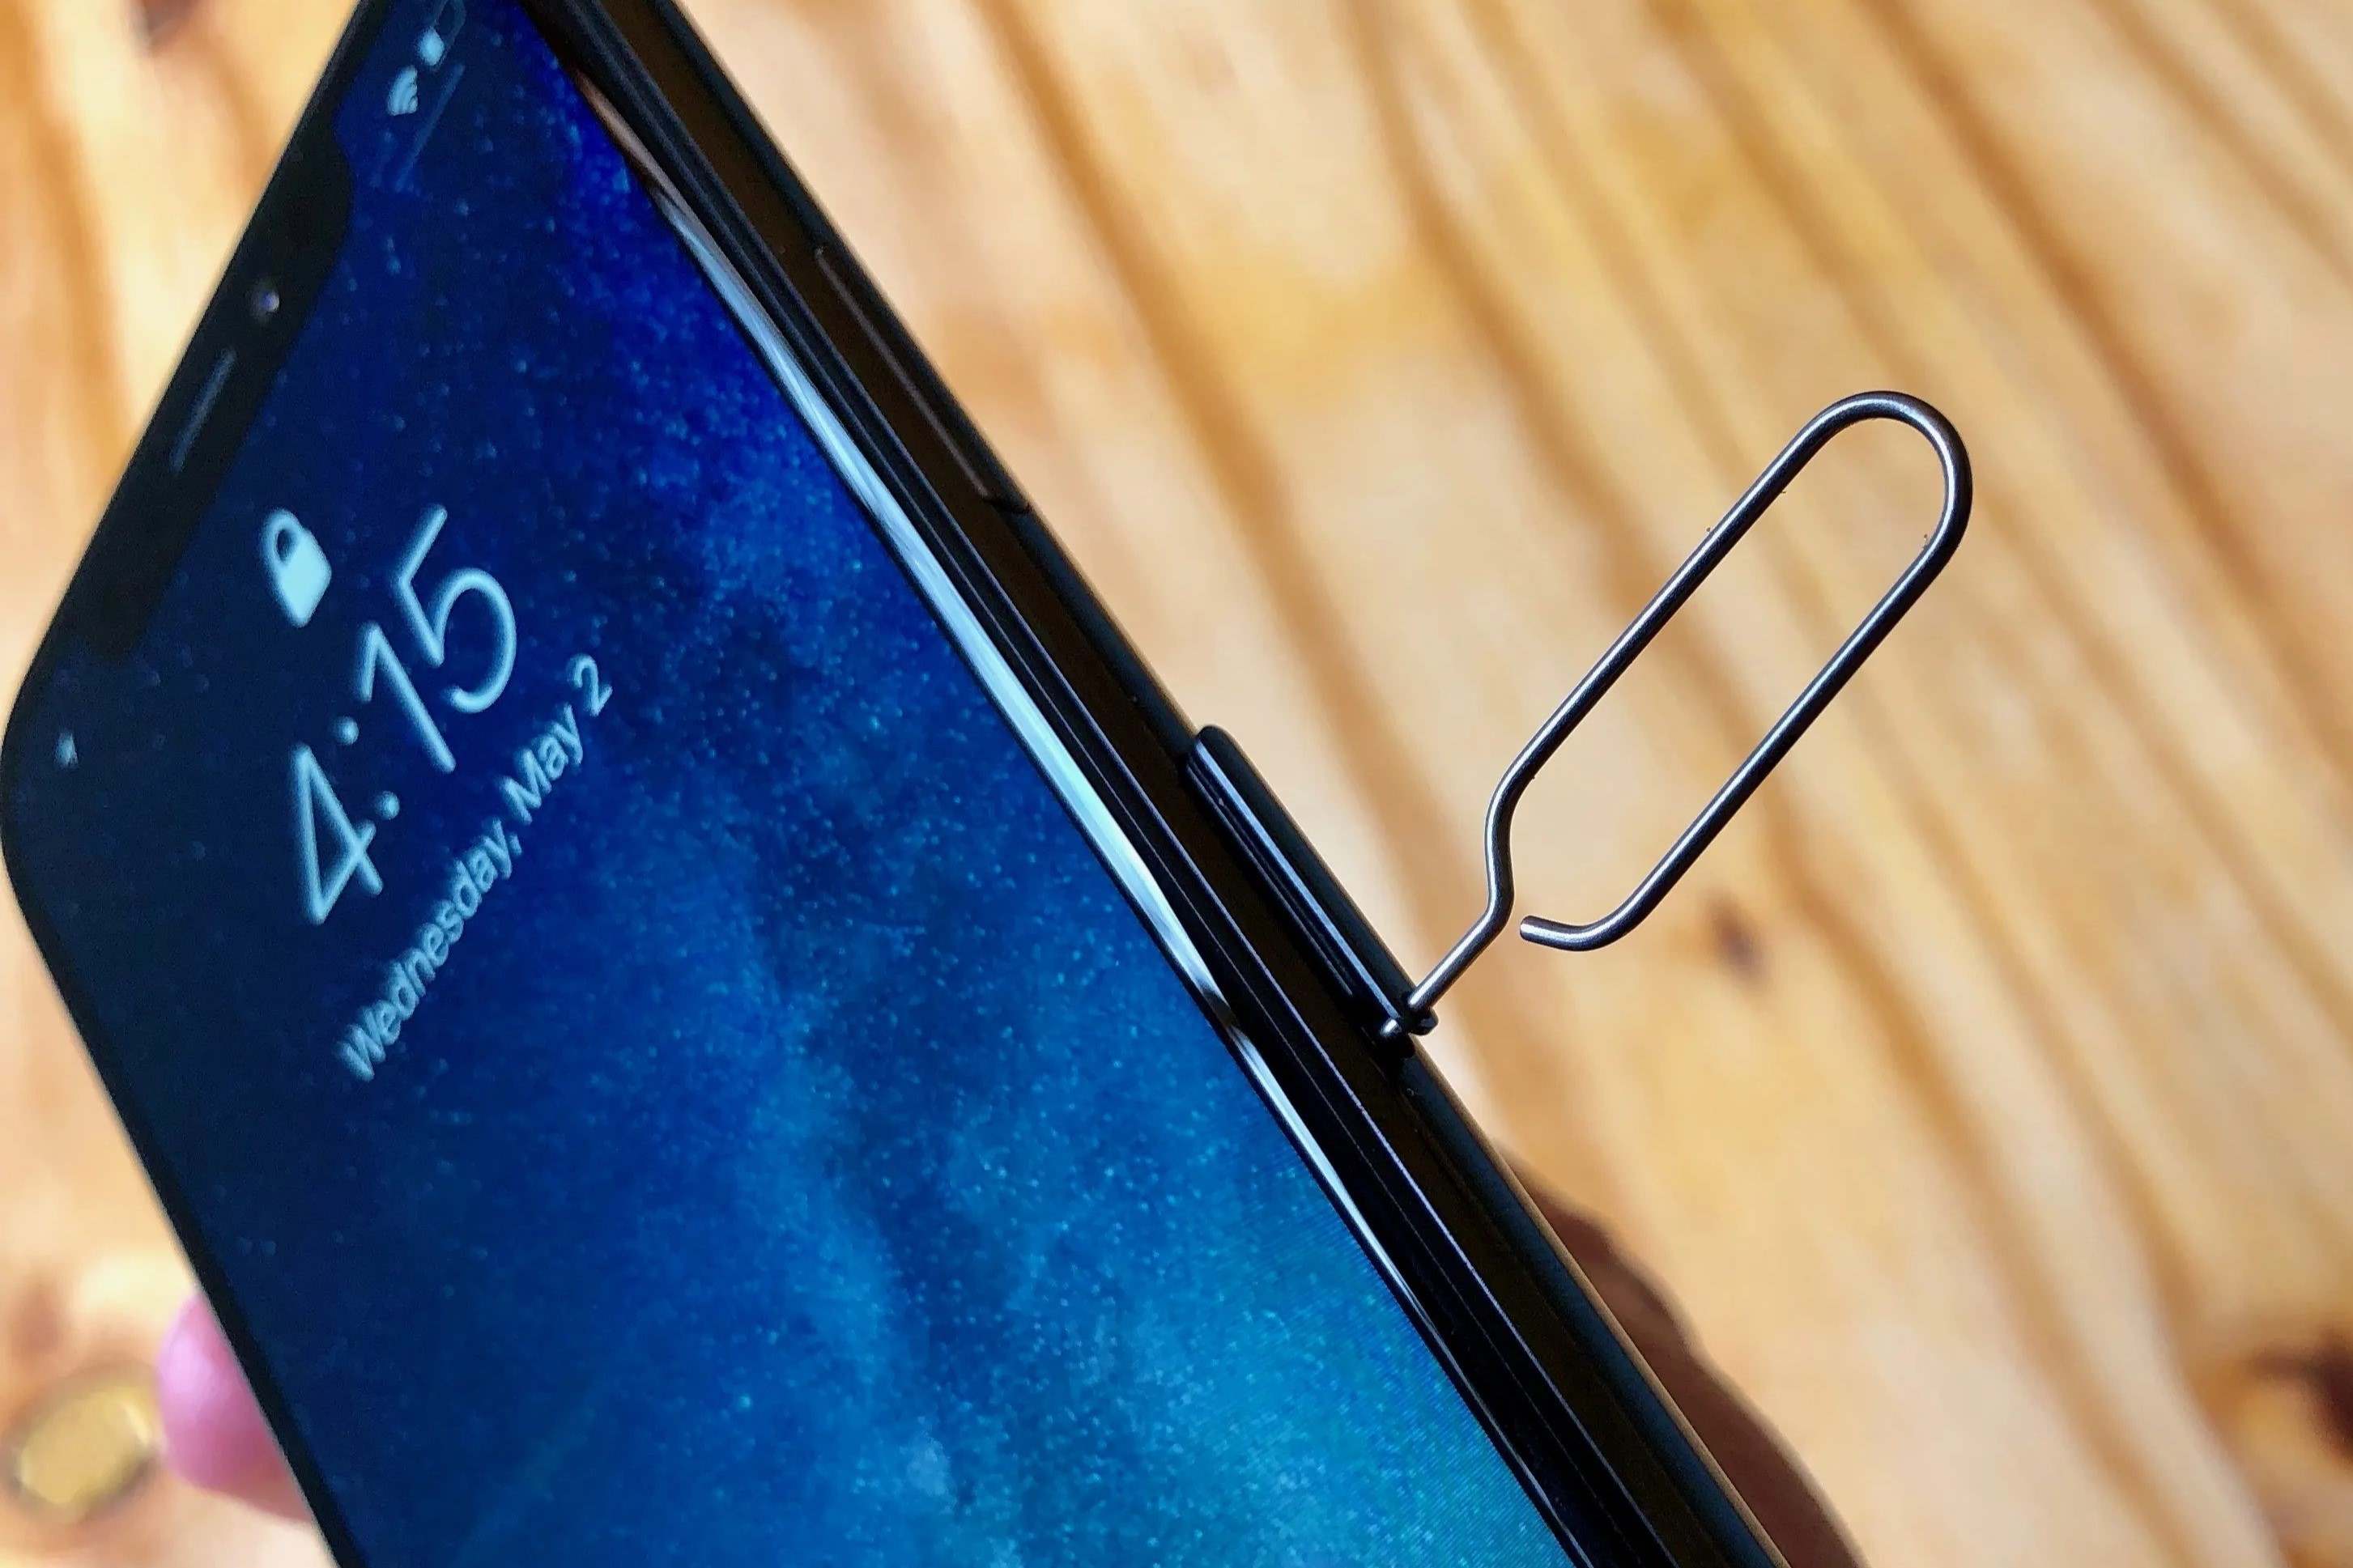
Step 3: Insert the SIM eject tool
With the SIM card tray location identified, the next crucial step in safely extracting the SIM card from your iPhone 12 is to insert the SIM eject tool into the designated SIM card tray eject hole. The SIM eject tool, a small and slender instrument provided by Apple, is specifically designed to facilitate the smooth removal of the SIM card tray without causing any damage to the device.
To initiate this step, retrieve the SIM eject tool from its original packaging or utilize a suitable alternative, such as a straightened paperclip, if the original tool is unavailable. The SIM eject tool features a narrow, pointed end that is inserted into the SIM card tray eject hole, allowing you to release the SIM card tray from its housing with precision and ease.
Hold the iPhone 12 securely in one hand, ensuring a stable grip, and position the pointed end of the SIM eject tool directly into the SIM card tray eject hole. Apply gentle pressure to the tool, maintaining a steady and controlled approach as you insert it into the pinhole. The SIM card tray should begin to disengage from its housing, signaling that the tool has successfully initiated the release mechanism.
As you carefully insert the SIM eject tool into the SIM card tray eject hole, it's important to exercise caution and avoid applying excessive force that could potentially damage the device. The SIM eject tool is designed to engage the internal mechanism of the SIM card tray, allowing for a smooth and controlled extraction process without compromising the integrity of the iPhone 12.
By following this step with precision and care, you are positioning yourself for a seamless and secure SIM card removal experience. With the SIM eject tool successfully inserted into the SIM card tray eject hole, you are now prepared to proceed to the subsequent step, where you will gently push to eject the SIM tray from your iPhone 12, allowing for the safe retrieval of the SIM card.
With the SIM eject tool effectively engaged in the SIM card tray eject hole, you have completed the pivotal task of preparing the SIM card tray for extraction, ensuring that you can proceed with the subsequent steps confidently and without any unnecessary risks to the device or the SIM card.
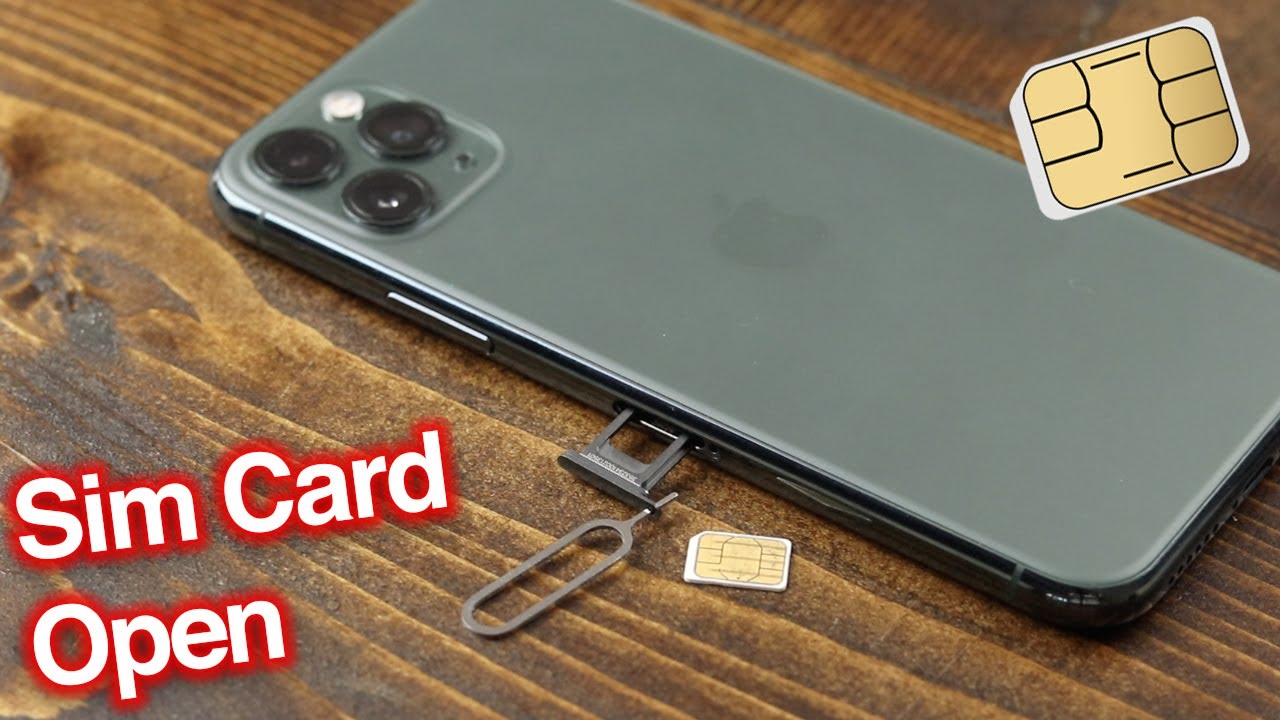
Step 4: Gently push to eject the SIM tray
With the SIM eject tool securely inserted into the SIM card tray eject hole, the next step in safely extracting the SIM card from your iPhone 12 involves gently pushing to eject the SIM tray from its housing. This delicate maneuver requires a steady and controlled approach to ensure the smooth release of the SIM tray without causing any damage to the device or the SIM card.
Applying gentle pressure to the SIM eject tool, continue to push steadily into the SIM card tray eject hole. As you do so, you will feel a subtle resistance, indicating that the internal mechanism of the iPhone 12 is disengaging the SIM tray from its locked position. It's crucial to maintain a steady and even pressure, avoiding any abrupt or forceful movements that could potentially compromise the integrity of the SIM card tray or the device itself.
As you continue to push the SIM eject tool, you will notice the SIM tray gradually protruding from the iPhone 12. This gradual emergence is a testament to the effectiveness of the SIM eject tool in facilitating a smooth and controlled extraction process. It's important to exercise patience and precision during this step, allowing the SIM tray to extend fully from the device without any undue haste.
Once the SIM tray has been fully ejected from the iPhone 12, carefully remove the SIM eject tool from the SIM card tray eject hole, ensuring that the tool is disengaged from the device with care. With the SIM tray now accessible, gently grasp it with your fingers, taking care to handle it with delicacy and avoiding any sudden movements that could dislodge the SIM card or cause damage to the tray.
By following this step with attentiveness and precision, you are positioning yourself for a successful and secure SIM card extraction experience. The gentle yet deliberate approach to pushing and ejecting the SIM tray from your iPhone 12 reflects your commitment to safeguarding the integrity of the device and the SIM card, ensuring that the extraction process proceeds seamlessly and without any unnecessary risks.
With the SIM tray successfully ejected from your iPhone 12, you are now prepared to proceed to the next step, where you will carefully remove the SIM card from the tray, concluding the extraction process with finesse and confidence.
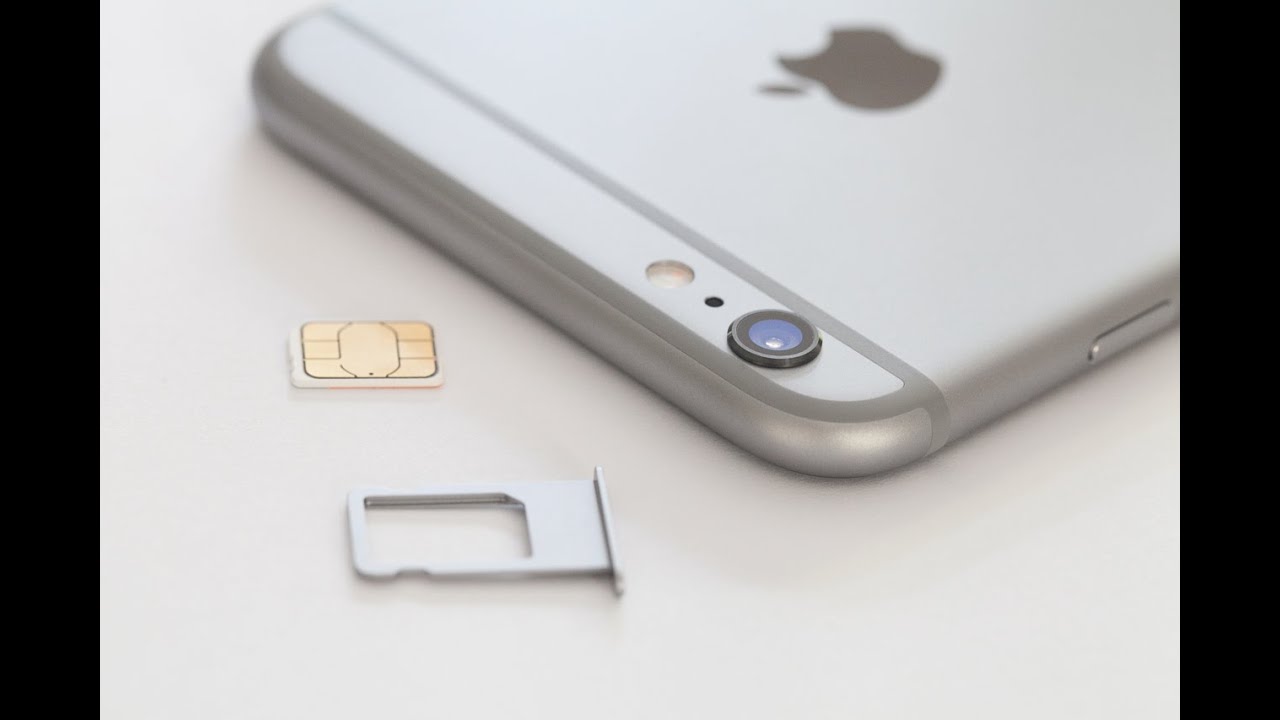
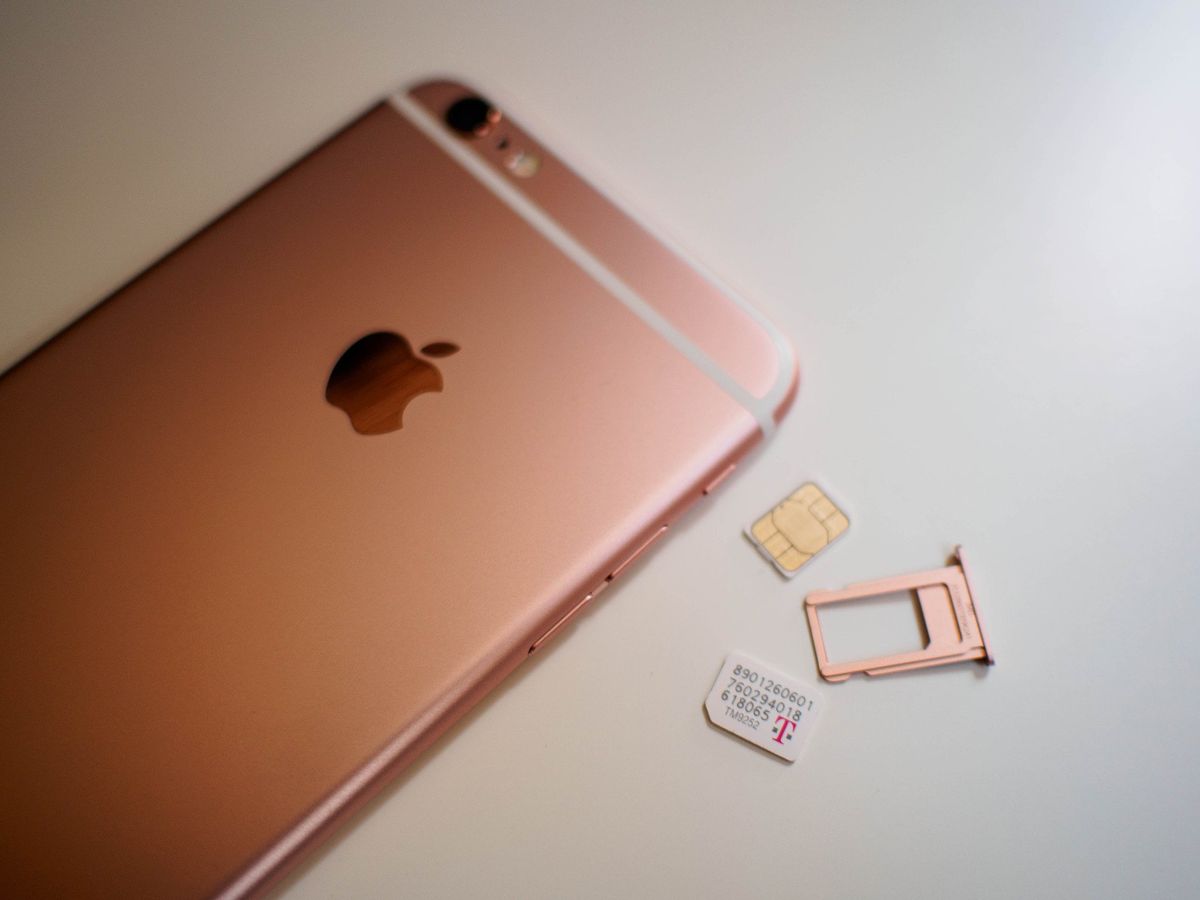
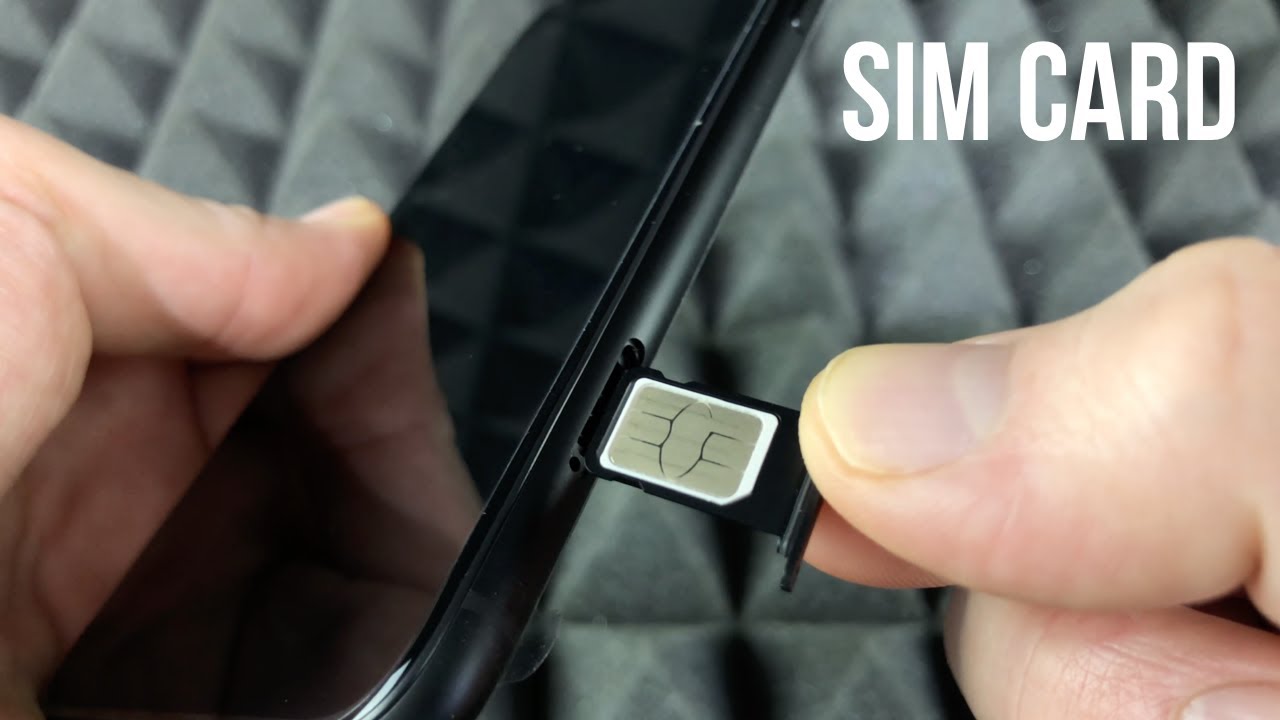
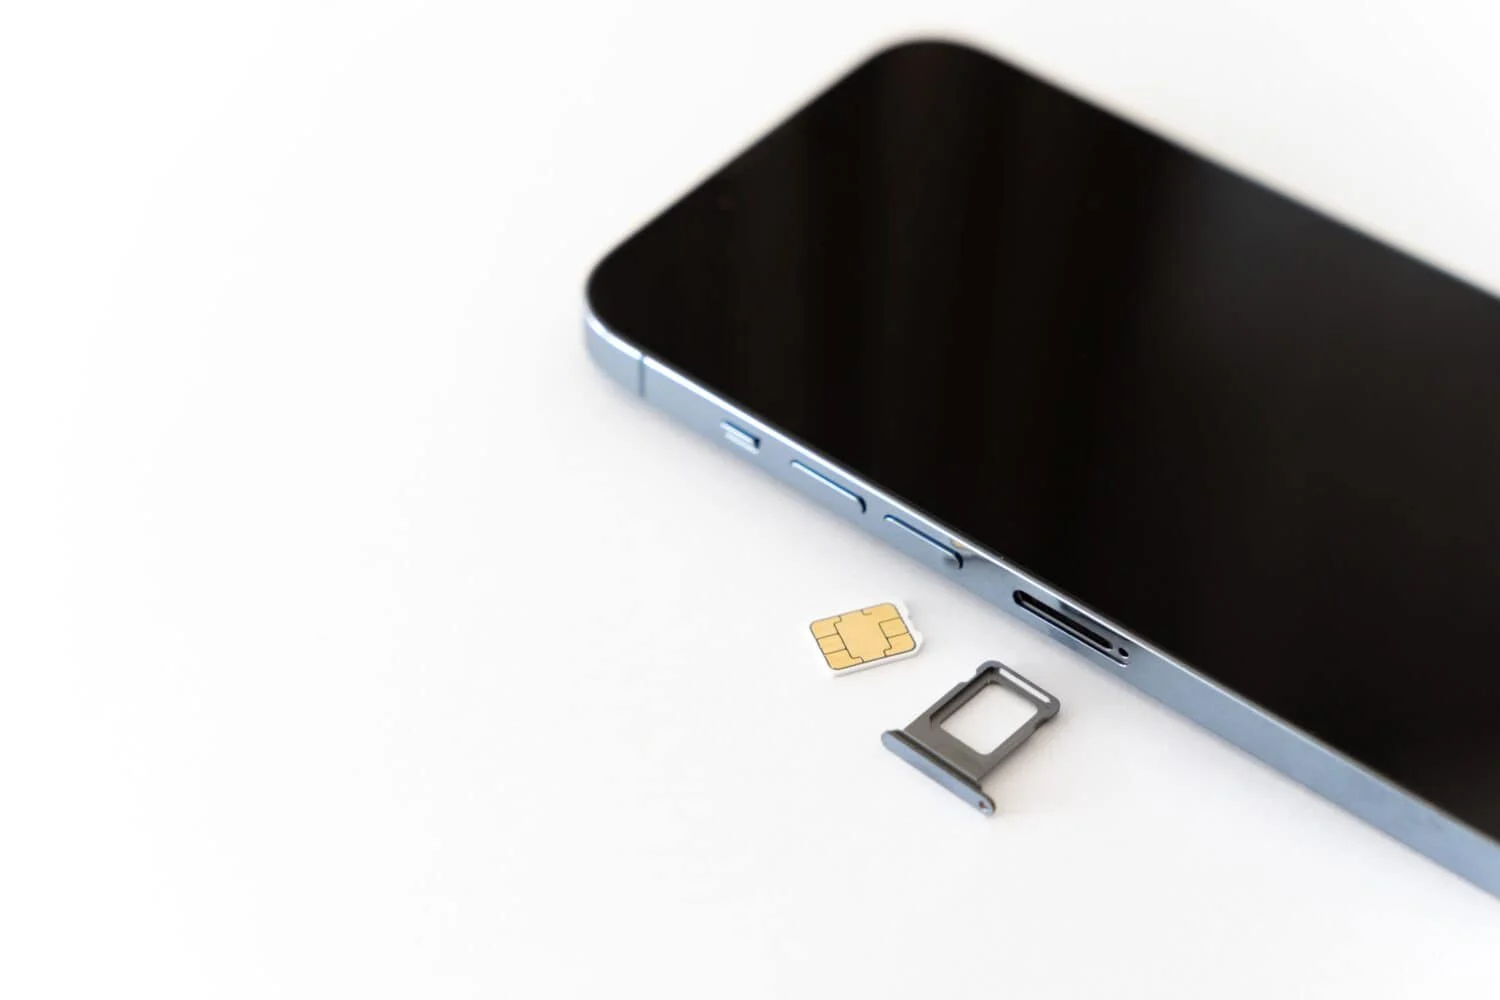
Step 5: Remove the SIM card
With the SIM tray now accessible, it's time to delicately remove the SIM card from the tray. The SIM card is a small, rectangular chip that is vital for connecting your iPhone 12 to your mobile network. It's essential to handle the SIM card with care to avoid any damage to its delicate components.
Gently examine the SIM tray to locate the position of the SIM card. You will notice a small indentation or outline within the tray that corresponds to the size and shape of the SIM card. This visual cue serves as a guide for correctly orienting and removing the SIM card from the tray.
Using your fingertips, carefully lift the SIM card from the tray, ensuring a steady and controlled grip to prevent any accidental slippage or mishandling. The SIM card should come free from the tray with minimal effort, allowing you to retrieve it smoothly without causing any damage to its surface or the tray itself.
As you remove the SIM card, take note of its orientation within the tray. The SIM card features a distinctive notch or corner that aligns with a corresponding notch in the tray, ensuring that it can only be inserted in one specific orientation. This design prevents incorrect insertion and ensures the proper functioning of the SIM card within the device.
Once the SIM card has been successfully removed from the tray, take a moment to inspect it for any signs of damage or wear. Check for any visible scratches, bends, or discoloration that may indicate potential issues with the SIM card. It's important to handle the SIM card with caution, as any damage to its surface or internal components could impact its functionality when reinserted into the device.
With the SIM card safely removed from the tray and carefully inspected, you have completed a crucial phase of the SIM card extraction process. Your meticulous approach to handling the SIM card reflects your commitment to preserving its integrity and ensuring a seamless transition as you proceed with the subsequent steps.
Now that the SIM card has been successfully removed from the tray, you are ready to advance to the next step, where you will reinsert the SIM tray into your iPhone 12, finalizing the extraction process with precision and care.
Step 6: Reinsert the SIM tray into the iPhone 12
With the SIM card safely removed from the tray, the final step in the process of safely extracting the SIM card from your iPhone 12 is to reinsert the SIM tray into the device. This crucial step ensures that the SIM card is securely housed within the iPhone 12, allowing for seamless connectivity and functionality upon completion of the extraction process.
Begin by carefully inspecting the SIM tray to ensure that it is free from any debris or obstructions that could impede the reinsertion process. Take a moment to visually examine the interior of the SIM tray slot on your iPhone 12, verifying that it is clean and devoid of any foreign objects that may hinder the proper seating of the SIM tray.
Next, orient the SIM tray in the correct position for reinsertion, ensuring that the notch or corner of the tray aligns with the corresponding notch within the SIM tray slot on the iPhone 12. This alignment is essential for the proper seating of the SIM tray, as it ensures that the SIM card will be inserted in the correct orientation, allowing for seamless integration with the device.
Carefully position the SIM tray above the SIM tray slot, aligning it with precision to facilitate a smooth and effortless reinsertion process. With a steady and controlled approach, gently guide the SIM tray into the slot, ensuring that it sits flush with the exterior of the device. Exercise caution to avoid any abrupt movements that could potentially dislodge the SIM tray or cause damage to the device.
As the SIM tray is reinserted into the iPhone 12, you will feel a subtle resistance as it securely seats itself within the slot. This tactile feedback indicates that the SIM tray has been successfully repositioned within the device, ready to accommodate the SIM card and facilitate its seamless functionality.
Once the SIM tray is securely reinserted into your iPhone 12, take a moment to verify that it sits flush with the device's exterior, indicating a proper and secure seating. With the SIM tray successfully repositioned, the extraction process is brought to a close, and your iPhone 12 is ready to resume its connectivity and functionality with the SIM card securely in place.
By following this final step with precision and care, you have completed the essential process of safely extracting and reinserting the SIM card into your iPhone 12, ensuring that the device remains in optimal condition and ready for seamless operation.
Conclusion
In conclusion, the process of safely extracting the SIM card from your iPhone 12 is a fundamental task that requires precision, care, and attention to detail. By following the step-by-step guide outlined in this article, you can confidently navigate the extraction process while safeguarding the integrity of both the device and the SIM card.
Beginning with the crucial step of powering off the iPhone 12, you set the stage for a secure and controlled extraction process, minimizing the risk of damage to the device and ensuring that the SIM card is not actively in use during the removal procedure. Locating the SIM card tray eject hole and inserting the SIM eject tool with precision further facilitated the smooth initiation of the extraction process, laying the groundwork for the subsequent steps.
Gently pushing to eject the SIM tray and delicately removing the SIM card from the tray exemplified your commitment to handling the delicate components with care and attention. The deliberate and controlled approach employed during these steps ensured the successful extraction of the SIM card without compromising its integrity.
Finally, reinserting the SIM tray into the iPhone 12 with precision and care brought the extraction process to a seamless conclusion, ensuring that the SIM card is securely housed within the device, ready to resume its pivotal role in connecting you to your mobile network.
By adhering to the guidelines outlined in this comprehensive guide, you have not only successfully extracted the SIM card from your iPhone 12 but also demonstrated a commendable commitment to maintaining the device's integrity and functionality. Your dedication to precision and care throughout the extraction process reflects your understanding of the importance of safeguarding the delicate components of the iPhone 12.
As you proceed with confidence and ease through the process of safely extracting the SIM card from your iPhone 12, you contribute to the preservation of the device's seamless connectivity and functionality, ensuring that it continues to serve as a reliable companion in your daily endeavors.
With the completion of the extraction process, you can rest assured that your iPhone 12 remains in optimal condition, ready to resume its essential role in keeping you connected to the world around you.