Introduction
Replacing the screen of your Moto G Power can be a daunting task, especially if you've never attempted a repair like this before. However, with the right tools, a bit of patience, and a clear understanding of the process, it's entirely possible to restore your device to its former glory. Whether your screen has been cracked, scratched, or is simply unresponsive, this guide will walk you through the necessary steps to successfully replace the screen of your Moto G Power.
By following this comprehensive tutorial, you'll not only save money on costly professional repairs but also gain a sense of accomplishment by taking matters into your own hands. Additionally, you'll have the opportunity to familiarize yourself with the internal components of your device, which can be a valuable learning experience for any tech enthusiast.
So, roll up your sleeves, gather the required tools and materials, and let's embark on this DIY journey to breathe new life into your Moto G Power. With careful attention to detail and a steady hand, you'll soon have a fully functional and visually pristine smartphone once again. Let's dive into the step-by-step process of replacing the screen of your Moto G Power.
Tools and Materials Needed
Before delving into the process of replacing the screen of your Moto G Power, it's crucial to ensure that you have the necessary tools and materials at your disposal. Here's a comprehensive list of what you'll need to successfully undertake this repair:
Tools:
- Precision Screwdriver Set: A set of precision screwdrivers with various head types is essential for disassembling the device without causing damage to the internal components.
- Plastic Opening Tools: These non-conductive and non-scratch tools are vital for prying open the phone's casing without leaving any marks or causing harm to the delicate components.
- Heat Gun or Hair Dryer: To soften the adhesive securing the back cover and other components, a heat gun or hair dryer can be used with caution to avoid overheating the device.
- Tweezers: Precision tweezers are indispensable for handling small screws and delicate components during the disassembly and reassembly process.
- Suction Cup: A suction cup, ideally with a handle, can aid in lifting the screen and separating it from the adhesive for safe removal.
- Spudger Tool: This tool assists in disconnecting cables and prying apart components without causing damage.
Materials:
- Replacement Screen: Ensure you have a compatible replacement screen specifically designed for the Moto G Power model to guarantee a perfect fit and functionality.
- Adhesive Strips or Glue: Depending on the replacement screen type, you may need adhesive strips or glue to secure the new screen in place.
- Cleaning Cloth: A lint-free microfiber cleaning cloth is essential for wiping down the internal components and the new screen to remove any dust, fingerprints, or smudges.
- Isopropyl Alcohol: This is used to clean the surfaces and remove any residual adhesive or dirt during the repair process.
- Safety Glasses and Gloves: While not directly related to the repair, safety glasses and gloves are recommended to protect your eyes and hands from any potential hazards.
By ensuring that you have all the necessary tools and materials on hand, you can proceed with confidence, knowing that you are well-equipped to tackle the screen replacement process effectively and safely.
Step 1: Removing the Back Cover
The first step in replacing the screen of your Moto G Power involves carefully removing the back cover of the device. This process requires precision and patience to avoid causing any damage to the delicate components housed within the phone. Here's a detailed guide on how to successfully remove the back cover:
-
Power Off the Device: Before initiating any disassembly, ensure that your Moto G Power is powered off to prevent any potential electrical hazards during the repair process.
-
Locate the Notch: On the lower part of the phone's back cover, you'll find a small notch. This is where you'll begin the removal process.
-
Apply Heat: Using a heat gun or a hair dryer set to a moderate temperature, gently apply heat to the back cover. This will help soften the adhesive securing the cover to the device.
-
Use a Suction Cup: Once the adhesive has been sufficiently warmed, place a suction cup over the notch on the back cover. Ensure that the suction cup has a firm grip.
-
Lift the Cover: With the suction cup securely attached, gently lift the cover away from the device. Take care not to apply excessive force, as this could lead to damage.
-
Insert a Plastic Opening Tool: While maintaining a slight gap between the cover and the device, carefully insert a plastic opening tool into the gap. Slowly slide the tool along the edges to gradually release the clips securing the cover.
-
Work Around the Edges: Continue using the plastic opening tool to work around the edges of the device, releasing the clips as you progress. Exercise caution to avoid prying too forcefully, as this could cause damage to the cover or the internal components.
-
Lift and Remove the Cover: Once all the clips have been released, gently lift and remove the back cover from the device. Take note of any adhesive or cables that may still be attached and proceed with caution to avoid causing any damage.
By following these steps meticulously, you can successfully remove the back cover of your Moto G Power, setting the stage for the subsequent stages of the screen replacement process. Remember to handle the back cover with care, as it will need to be reattached securely after the screen replacement is complete.
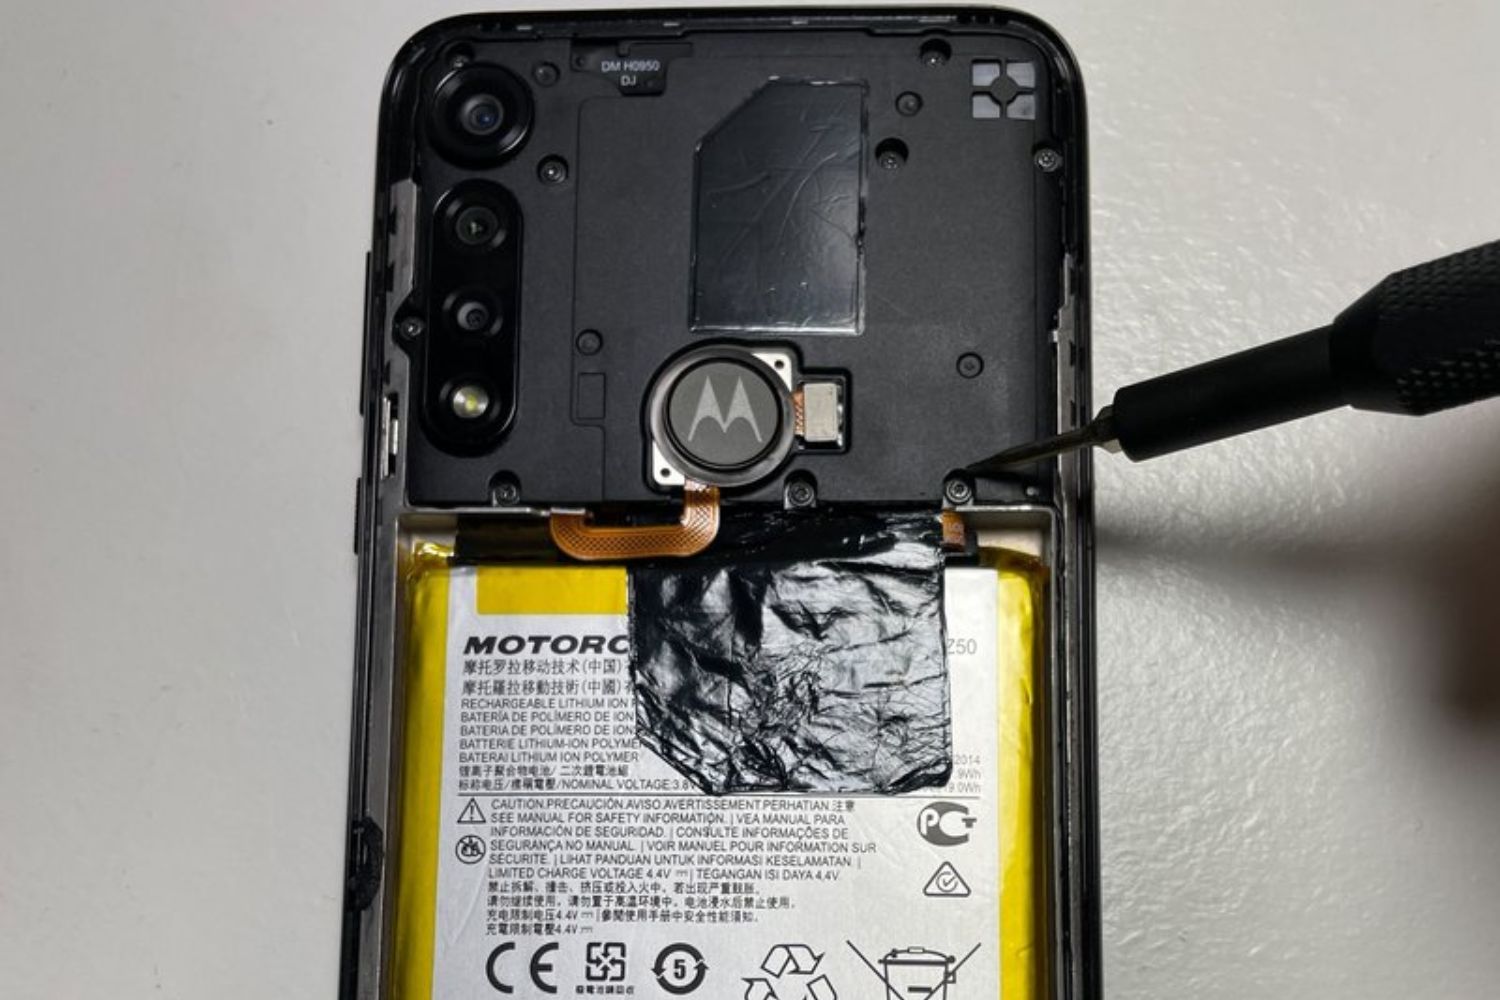
Step 2: Removing the Battery
After successfully removing the back cover, the next crucial step in replacing the screen of your Moto G Power is removing the battery. This process is essential to ensure the safety of the device and to prevent any potential electrical mishaps during the screen replacement. Here's a detailed guide on how to effectively remove the battery from your Moto G Power:
-
Disconnect the Battery Connector: Upon exposing the internal components of the device, locate the battery connector, which is typically secured to the motherboard. Using a pair of precision tweezers or a spudger tool, carefully disconnect the battery connector to cut off the power supply to the device. This step is critical for preventing any electrical currents from running through the phone during the repair process.
-
Identify the Battery: Once the battery connector has been safely disconnected, identify the location of the battery within the device. In most smartphones, including the Moto G Power, the battery is a prominent component that is often secured in place with adhesive or screws.
-
Remove Any Securing Adhesive: If the battery is held in place with adhesive, gently apply heat to the area using a heat gun or hair dryer to soften the adhesive. Exercise caution to avoid overheating the device. Once the adhesive has been sufficiently warmed, carefully pry the battery away from the device using a plastic opening tool. Take care not to puncture or damage the battery during this process.
-
Unscrew Any Securing Screws: In some cases, the battery may be secured with screws. Using the appropriate screwdriver from your precision screwdriver set, carefully unscrew and remove any fasteners holding the battery in place. Keep track of the screws to ensure they can be reinstalled correctly during the reassembly process.
-
Lift and Remove the Battery: With the adhesive softened or the screws removed, gently lift the battery away from the device. Exercise caution and ensure that no cables or components are being pulled or strained during this process. Once the battery has been safely removed, place it in a secure location away from any potential damage or interference.
By meticulously following these steps, you can safely and effectively remove the battery from your Moto G Power, paving the way for the subsequent stages of the screen replacement process. Remember to handle the battery with care and store it in a safe location to prevent any damage or electrical hazards.
Step 3: Removing the Old Screen
With the back cover and battery successfully removed, the next pivotal step in the screen replacement process for your Moto G Power is the careful removal of the old screen. This phase demands precision and patience to ensure that the delicate internal components remain unharmed throughout the process. Here's a comprehensive guide on how to effectively remove the old screen from your Moto G Power:
-
Disconnecting Flex Cables: The old screen is connected to the device's motherboard via delicate flex cables. Using a pair of precision tweezers or a spudger tool, carefully disconnect these flex cables to ensure that the screen is no longer electrically connected to the device. Exercise caution to avoid applying excessive force or causing damage to the cables or connectors.
-
Softening the Adhesive: The old screen is typically secured to the device's frame with adhesive. To facilitate safe removal, gently apply heat to the edges of the screen using a heat gun or hair dryer. This process softens the adhesive, making it easier to separate the screen from the device's frame. Take care to apply heat uniformly and avoid overheating any specific area.
-
Using a Suction Cup: Once the adhesive has been sufficiently warmed, place a suction cup near the edge of the old screen. Ensure that the suction cup has a firm grip on the screen.
-
Separating the Screen: With the suction cup securely attached, gently lift the screen away from the device. Apply steady and even pressure to gradually separate the screen from the adhesive and the frame. Take care not to exert excessive force, as this could lead to damage to the screen or the internal components.
-
Inserting a Plastic Opening Tool: While maintaining a slight gap between the screen and the device's frame, carefully insert a plastic opening tool into the gap. Slowly slide the tool along the edges to gradually release the adhesive securing the screen. Exercise caution to avoid prying too forcefully, as this could cause damage to the screen or the internal components.
-
Working Around the Edges: Continue using the plastic opening tool to work around the edges of the screen, releasing the adhesive as you progress. Exercise patience and precision to ensure that the screen is gradually and evenly separated from the device's frame.
-
Lifting and Removing the Screen: Once the adhesive has been sufficiently released, gently lift and remove the old screen from the device. Take note of any residual adhesive or cables that may still be attached and proceed with caution to avoid causing any damage.
By meticulously following these steps, you can safely and effectively remove the old screen from your Moto G Power, setting the stage for the subsequent installation of the new screen. Remember to handle the old screen with care and store it in a secure location to prevent any damage or interference.
Step 4: Installing the New Screen
With the old screen successfully removed, it's time to embark on the pivotal phase of installing the new screen on your Moto G Power. This step demands precision, attention to detail, and a steady hand to ensure that the new screen is seamlessly integrated into the device, restoring its functionality and visual appeal. Here's a comprehensive guide on how to effectively install the new screen on your Moto G Power:
-
Prepare the Replacement Screen: Before proceeding with the installation, carefully inspect the replacement screen to ensure that it is free from any defects or damage. Remove any protective films or covers from the screen, taking care not to leave any fingerprints or smudges on the display.
-
Align the New Screen: Position the replacement screen carefully over the device, ensuring that it aligns perfectly with the frame and the existing screw holes. Take your time to ensure precise alignment, as this will contribute to a seamless and secure installation.
-
Reconnect Flex Cables: Gently reconnect the flex cables from the new screen to the corresponding connectors on the device's motherboard. Exercise caution and ensure that the connectors are aligned correctly before applying gentle pressure to secure them in place.
-
Securing the Screen: If the replacement screen requires adhesive strips or glue, carefully apply them to the edges of the screen or the device's frame as per the manufacturer's instructions. Ensure that the adhesive is applied uniformly and sparingly to avoid any excess seepage.
-
Screw in the Fasteners: If the replacement screen is secured with screws, use the appropriate screws from your precision screwdriver set to fasten the screen in place. Take care not to overtighten the screws, as this could lead to damage to the screen or the device's frame.
-
Test the Screen: Before proceeding with the reassembly, power on the device to ensure that the new screen functions correctly. Verify touch responsiveness, display clarity, and color accuracy to confirm that the replacement screen is fully operational.
-
Clean the Screen: Using a lint-free microfiber cleaning cloth lightly dampened with isopropyl alcohol, gently clean the surface of the new screen to remove any dust, fingerprints, or smudges. Ensure that the screen is completely dry before proceeding with the reassembly.
By meticulously following these steps, you can effectively install the new screen on your Moto G Power, restoring its functionality and visual appeal. Remember to handle the replacement screen with care and precision to ensure a successful installation.
Step 5: Reassembling the Phone
After successfully installing the new screen, the final and crucial step in the screen replacement process for your Moto G Power is the meticulous reassembly of the device. This phase demands careful attention to detail, precision, and patience to ensure that all components are securely and correctly integrated, culminating in a fully functional and visually pristine smartphone. Here's a comprehensive guide on how to effectively reassemble your Moto G Power:
-
Reconnecting the Battery: Begin by carefully repositioning the battery in its designated location within the device. If the battery was secured with adhesive, ensure that it is firmly and uniformly pressed into place, adhering to the frame without any gaps. If screws were used to secure the battery, reinsert and tighten them using the appropriate screwdriver from your precision screwdriver set.
-
Securing the Back Cover: With the battery in place, align the back cover with the device, ensuring that all clips and edges are positioned correctly. Gently press the cover to secure it in place, ensuring that it sits flush with the device's frame. If the back cover was secured with adhesive, apply gentle pressure to ensure a secure bond. Take care to avoid applying excessive force, as this could lead to damage to the cover or the internal components.
-
Reconnecting Flex Cables: Carefully reconnect any flex cables that were detached during the disassembly process. Ensure that the connectors are aligned correctly and gently press them into place to establish a secure connection. Exercise caution to avoid applying excessive force, as this could damage the cables or connectors.
-
Testing the Device: Before completing the reassembly, power on the device to verify that all components, including the new screen, are functioning correctly. Test the touch responsiveness, display clarity, and overall functionality to ensure that the device is fully operational.
-
Final Inspection and Cleaning: Once the device has been reassembled and tested, perform a final inspection to ensure that all components are securely in place and that the device's exterior is free from any marks or damage. Using a lint-free microfiber cleaning cloth lightly dampened with isopropyl alcohol, gently wipe down the exterior of the device to remove any dust, fingerprints, or smudges, ensuring that it is visually pristine.
By meticulously following these steps, you can effectively reassemble your Moto G Power, resulting in a fully functional and visually pristine smartphone. Remember to handle the components with care and precision to ensure a successful reassembly, culminating in the restoration of your device to its former glory.
Conclusion
Congratulations on successfully replacing the screen of your Moto G Power! By embarking on this DIY journey, you've not only saved money on professional repairs but also gained valuable insight into the internal components of your device. The process of disassembling, replacing, and reassembling the screen may have seemed daunting at first, but your perseverance and attention to detail have paid off, resulting in a fully functional and visually pristine smartphone.
As you reflect on this experience, it's important to acknowledge the sense of accomplishment that comes with taking matters into your own hands. The satisfaction of witnessing your device come back to life, coupled with the knowledge gained throughout the repair process, is truly invaluable. You've demonstrated resilience and resourcefulness, attributes that extend beyond the realm of smartphone repair.
Furthermore, by engaging in this repair, you've contributed to the reduction of electronic waste. Instead of discarding a potentially salvageable device due to a damaged screen, you've extended the lifespan of your Moto G Power, aligning with sustainable practices and environmental consciousness.
It's essential to note that while the repair process may have been challenging, it has equipped you with newfound skills and confidence in handling similar tasks in the future. Whether it's replacing other smartphone components or undertaking different DIY projects, the experience gained from this endeavor serves as a foundation for future technical pursuits.
Lastly, as you revel in the restored functionality and aesthetics of your Moto G Power, remember to share your newfound knowledge with others. Your journey can inspire and empower those around you to consider DIY solutions for their electronic devices, fostering a culture of self-sufficiency and technical proficiency.
In conclusion, the successful replacement of your Moto G Power's screen is a testament to your determination and willingness to explore new horizons. As you continue to navigate the ever-evolving landscape of technology, may this experience serve as a reminder of your capabilities and adaptability in overcoming challenges.
Well done, and may your revitalized Moto G Power accompany you on many more adventures to come!