Introduction
When it comes to mobile devices, the battery is a crucial component that powers the device and enables it to function. In the case of the Sony Xperia, the battery is an integral part of the device, providing the necessary power to keep it running smoothly throughout the day. However, there are instances when it becomes necessary to remove the battery, whether for troubleshooting, replacement, or other maintenance purposes.
Understanding how to safely remove the battery from your Sony Xperia is essential knowledge for any device owner. Whether you are a tech enthusiast, a DIY repair aficionado, or simply someone looking to gain a better understanding of your device, knowing how to properly remove the battery is a valuable skill.
In this comprehensive guide, we will walk you through the step-by-step process of removing the battery from your Sony Xperia. By following these instructions, you will gain the confidence and knowledge needed to safely and effectively handle the battery removal process. Whether you own a Sony Xperia smartphone or tablet, the steps outlined in this guide will provide you with the necessary guidance to carry out the task with ease.
By the end of this guide, you will have a clear understanding of the battery removal process for your Sony Xperia device, empowering you to take control of your device's maintenance and care. So, without further ado, let's dive into the step-by-step instructions for removing the battery from your Sony Xperia.
Step 1: Power off the Sony Xperia
Before embarking on the process of removing the battery from your Sony Xperia, it is crucial to ensure that the device is powered off. This initial step is essential for safety reasons and to prevent any potential damage to the device or the battery during the removal process.
To power off your Sony Xperia, begin by pressing and holding the power button located on the side or top of the device. After a few seconds, a prompt will appear on the screen, giving you the option to power off the device. Tap on the "Power off" or "Shut down" option to initiate the shutdown process.
Once the shutdown sequence is initiated, the device will begin to power down, and the screen will go blank. It is important to wait for the device to completely power off before proceeding to the next step. This ensures that the internal components, including the battery, are not active during the removal process, minimizing the risk of electrical hazards or damage.
If your Sony Xperia device has a removable battery, it is advisable to remove the back cover after the device has powered off completely. However, if your device features a non-removable battery, it is still essential to power off the device before attempting any battery removal procedures.
By following this crucial first step and ensuring that your Sony Xperia is powered off, you are taking a proactive approach to safeguarding both the device and yourself during the battery removal process. With the device powered off, you can proceed with confidence to the next step of removing the back cover to access the battery compartment.
Ensuring that the device is powered off before initiating any hardware-related procedures is a fundamental practice that promotes safety and minimizes the risk of accidental damage. By adhering to this important step, you are setting the stage for a smooth and secure battery removal process for your Sony Xperia device.
Step 2: Remove the back cover
The next step in the process of removing the battery from your Sony Xperia involves removing the back cover of the device. The back cover serves as the protective housing for the internal components, including the battery, and gaining access to the battery compartment requires carefully detaching the back cover.
To begin, locate the designated area where the back cover meets the main body of the device. Depending on the specific model of your Sony Xperia, the back cover may feature a small indentation or groove along the edges, designed to facilitate its removal. Once you have identified the appropriate area, use your fingertips to gently apply pressure and begin prying the back cover away from the device.
It is important to exercise caution and avoid using excessive force during this process, as the back cover is typically secured in place by a series of clips or latches. By applying gradual and even pressure along the edges, you can gradually release these clips and begin separating the back cover from the device.
As you work your way around the perimeter of the device, continue to apply gentle pressure and listen for the distinct sound of the clips disengaging. Take your time and ensure that you are exerting pressure evenly to avoid causing any damage to the back cover or the device itself.
Once the clips have been successfully disengaged, carefully lift the back cover away from the device, taking note of any resistance or areas that may still be secured. Some Sony Xperia models may have additional mechanisms, such as adhesive strips or screws, securing the back cover in place. If this is the case, carefully inspect the edges and corners of the back cover to identify and address any remaining attachment points.
With the back cover removed, you will gain access to the internal components of the device, including the battery compartment. At this stage, it is important to handle the back cover with care, as it serves as a protective barrier for the delicate internal components. Set the back cover aside in a safe and secure location, ensuring that it is placed away from any potential hazards or contaminants.
By successfully removing the back cover, you have cleared the path to accessing the battery compartment of your Sony Xperia. This marks a significant milestone in the battery removal process, bringing you one step closer to safely and effectively removing the battery from your device.
Removing the back cover requires patience, precision, and a gentle touch to avoid causing any damage to the device. By following these detailed instructions, you can confidently navigate the process of removing the back cover from your Sony Xperia, setting the stage for the subsequent steps in the battery removal process.
Step 3: Locate the battery
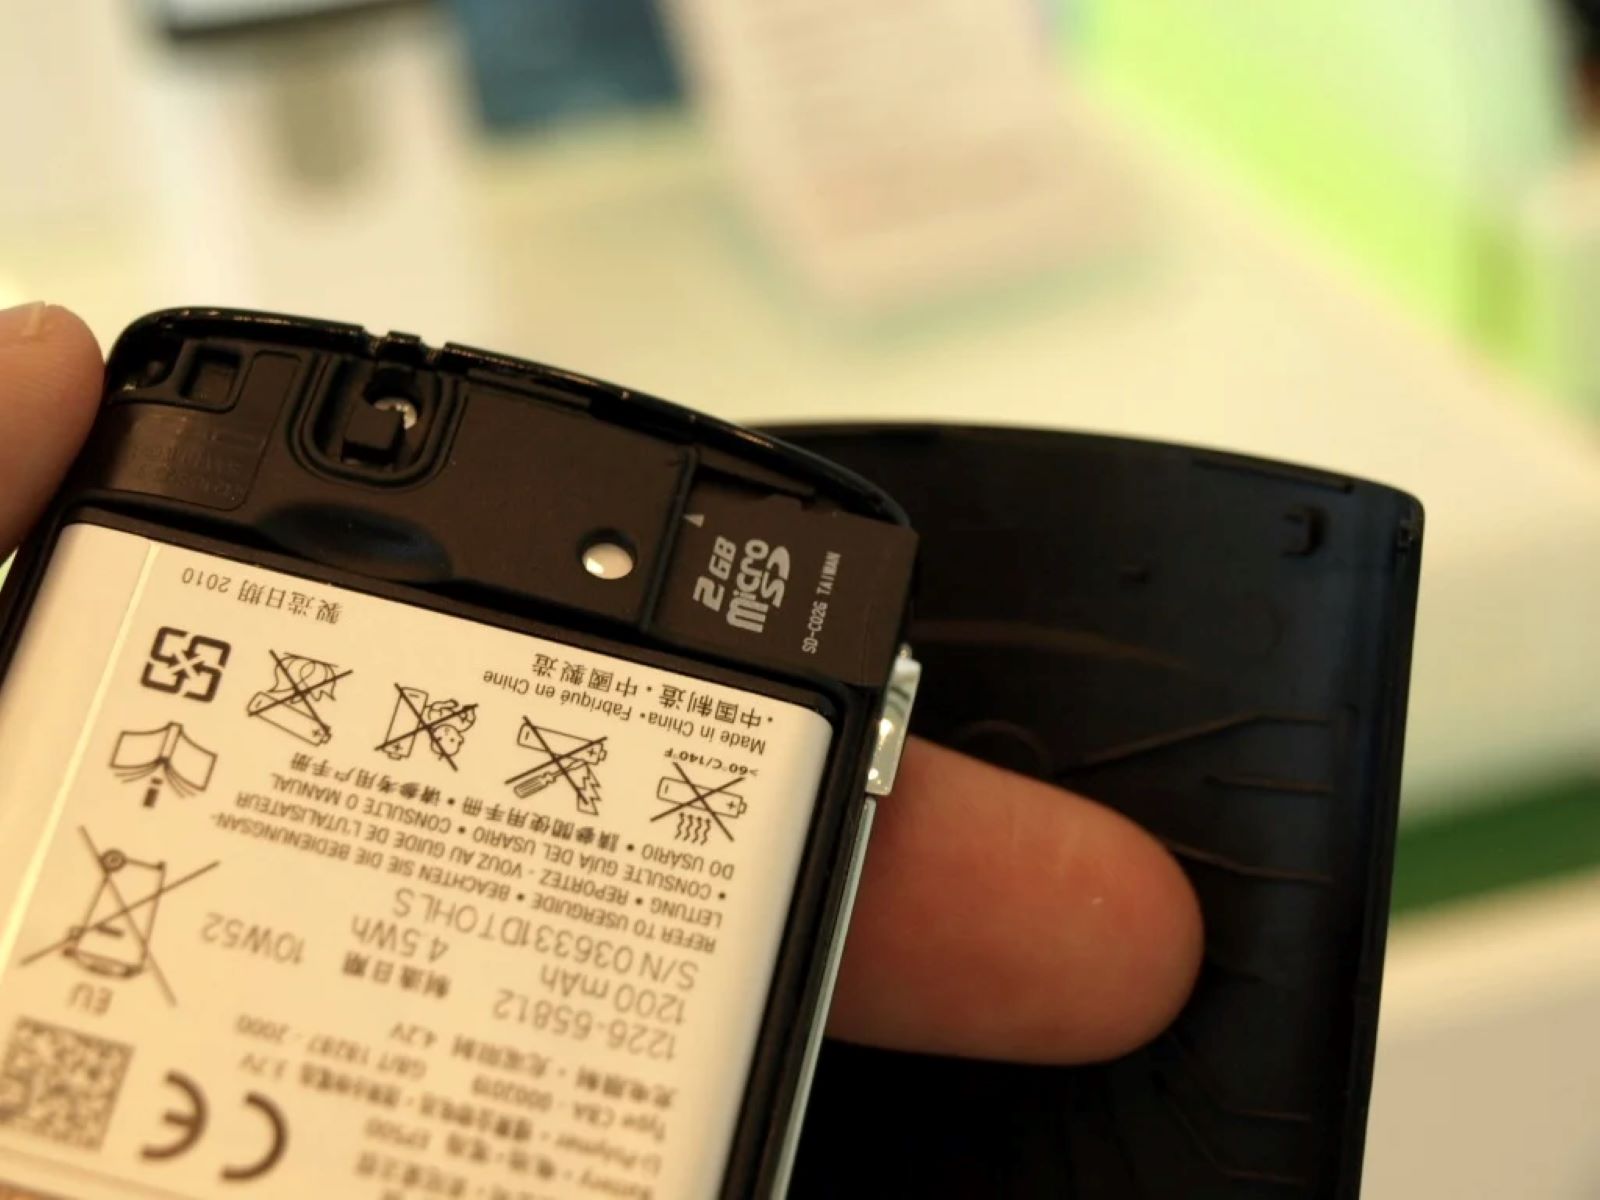
With the back cover successfully removed, the next critical step in the battery removal process for your Sony Xperia is to locate the battery within the device. The battery is a vital component that powers the device, and identifying its precise location is essential for safely and effectively proceeding with the removal process.
Upon gaining access to the internal components of your Sony Xperia, take a moment to familiarize yourself with the layout and arrangement of the internal hardware. Depending on the specific model of your device, the battery may be prominently visible, or it may be nestled within a designated compartment alongside other components.
In most Sony Xperia smartphones and tablets, the battery is typically located near the center or towards the bottom of the device's interior. It is often secured in place with adhesive strips or held in a dedicated compartment, ensuring stability and proper connection to the device's power circuitry.
As you survey the internal layout of your Sony Xperia, look for a rectangular or square-shaped component with wires or connectors attached to it. This is likely to be the battery, and it may feature manufacturer labeling or identification markings to distinguish it from other internal components.
In some cases, the battery may be partially concealed by additional hardware or components, such as the motherboard or other circuitry. Take your time to carefully inspect the interior of the device, using a flashlight or adequate lighting to aid in identifying the battery's location.
If you encounter any difficulty in locating the battery, consult the device's user manual or seek online resources specific to your Sony Xperia model. These sources can provide detailed diagrams and illustrations that pinpoint the exact location of the battery within the device, offering valuable guidance as you navigate the internal components.
By successfully identifying the battery within your Sony Xperia, you have reached a pivotal stage in the battery removal process. This crucial step sets the stage for the subsequent actions required to disconnect and remove the battery from the device, empowering you to proceed with confidence and precision.
Locating the battery within your Sony Xperia is a foundational aspect of the battery removal process, and by carefully following these instructions, you are well-equipped to advance to the next step of disconnecting the battery connector and preparing for the final stages of battery removal.
Step 4: Disconnect the battery connector
With the battery located within your Sony Xperia, the next critical step in the battery removal process involves disconnecting the battery connector. The battery connector is the interface through which the battery communicates with the device's power circuitry, and disconnecting it is essential to ensure the safe and effective removal of the battery.
Before proceeding with the disconnection of the battery connector, it is important to exercise caution and ensure that the device remains powered off. This precautionary measure minimizes the risk of electrical hazards and protects both the device and the individual performing the battery removal process.
To begin the disconnection process, carefully inspect the battery and locate the connector attached to it. The connector is typically a small, rectangular component with wires leading to the device's circuitry. Depending on the specific model of your Sony Xperia, the connector may feature a latch, clip, or tab that secures it in place.
Using a pair of fine-tipped tweezers or a plastic spudger tool, gently pry open the latch or clip securing the battery connector. Exercise patience and precision during this step, ensuring that you apply even pressure to avoid causing any damage to the connector or the surrounding components.
As the latch or clip is released, carefully grasp the connector and gently disconnect it from the corresponding port on the device's circuit board. It is important to handle the connector with care and avoid applying excessive force during the disconnection process, as this can lead to damage or breakage.
Once the battery connector has been successfully disconnected, take a moment to inspect the connector and the port on the circuit board. Ensure that there are no signs of damage, such as bent pins or misalignment, which could impede the reconnection process when installing a new battery or performing maintenance on the device.
With the battery connector safely disconnected, the battery is now isolated from the device's power supply, and you are one step closer to completing the battery removal process for your Sony Xperia. This crucial step sets the stage for the final phase of removing the battery from the device, marking significant progress in the overall maintenance and care of your device.
By following these detailed instructions and exercising precision and care, you have successfully navigated the process of disconnecting the battery connector from your Sony Xperia, laying the groundwork for the subsequent step of removing the battery from the device.
Step 5: Remove the battery
With the battery connector safely disconnected, you have reached the pivotal stage of removing the battery from your Sony Xperia. The process of removing the battery requires precision, care, and attention to detail to ensure a safe and effective outcome.
Begin by identifying the specific mechanism used to secure the battery within your Sony Xperia. In most cases, the battery may be held in place by adhesive strips, retaining clips, or within a designated compartment. Take a moment to inspect the battery and its surroundings, noting any securing mechanisms that may be present.
If the battery is held in place by adhesive strips, carefully lift one corner of the battery using a plastic spudger tool or a non-metallic pry tool. Exercise caution to avoid puncturing or damaging the battery during this step. Slowly and gently work the tool beneath the battery, gradually releasing it from the adhesive securing it to the device's frame.
In the case of retaining clips or a designated compartment, carefully inspect the area surrounding the battery to identify any screws, latches, or additional securing mechanisms. If screws are present, use the appropriate screwdriver to carefully remove them, taking care to keep track of the screws and their placement for reassembly. For retaining clips, gently disengage them using a plastic spudger tool or your fingertips, ensuring that the battery is released without excessive force.
As the battery becomes free from its securing mechanism, proceed to lift it away from the device, taking care to support it from underneath to prevent any unnecessary bending or flexing. If the battery proves to be resistant, reevaluate the securing mechanisms and ensure that all retention points have been addressed before attempting to remove the battery.
Once the battery has been successfully removed from your Sony Xperia, take a moment to inspect it for any signs of damage, such as bulging, punctures, or deformation. Properly dispose of the old battery in accordance with local regulations and environmental guidelines, ensuring that it is handled and recycled responsibly.
With the old battery removed, you are now prepared to install a new battery, perform maintenance on the device, or proceed with any necessary troubleshooting or repairs. By successfully navigating the process of removing the battery from your Sony Xperia, you have demonstrated a proactive approach to device care and maintenance, empowering you to take control of the maintenance and well-being of your device.
By following these detailed instructions and exercising precision and care, you have successfully completed the process of removing the battery from your Sony Xperia, marking a significant milestone in the maintenance and care of your device.
Conclusion
In conclusion, the process of removing the battery from your Sony Xperia is a fundamental aspect of device maintenance and care. By following the step-by-step instructions outlined in this comprehensive guide, you have gained valuable insights into the intricate process of safely and effectively handling the battery removal procedure.
Throughout this guide, we have emphasized the importance of prioritizing safety, precision, and attention to detail when undertaking any hardware-related tasks on your Sony Xperia. From powering off the device to disconnecting the battery connector and ultimately removing the battery, each step plays a crucial role in ensuring a successful outcome.
By adhering to these detailed instructions, you have demonstrated a proactive approach to device maintenance, empowering yourself with the knowledge and confidence needed to navigate the intricacies of your Sony Xperia. Whether you are seeking to replace the battery, perform maintenance on the device, or gain a deeper understanding of its internal components, the skills acquired through this guide will serve you well in your device ownership journey.
It is essential to note that the process of removing the battery from your Sony Xperia requires careful consideration and adherence to best practices. As with any hardware-related task, it is advisable to consult the device's user manual, seek guidance from reputable sources, and exercise caution to ensure a safe and successful outcome.
As technology continues to evolve, the ability to understand and engage with the maintenance and care of our devices becomes increasingly valuable. By equipping yourself with the knowledge and skills necessary to handle battery removal and other maintenance tasks, you are actively participating in the responsible stewardship of your Sony Xperia.
In closing, I encourage you to approach device maintenance with a sense of curiosity, responsibility, and empowerment. By embracing the process of learning and engaging with the inner workings of your Sony Xperia, you are not only enhancing your device ownership experience but also contributing to a culture of informed and proactive device care.
With the completion of this guide, you are well-prepared to navigate the battery removal process for your Sony Xperia with confidence and precision, setting the stage for a seamless and successful maintenance journey.