Introduction
Welcome to our guide on how to transfer money from Chime to Venmo instantly. Chime and Venmo are two popular platforms that provide convenient and hassle-free ways to manage your finances and make transactions online. While Chime offers a full range of banking services, including mobile banking and debit cards, Venmo specializes in peer-to-peer money transfers and is widely used for splitting bills, paying friends, and making online purchases.
If you’re an avid user of both Chime and Venmo, you may find yourself in a situation where you need to transfer money from your Chime account to your Venmo account. Fortunately, this process can be fairly simple and straightforward. In this guide, we will walk you through the steps to transfer money from Chime to Venmo instantly, allowing you to seamlessly move funds between the two platforms.
Before we dive into the steps, it’s worth noting that both Chime and Venmo have their own unique features and limitations. Chime is primarily designed as an online banking platform and offers various benefits such as early direct deposit, fee-free overdraft protection, and automated savings tools. On the other hand, Venmo is known for its social aspect, allowing users to interact and share payments with their friends through comments and emojis.
Now that we have an understanding of the two platforms, let’s get started with the step-by-step process of transferring money from Chime to Venmo instantly. Whether you need to repay a friend, split expenses, or simply move money between your accounts, this guide will help you accomplish it quickly and securely.
Step 1: Link your Chime card to Venmo
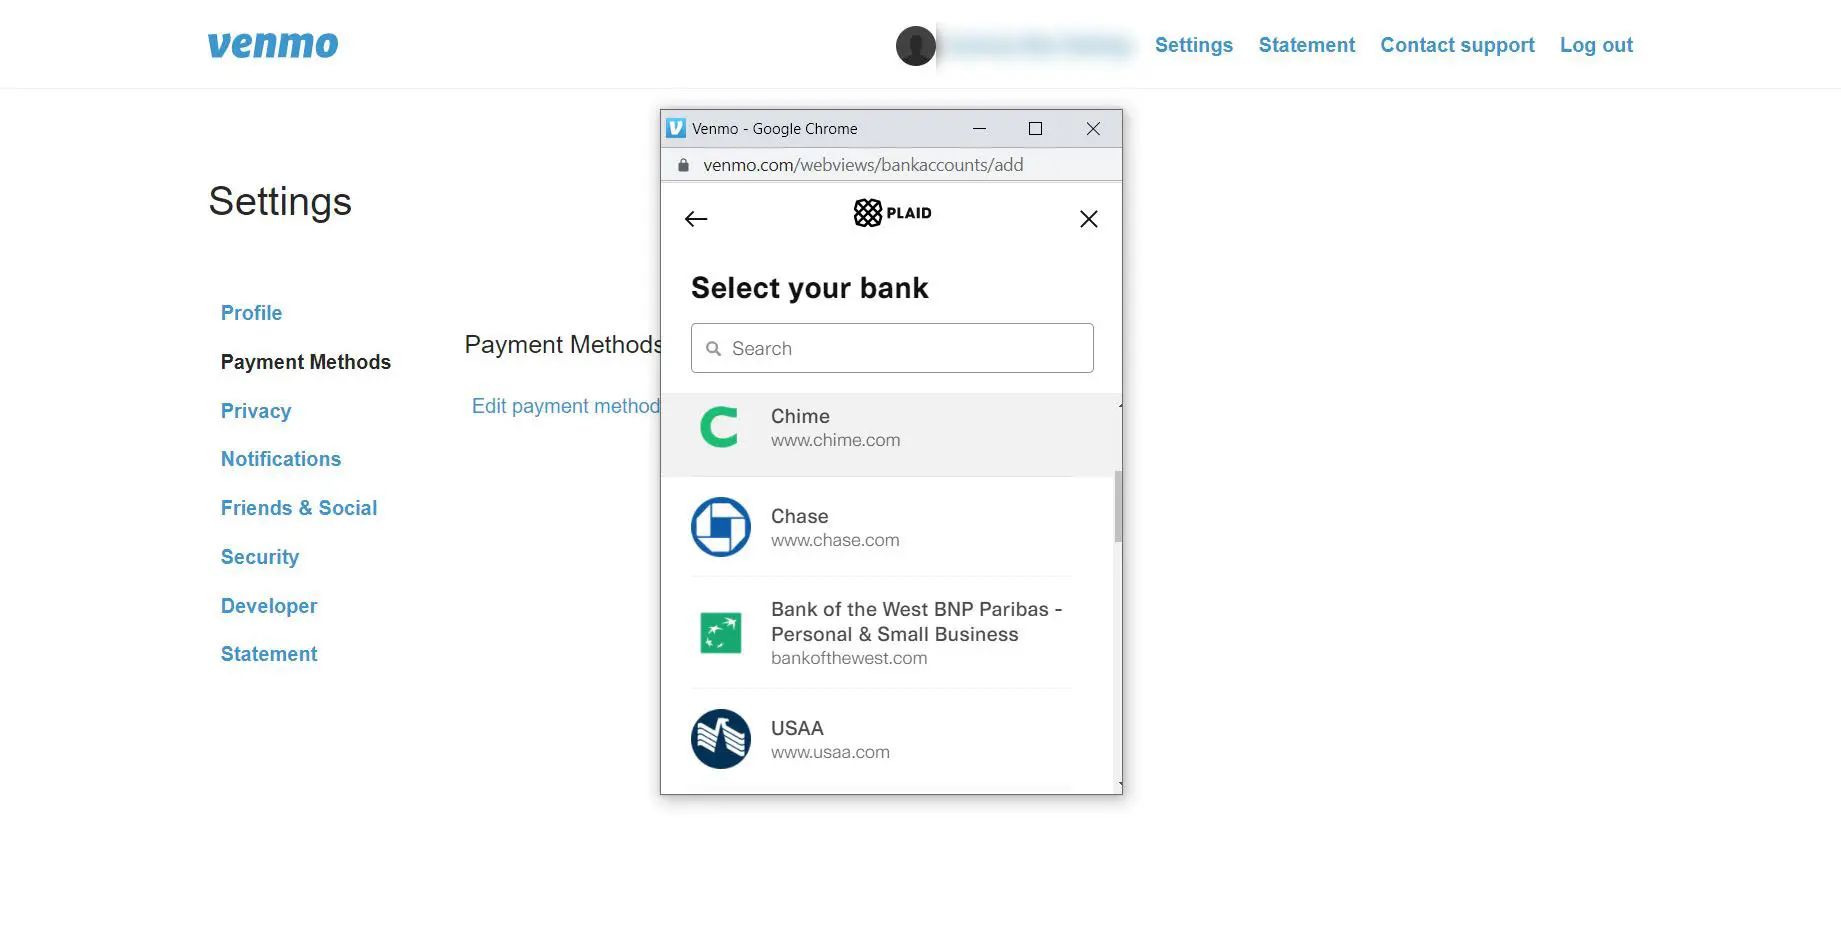
The first step in transferring money from Chime to Venmo is to link your Chime card to your Venmo account. This will allow you to use your Chime funds to make payments and transfers through Venmo. Follow the steps below to complete the linking process:
- Open the Venmo app on your mobile device or visit the Venmo website on your computer.
- Log in to your Venmo account using your credentials. If you don’t have a Venmo account, you can easily create one by following the prompts.
- Once you’re logged in, navigate to the settings menu. In the app, tap on the “☰” icon in the top left corner and select “Settings.” On the website, click on your profile picture in the top right corner and select “Settings” from the dropdown menu.
- In the settings menu, look for the “Payment Methods” section and click on it.
- Next, select the option to add a new payment method. This will allow you to link your Chime card to your Venmo account.
- Provide the required information, including your Chime card details such as the card number, expiration date, and security code. Make sure to double-check the accuracy of the information to avoid any errors.
- After entering the necessary details, click on the “Add Card” or “Link Card” button to proceed.
- Venmo will now validate the information you provided and establish the connection between your Chime card and your Venmo account. This process typically takes only a few moments.
- Once the linking process is complete, you will receive a notification confirming the successful connection between your Chime card and your Venmo account.
By linking your Chime card to Venmo, you have successfully set the foundation for transferring money between your Chime and Venmo accounts. In the next steps, we will guide you through adding money to your Venmo account and initiating the transfer process. Stay tuned!
Step 2: Add Money to your Venmo Account
Before you can transfer money from your Chime account to Venmo, you need to ensure that your Venmo account has sufficient funds. Follow the steps below to add money to your Venmo account:
- Launch the Venmo app on your mobile device or access the Venmo website on your computer.
- Sign in to your Venmo account using your login credentials.
- In the Venmo app, tap on the “☰” icon in the top left corner to access the menu, or click on your profile picture in the top right corner on the website, then select “Transfer to Bank” from the dropdown menu.
- On the “Transfer to Bank” screen, you can choose to add money instantly from your linked bank account or card. Select the option that best suits your needs. Please note that instant transfers may incur a small fee.
- Enter the desired amount you wish to add to your Venmo balance. Take into consideration any fees that may apply based on your transfer option.
- Confirm the transfer by reviewing the details and tapping on the “Transfer” or “Add Money” button.
- Venmo will initiate the transfer process, and the funds should be reflected in your Venmo account balance shortly.
- Once the transfer is complete, you are ready to proceed with transferring money from your Chime account to Venmo.
It’s important to keep in mind that Venmo has daily and weekly limits for adding money to your account. If you exceed these limits, you may need to wait until the following day or week to add more funds. Additionally, ensure that your linked bank account or card has sufficient funds to cover the amount you want to transfer.
With funds successfully added to your Venmo account, let’s move on to the next step – transferring money from Chime to Venmo. Continue reading to discover how to complete this process smoothly.
Step 3: Transfer Money from Chime to Venmo
Now that you have linked your Chime card to Venmo and added funds to your Venmo account, you’re ready to transfer money from your Chime account to Venmo. Follow the steps below to initiate the transfer:
- Launch the Chime mobile app or visit the Chime website on your computer.
- Log in to your Chime account using your credentials.
- In the Chime app, tap on the “Move Money” option, usually located at the bottom of the screen. On the website, look for the “Transfer” or “Move Money” button.
- Select the option to transfer money to an external bank account. Since Venmo operates as an external bank account, you’ll need to choose this option.
- Enter the necessary details to identify your Venmo account as the recipient of the transfer. This may include the account holder’s name, account number, and routing number. Make sure to double-check the information for accuracy.
- Specify the amount of money you wish to transfer from your Chime account to Venmo.
- Review the details of the transfer, including any associated fees, if applicable.
- Confirm the transfer by submitting the request. Chime will begin processing the transfer to your Venmo account.
- Wait for the transfer to complete. The processing time may vary, but typically, it takes 1-3 business days for the funds to be available in your Venmo account.
It’s worth noting that some transfers between banks may take longer to process, especially over weekends or holidays. If you encounter any issues or have questions regarding the transfer, it’s advisable to reach out to Chime’s customer support for assistance.
Once the transfer is complete, you’re almost there! The next step involves verifying the successful transfer to ensure that your funds are safely deposited into your Venmo account. Continue reading to know how to do this.
Step 4: Confirm the Transfer
After initiating the transfer from your Chime account to Venmo, it’s important to confirm that the transfer has been successfully processed. Here’s how you can confirm the transfer:
- Open the Venmo app on your mobile device or access the Venmo website on your computer.
- Sign in to your Venmo account using your login credentials.
- Navigate to your Venmo account’s transaction history or activity feed. In the app, tap on the “☰” icon and select “Activity”. On the website, click on “Activity” in the sidebar.
- Scroll through your recent transactions to locate the transfer from your Chime account. The transaction should be labeled as “Transfer from Chime” or something similar.
- Click or tap on the transaction to view the details. Verify that the transferred amount matches the amount you intended to transfer.
- Check the date and time stamp of the transfer to ensure it aligns with when you initiated the transfer from your Chime account.
- Review any applicable transaction fees or charges associated with the transfer. If there are unexpected fees, contact Venmo’s support for clarification.
- If all the details are accurate, you can consider the transfer successfully confirmed.
Confirming the transfer helps ensure that your funds have been securely transferred from your Chime account to your Venmo account. By verifying the details, you can have peace of mind knowing that the transaction went through as intended.
If you encounter any discrepancies or issues during the confirmation process, it’s advisable to reach out to Venmo’s support for assistance. They will be able to provide further guidance and help resolve any concerns you may have.
With the transfer confirmed, you are now ready to use the funds in your Venmo account for various purposes such as sending payments, splitting bills, or making purchases. Keep reading to know how to verify the successful transfer in the next step.
Step 5: Verify Successful Transfer
After confirming the transfer from your Chime account to Venmo, it’s essential to verify the successful deposit of the funds into your Venmo account. By following the steps below, you can ensure that the transfer was completed without any issues:
- Launch the Venmo app on your mobile device or access the Venmo website on your computer.
- Sign in to your Venmo account using your login credentials.
- Review the balance displayed on your Venmo account homepage or account dashboard. This balance should reflect the amount you transferred from your Chime account.
- Double-check that the transferred amount matches the intended transfer amount. Ensure that there are no discrepancies or unexpected deductions.
- If you have made multiple transfers, you can track the specific transfer from your Chime account by using the transaction history or activity feed in your Venmo account. Look for the transfer labeled as “Transfer from Chime.”
- Review the transaction details, including the date, time, and any associated fees. Ensure that everything aligns with your expectations.
- If all the details are accurate and the funds are successfully deposited into your Venmo account, you can consider the transfer as verified.
Verifying the successful transfer adds an extra layer of confidence that your funds have safely arrived in your Venmo account. It allows you to proceed with using the funds for your desired transactions, such as making payments, sending money to friends, or making purchases online.
If you notice any discrepancies or issues during the verification process, it’s recommended to reach out to Venmo’s support for assistance. They will be able to address your concerns and provide appropriate solutions.
With the successful transfer now verified, you can take full advantage of the funds in your Venmo account and enjoy the convenience and flexibility of making payments and transactions through the platform.
Conclusion
Transferring money from Chime to Venmo can be a seamless process that allows you to conveniently move funds between the two platforms. By following the steps outlined in this guide, you can link your Chime card to Venmo, add money to your Venmo account, initiate the transfer from Chime to Venmo, confirm the transfer, and verify its success.
Throughout this guide, we have discussed the importance of linking your Chime card to Venmo for a smooth transfer experience. We have also highlighted the process of adding money to your Venmo account, which is a necessary step before initiating the transfer. By carefully following each step, you can confidently transfer money between your Chime and Venmo accounts.
It is crucial to double-check all the details during each step of the process, such as the accuracy of your card information and the amount being transferred. Ensuring that everything is correct will help avoid any potential issues or delays in transferring your funds.
Remember to confirm the transfer and verify its success by reviewing your Venmo account’s transaction history. Checking the balance and transaction details will give you peace of mind and enable you to proceed with using the funds in your Venmo account as needed.
As you continue to utilize Chime and Venmo for your financial transactions, it’s essential to stay informed about any updates or changes in their policies or procedures. This will help you make the most of these platforms and their features.
We hope this guide has been helpful in guiding you through the process of transferring money from Chime to Venmo. By following the steps in this guide, you can enjoy the convenience and flexibility of seamlessly moving funds between these two popular platforms.
Should you encounter any difficulties during the transfer process or have any specific questions, it is always recommended to reach out to the customer support of Chime or Venmo for further assistance.
Now that you have the knowledge and know-how, you can confidently navigate the transfer process and make the most of your Chime and Venmo accounts. Happy transferring!


