If you love watching movies or playing games on your PC, you know how important it is to know how to calibrate monitor colors. It’s even more important if you’re an artist who needs a color-accurate display. Unfortunately, monitor quality degrades over time, and sometimes it’s not perfect out of the box. Maybe your monitor is now too dim or too bright or maybe the colors feel a little off. If so, don’t panic.
This doesn’t mean you have to rush out and purchase a brand new monitor. That’s because there are easy fixes you can do to refine your monitor’s color and image quality. In this article, we’ll show you how to calibrate monitor colors and settings to ensure you get a good experience. Let’s get the most out of that monitor, shall we?
How Monitor Calibration Works
Nowadays, most people’s work and life heavily rely on online mediums. We use our phones, computers, and tablets to get work done or connect with other people. While social media won’t benefit too much from color calibration, you can bet it’s important when you’re an artist.
If you’re a photographer, video editor, or artist of any kind, you know that colors are important. Honestly, they’re even essential to your line of work. That’s because you need to make sure that the colors you’re editing on-screen get across accurately to other people’s screens or even in print. Hence, why learning how to calibrate a monitor’s colors and settings is so essential.
It’s one thing to learn how to calibrate monitor settings, but it’s another to truly understand how it works. Let us first understand how your monitor works and why you sometimes need to color-calibrate your monitor settings.
The RGB Color Space
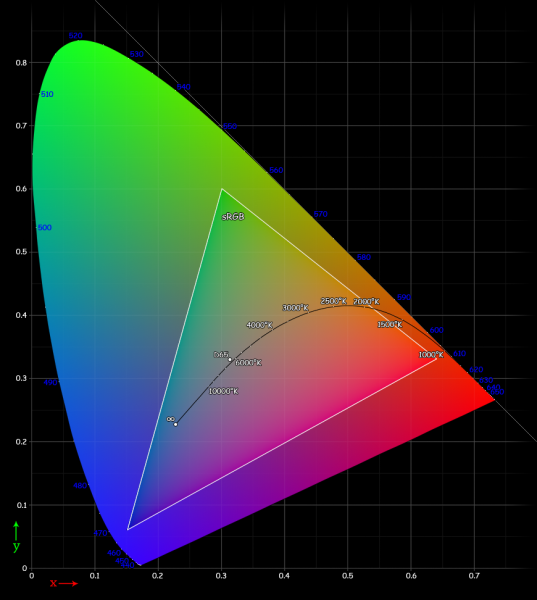

If you want to know how to calibrate monitor colors, you have to understand how digital colors work. Monitors — and screens in general — typically use the RGB color space. This just means that screens combine red, green, and blue lights to display different colors. Each digital image you see has a set of pixels with RGB values assigned to them. Given that these images don’t change when you transfer them from device to device, they should always look the same. At least, that’s the ideal.
However, you might notice that images’ colors are slightly different from screen to screen. That means one (or both) of your monitors is incorrectly calibrated. If your monitor has a higher red value, it’ll seem warmer compared to other screens. On the other hand, higher or lower greens and blues also affect your images in different ways. They make them appear cooler or a bit different than what you intended.
This will lead to problems with viewing experiences. Watching movies in a cinema compared to your monitor might feel different because of color calibration. It’s especially problematic if you’re an artist or photographer — relying on the colors you see on screen. Moreover, if you’re an artist who prints your work, you’ll notice colors are particularly off when they’re printed. To ensure that your images are accurate and consistent, you have to learn how to calibrate monitor colors.
When to Calibrate Your Monitor
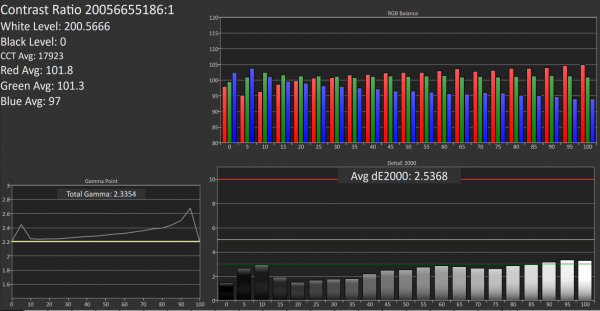

You might think that learning how to calibrate monitor colors is only for old, run-down monitors. However, regardless of your monitor’s age, color calibration is highly recommended. That’s because colors don’t necessarily come calibrated out of the box.
Out-of-the-Box Calibration
The reason for this is that monitors sold in retail stores often have higher brightness than usual. Retailers do this to make images more appealing to passersby. However, if you buy the monitor on the spot and use it out of the box, you might run into problems.
For example, your monitor is bright and, as a result, you lower your image’s brightness thinking it’ll improve quality. However, when you printed it, your image came out darker than you expected.
Brightness isn’t the only thing customers fall prey to, either. Retailers often heighten the contrast to make images appear more captivating. However, they’re not accurate for consistency purposes, either. Moreover, not all factories calibrate their monitors. Even if they did, they might have calibrated the monitor based on their factory’s lighting conditions.
Color and brightness are incredibly relative to the surroundings. That’s why a monitor’s calibration based on a factory’s location isn’t necessarily the best for your location.
Calibration Due to Age
Of course, monitors also age over time. Therefore, the way they portray colors can also alter over time. If you notice your monitor’s colors or lighting doesn’t look quite right, it might be time to calibrate it. Some tell-tale signs might include washed out colors or a display that’s either too dark or too bright. To be sure, you can compare your current monitor to an accurate, color-calibrated one and spot the difference.
If your monitor’s not calibrated properly, it’s time to do the dirty work of calibration. This is why learning how to calibrate monitor colors is an essential skill for any computer user. Of course, if you’re fine with inaccurate colors because you’re just viewing movies or browsing Facebook, that’s okay too. However, if you’re a creative professional, this is a crucial skill to learn.
Routine Calibration
If you want to ensure your monitor’s colors are accurate, you should calibrate it regularly. That doesn’t mean you have to do it every week or every month, though. The best time to calibrate your monitor is every few months to keep them fresh, accurate, and consistent.
How to Calibrate Monitor: Windows 10

Now that you know more about monitor calibration, let’s learn how to calibrate monitor settings on each OS. Let’s talk about learning to calibrate a monitor on Windows 10 first. There are multiple ways of doing this depending on the method you choose. However, there are universal preparations you must make regardless of the method.
Pre-Calibration: Warming Up
The first thing you should do is to boot up your computer and turn on your monitor. Ensure that your monitor is running at native resolution (that means its highest capacity resolution). Afterward, allow your monitor half an hour to warm up.
Before starting the calibration, make sure to have ample lighting in the room. Color and brightness always depend on the physical environment. You don’t want to end up with inaccurate calibrations because your room lighting was a bit off.
Method 1: Manual Calibration With Monitor Controls
Learning how to calibrate monitor colors and settings doesn’t require a lot. You can certainly use just your monitor’s on-screen display to color calibrate manually. To do this, all you need is a resource for checking monitor calibrations’ test patterns. We recommend Lagom LCD Monitor Test Pages as one of the good resources for this.
The website will show you free test patterns to test against your monitor’s settings. To recalibrate your monitor, just use the controls your monitor already has. These should be a set of physical buttons your monitor has to adjust color, brightness, contrast, sharpness, etc. You can find them on either the sides (top, bottom, left, and right) or back of your display.
Method 2: Software Calibration
Perhaps you’re not using an external monitor on a desktop but a laptop without physical buttons. So, what do you do now? Learning how to calibrate monitor colors and settings is useless without physical buttons, right? Are laptop owners doomed to having inaccurate colors and settings on their displays?
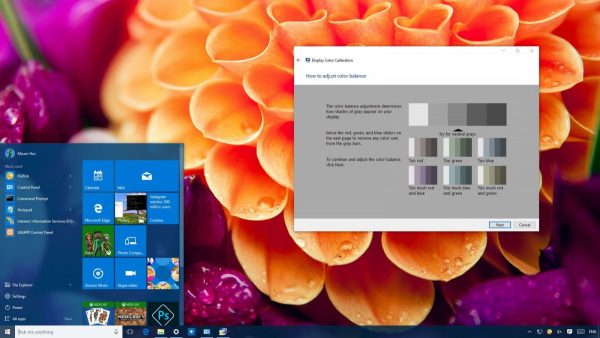
Thankfully, there is a way for folks who don’t have physical controls. The benefit of being on Windows 10 is that it has a built-in color calibrator. They have built-in software color calibration tools to help you calibrate your display according to your preferences. To do this, just follow the given steps:
- Click on the search bar on your desktop’s taskbar to run a search.
- On the search bar, type in “Color Calibration.”
- The result for the color calibration should show up. You can just click on the result that the search brings up.
- Note: If you’re running an older Windows version, just go to Control Panel > Appearance and Personalization > Display > Color Calibration.
- From here, you should see a color calibration tool that Windows 10 has built into its system. Follow the steps it gives you to adjust the different settings.
Within this calibration tool, you should be able to correct and configure various settings. These include brightness, contrast, color, and gamma. You’ll find different samples of ideal settings and adjust your monitor as you please with a slider. However, brightness and contrast won’t have sliders within the calibration tool itself.
For those, you have to find them within the system yourself. Usually, laptop keyboards have built-in brightness controls. Alternatively, you can also easily locate them through a quick search from your ask bar or your settings menu. After tweaking all your settings, just click on “Finish” after reviewing the before and after of your monitor’s configurations.
How to Calibrate Monitor: macOS

So, you now know how to calibrate monitor settings on Windows 10. However, macOS runs differently from Windows and will have different steps to follow. Thankfully, Apple also has built-in calibration tools so you don’t have to spend a dime.
Pre-Calibration: Warming Up
Part of learning how to calibrate monitor settings is getting used to the warm-up. The calibration warm-up for Windows 10 is the same for macOS. Make sure you turn on your display for at least 30 minutes before you start the process. Also, set your monitor’s resolution to its default (native) screen resolution.
Afterward, make sure that your surroundings have ample lighting that’s neither blazing bright nor too dim. Then, if your Mac has physical controls on the monitor, make sure to check them out. Familiarize yourself with them so that you can fly through the process quickly and easily.
Built-In Color Calibration
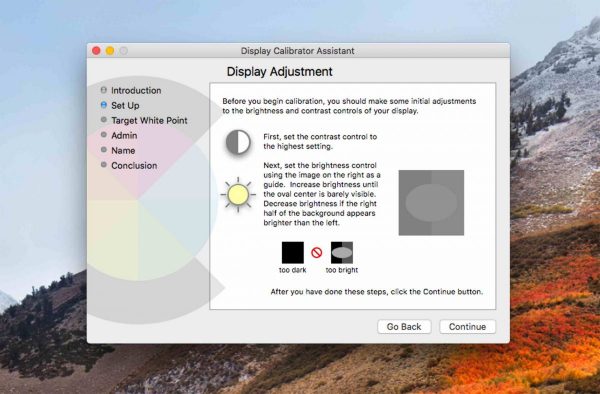
Fortunately, macOS isn’t that difficult to learn how to calibrate monitor colors for, either. Like Windows, Mac has a built-in color calibration tool to ensure you have accurate colors for your monitor. To do this, just follow the given steps:
- Conduct a spotlight search by entering “Calibrate.”
- Under the System Preferences panel, you should see the utility for the Display Calibrator Assistant
- Alternatively, you can check System Preferences and navigate to Displays > Color > Display Calibrator Assistant
- Afterward, you should find step-by-step directions to help you through the color calibration process. The calibration wizard should allow you to adjust color, white point, and even administration access and naming the profile.
- If you want to tweak your profile’s adjustments, select the new profile you created, and choose Open Profile.
- You’ll find a new window with tags and their descriptions. These tags will either contain color information or allow you to adjust individual settings. You can dig deeper and play with the settings further. However, do note that some of the settings require good technical knowledge of calibration settings. Make sure to study up on those before you make changes.
Recommended Monitor Calibration Tools
Learning how to calibrate monitor colors and settings with default tools is only one part of the equation. That’s because these built-in software tools offer only basic calibration. For more robust and customized calibration, you need third-party tools to calibrate your monitor.
This is especially true if you’re a creative professional dealing with photos, videos, or any type of artwork. On the other hand, gamers or enthusiasts who are meticulous about color accuracy may also benefit from more advanced tools. Here are all the advanced tools you can check out:
Interactive Online Monitor Test from FlatPanelsDK
Firstly, we recommend the Interactive Online Monitor Test from FlatPanelsDK if you want deep blacks and precise whites. Check it out to accurately test your monitor’s contrast and white balance.
Lagom LCD Monitor Test Pages
Secondly, the Lagom LCD Monitor Test Pages is a great tool for not just Windows but other systems as well. It can help with comparisons and calibration for any monitor — including those you’re thinking of buying. That’s because this tool allows you to download test images to carry around with you.
Calibrize 2.0
Lastly, if you want deeper customization for your display calibration, you can’t go wrong with Calibrize 2.0. This tool is free and guides your calibration process with detailed steps and explanations of each setting. You can adjust almost anything, whether it’s grayscale, color, gamma, or other settings.
Final Word
Color calibration may not matter to people who only conduct administrative tasks on their computers. However, learning how to calibrate monitor colors and settings is important for many others. Creative professionals, gamers, art enthusiasts, and movie buffs might all want the best, most accurate viewing experience. Thankfully, calibrating your monitor is easy enough. Just make sure to do it periodically so that you can ensure your content’s accuracy and consistency across different devices.


