Introduction
Are you interested in investing in cryptocurrency? If so, Ethereum is likely on your radar. Ethereum is a popular cryptocurrency that has gained significant attention due to its innovative blockchain technology and potential for growth. If you’re wondering how to get started with buying Ethereum, look no further than Metamask.
What is Metamask?
Metamask is a browser extension that serves as a digital wallet, allowing users to securely store, manage, and interact with Ethereum and other ERC-20 tokens. It acts as a bridge between your browser and the Ethereum blockchain, providing a convenient way to access decentralized applications (dApps) and make transactions.
What is Ethereum?
Ethereum is a decentralized, open-source blockchain platform that enables developers to build and deploy smart contracts and dApps. It is the second-largest cryptocurrency by market capitalization, behind Bitcoin. Ethereum’s native cryptocurrency, Ether (ETH), is used to facilitate transactions and incentivize network participants.
Why use Metamask to buy Ethereum?
Metamask offers several advantages for buying Ethereum compared to other methods. Firstly, it provides a user-friendly interface that simplifies the process of buying, storing, and managing Ethereum. Additionally, by using Metamask, you can maintain control over your private keys, ensuring the security of your funds. Lastly, Metamask allows you to seamlessly interact with decentralized exchanges and dApps, increasing your options for trading and utilizing your Ethereum.
In the following sections, we will guide you through the process of setting up Metamask, funding your wallet, choosing an exchange platform, linking your exchange account with Metamask, placing an order to buy Ethereum, and storing and managing your Ethereum using the Metamask wallet. By the end of this guide, you’ll have the knowledge and confidence to buy Ethereum using Metamask and take advantage of this exciting cryptocurrency.
What is Metamask?
Metamask is a browser extension that serves as a digital wallet for Ethereum and other ERC-20 tokens. It acts as a bridge between your browser and the Ethereum blockchain, providing a convenient way to access decentralized applications (dApps) and make transactions.
When you install Metamask, it adds a small fox icon to your browser toolbar. Clicking on this icon opens up a user-friendly interface that allows you to manage your Ethereum assets. Metamask supports popular browsers like Chrome, Firefox, and Brave, making it accessible to a wide range of users.
One of the key features of Metamask is its ability to securely store your private keys. Private keys are cryptographic codes that grant access to your Ethereum funds. By storing the keys locally on your device, Metamask ensures that you have complete control over your funds and reduces the risk of them being compromised.
Metamask also integrates seamlessly with dApps, which are decentralized applications built on the Ethereum blockchain. When you visit a dApp, Metamask automatically detects its compatibility and enables you to interact with it. This opens up a world of possibilities, from decentralized exchanges and decentralized finance (DeFi) platforms to blockchain-based games and virtual collectibles.
In addition to its core functionality as a digital wallet, Metamask offers several useful features. One such feature is the ability to create multiple Ethereum accounts within the same wallet. This allows you to organize your funds and transactions based on different purposes or projects.
Metamask also supports the import and export of wallet accounts, making it easy to switch between devices or backup your wallet securely. It also provides a built-in password manager to further enhance the security of your accounts.
Overall, Metamask is a powerful tool for anyone looking to interact with the Ethereum blockchain. It combines user-friendly design with robust security features, making it an excellent choice for storing, managing, and using Ethereum and other ERC-20 tokens. With Metamask, you can explore the world of dApps, trade on decentralized exchanges, and participate in the Ethereum ecosystem with ease.
What is Ethereum?
Ethereum is a decentralized, open-source blockchain platform that enables developers to build and deploy smart contracts and decentralized applications (dApps). It was proposed by Vitalik Buterin in late 2013 and launched in 2015, quickly gaining popularity and becoming the second-largest cryptocurrency by market capitalization, behind Bitcoin.
At its core, Ethereum is a distributed network of computers, known as nodes, that work together to maintain a shared database called the blockchain. Unlike traditional centralized systems, Ethereum operates on a peer-to-peer network, ensuring decentralization and eliminating the need for intermediaries.
One of the key features of Ethereum is its ability to execute smart contracts. Smart contracts are self-executing agreements stored on the blockchain that automatically perform actions when certain predefined conditions are met. These contracts are transparent, immutable, and eliminate the need for intermediaries, providing efficiency, security, and trustworthiness.
Ethereum’s native cryptocurrency, Ether (ETH), is used to facilitate transactions and incentivize network participants. Ether is also used to pay for computational services on the network, such as executing smart contracts and running dApps.
In addition to its smart contract capabilities, Ethereum allows developers to create and deploy dApps. These dApps are decentralized applications that run on the Ethereum blockchain, enabling developers to create innovative solutions across various industries like finance, gaming, supply chain management, and more.
Ethereum has also pioneered the concept of decentralized finance (DeFi), which aims to build an open financial system that is accessible to everyone, without the need for traditional intermediaries like banks. DeFi applications on Ethereum enable users to lend, borrow, trade, and earn interest on their cryptocurrency holdings, all while retaining control over their funds.
Ethereum’s open-source nature has fostered a vibrant community of developers, entrepreneurs, and enthusiasts who are continually building and contributing to the ecosystem. This community-driven approach has resulted in the development of numerous tools, libraries, and frameworks that make it easier for developers to create dApps on the Ethereum platform.
In summary, Ethereum is a decentralized blockchain platform that enables the development of smart contracts and decentralized applications. With its focus on transparency, security, and decentralization, Ethereum has become a driving force for innovation in the blockchain space, attracting developers, investors, and users from around the world.
Why use Metamask to buy Ethereum?
Metamask offers several advantages for buying Ethereum compared to other methods. Let’s explore why using Metamask is a great option when it comes to purchasing Ethereum.
User-Friendly Interface: Metamask provides a user-friendly interface that simplifies the process of buying, storing, and managing Ethereum. With its intuitive design and easy-to-navigate features, even beginners can quickly grasp the functionality of the wallet.
Secure Storage: One of the significant advantages of using Metamask is the ability to maintain control over your private keys. Private keys are essential cryptographic codes that grant access to your Ethereum funds. By storing the keys locally on your device, Metamask ensures that you have complete control over your funds and reduces the risk of them being compromised.
Seamless dApp Integration: Metamask seamlessly integrates with decentralized applications (dApps) built on the Ethereum blockchain. This integration allows you to interact with various dApps, such as decentralized exchanges, lending platforms, and games, directly from your Metamask wallet. This opens up a range of opportunities to utilize your Ethereum holdings and participate in the thriving Ethereum ecosystem.
Wide Compatibility: Metamask is compatible with popular browsers like Chrome, Firefox, and Brave. This compatibility ensures that you can access and use Metamask on your preferred browser without any hassle. The flexibility in browser compatibility makes Metamask accessible to a wide range of users.
Multiple Account Management: Metamask allows you to create multiple Ethereum accounts within the same wallet. This feature is beneficial for individuals who wish to separate their funds or manage different projects or purposes efficiently. You can easily switch between accounts and keep your Ethereum holdings organized.
Integration with Exchange Platforms: Metamask integrates with various exchange platforms, providing a seamless experience for buying and selling Ethereum. This integration eliminates the need to transfer your funds to a separate exchange wallet, streamlining the process and saving time.
Control and Ownership: By using Metamask, you retain full control and ownership of your Ethereum funds. Unlike centralized exchanges or other third-party platforms, which may require you to trust them with your assets, Metamask allows you to transact directly on the Ethereum blockchain without relinquishing control.
In addition to these advantages, Metamask also offers features like account import/export for easy backup and account synchronization across multiple devices.
Overall, Metamask provides a user-friendly and secure way to buy, store, and manage Ethereum. With its seamless integration with dApps, compatibility with popular browsers, and extensive control over your funds, Metamask is an excellent choice for anyone looking to enter the world of Ethereum and take advantage of its potential.
Setting up Metamask
Setting up Metamask is a straightforward process that allows you to quickly start using this powerful Ethereum wallet. Follow the steps below to get started:
Step 1: Install Metamask Extension: Open your preferred browser and search for the Metamask extension. Once you find it, click on the “Add to [Browser Name]” button and follow the on-screen instructions to install the extension.
Step 2: Create a New Wallet: After installing the Metamask extension, click on the fox icon in your browser toolbar to open the Metamask interface. Click on the “Get Started” button and then select “Create a Wallet.” Create a strong password, agree to the terms of use, and click “Create” to proceed.
Step 3: Backup Your Seed Phrase: Metamask will display a unique 12-word seed phrase that acts as a backup for your wallet. This phrase is crucial for recovering your wallet in case you forget your password or need to restore it on another device. Write down the seed phrase and keep it in a secure place. Confirm the seed phrase by entering the words in the correct order when prompted.
Step 4: Access Your Wallet: Once you have confirmed your seed phrase, you will gain access to your Metamask wallet. You can see your account address, account balance, and transaction history on the main screen.
Step 5: Customize Your Wallet: Metamask allows you to customize your wallet by adding a name and an avatar to distinguish it from other accounts. Click on the account icon in the top right corner of the screen, select “Edit,” and make the desired changes.
Step 6: Connect to Ethereum Mainnet: By default, Metamask connects to the Ethereum Mainnet, which is the main Ethereum blockchain. It is essential to ensure that you are connected to this network to perform Ethereum transactions. If the network is not selected, click on the network dropdown and choose “Ethereum Mainnet.”
Congratulations! You have successfully set up your Metamask wallet. You can now proceed to fund your wallet and start buying Ethereum.
It is worth noting that Metamask also allows you to import an existing wallet using your private key or JSON file. If you already have an Ethereum wallet, you can easily import it into Metamask by selecting the appropriate option during the wallet creation process.
Metamask provides a secure and user-friendly environment to interact with the Ethereum blockchain. With your wallet set up, you can now explore the world of decentralized applications, store and manage Ethereum, and participate in the exciting opportunities offered by the Ethereum ecosystem.
Funding your Metamask wallet
Once you have set up your Metamask wallet, the next step is to fund it with Ethereum. Here’s how you can securely add funds to your wallet:
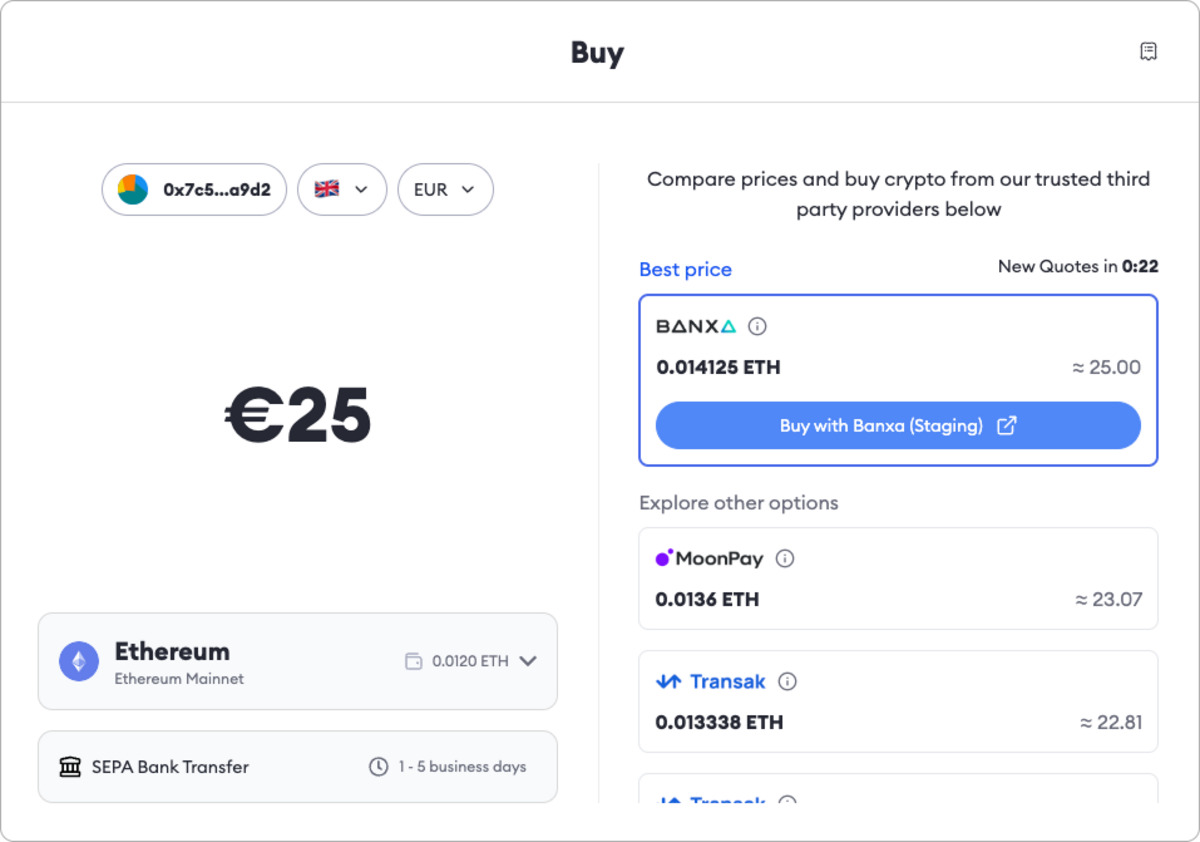
Step 1: Obtain Ethereum: Before funding your Metamask wallet, you need to acquire Ethereum (ETH). There are several ways to obtain Ethereum, including purchasing it from a cryptocurrency exchange, receiving it from someone else, or earning it through various platforms or services.
Step 2: Copy Your Metamask Address: In your Metamask wallet, click on the account icon in the top right corner of the screen. It will display your account address, which is a long string of alphanumeric characters. Click on the address to automatically copy it to your clipboard.
Step 3: Choose a Funding Method: To fund your Metamask wallet, you can either send Ethereum directly to your wallet address from another wallet or use a cryptocurrency exchange. If using an exchange, ensure that it supports Ethereum and allows withdrawals to external wallets.
Step 4: Sending Ethereum to Your Metamask Wallet: If you are sending Ethereum from another wallet or service, paste your copied Metamask address in the recipient field. Double-check the address to ensure it is correct. Enter the amount of Ethereum you want to send and complete the transaction following the instructions provided by your wallet or exchange.
Step 5: Confirm Transaction: Depending on the sending wallet or exchange, you may need to wait for confirmations before the Ethereum funds appear in your Metamask wallet. Confirmations verify the legitimacy of the transaction on the blockchain. Once the transaction is confirmed, your wallet balance will reflect the received Ethereum.
It’s important to note that Ethereum transactions are subject to transaction fees, known as gas fees. These fees are paid to the network’s miners for processing the transactions. The higher the gas fee you choose, the faster your transaction will be confirmed.
Remember to keep your seed phrase and private keys safe. Do not share them with anyone, as they grant access to your Ethereum funds. By following these steps and funding your Metamask wallet securely, you can now take advantage of the features and opportunities offered by Ethereum and the Metamask ecosystem.
In the next section, we will explore how to choose an exchange platform to buy Ethereum and link it with your Metamask wallet.
Choosing an exchange platform
When it comes to buying Ethereum, choosing the right exchange platform is crucial. An exchange platform acts as an intermediary that allows you to convert your traditional currency into Ethereum. Here are some factors to consider when selecting an exchange platform:
Security: Security should be your top priority when selecting an exchange platform. Look for platforms that have robust security measures in place, such as two-factor authentication (2FA), cold storage for funds, and encryption of personal data. Additionally, check if the platform has a good reputation and a history of handling customer funds securely.
Licensing and Regulation: It is important to choose an exchange platform that operates under proper licensing and regulatory oversight. This provides assurance that the platform follows industry standards and complies with regulations, reducing the risk of fraudulent activities.
Liquidity: Liquidity refers to the ability to buy or sell Ethereum quickly without affecting its market price. Choose an exchange platform with sufficient liquidity to ensure that your orders can be executed smoothly and at fair prices.
Fees: Take into consideration the fees charged by the exchange platform. Look for platforms with transparent fee structures that are competitive in the market. Pay attention to deposit, withdrawal, and trading fees, as they can vary significantly between platforms.
Payment Methods: Ensure that the exchange platform supports payment methods that are convenient for you. Common payment methods include bank transfers, credit/debit card payments, and even cryptocurrencies. Choose a platform that offers the payment options that align with your preferences and accessibility.
User Interface and Experience: A user-friendly interface and intuitive user experience can make a significant difference when navigating an exchange platform. Look for platforms that provide easy-to-use interfaces, charting tools, order books, and other features that simplify the trading process.
Customer Support: Consider the availability and quality of customer support services offered by the exchange platform. Check if they provide multiple channels of communication, such as email or live chat, and if they have a reputation for resolving customer issues promptly and effectively.
Reputation and Reviews: Conduct thorough research on the reputation and reviews of the exchange platform. Read feedback from other users to get an idea of their experiences. Look for platforms with positive reviews and a solid track record in the industry.
Geographical Restrictions: Some exchange platforms have restrictions based on geographical locations. Make sure the platform you choose is available in your country or region.
Taking these factors into account, it is a good practice to compare multiple exchange platforms to find the one that best suits your needs. Some popular exchange platforms that offer Ethereum trading options include Coinbase, Binance, Kraken, and Gemini.
Once you have chosen an exchange platform, the next step is to link your exchange account with your Metamask wallet. In the next section, we will guide you through the process of linking your exchange account with Metamask, allowing for seamless Ethereum transactions.
Linking your exchange account with Metamask
Linking your exchange account with Metamask allows for easy and seamless Ethereum transactions. By connecting the two, you can efficiently transfer funds from your exchange account to your Metamask wallet. Here’s how you can link your exchange account with Metamask:
Step 1: Open your Metamask Wallet: Open your Metamask wallet by clicking on the fox icon in your browser toolbar. Enter your password to access your wallet.
Step 2: Copy your Metamask wallet address: In your Metamask wallet, click on the account icon to view your wallet address. Click on the address to copy it to your clipboard.
Step 3: Open your exchange account: Log in to your exchange account using the provided credentials. Navigate to the settings or account section, where you can manage your wallet addresses.
Step 4: Add a withdrawal address: Look for the option to add a withdrawal address or external wallet address in your exchange account. Click on this option and paste the copied Metamask wallet address into the provided field. Review the address to ensure accuracy.
Step 5: Complete security verification (if required): Some exchange platforms may require additional security verification before adding an external wallet address. Follow the instructions provided by the exchange to complete the verification process.
Step 6: Confirm the link: After adding your Metamask wallet address as a withdrawal address, the exchange may require you to confirm the link. Typically, this involves verifying the link through an email or authentication code sent to your registered email address.
Once the link is confirmed, your exchange account is successfully connected to your Metamask wallet. This connection enables the seamless transfer of Ethereum between the two.
Note: It is essential to ensure the security of your Metamask wallet and exchange account. Keep your Metamask wallet password and seed phrase secure, and enable additional security measures, such as two-factor authentication (2FA), if available. Also, be cautious of phishing attempts or suspicious websites that may attempt to access your wallet information.
Linking your exchange account with Metamask provides a convenient way to transfer funds and access your Ethereum holdings directly from your wallet. With this connection established, you can proceed with placing an order to buy Ethereum, as we will discuss in the next section.
Placing an order to buy Ethereum
Now that you have set up your Metamask wallet and linked your exchange account, you are ready to place an order to buy Ethereum. Here is a step-by-step guide on how to do it:
Step 1: Navigate to the trading section: Log in to your linked exchange account and navigate to the trading section or marketplace where you can buy and sell cryptocurrencies.
Step 2: Select Ethereum: In the trading section, look for Ethereum (ETH) among the list of available cryptocurrencies. Click on the Ethereum trading pair that you wish to trade with (e.g., ETH/USD or ETH/BTC).
Step 3: Choose the order type: Typically, there are two types of orders you can place: market orders and limit orders. A market order will execute the trade at the current market price, while a limit order allows you to set a specific price at which you are willing to buy Ethereum.
Step 4: Set the quantity: Enter the amount of Ethereum you want to buy. Some exchanges allow you to enter the quantity in ETH, while others may require you to enter the equivalent value in your local currency.
Step 5: Review the order: Double-check the details of your order, including the quantity and the total cost. Ensure that everything is accurate before proceeding.
Step 6: Place the order: Once you are satisfied with the order details, click on the “Buy” or “Place Order” button to execute the transaction. The exchange will typically ask for a final confirmation before processing the order.
Step 7: Wait for the trade to complete: Depending on the exchange and market conditions, your order may execute instantly or take some time to fill. You can monitor the progress of your order in the trading section of the exchange platform.
Once your order is completed, the Ethereum will be credited to your exchange account. To fully take advantage of the security and control offered by Metamask, you should consider transferring the purchased Ethereum to your Metamask wallet for safekeeping.
Transferring Ethereum to Metamask: To transfer Ethereum from your exchange account to your Metamask wallet, follow these steps:
1. Open your Metamask wallet and copy your Ethereum wallet address.
2. Navigate to the withdrawal or send section of your exchange account.
3. Paste the copied Metamask wallet address as the recipient of the Ethereum.
4. Enter the amount of Ethereum you want to transfer and review the details.
5. Confirm the withdrawal or send request to initiate the transfer.
Once the transfer is confirmed and processed by the exchange, the Ethereum will be transferred to your Metamask wallet. You can then access and manage your Ethereum directly from Metamask to interact with decentralized applications or hold it as a long-term investment.
Remember to take necessary precautions to protect your Metamask wallet and keep your private keys and seed phrase secure. This will help ensure the safety of your Ethereum funds.
In the next section, we will discuss how to store and manage your Ethereum in Metamask effectively.
Confirming the transaction
Once you have placed an order to buy Ethereum and transfer it to your Metamask wallet, the next step is to confirm the transaction. Confirming the transaction ensures that the Ethereum has been successfully transferred to your wallet and is reflected in your Metamask balance. Here’s how you can confirm the transaction:
Step 1: Open your Metamask wallet: Click on the Metamask icon in your browser toolbar to open your wallet. Enter your password to unlock the wallet if prompted.
Step 2: Check your Ethereum balance: Upon opening your Metamask wallet, you can view your Ethereum balance on the main screen. Confirm that the amount of Ethereum you purchased is visible in your wallet.
Step 3: Verify the transaction on the blockchain: To ensure that the transaction has been successfully processed on the Ethereum blockchain, you can click on the transaction history or activity tab within your Metamask wallet. This will provide you with details about the transaction, such as the transaction hash, block number, and status.
Step 4: Confirmations: Ethereum transactions require confirmations to be included in a block on the blockchain. Confirmations are a measure of how many blocks have been added to the blockchain since the transaction was initiated. The more confirmations, the more secure the transaction is considered. Typically, it is advisable to wait for several confirmations, which can range from a few minutes to several minutes or even longer during times of network congestion.
Step 5: Compare the transaction details: To verify the transaction details, you can compare the transaction hash provided in your Metamask wallet with the transaction details on a blockchain explorer. A blockchain explorer is a tool that allows you to view transaction history and other information on the blockchain. By comparing the transaction details, you can ensure that the transaction has been successfully processed and that the Ethereum has been transferred to your wallet.
By following these steps and confirming the transaction, you can have peace of mind knowing that your Ethereum has been securely transferred to your Metamask wallet. It is essential to regularly monitor your transactions and balance to identify any unexpected activity or discrepancies.
From this point forward, you can store, manage, and use your Ethereum directly from your Metamask wallet. Whether you want to hold onto your Ethereum as a long-term investment or use it to interact with decentralized applications (dApps), Metamask provides a convenient and secure environment to do so.
In the next section, we will explore how you can effectively store and manage your Ethereum within the Metamask wallet.
Storing and managing your Ethereum in Metamask
Metamask provides a secure and user-friendly environment for storing and managing your Ethereum. Once you have confirmed the transaction and your Ethereum is in your Metamask wallet, you can take advantage of its various features to effectively store and manage your funds. Here’s how:
Viewing your Ethereum balance: Upon opening your Metamask wallet, you can easily view your Ethereum balance on the main screen. The balance will be displayed in ETH (Ether), which is the native cryptocurrency of the Ethereum blockchain.
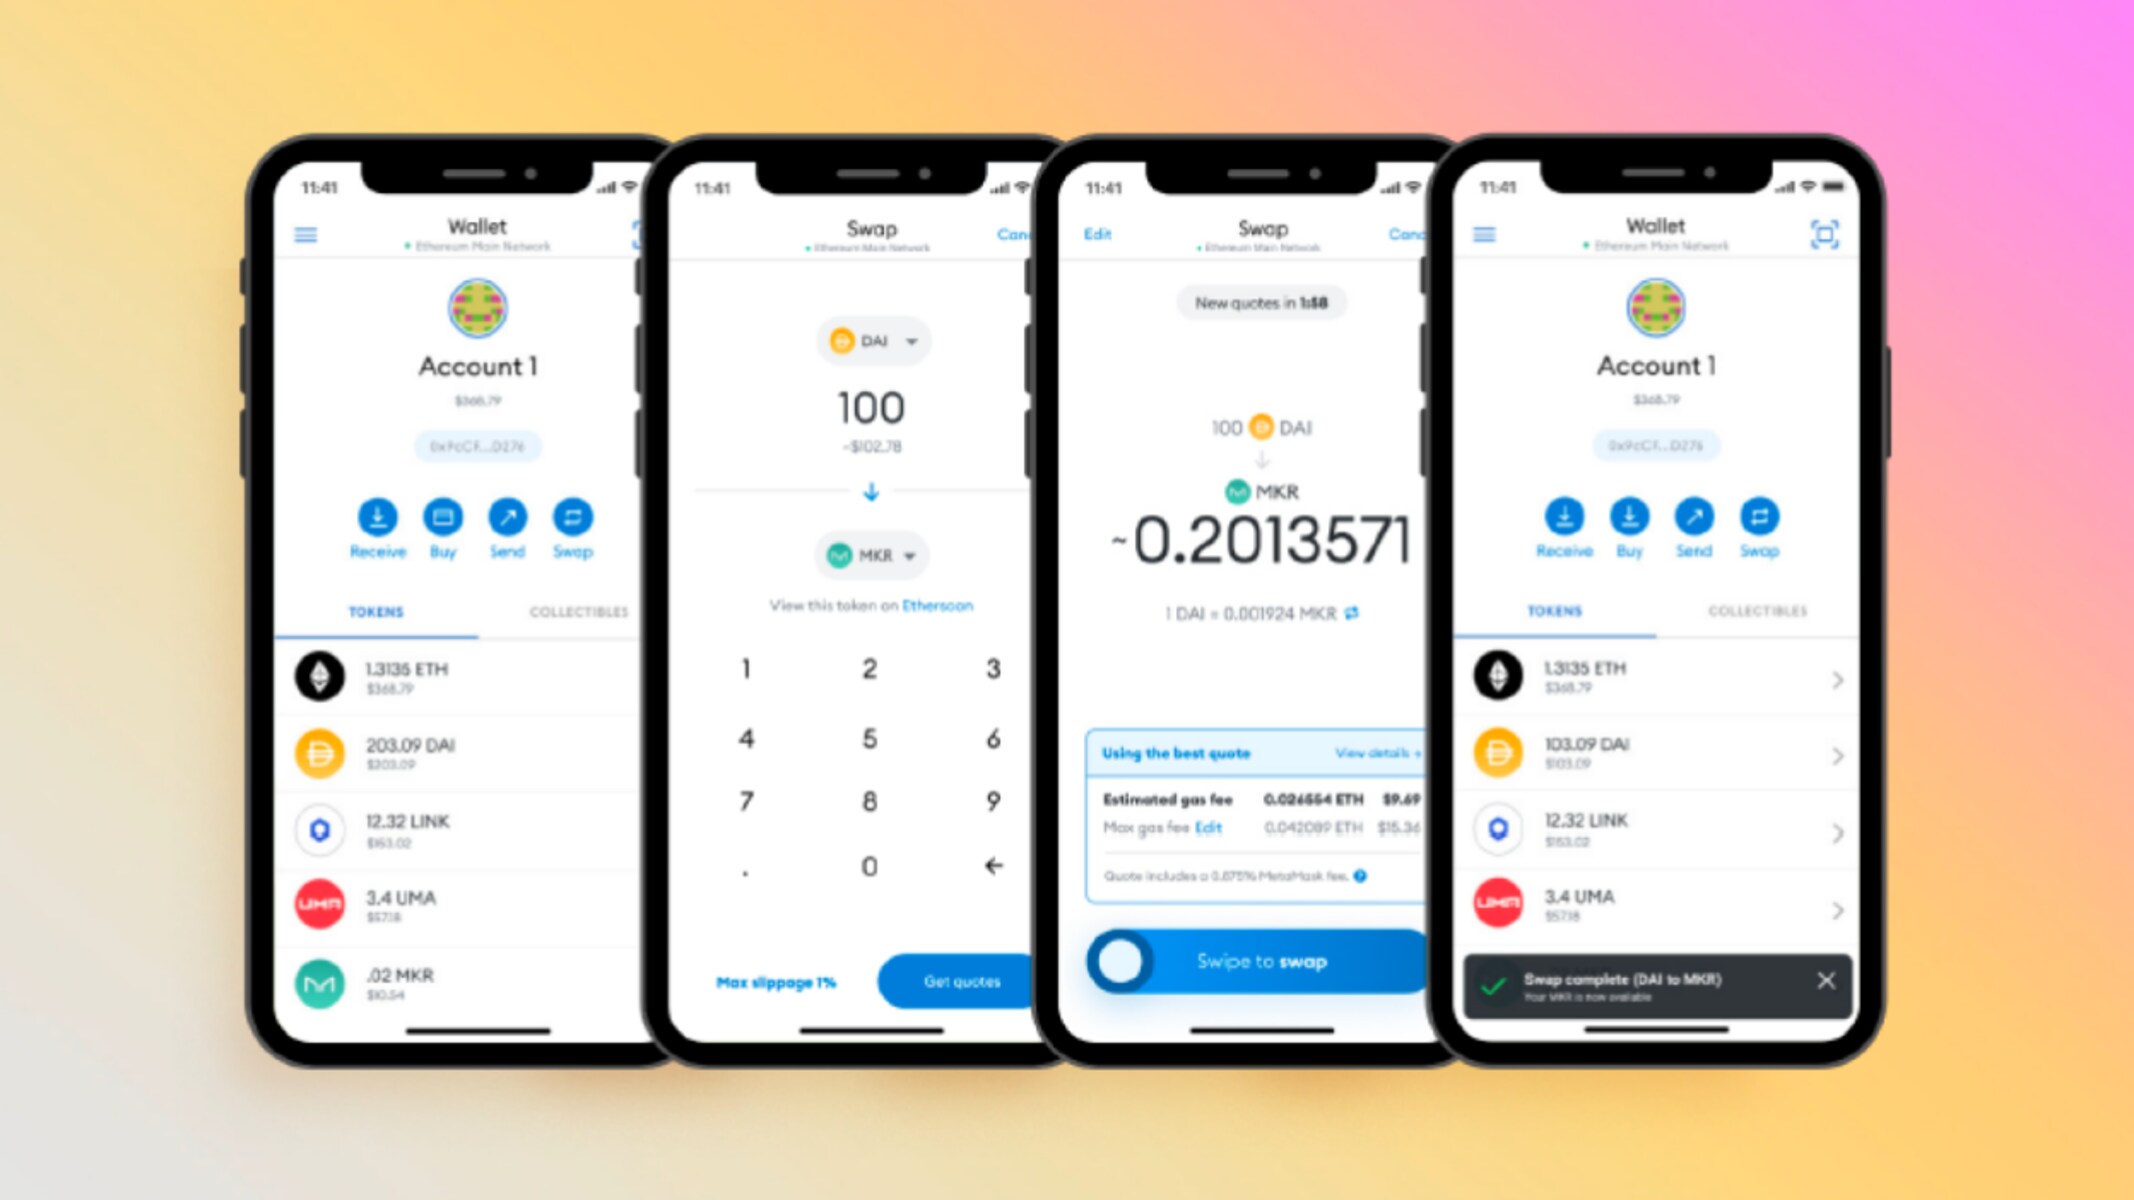
Sending Ethereum: If you want to send Ethereum to another wallet or address, you can do so by clicking on the “Send” button within your Metamask wallet. Enter the recipient’s wallet address, specify the amount of Ethereum you want to send, and confirm the transaction. Metamask will guide you through the process and provide you with a transaction summary for verification.
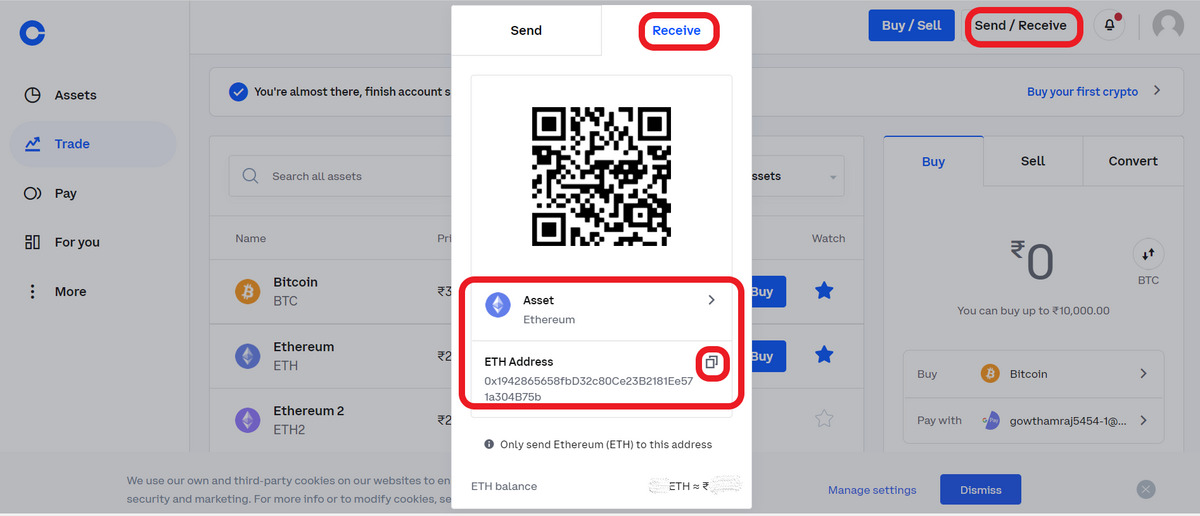
Receiving Ethereum: To receive Ethereum, you can share your Metamask wallet address with the sender. Click on the “Receive” button in your wallet to view your Ethereum address. You can simply copy the address or share the QR code, making it convenient to receive Ethereum from other wallets or exchanges.
Managing multiple Ethereum accounts: Metamask allows you to create and manage multiple Ethereum accounts within the same wallet. This feature is useful for organizing your funds, keeping track of different projects, or separating personal and business transactions. To create additional accounts, click on the account icon in your Metamask wallet and select “Create Account.”
Exploring decentralized applications (dApps): Metamask is designed to seamlessly integrate with various decentralized applications (dApps) built on the Ethereum blockchain. Within your Metamask wallet, you can access a wide range of dApps, including decentralized exchanges, lending platforms, games, and more. Simply click on the dApp you want to explore, and Metamask will automatically connect and enable you to interact with it using your Ethereum funds.
Customizing transaction settings: Metamask provides options to customize the gas fees and transaction speed for your Ethereum transactions. By adjusting the gas fees, you can prioritize the speed of your transactions. Higher gas fees typically result in faster confirmation times, while lower gas fees may take longer to process.
Backing up your wallet: It’s crucial to have a secure backup of your Metamask wallet to protect against the loss of funds. Metamask provides a seed phrase when you set up your wallet. This phrase is a backup of your wallet’s private keys and should be stored securely offline. In the event that you lose access to your wallet, the seed phrase can be used to restore your account and regain access to your Ethereum funds.
With these features and capabilities, Metamask offers a comprehensive solution for storing and managing your Ethereum. Whether you want to send or receive Ethereum, explore dApps, or manage multiple accounts, Metamask provides a user-friendly interface and robust security measures to enhance your Ethereum experience.
In the next section, we will conclude our guide on buying Ethereum using Metamask and summarize the key points discussed throughout the article.
Conclusion
In this guide, we have explored the process of buying Ethereum using Metamask, a popular browser extension and digital wallet. Metamask provides a user-friendly interface, secure storage of private keys, seamless integration with decentralized applications (dApps), and the ability to manage multiple Ethereum accounts.
We started by understanding the concept of Metamask and its role as a bridge between your browser and the Ethereum blockchain. Metamask allows you to securely store, manage, and interact with Ethereum and other ERC-20 tokens. We then delved into Ethereum, a decentralized blockchain platform that enables the creation of smart contracts and decentralized applications. Ethereum has gained significant popularity due to its innovative technology and potential for growth.
Next, we discussed the advantages of using Metamask to buy Ethereum, including its user-friendly interface, secure storage, seamless dApp integration, wide compatibility, multiple account management, and complete control and ownership of funds. These benefits make Metamask a convenient and reliable choice for engaging with the Ethereum ecosystem.
We then provided a step-by-step guide on how to set up Metamask, including installing the extension, creating a new wallet, and securing your seed phrase. Additionally, we explored the process of funding your Metamask wallet, which involves obtaining Ethereum and transferring it to your wallet.
To buy Ethereum, we discussed the importance of choosing a reputable exchange platform and provided factors to consider, such as security, licensing, liquidity, fees, payment methods, user experience, and customer support. We also explained how to link your exchange account with Metamask to facilitate seamless Ethereum transactions.
Placing an order to buy Ethereum on the exchange platform and confirming the transaction were the next steps. We emphasized the need to review the transaction details, ensure sufficient confirmations on the blockchain, and monitor the transaction using your Metamask wallet and a blockchain explorer.
Finally, we explored how to store and manage Ethereum within your Metamask wallet. We discussed features such as viewing your Ethereum balance, sending and receiving Ethereum, managing multiple accounts, exploring dApps, customizing transaction settings, and backing up your wallet using the seed phrase.
By following this guide, you now have the knowledge and confidence to buy Ethereum using Metamask and leverage its features for storing, managing, and utilizing your Ethereum holdings. Remember to exercise caution, prioritize security, and stay informed about the latest developments in the cryptocurrency space.
Start your journey with Ethereum and Metamask today and explore the exciting opportunities offered by this innovative blockchain platform.