Introduction
With the rise of cryptocurrencies, more and more people are exploring the world of digital assets. Coinbase and Metamask are two popular platforms that enable users to buy, store, and trade cryptocurrencies. Coinbase is a well-known cryptocurrency exchange that provides a user-friendly interface for buying and selling various cryptocurrencies. On the other hand, Metamask is a browser extension wallet that allows users to manage their Ethereum-based tokens and interact with decentralized applications (DApps).
While Coinbase offers a convenient way to buy and hold cryptocurrencies, some users might prefer to transfer their crypto assets to a wallet like Metamask. There are several reasons why someone might choose to do this. Firstly, by transferring funds to Metamask, users gain full control over their private keys, enhancing the security of their holdings. Additionally, Metamask provides users with access to a wider array of decentralized applications, enabling them to participate in the growing DeFi (Decentralized Finance) ecosystem.
In this guide, we will walk you through the process of transferring crypto from Coinbase to Metamask. We will cover the steps to set up Metamask, create a new wallet, and link it to your Coinbase account. Lastly, we will explain how to initiate the transfer and confirm it in Metamask. By the end of this guide, you will have a clear understanding of how to safely move your crypto assets from Coinbase to Metamask, empowering you to take advantage of the DeFi opportunities and gain greater control over your digital assets.
What is Coinbase?
Coinbase is one of the most well-known and widely used cryptocurrency exchanges in the world. Founded in 2012, it has become a trusted platform for buying, selling, and storing various cryptocurrencies. Coinbase provides a user-friendly interface that makes it easy for both beginners and experienced traders to navigate the crypto market.
As a centralized exchange, Coinbase acts as an intermediary between buyers and sellers. It allows users to purchase cryptocurrencies like Bitcoin (BTC), Ethereum (ETH), and Litecoin (LTC) using fiat currencies such as US dollars and euros. Coinbase also supports a range of other digital assets, including popular altcoins and newly emerging tokens.
One of the key benefits of using Coinbase is its emphasis on security. The platform employs robust security measures, including two-factor authentication (2FA), cold storage of funds, and insurance coverage for digital assets held on the exchange. This gives users peace of mind that their cryptocurrencies are protected.
In addition to its exchange services, Coinbase offers other features such as Coinbase Pro (formerly known as GDAX), a more advanced trading platform for experienced users. Coinbase also provides a mobile app, allowing users to manage their cryptocurrencies on the go.
Coinbase has played a pivotal role in expanding cryptocurrency adoption worldwide. Its user-friendly interface, security features, and wide range of supported cryptocurrencies have made it an attractive option for individuals and institutions looking to enter the cryptocurrency market.
What is Metamask?
Metamask is a browser extension wallet that allows users to interact with decentralized applications (DApps) on the Ethereum blockchain. It serves as a bridge between users and the Ethereum network, enabling seamless interaction with smart contracts and decentralized finance (DeFi) protocols.
With Metamask, users can store, send, and receive Ethereum and Ethereum-based tokens. The wallet integrates directly into popular web browsers like Chrome and Firefox, making it convenient to access and manage digital assets without the need for a separate application or hardware wallet.
One of the main features of Metamask is its support for decentralized applications. By integrating Metamask with their browsers, users can effortlessly connect to various DApps, such as decentralized exchanges, lending platforms, and digital collectible marketplaces. This enables users to participate in the vibrant DeFi ecosystem and explore the countless possibilities enabled by blockchain technology.
Metamask prioritizes user security and privacy. When setting up the wallet for the first time, users will generate a unique 12-word seed phrase. This seed phrase acts as a backup, allowing users to restore their wallet and access their funds in case of device loss or theft. Additionally, Metamask requires users to authorize every transaction, ensuring that they have full control over the movement of their funds.
Over the years, Metamask has gained popularity within the Ethereum community and beyond. Its intuitive interface, seamless DApp integration, and commitment to security make it a go-to option for cryptocurrency enthusiasts and developers alike. Whether you want to manage your Ethereum-based assets, participate in DeFi, or explore the decentralized web, Metamask provides a powerful and user-friendly solution.
Why Transfer Crypto from Coinbase to Metamask?
While Coinbase offers a convenient platform for buying, selling, and storing cryptocurrencies, some users may choose to transfer their crypto assets to a wallet like Metamask. There are several reasons why someone might make this decision:
1. Enhanced Security: When you hold your crypto assets on Coinbase, you are relying on the exchange’s security measures to protect your funds. By transferring your assets to Metamask, you gain full control over your private keys. This gives you greater security as you are not relying on a centralized platform to safeguard your assets. Remember, with full control over your private keys, you become the sole custodian of your funds.
2. Access to the Decentralized Web: Metamask is specifically designed to interact with decentralized applications (DApps) on the Ethereum blockchain. By transferring your crypto assets to Metamask, you gain the ability to seamlessly connect to a wide range of DApps. This opens up new possibilities for participating in decentralized finance (DeFi) protocols, digital collectibles, and other blockchain-based applications.
3. Participate in the DeFi Ecosystem: The decentralized finance space has witnessed tremendous growth in recent years. By using Metamask, you can tap into this emerging ecosystem and take advantage of various DeFi protocols. From lending and borrowing platforms to decentralized exchanges and yield farming opportunities, Metamask gives you the ability to engage with cutting-edge financial applications and potentially earn rewards.
4. Wallet Compatibility: Some tokens and projects may require the use of a wallet like Metamask to interact with their smart contracts. By transferring your crypto assets to Metamask, you ensure compatibility with a wide range of Ethereum-based projects and tokens. This flexibility allows you to participate in different blockchain ecosystems and explore new opportunities in the decentralized world.
5. Greater Privacy: Transferring your crypto assets from Coinbase to Metamask can provide you with a higher level of privacy. While Coinbase may comply with regulatory requirements, using a wallet like Metamask adds an additional layer of anonymity to your transactions. Metamask allows you to interact with the Ethereum network without providing personal information, giving you more control over your privacy.
Overall, transferring your crypto assets from Coinbase to Metamask offers a range of benefits, including enhanced security, access to the decentralized web, participation in the DeFi ecosystem, compatibility with various tokens and projects, and greater privacy. It empowers you to take full control of your digital assets and explore the exciting world of decentralized applications on the Ethereum blockchain.
Setting up Metamask
Setting up Metamask is a straightforward process that involves installing the browser extension and creating a new wallet. Follow the steps below to get started:
1. Install the Metamask Browser Extension: Visit the Metamask website and download the browser extension for your preferred browser (e.g., Chrome, Firefox). Once installed, you will see the Metamask icon in your browser’s toolbar.
2. Create a New Wallet: Click on the Metamask icon and select “Create a Wallet.” You will be guided through the process of creating a new wallet. Make sure to read and understand the terms of use. Metamask will then generate a unique 12-word seed phrase. Write down this seed phrase and store it in a secure place as it is essential for wallet recovery.
3. Confirm Your Seed Phrase: To ensure you have safely recorded your seed phrase, Metamask will ask you to confirm it. Enter the words in the correct order as prompted. This step is crucial for wallet security.
4. Set Up a Password: Create a strong password to further secure your Metamask wallet. It should be unique to Metamask and not shared with any other accounts. Confirm the password and proceed to the next step.
5. Congratulations! Your Wallet Is Ready: Once you have completed the setup process, you will be greeted with your Metamask wallet interface. Here, you can see your account balance, transaction history, and other options for managing your Ethereum and tokens.
It is important to note that when using Metamask, you are responsible for safely storing your seed phrase and password. Losing access to them may result in permanent loss of funds. Consider using a hardware wallet or other backup methods to enhance the security of your wallet.
In the next sections, we will explore how to link your Coinbase account to Metamask and transfer your crypto assets.
Creating a New Wallet in Metamask
Creating a new wallet in Metamask is a crucial step in gaining full control over your crypto assets. Follow the steps below to create a new wallet in Metamask:
1. Install the Metamask Browser Extension: If you haven’t already done so, visit the Metamask website and install the browser extension for your preferred browser (e.g., Chrome, Firefox). Once installed, you will see the Metamask icon in your browser’s toolbar.
2. Open Metamask: Click on the Metamask icon in your browser’s toolbar to open the wallet interface. If this is your first time using Metamask, you will be prompted to create a new wallet. If you already have a Metamask wallet, click on the menu icon (☰) and select “Create a New Wallet.”
3. Accept the Terms of Use: Read and understand the terms of use presented by Metamask. Once you are ready, click on “Create” to proceed.
4. Secure Your Wallet: Metamask will generate a unique 12-word seed phrase for your wallet. It is crucial to write down this seed phrase and store it in a safe and secure place. This seed phrase acts as a backup and allows you to restore your wallet in case of loss or theft. Click on “Next” to continue.
5. Confirm Your Seed Phrase: In order to ensure you have correctly written down your seed phrase, Metamask will ask you to confirm it. Enter the words in the correct order as prompted, and then click on “Confirm” to proceed to the next step.
6. Set Up a Password: Create a strong password to secure your Metamask wallet. This password should be unique to Metamask and not used for any other accounts. Confirm the password and click on “Create” to finalize the wallet creation process.
7. Congratulations! Your Wallet is Created: Once you have completed the steps above, you will see the Metamask wallet interface displaying your Ethereum account address, balance, and transaction history. You are now ready to link your Coinbase account to Metamask and transfer your crypto assets.
Remember to always keep your seed phrase, password, and wallet information secure. Losing access to this information may result in permanent loss of your funds. Consider using additional security measures such as hardware wallets or passphrase encryption to further protect your wallet.
In the next section, we will explore how to link your Coinbase account to Metamask.
Linking Coinbase to Metamask
Linking your Coinbase account to Metamask allows for seamless transfer of crypto assets between the two platforms. Follow the steps below to link your Coinbase account to Metamask:
1. Install and Set Up Metamask: Make sure you have the Metamask browser extension installed and have created a new wallet as described in the previous section.
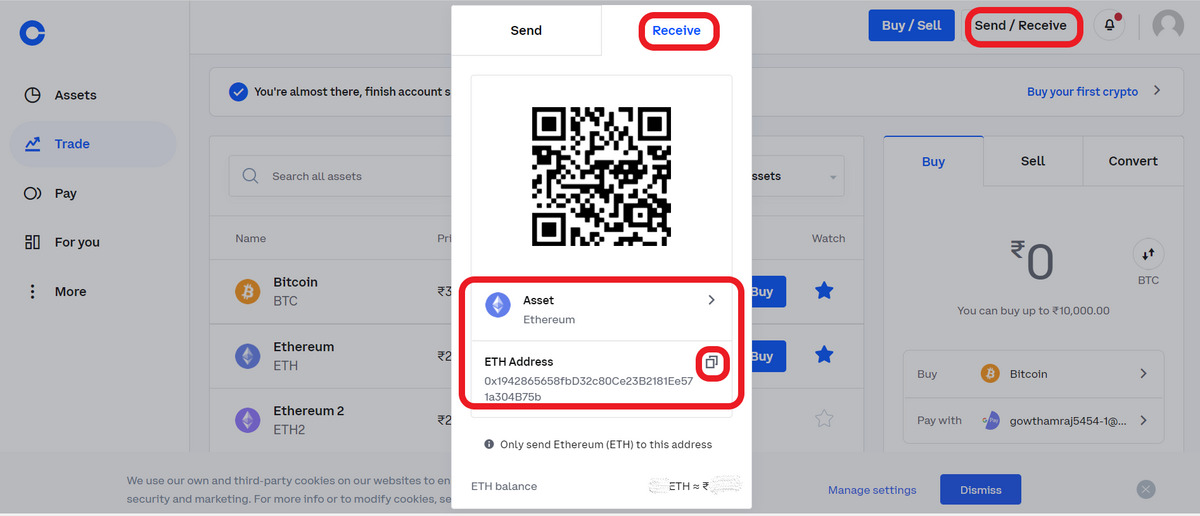
2. Copy your Metamask Account Address: In the Metamask wallet interface, locate your Ethereum account address. Click on the account icon and select “Copy Address” to copy it to your clipboard.
3. Log in to Coinbase: Open a new tab in your browser and log in to your Coinbase account.
4. Navigate to “Wallets”: In your Coinbase account, navigate to the “Wallets” section. This is where you will find your cryptocurrency holdings.
5. Click on “Connect Wallet”: Look for the option to connect an external wallet or account. Click on “Connect Wallet” and select Metamask from the list of options.
6. Authorize the Connection: Coinbase will prompt you to authorize the connection with Metamask. Click on “Authorize” to proceed.
7. Paste Your Metamask Account Address: In the Coinbase interface, paste your Metamask account address that you copied earlier into the appropriate field.
8. Confirm the Address: Double-check that the pasted Metamask account address matches what is displayed in the Coinbase interface. It is crucial to ensure the accuracy of the address to avoid any errors or loss of funds.
9. Link Complete: Once you have confirmed and submitted your Metamask address in Coinbase, the linking process is complete. You will now be able to transfer crypto assets from Coinbase to your Metamask wallet.
It is important to note that the linking process may slightly vary depending on updates to the Coinbase and Metamask interfaces. Make sure to follow the instructions provided by both platforms to ensure a successful linking process.
In the next section, we will explore how to transfer your crypto assets from Coinbase to Metamask.
Transferring Crypto from Coinbase to Metamask
Once you have linked your Coinbase account to Metamask, you can proceed with transferring your crypto assets to your Metamask wallet. Follow the steps below to transfer crypto from Coinbase to Metamask:
1. Open Metamask and Copy your Metamask Account Address: Ensure that you have the Metamask browser extension installed and open the Metamask wallet interface. Copy your Metamask account address by clicking on the account icon and selecting “Copy Address.”
2. Log in to Coinbase and Navigate to “Wallets”: In your Coinbase account, log in and go to the “Wallets” section where you can see the list of your crypto holdings.
3. Select the Cryptocurrency to Transfer: Choose the cryptocurrency that you want to transfer from Coinbase to Metamask. It could be Ethereum (ETH) or any other supported token.
4. Click on “Send” or “Withdraw”: Look for the option to send or withdraw the selected cryptocurrency from Coinbase. Click on it to initiate the transfer process.
5. Paste Your Metamask Account Address: In the recipient field on Coinbase, paste the Metamask account address that you copied in step 1. Make sure to double-check the accuracy of the address to avoid any potential errors.
6. Specify the Amount to Transfer: Enter the amount of cryptocurrency you wish to transfer from Coinbase to Metamask. Ensure that the amount is within your available balance on Coinbase.
7. Review and Confirm the Transfer: Take a moment to review the transaction details, including the recipient address and amount. Once you have confirmed that everything is accurate, click on the “Send” or “Confirm” button to initiate the transfer.
8. Wait for Confirmation: The transfer process may take a few minutes to complete, depending on the network congestion and the specific cryptocurrency you are transferring. You can monitor the progress of the transfer by checking the transaction history on both Coinbase and Metamask.
9. On Metamask, Confirm the Receipt: Once the transfer is confirmed on the Ethereum network, you will see the transferred crypto assets in your Metamask wallet. You may need to add the token in Metamask to view the balance if you transferred a token other than Ethereum.
It’s important to note that each cryptocurrency has its own network fees and minimum transfer amounts. Ensure you are aware of the specific requirements and fees associated with the cryptocurrency you are transferring.
By following these steps, you can successfully transfer your crypto assets from Coinbase to your Metamask wallet and gain full control over your digital assets.
Choosing the Right Network in Metamask
When using Metamask, it is important to select the correct network to ensure that your transactions and interactions with decentralized applications (DApps) are successful. Here are the steps to choose the right network in Metamask:
1. Open Metamask: Make sure you have the Metamask browser extension installed and open the Metamask wallet interface.
2. Click on the Network Dropdown: In the Metamask interface, locate the network dropdown. It is usually located near the top of the wallet interface and displays the current network you are connected to.
3. Select the Desired Network: Click on the network dropdown to reveal a list of available networks. The most common networks include Mainnet (for the Ethereum main network), Testnets (such as Ropsten, Rinkeby, or Kovan), and custom networks.
4. Choose the Network: From the list of available networks, select the network that you would like to connect to. If you are interacting with a specific DApp or token, make sure to use the network that is recommended or required by the DApp or token provider.
5. Confirm Network Selection: After selecting the desired network, Metamask may prompt you to confirm your network selection. Review the details and click on “Switch” or “Confirm” to finalize the network connection.
6. Network Confirmation: Once you have confirmed the network selection, Metamask will switch to the chosen network, and your wallet interface will display the relevant account balance, transaction history, and other settings specific to the selected network.
Choosing the right network is essential to ensure that your transactions, interactions with DApps, and display of token balances are accurate and successful. Different networks may have varying transaction fees, block confirmation times, and support for specific DApps and tokens.
If you are unsure about which network to choose, consult the documentation or support channels of the DApp or token you are planning to use. They will typically provide instructions on the recommended network for seamless and secure interactions.
By selecting the appropriate network in Metamask, you can fully utilize the features and capabilities of different networks and participate in the decentralized ecosystem with confidence.
Sending Crypto from Coinbase to Metamask
Once you have set up Metamask and linked your Coinbase account, you can proceed with sending crypto from Coinbase to your Metamask wallet. Follow the steps below to send crypto from Coinbase to Metamask:
1. Log in to Coinbase: Open Coinbase in your browser and log in to your account.
2. Navigate to “Wallets”: Look for the “Wallets” section in your Coinbase account. This is where you can find the list of your cryptocurrency holdings.
3. Select the Cryptocurrency to Send: Choose the cryptocurrency that you want to send from Coinbase to Metamask. It could be Ethereum (ETH) or any other supported token.
4. Click on “Send” or “Withdraw”: Find the option to send or withdraw the selected cryptocurrency from Coinbase. Click on it to initiate the send process.
5. Enter Your Metamask Account Address: In the recipient field on Coinbase, enter the account address of your Metamask wallet. Make sure to double-check the accuracy of the address to avoid any potential transfer errors.
6. Specify the Amount to Send: Enter the amount of cryptocurrency you wish to send from Coinbase to Metamask. Ensure that the amount is within your available balance on Coinbase.
7. Review and Confirm the Transaction: Take a moment to review the transaction details, including the recipient address and the amount being sent. Once you have confirmed that everything is accurate, click on the “Send” or “Confirm” button to initiate the transaction.
8. Verify the Transaction: Coinbase may require you to go through an additional verification step to confirm the transaction. This step may involve entering a verification code sent to your registered email or phone number.
9. Wait for Confirmation: The transaction may take some time to be processed and confirmed on the blockchain. You can track the progress of the transaction on Coinbase’s transaction history page.
10. Check Metamask for Receipt: Once the transaction is confirmed on the blockchain, you will see the transferred crypto assets in your Metamask wallet. You may need to add the token in Metamask to view the balance if you sent a token other than Ethereum.
It is important to note that each cryptocurrency has its own transaction fees and network confirmation times. Keep in mind that these factors can affect the speed and cost of your transaction.
By following these steps, you can successfully send your desired cryptocurrency from Coinbase to your Metamask wallet and have full control over your digital assets.
Confirming the Transfer
After sending crypto from Coinbase to your Metamask wallet, it is important to confirm the transfer to ensure the transaction was successful. Follow the steps below to confirm the transfer in Metamask:
1. Open Metamask: Ensure you have the Metamask browser extension installed and open the Metamask wallet interface.
2. Review the Recent Transactions: In the Metamask wallet interface, look for the “Activity” or “Transactions” tab. This section displays a list of recent transactions, including the transfer you initiated from Coinbase.
3. Locate the Coinbase Transfer: Scan through the list of transactions and locate the one that corresponds to the transfer from Coinbase. It should display the relevant details, such as the transaction amount and recipient address.
4. Confirm the Details: Take a moment to carefully review the transaction details, ensuring that the amount and recipient address match what you sent from Coinbase. This step is crucial to verify that the transfer was successful.
5. Check for Confirmation Status: Metamask will indicate the confirmation status of the transfer. If the transaction has been confirmed on the blockchain, it will typically show as “Completed” or “Confirmed.” If it has not yet been confirmed, it may display as “Pending” or show the number of confirmations received.
6. Verify the Balance: After confirming the status of the transfer, check the balance of your Metamask wallet to ensure that the transferred crypto assets are reflected. You should see an updated balance, including the amount that was transferred from Coinbase.
If you do not see the transferred amount in your Metamask wallet, wait a little longer as it may take some time for the transfer to be confirmed on the blockchain. If there are any issues or discrepancies, cross-check the recipient address and transaction details to ensure accuracy.
Confirming the transfer is essential to ensure that your crypto assets have been successfully received in your Metamask wallet. It provides peace of mind that the transfer was completed and the funds are now under your control.
If you encounter any difficulties or have further concerns, consult the support resources provided by Metamask or contact their customer support for assistance.
Conclusion
Transferring your crypto assets from Coinbase to Metamask can provide you with enhanced security, access to the decentralized web, and the ability to participate in the expanding world of decentralized finance (DeFi) applications. Throughout this guide, we covered the necessary steps to set up Metamask, create a new wallet, link Coinbase to Metamask, and transfer your crypto assets.
By moving your crypto assets to Metamask, you gain full control over your private keys, increasing the security of your holdings. Metamask also allows you to seamlessly interact with a wide range of decentralized applications on the Ethereum blockchain, providing you with access to the growing DeFi ecosystem and exciting opportunities.
Remember, when setting up Metamask, it is crucial to safely store your seed phrase and password. Losing access to these can result in permanent loss of your funds. Consider using additional security measures like hardware wallets for added protection.
Throughout the process, make sure to carefully review transaction details, double-check recipient addresses, and confirm the successful transfer in your Metamask wallet. Following these best practices will help ensure a smooth and secure transfer process.
By transferring your crypto assets from Coinbase to Metamask, you are taking a step toward greater control and participation in the decentralized finance ecosystem. With your new Metamask wallet, you can explore the myriad of opportunities and innovations that blockchain technology has to offer.
Remember to stay informed about updates and developments in the cryptocurrency space, as security and best practices may evolve over time. As you gain experience and confidence in managing your crypto assets, continue to explore and learn about new opportunities that arise in the ever-evolving world of cryptocurrencies.
Now that you have completed the steps outlined in this guide, you are well-equipped to make the most of your Metamask wallet and actively participate in the decentralized revolution.