Introduction
Welcome to the world of cryptocurrency! If you’re new to the game, you’ve probably heard about Ethereum, one of the most popular cryptocurrencies out there. Now you may be wondering how to transfer your Ethereum holdings from your Metamask wallet to Coinbase, one of the leading cryptocurrency exchanges. Look no further, as this article will guide you through the process step by step.
Metamask is a browser extension that allows you to manage your Ethereum and ERC-20 tokens securely. It serves as a digital wallet, enabling you to send, receive, and store your Ethereum in a convenient and user-friendly manner. On the other hand, Coinbase is a cryptocurrency exchange platform that provides a secure and reliable environment for buying, selling, and storing various cryptocurrencies, including Ethereum.
The process of transferring Ethereum from Metamask to Coinbase is straightforward, but it does require a few essential steps. In order to complete the transfer successfully, you’ll first need to set up accounts with both Coinbase and Metamask. Once your accounts are set up, you can connect Metamask to Coinbase and initiate the transfer. It’s important to follow these steps carefully to ensure the safety of your funds.
In this guide, we’ll walk you through the process of transferring Ethereum from Metamask to Coinbase, providing clear instructions and valuable insights along the way. By the end of this article, you’ll have the knowledge and confidence to make secure and seamless Ethereum transfers between your Metamask wallet and Coinbase.
What is Metamask?
Metamask is a popular browser extension that serves as a digital wallet for managing Ethereum and ERC-20 tokens. It provides a seamless way to interact with decentralized applications (DApps) on the Ethereum blockchain directly from your web browser.
With Metamask, you can securely send, receive, and store Ethereum and other compatible tokens. It acts as a bridge between your web browser and the Ethereum blockchain, allowing you to access various DApps and decentralized exchanges while ensuring the privacy and security of your funds.
One of the main advantages of using Metamask is its user-friendly interface. It offers a simple and intuitive way to manage your Ethereum holdings without the need to download a separate wallet application. By adding the Metamask extension to your favorite browser, you can easily view your account balance, transaction history, and manage multiple Ethereum addresses.
Metamask also supports the creation and management of multiple wallets, giving you the flexibility to organize and categorize your Ethereum holdings. This feature is particularly useful if you’re involved in different projects or want to separate personal and business transactions.
Another great feature of Metamask is its integration with various DApps. You can seamlessly interact with decentralized applications such as decentralized finance (DeFi) platforms, decentralized exchanges (DEXs), and other Ethereum-based services. Metamask provides you with a smooth and secure experience when interacting with the wide range of functionalities offered by these DApps.
When it comes to security, Metamask takes several measures to protect your funds. It uses industry-standard encryption algorithms to safeguard your private keys and has implemented various security features like password protection and two-factor authentication. However, it’s important to note that no wallet is completely immune to risks, so it’s crucial to follow best practices for securing your account and keeping your private keys safe.
In summary, Metamask is a convenient and user-friendly digital wallet that allows you to securely manage your Ethereum and ERC-20 tokens. With Metamask, you can seamlessly interact with decentralized applications, access decentralized exchanges, and enjoy the benefits of the Ethereum blockchain directly from your web browser.
What is Coinbase?
Coinbase is one of the most popular and widely used cryptocurrency exchange platforms in the world. Founded in 2012, Coinbase serves as a bridge between the traditional financial system and the world of cryptocurrencies. It provides a secure and user-friendly platform for buying, selling, and storing a variety of cryptocurrencies, including Ethereum.
One of the key features that makes Coinbase stand out is its emphasis on security. The platform utilizes advanced security measures, including encryption and offline cold storage, to protect users’ funds. Coinbase also offers a 2-step verification process and the option to enable biometric access for added security.
In addition to security, Coinbase is known for its user-friendly interface and intuitive user experience. The platform is designed to be accessible for both beginners and experienced traders, making it easy to navigate and execute transactions. Coinbase also provides a mobile app, allowing users to manage their cryptocurrency portfolios on the go.
As a regulated and licensed cryptocurrency exchange, Coinbase complies with the legal and regulatory requirements in the jurisdictions it operates in. This gives users peace of mind, knowing that their transactions are conducted within a legitimate and regulated framework.
Coinbase offers a range of services tailored to meet the needs of different users. The platform allows users to buy cryptocurrencies using various payment methods, including bank transfers, credit cards, and debit cards. It also provides a secure and reliable platform for selling cryptocurrencies and converting them back to fiat currency.
In addition to buying and selling, Coinbase offers a wallet service where users can securely store their cryptocurrencies. While it’s generally recommended to store large amounts of cryptocurrencies in hardware wallets for added security, Coinbase’s wallet provides a convenient option for storing smaller amounts that are actively used for trading or transacting.
Furthermore, Coinbase is constantly expanding its offerings to provide users with more ways to engage with cryptocurrencies. The platform has introduced features like Coinbase Earn, which allows users to earn cryptocurrencies by completing educational tasks, and Coinbase Pro, a trading platform with advanced features for experienced traders.
In summary, Coinbase is a leading cryptocurrency exchange that offers a secure and user-friendly platform for buying, selling, and storing cryptocurrencies like Ethereum. With its emphasis on security, user experience, and regulatory compliance, Coinbase has become a trusted and reliable platform for cryptocurrency enthusiasts and investors around the world.
Step 1: Set up an account with Coinbase
The first step in transferring Ethereum from Metamask to Coinbase is to set up an account with Coinbase if you don’t already have one. Coinbase provides a user-friendly and secure platform for buying, selling, and storing cryptocurrencies, including Ethereum.
To create an account with Coinbase, follow these steps:
- Visit the Coinbase website (www.coinbase.com) using your web browser.
- Click on the “Get Started” or “Sign Up” button to begin the registration process.
- Provide your email address and create a strong password for your Coinbase account.
- Complete the verification process by verifying your email address.
- Once your email is verified, Coinbase will prompt you to connect your phone number for added security. Follow the instructions to verify your phone number.
- Next, Coinbase may require you to provide additional identity verification information to comply with regulatory requirements. This may include uploading a copy of your government-issued ID and completing a verification questionnaire.
- Once your identity is verified, you can proceed to set up 2-step verification for your Coinbase account. This adds an extra layer of security to your account by requiring a second form of verification, such as a code from an authentication app or a text message.
- After completing these steps, your Coinbase account will be set up and ready to use.
It’s important to note that Coinbase availability may vary depending on your country. Make sure to check if Coinbase is available in your region before proceeding with the account setup process.
Once your Coinbase account is set up, you’ll have access to a variety of features and services offered by the platform, including the ability to deposit funds, buy and sell cryptocurrencies, and store your digital assets securely. This will be essential for the next steps in transferring Ethereum from Metamask to Coinbase.
Step 2: Set up an account with Metamask
In order to transfer Ethereum from Metamask to Coinbase, you’ll need to have a Metamask account. Metamask is a digital wallet that allows you to securely manage your Ethereum and ERC-20 tokens. Setting up an account with Metamask is quick and easy.
Follow these steps to create a Metamask account:
- Visit the Metamask website (www.metamask.io) using your preferred web browser.
- Click on the “Get Started” or “Download” button to initiate the installation process.
- Metamask is available as a browser extension for Chrome, Firefox, Brave, and Edge. Choose the appropriate browser extension for your needs and click “Add to Chrome” or “Add to Firefox”, depending on your browser.
- Once the extension is installed, you’ll see the Metamask icon in your browser toolbar. Click on the icon to open the Metamask setup wizard.
- In the setup wizard, you’ll be asked to create a password for your Metamask wallet. Choose a strong and unique password that you’ll remember, as this will be required to access your wallet in the future.
- After setting your password, Metamask will generate a secret backup phrase consisting of 12 or 24 words. Write down this backup phrase and keep it in a safe place. This phrase is crucial for restoring access to your wallet in case you forget your password or device gets lost or damaged.
- Confirm your backup phrase by entering the words in the correct order. This step ensures that you’ve correctly written down your backup phrase.
- Once your backup phrase is confirmed, your Metamask wallet is created, and you’ll be able to access it by entering your password.
It’s important to note that Metamask is a non-custodial wallet, which means that you have complete control over your private keys and funds. This also means that you’re solely responsible for keeping your backup phrase safe and secure. Make sure to store it in a secure location and never share it with anyone.
With your Metamask account set up, you’re ready to move on to the next step of the process: connecting Metamask to Coinbase.
Step 3: Connect Metamask to Coinbase
Now that you have both a Coinbase account and a Metamask wallet, the next step is to connect Metamask to Coinbase. This connection will allow you to transfer your Ethereum from Metamask to Coinbase seamlessly.
Follow these steps to connect Metamask to Coinbase:
- Sign in to your Coinbase account using your email and password.
- Once logged in, navigate to the “Accounts” or “Wallets” section of your Coinbase dashboard.
- Locate and select the option to add an external wallet.
- A pop-up window will appear, giving you the option to select “Metamask” as the type of wallet you want to add.
- Click on the “Connect” or “Authorize” button to grant Coinbase permission to access your Metamask wallet.
- Metamask will prompt you to confirm the connection to Coinbase. Review the details and click on the “Connect” or “Confirm” button.
- After confirming the connection, Coinbase will display your Metamask wallet under the “Accounts” or “Wallets” section.
Once Metamask is successfully connected to Coinbase, you’ll be able to view your Metamask wallet balance and transactions directly within your Coinbase account. This connection establishes a bridge between the two platforms, enabling you to transfer Ethereum between them.
Connecting Metamask to Coinbase simplifies the process of managing your Ethereum holdings, as it allows you to utilize both platforms’ features and functionalities seamlessly. You can easily transfer Ethereum from Metamask to your Coinbase account and vice versa, making it convenient for trading, selling, or storing your Ethereum.
It’s worth mentioning that the connection between Metamask and Coinbase is secure, thanks to the use of encryption protocols and industry-standard security measures. It’s still important to exercise caution and ensure that you’re visiting the legitimate websites of both Coinbase and Metamask when connecting and transferring funds.
With Metamask successfully connected to Coinbase, you’re now ready for the final step: transferring your Ethereum from Metamask to Coinbase.
Step 4: Transfer Ethereum from Metamask to Coinbase
Now that you have your Coinbase account connected to your Metamask wallet, you can proceed to transfer your Ethereum from Metamask to Coinbase. This step will enable you to have your Ethereum holdings easily accessible within your Coinbase account for trading, selling, or storing.
Follow these steps to transfer Ethereum from Metamask to Coinbase:
- Access your Metamask wallet by clicking on the Metamask icon in your browser toolbar and entering your password.
- In your Metamask wallet, locate and click on the “Send” button or icon.
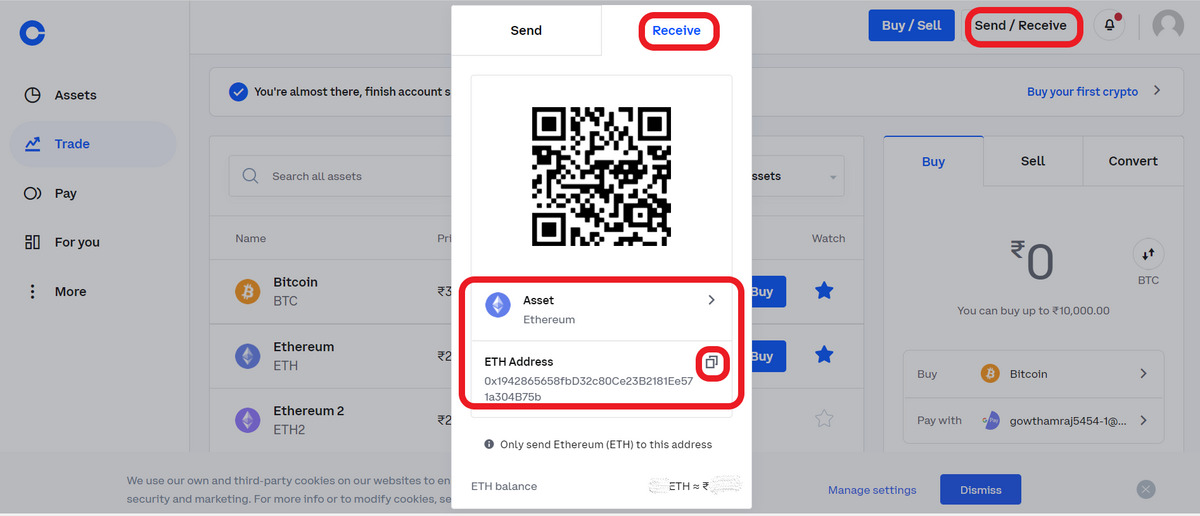
- Enter your Coinbase Ethereum address as the recipient of the transfer. You can find your Coinbase Ethereum address in the “Accounts” or “Wallets” section of your Coinbase account by selecting your Ethereum wallet.
- Specify the amount of Ethereum that you want to transfer from your Metamask wallet to Coinbase. Make sure to double-check the amount to avoid any mistakes.
- Review the transaction details, including the Ethereum address and the amount, to ensure everything is accurate.
- Once you are satisfied with the details, confirm the transaction by clicking the “Send” or “Confirm” button in your Metamask wallet.
- Metamask will prompt you to review and approve the transaction. Verify the details once again, and if they are correct, proceed with confirming the transfer.
- After confirming the transfer, wait for the transaction to be processed and confirmed on the Ethereum blockchain. This may take a few minutes, depending on the network congestion and gas fees.
- Once confirmed, you can verify the success of the transaction by checking your Coinbase account and viewing the Ethereum balance in your Ethereum wallet.
It’s important to remember that there may be transaction fees associated with transferring Ethereum from Metamask to Coinbase. These fees are paid to the Ethereum network to process and include your transaction in a block. The transaction fee amount may vary depending on network conditions.
Furthermore, keep in mind that it is crucial to verify the accuracy of the Ethereum address entered as the recipient in Coinbase. Sending Ethereum to the wrong address may result in permanent loss of funds.
By following these steps and confirming the successful transfer of Ethereum from Metamask to Coinbase, you now have full access to your Ethereum holdings within your Coinbase account. You can proceed to utilize Coinbase’s features and services with your transferred Ethereum, such as trading, selling, or securely storing your assets.
Congratulations! You have successfully transferred Ethereum from Metamask to Coinbase, allowing you to manage and leverage your Ethereum holdings effectively.