Introduction
Welcome to our guide on how to transfer Ethereum! Whether you are new to the world of cryptocurrencies or an experienced investor, understanding how to transfer Ethereum is a fundamental skill that can help you navigate the decentralized finance landscape.
Ethereum is a blockchain-based platform that enables developers to build and deploy decentralized applications (DApps). It has its native cryptocurrency called Ether (ETH), which is widely used for various purposes including transactions, investments, and smart contracts.
In this guide, we will walk you through the process of transferring Ethereum from one address to another. Whether you want to send ETH to a friend, exchange it for another cryptocurrency, or make a purchase using Ethereum, this guide will provide you with the necessary steps to make a secure and successful transfer.
Before we delve into the transfer process, there are a few important things you need to know. First, you will need to set up an Ethereum wallet to store and manage your ETH. Secondly, you will need to obtain the recipient’s Ethereum address, which is similar to a bank account number in traditional banking.
There are several wallet options available, each with its own unique features and levels of security. Some wallets are designed for beginners, while others offer advanced features for experienced users. We will discuss these options in detail later in this guide.
Once you have set up your wallet and obtained the recipient’s Ethereum address, you can proceed with the transfer. There are multiple methods you can use to transfer Ethereum, including sending it from your wallet, using a cryptocurrency exchange, or utilizing a peer-to-peer trading platform.
Throughout this guide, we will outline the steps involved in each transfer method, as well as provide tips for ensuring the accuracy and security of your transactions. Additionally, we will discuss how to track the progress of your transfer to ensure that it reaches the intended recipient successfully.
Now that we’ve covered the basics, let’s dive into the details of how to transfer Ethereum. Get ready to take control of your digital assets and explore the exciting possibilities that Ethereum has to offer!
What is Ethereum?
Ethereum is a decentralized, open-source blockchain platform that enables the creation and execution of smart contracts. It was proposed by Vitalik Buterin in late 2013 and has since become one of the most significant players in the world of cryptocurrencies and blockchain technology.
At its core, Ethereum aims to provide a decentralized platform for developers to build and deploy applications without relying on a central authority. It allows for the execution of smart contracts, which are self-executing agreements with predefined conditions. These contracts can automatically verify and enforce the terms of an agreement, reducing the need for intermediaries and streamlining the exchange of value.
One of the key features of Ethereum is its native cryptocurrency, Ether (ETH). Ether is used not only as a medium of exchange but also as a fuel for running applications on the Ethereum network. Every transaction and computation on the Ethereum platform requires a certain amount of Ether to be paid as a fee, known as “gas.”
Ethereum also introduced the concept of tokens, which are digital assets that can represent various things, such as ownership of real-world assets, voting rights, or even collectibles. These tokens are created using Ethereum’s token standards, such as ERC-20 and ERC-721, and can be seamlessly traded on decentralized exchanges.
Furthermore, Ethereum has gained significant attention for its support of decentralized finance (DeFi) applications. DeFi refers to a set of financial applications built on top of the Ethereum blockchain that aim to provide traditional financial services in a decentralized manner. This includes lending and borrowing platforms, decentralized exchanges, and stablecoins.
Ethereum’s robust and flexible architecture has attracted numerous developers and businesses to build on its platform. It has fostered a rich ecosystem of decentralized applications, ranging from decentralized exchanges like Uniswap to innovative projects like decentralized autonomous organizations (DAOs).
With its focus on decentralization, transparency, and programmability, Ethereum has the potential to revolutionize various industries beyond finance. From supply chain management and healthcare to voting systems and identity verification, Ethereum’s blockchain technology offers new possibilities for secure, trustless interactions.
In summary, Ethereum is a decentralized blockchain platform that enables the creation and execution of smart contracts. It provides a fertile ground for innovation and the development of decentralized applications, with Ether serving as the native cryptocurrency. With its programmable and transparent infrastructure, Ethereum has the potential to reshape traditional industries and foster a new era of decentralized applications and services.
Why Transfer Ethereum?
There are several reasons why you may need to transfer Ethereum from one address to another. Understanding these reasons can help you make informed decisions about when and how to initiate a transfer.
1. Sending Funds: One of the most common reasons to transfer Ethereum is to send funds to another individual or entity. Whether you want to repay a friend, contribute to a crowdfunding campaign, or make a purchase, transferring Ethereum allows you to quickly and securely send value across the globe.
2. Exchanging Cryptocurrencies: Ethereum is one of the most widely accepted cryptocurrencies, and many individuals and businesses accept it as a form of payment. If you want to convert your Ethereum into another cryptocurrency, such as Bitcoin or Litecoin, you can transfer your ETH to a cryptocurrency exchange and initiate a trade.
3. Investing and Trading: Ethereum is not only a means of exchange but also a highly sought-after investment asset. If you are an investor or trader looking to buy or sell Ethereum, transferring your funds to a cryptocurrency exchange or trading platform can provide you with access to a broader market and more trading opportunities.
4. Interacting with Decentralized Applications (DApps): Ethereum’s blockchain platform enables the creation and execution of smart contracts and decentralized applications (DApps). These applications often require Ethereum as the underlying currency to interact with their services. By transferring Ethereum to your DApp wallet, you can participate in various decentralized finance (DeFi) activities, such as lending, borrowing, and yield farming.
5. Security and Control: Owning Ethereum means having control over your digital assets. By transferring your Ethereum to a secure wallet that you control, you reduce the risk of theft or loss associated with leaving your funds on an exchange or custodial wallet.
6. Migrating to a New Wallet: If you have decided to switch to a new Ethereum wallet for better security, features, or user experience, you will need to transfer your Ethereum from your old wallet to the new one. This allows you to retain control of your funds while benefiting from the features of the new wallet.
7. Donations and Contributions: Ethereum’s blockchain acts as a platform for various philanthropic and community-driven initiatives. Transferring Ethereum allows you to contribute to charitable causes, support open-source development projects, or participate in decentralized governance through voting mechanisms.
These are just a few of the reasons why you may need to transfer Ethereum. Regardless of your specific motive, understanding the transfer process and taking necessary precautions will ensure that your transactions are conducted securely and efficiently, allowing you to harness the full potential of Ethereum’s decentralized ecosystem.
Setting Up a Wallet
Before you can transfer Ethereum, you need a wallet to store and manage your ETH. An Ethereum wallet is a software application or hardware device that allows you to securely store your private keys, which are required to access and manage your Ethereum funds.
There are several wallet options available, each with its own features, security levels, and user interfaces. Here are some of the most common types of Ethereum wallets:
- Desktop Wallets: These wallets are software applications that you install on your computer. They offer a good balance between security and convenience. Examples include Exodus, MyEtherWallet, and MetaMask.
- Mobile Wallets: These wallets are apps that you can install on your smartphone. They provide ease of use and accessibility. Examples include Trust Wallet, Coinbase Wallet, and Argent.
- Hardware Wallets: These wallets are physical devices that store your private keys offline, providing the highest level of security. Examples include Ledger, Trezor, and KeepKey.
- Web Wallets: These wallets are online services that allow you to access your Ethereum funds through a web browser. While convenient, they can be less secure than other types of wallets due to the potential for phishing attacks. Examples include MyEtherWallet and MetaMask.
When choosing a wallet, consider factors such as security, ease of use, compatibility with other services, and community trust. It’s important to research and select a wallet that aligns with your needs and preferences.
Once you have chosen a wallet, you will need to set it up by following these general steps:
- Download and Install: If you are using a desktop or mobile wallet, visit the official website or app store to download and install the wallet application.
- Create a New Wallet: Open the wallet application and follow the instructions to create a new wallet. This may involve creating a strong password, writing down your recovery phrase (a series of words that can be used to restore your wallet), or setting up additional security measures.
- Secure Your Wallet: Take precautions to secure your wallet, such as enabling two-factor authentication (2FA), setting up a PIN code, or using biometric authentication if available.
- Back up Your Wallet: It’s crucial to back up your wallet’s recovery phrase and store it in a safe place. This will help you recover your funds in case your device is lost, stolen, or damaged.
- Test Your Wallet: Before transferring a large amount of Ethereum, send a small test amount to verify that your wallet is functioning correctly and you are able to receive funds.
Remember, managing your wallet’s private keys is crucial to protecting your Ethereum funds. Keep them secure and be cautious when sharing them or entering them online.
Now that you have set up your wallet, you are ready to proceed with transferring Ethereum to another address. In the following sections, we will explore different methods you can use to transfer Ethereum securely.
Your Wallet Options
When it comes to storing and managing your Ethereum, you have a variety of wallet options to choose from. Each type of wallet offers different features, levels of security, and user experiences. The wallet you choose will depend on your preferences and requirements. Here are some of the most common wallet options for Ethereum:
- Desktop Wallets: Desktop wallets are software applications that you install on your computer. They offer a good balance between security and convenience. Desktop wallets like Exodus, MyEtherWallet, and MetaMask give you full control over your private keys and allow you to manage multiple cryptocurrencies not just Ethereum. They usually provide a user-friendly interface and can be accessed offline.
- Mobile Wallets: Mobile wallets are apps that you can install on your smartphone. They provide convenience and accessibility, allowing you to manage your Ethereum on the go. Popular mobile wallets for Ethereum include Trust Wallet, Coinbase Wallet, and Argent. These wallets are often easy to set up and use, and some even offer additional security features such as biometric authentication.
- Hardware Wallets: Hardware wallets are physical devices that store your Ethereum private keys offline. They offer the highest level of security for managing your funds. Devices like Ledger, Trezor, and KeepKey keep your private keys isolated from your computer or smartphone, reducing the risk of theft or hacking. Hardware wallets are recommended for users with large amounts of Ethereum or those seeking maximum security.
- Web Wallets: Web wallets are online services that allow you to access your Ethereum funds through a web browser. Popular web wallets include MyEtherWallet (MEW) and MetaMask. These wallets offer convenience as they can be accessed from any device with an internet connection. However, it’s important to exercise caution when using web wallets as they can be vulnerable to phishing attacks.
When selecting a wallet, consider factors such as security, ease of use, compatibility with other services, and community trust. It’s important to choose a wallet that aligns with your needs and that you feel comfortable using.
Regardless of the wallet type you choose, it is crucial to prioritize the security of your Ethereum funds. Implement security measures such as setting a strong password, enabling two-factor authentication (2FA), and keeping your wallet software and devices up to date.
Remember to regularly back up your wallet’s private keys or recovery phrase and store them in a secure location. This backup will allow you to restore your wallet and access your funds in case of device loss, damage, or theft.
Now that you are familiar with the various wallet options available, you can choose the one that suits your requirements and proceed with setting up your Ethereum wallet.
Step 1: Get the Recipient’s Ethereum Address
To successfully transfer Ethereum, you will need the recipient’s Ethereum address. The Ethereum address is a unique identifier that acts as the destination for your ETH transfer, similar to a bank account number in traditional banking.
Here’s how you can obtain the recipient’s Ethereum address:
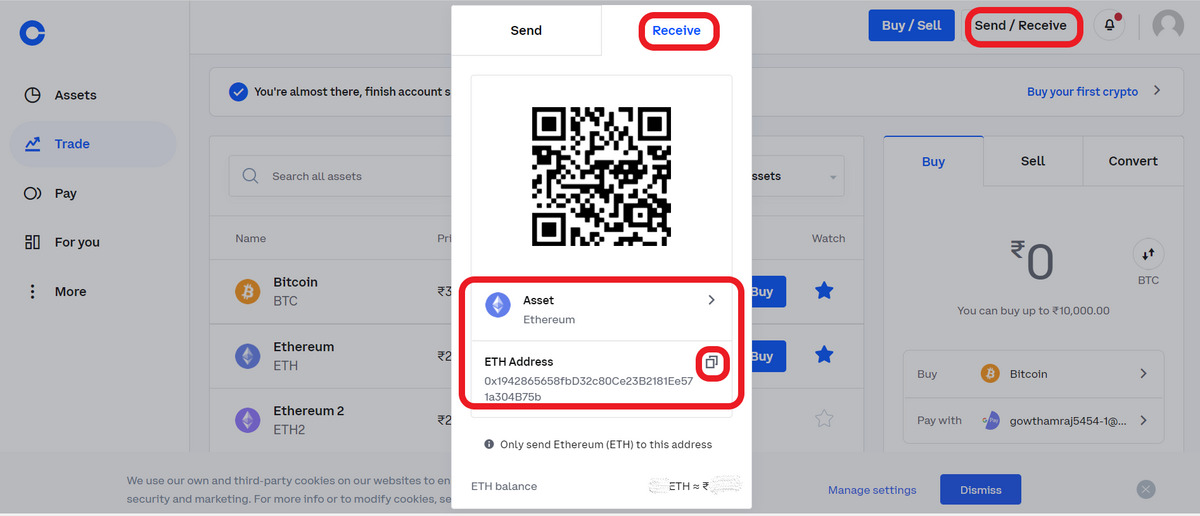
- Ask the Recipient: The simplest way to get the recipient’s Ethereum address is to ask them directly. Reach out to the person or organization you want to send Ethereum to and request their Ethereum address. They can provide you with the address in either its long form (hexadecimal) or its abbreviated form (beginning with “0x”).
- Scan a QR Code: If the recipient is physically present, they can provide you with a QR code that contains their Ethereum address. You can scan this QR code using your wallet app or a QR code scanner to automatically retrieve the recipient’s address. This method removes the risk of manual entry errors.
- Copy from a Trusted Source: If the recipient has shared their Ethereum address publicly, you can copy it from a trusted source. This could be their website, social media profile, or any other platform where they have publicly disclosed their Ethereum address. However, exercise caution and ensure that you are copying the address from a legitimate and verified source to avoid potential scams or fraudulent activity.
When obtaining the recipient’s Ethereum address, it’s crucial to double-check its accuracy. Ethereum addresses are case-sensitive and should be copied or entered without any spaces or additional characters. Any mistake in entering the address could result in the loss of your funds, as transactions on the blockchain are irreversible.
It’s also essential to note that Ethereum addresses can be used for multiple transactions, so ensure you are using the most up-to-date address provided by the recipient. Ethereum addresses are not tied to specific individuals but rather act as identifiers for wallets or accounts.
With the recipient’s Ethereum address in hand, you are now ready to proceed to the next step: selecting a suitable transfer method. In the following sections, we will explore different methods you can use to transfer Ethereum securely.
Step 2: Select a Transfer Method
After obtaining the recipient’s Ethereum address, the next step in transferring Ethereum is to select a suitable transfer method. There are a few different methods you can use, each with its own advantages and considerations. Let’s explore three common transfer methods:
- Method 1: Sending Ethereum via Wallet: This method involves using your own Ethereum wallet to initiate the transfer. Most wallets have a built-in feature that allows you to send Ethereum to another address. You will need to enter the recipient’s Ethereum address and specify the amount of ETH you wish to send. This method offers convenience and control over your funds, as you can initiate the transfer directly from your wallet.
- Method 2: Using a Cryptocurrency Exchange: If you prefer to use a cryptocurrency exchange for your Ethereum transfer, this method is for you. Cryptocurrency exchanges act as intermediaries that facilitate the buying, selling, and exchanging of cryptocurrencies. Some popular exchanges that support Ethereum transfers include Coinbase, Binance, and Kraken. To transfer Ethereum using a cryptocurrency exchange, you will need to create an account, deposit your Ethereum into the exchange wallet, and then initiate the transfer to the recipient’s Ethereum address.
- Method 3: Using a Peer-to-Peer (P2P) Trading Platform: Peer-to-peer trading platforms, such as LocalCryptos and LocalEthereum, provide a decentralized marketplace where individuals can buy and sell cryptocurrencies directly with each other. With this method, you can find a seller willing to accept your payment in Ethereum and initiate a transfer to their designated Ethereum address. P2P trading platforms often offer a wide range of payment options and allow for direct communication between buyers and sellers.
When selecting a transfer method, consider factors such as convenience, security, fees, and the specific requirements of your transaction. Each method has its own unique features and considerations that may be more suitable for your specific needs.
Regardless of the transfer method you choose, it’s essential to verify transaction details and ensure the accuracy of the recipient’s Ethereum address. Double-check the address, enter the correct amount of Ethereum you wish to send, and review any additional transaction fees or notes before proceeding.
Once you have selected a transfer method, proceed to the next step of the transfer process. In the following sections, we will guide you through the specific steps required for each transfer method so that you can successfully transfer your Ethereum.
Method 1: Sending Ethereum via Wallet
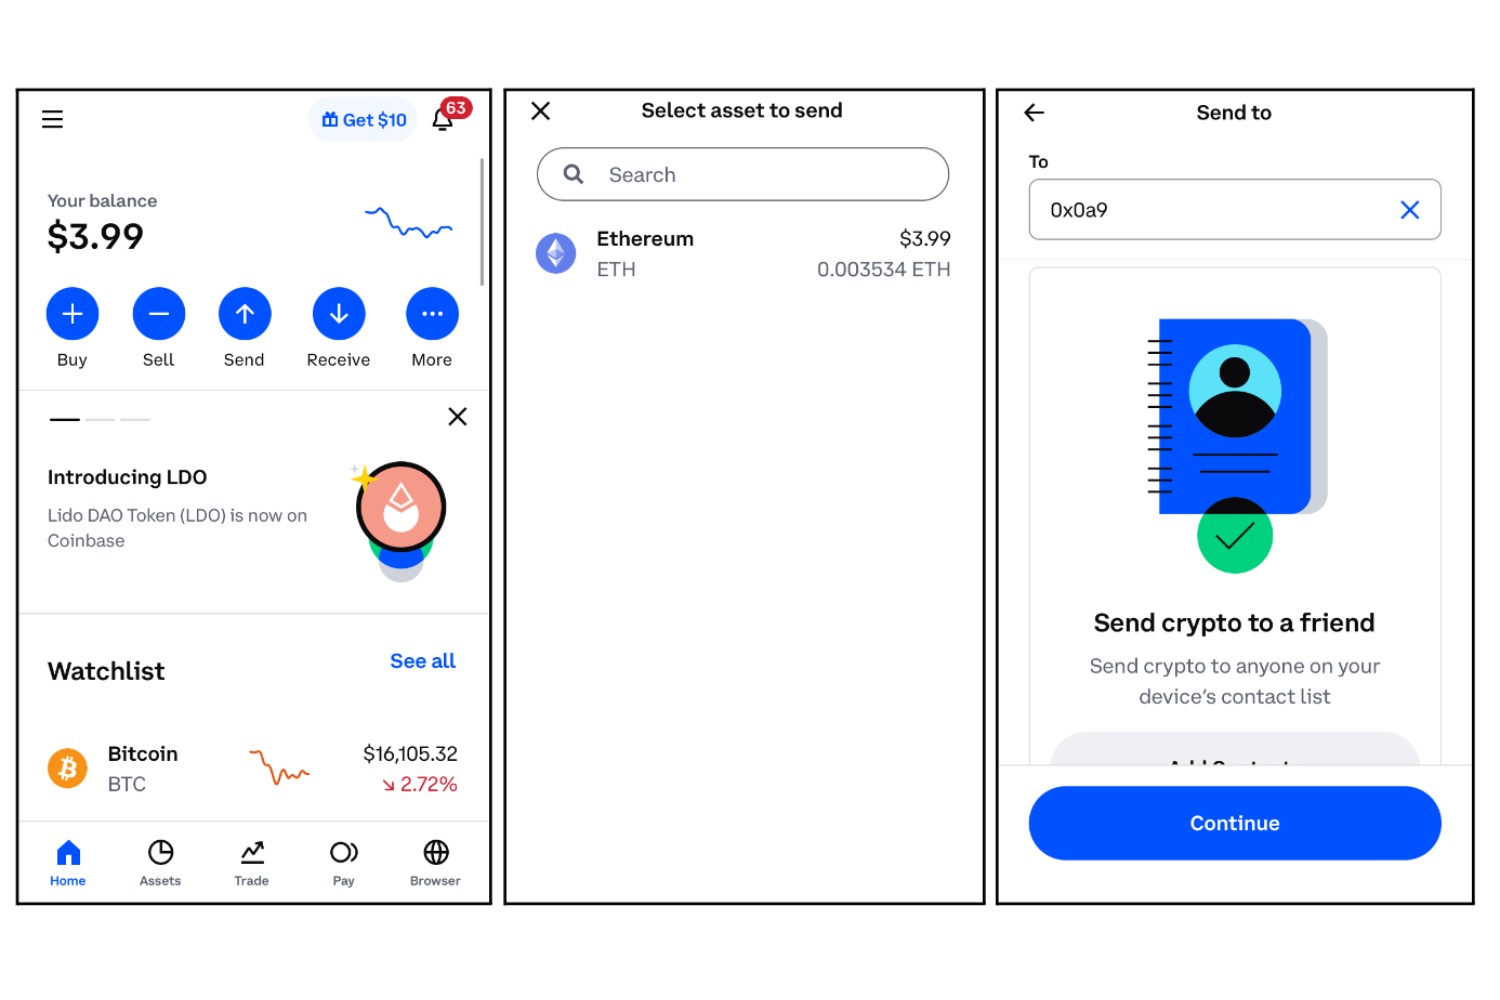
One of the most common and straightforward methods of transferring Ethereum is by using your own Ethereum wallet. Most wallet applications have a built-in feature that allows you to send Ethereum to another address. Here’s how you can send Ethereum via your wallet:
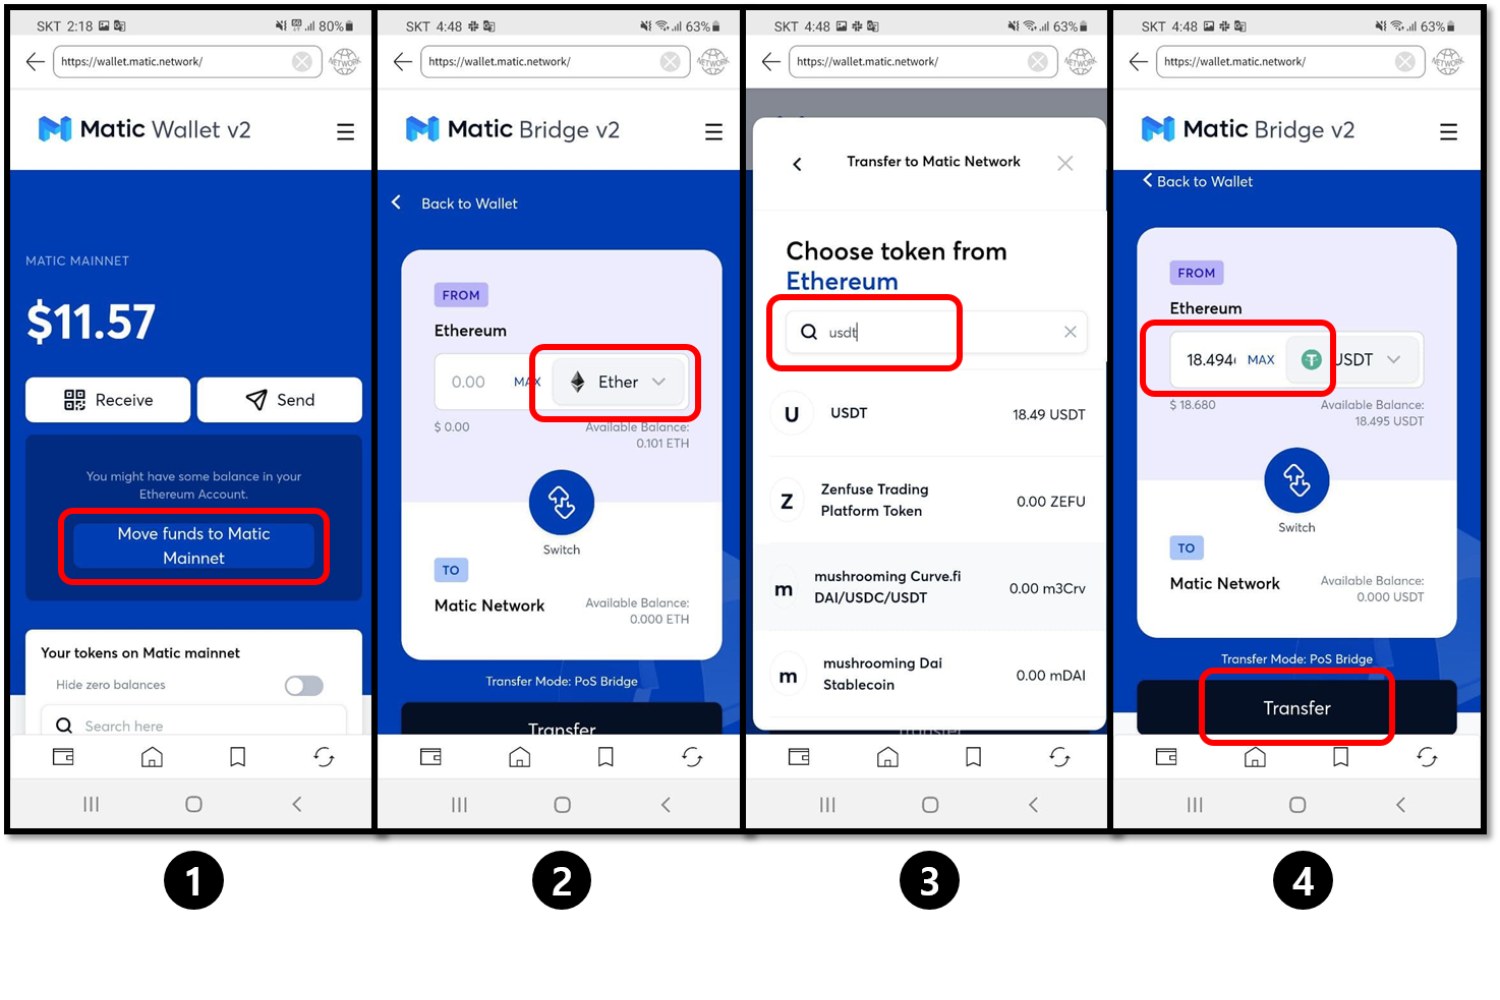
- Open Your Ethereum Wallet: Launch your Ethereum wallet application on your desktop or mobile device. Enter your credentials to access your wallet.
- Locate the Send or Transfer Option: Look for the “Send” or “Transfer” option within your wallet. This feature is usually easily accessible from the main dashboard or navigation menu.
- Enter the Recipient’s Ethereum Address: In the provided field, enter the recipient’s Ethereum address that you obtained in the previous step. It is crucial to ensure the address is accurate and entered without any mistakes.
- Specify the Amount: Indicate the amount of Ethereum that you wish to transfer to the recipient. Take note of the transaction fee, if applicable, as it may vary depending on the network congestion and the urgency of your transaction.
- Review Transaction Details: Before proceeding, carefully review the transaction details, including the recipient’s address and the amount of Ethereum you are sending. This step is crucial to avoid any errors or potential loss of funds.
- Confirm and Send: Once you have verified the transaction details, click on the “Send” or “Confirm” button to initiate the transfer. Your wallet will then prepare and broadcast the transaction to the Ethereum network for validation and inclusion in the blockchain.
- Wait for Confirmation: Depending on network congestion, it may take some time for the Ethereum network to confirm and validate the transaction. Your wallet application may provide you with a transaction ID or link to track the progress of the transfer.
- Completion: Once the transaction is confirmed and included in the blockchain, the recipient will receive the Ethereum in their wallet. The transaction is now completed, and you have successfully sent Ethereum via your wallet.
It’s important to note that Ethereum transactions on the blockchain are irreversible. Once the transaction has been confirmed and included in the blockchain, it cannot be reversed or canceled. Therefore, it is crucial to verify all transaction details before initiating the transfer to ensure accuracy.
Using your own Ethereum wallet to send Ethereum provides you with control and security over your funds. Make sure to keep your wallet software and devices updated, use secure internet connections, and follow best practices for wallet security to safeguard your Ethereum.
The process of sending Ethereum via wallet may vary slightly depending on the specific wallet application you are using. Always refer to the official documentation or support resources provided by your wallet provider for detailed instructions specific to your wallet.
Now that you are familiar with the method of sending Ethereum via wallet, you can proceed with transferring your Ethereum securely. In the next step, we will explore another transfer method: using a cryptocurrency exchange.
Method 2: Using a Cryptocurrency Exchange
Another popular method for transferring Ethereum is by using a cryptocurrency exchange. Cryptocurrency exchanges act as intermediaries that facilitate the buying, selling, and exchanging of cryptocurrencies, including Ethereum. Here’s how you can transfer Ethereum using a cryptocurrency exchange:
- Create an Account on a Cryptocurrency Exchange: Choose a reputable cryptocurrency exchange that supports Ethereum transfers. Visit the exchange’s website and create an account by providing the necessary information.
- Complete the Verification Process: Depending on the exchange’s security policies, you may need to complete a verification process, which typically involves providing identification documents and proof of address. This step is important to comply with Know Your Customer (KYC) and Anti-Money Laundering (AML) regulations.
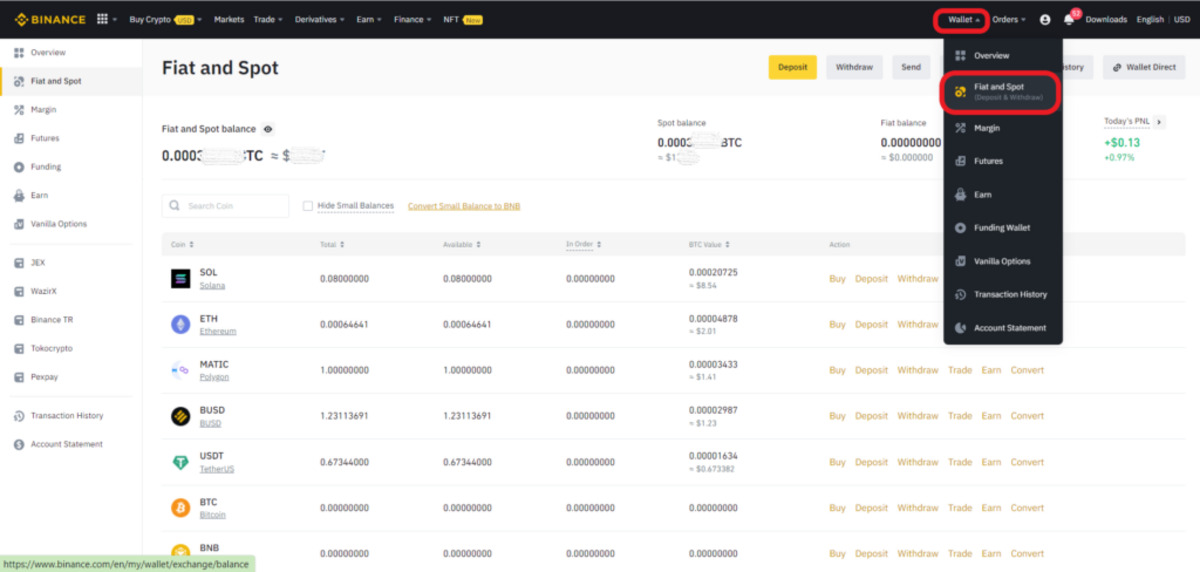
- Deposit Ethereum: After your account is set up and verified, deposit Ethereum into your exchange wallet. The exchange will provide you with a unique Ethereum deposit address. Send your Ethereum from your personal wallet to this address. Some exchanges may require you to generate a deposit memo or tag along with the address, so make sure to follow their specific instructions carefully.
- Navigate to the Trading Interface: Once your Ethereum deposit has been confirmed on the exchange, navigate to the trading interface. Look for the section where you can trade or exchange cryptocurrencies.
- Select Ethereum as the Send Currency: In the trading interface, select Ethereum as the cryptocurrency you want to send. Specify the amount of Ethereum you wish to transfer.
- Enter the Recipient’s Ethereum Address: Enter the recipient’s Ethereum address in the provided field. Double-check the accuracy of the address to ensure the Ethereum is sent to the correct destination.
- Review and Confirm the Transaction: Carefully review the transaction details, including the recipient’s address and the amount of Ethereum you are sending. Take note of any associated fees with the transfer. Once you are satisfied, click on the “Confirm” or “Send” button to initiate the transfer.
- Wait for the Transfer to Complete: The exchange will process your transaction and broadcast it to the Ethereum network. Depending on network congestion and the exchange’s processing time, it may take some time for the transfer to be confirmed and completed.
- Confirmation and Completion: Once the transaction is confirmed by the Ethereum network, the recipient’s Ethereum address will receive the transferred funds. The transaction is now complete, and you have successfully transferred Ethereum using a cryptocurrency exchange.
Using a cryptocurrency exchange for Ethereum transfers offers convenience and access to a broader market. However, it’s important to note that exchanges can be susceptible to hacking and other security risks. Take precautions to protect your exchange account, such as enabling two-factor authentication (2FA), using strong passwords, and keeping your account information confidential.
Additionally, it’s essential to choose reputable and well-established exchanges with a good track record of security and user satisfaction. Research and read user reviews to ensure you are using a trusted exchange for your Ethereum transfers.
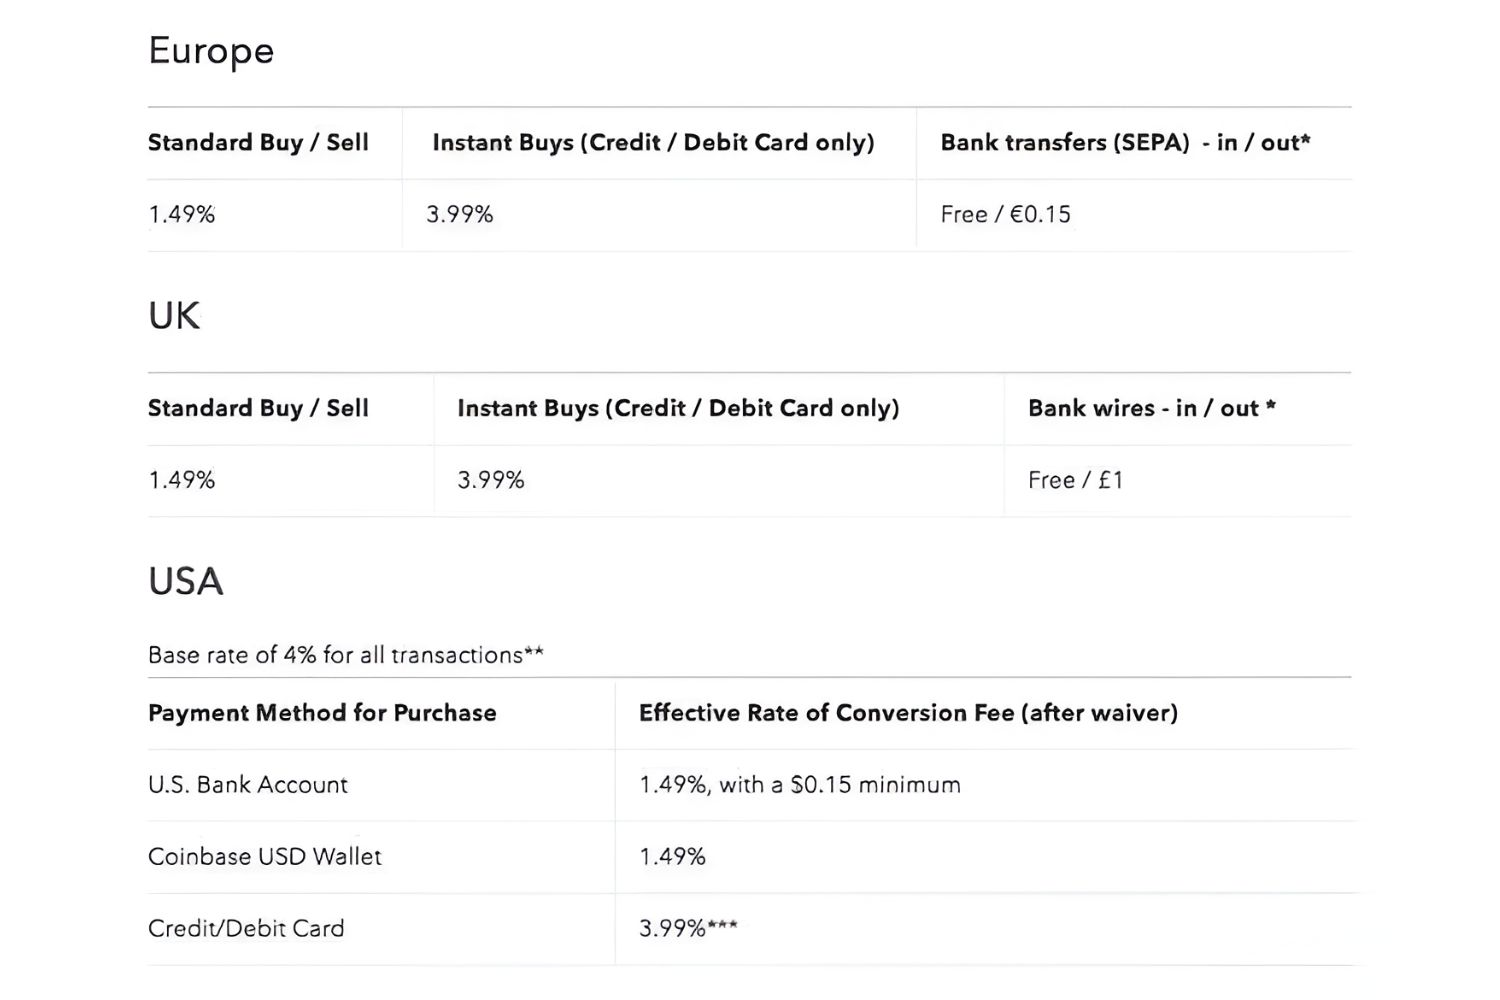
Remember to consider transaction fees associated with using a cryptocurrency exchange. Exchanges typically charge fees for depositing, trading, and withdrawing cryptocurrencies. Familiarize yourself with the fee structure of the exchange you choose to ensure you understand the costs involved.
Now that you are familiar with transferring Ethereum using a cryptocurrency exchange, you can proceed with your Ethereum transfer using this method. In the next section, we will explore another transfer method: using a peer-to-peer (P2P) trading platform.
Method 3: Using a Peer-to-Peer (P2P) Trading Platform
If you prefer a more direct and decentralized approach, you can consider using a peer-to-peer (P2P) trading platform to transfer your Ethereum. P2P trading platforms connect buyers and sellers directly, allowing for direct transactions without the need for intermediaries. Here’s how you can transfer Ethereum using a P2P trading platform:
- Select a P2P Trading Platform: Choose a reputable P2P trading platform that supports Ethereum transactions. Popular P2P platforms for Ethereum include LocalCryptos and LocalEthereum. Visit the platform’s website and create an account if required.
- Browse Available Listings: Once your account is set up, browse the available listings on the platform. Sellers on P2P platforms advertise their Ethereum for sale, indicating the price and preferred payment methods.
- Find a Suitable Seller: Look for a seller who is willing to accept your chosen payment method and price. Take note of the seller’s reputation, trading history, and any additional terms they have specified.
- Initiate the Transfer Request: On the P2P platform, initiate a transfer request to the selected seller. Specify the amount of Ethereum you wish to purchase and enter any required details or instructions.
- Communicate with the Seller: The P2P platform will provide a secure communication channel for you to communicate with the seller. Use this channel to discuss the details of the transaction, such as payment instructions and the recipient’s Ethereum address.
- Follow the Seller’s Payment Instructions: The seller will provide you with their preferred payment method and instructions. Follow these instructions carefully and complete the payment according to the agreed-upon terms.
- Provide Your Ethereum Address: Once the payment is made, provide the seller with your Ethereum address where you want the Ethereum to be transferred. Ensure that you provide the correct and accurate address to avoid any transfer issues.
- Confirm and Wait for the Transfer: After providing your Ethereum address, the seller will initiate the transfer from their wallet to your address. Confirm the transaction details and wait for the transfer to be completed.
- Transaction Completion: Once the Ethereum transfer is confirmed, you will receive the transferred funds in your Ethereum wallet. The transaction is now complete, and you have successfully transferred Ethereum using a peer-to-peer trading platform.
P2P trading platforms offer a direct method of transferring Ethereum, allowing you to interact with the seller and negotiate the terms of the transaction. Be sure to familiarize yourself with the platform’s features, security measures, and reputation, and choose a seller with a good track record and positive reviews.
Take precautions when using P2P trading platforms, such as verifying the seller’s identity, confirming payment details, and thoroughly understanding the terms and conditions of the transaction. Always exercise caution and follow the platform’s guidelines to reduce the risk of scams and fraudulent activities.
Now that you are familiar with transferring Ethereum using a P2P trading platform, you can consider this method for your Ethereum transfer. In the next step, we will explore how to verify transaction details before proceeding with the transfer.
Step 3: Verify Transaction Details
Before proceeding with a transfer, it is crucial to verify all transaction details to ensure accuracy and mitigate potential risks. Verifying transaction details helps prevent errors and ensures that the Ethereum is sent to the intended recipient. Here’s how you can verify transaction details:
- Recipient’s Ethereum Address: Double-check the recipient’s Ethereum address to ensure it is accurate and entered without any errors. Ethereum addresses are case-sensitive, so even a slight mistake can result in the transfer going to the wrong address.
- Amount of Ethereum: Review the amount of Ethereum you are transferring. Make sure it matches the desired amount and matches the expectations of both parties involved in the transaction. Take into consideration any network fees that might be deducted from the total amount.
- Transaction Fees: Take note of any transaction fees associated with the transfer. Depending on the transfer method and network congestion, there may be additional fees imposed by wallets, exchanges, or P2P platforms. Ensure that you are aware of these fees and factor them into your transfer calculation.
- Payment and Payment Method: If you are using a cryptocurrency exchange or a P2P platform, ensure that you have followed the agreed-upon payment instructions and used the correct payment method. Confirm the payment details, such as the bank account or digital wallet address used for the payment.
- Communication: If you have been communicating with the recipient or any intermediaries regarding the Ethereum transfer, review the communication history to ensure that all relevant details have been accurately communicated and understood. Double-check any payment instructions or additional information shared during the communication process.
- Terms and Conditions: If there are any specific terms and conditions associated with the transfer, such as deadlines, milestones, or additional agreements, carefully review and confirm that you are complying with them.
Verifying transaction details is essential for the accuracy and success of the Ethereum transfer. It reduces the risk of sending funds to the wrong address, ensuring a smooth and secure transfer process.
It is important to note that Ethereum transactions are irreversible once confirmed on the blockchain. Take the time to double-check all transaction details before confirming the transfer to avoid any potential loss of funds.
If you have any doubts or concerns about the transaction details, it is recommended to reach out to the recipient or any intermediaries involved to clarify and confirm the information. Effective communication is key to ensure a successful Ethereum transfer.
After thoroughly verifying the transaction details, you can proceed to the next step and initiate the transfer. In the next section, we will guide you through the steps required to initiate and complete the Ethereum transfer.
Step 4: Initiate the Transfer
Once you have verified all the transaction details and are confident in proceeding, it’s time to initiate the transfer of your Ethereum. The steps involved in initiating the transfer may vary depending on the transfer method you are using. Here’s a general guide to help you initiate the Ethereum transfer:
- Open Your Wallet or Exchange Account: If you are using a wallet to initiate the transfer, open your Ethereum wallet application on your desktop or mobile device. If you are using a cryptocurrency exchange, log in to your exchange account.
- Locate the “Send” or “Transfer” Option: In your wallet or exchange account, look for the “Send” or “Transfer” option. This feature is typically easily accessible and prominently displayed.
- Enter the Recipient’s Ethereum Address: Enter the accurate and verified Ethereum address of the recipient in the provided field. Ensure there are no typos or errors in the address, as this could result in the loss of your funds.
- Specify the Amount: Indicate the amount of Ethereum you wish to send to the recipient. Enter the desired amount either in Ether (ETH) or in the equivalent fiat currency, depending on the interface of your wallet or exchange.
- Confirm the Transaction: Before proceeding with the transfer, review the transaction details displayed on the screen. Double-check the recipient’s address and the amount of Ethereum being sent. Take note of any applicable transaction fees that may be deducted from the total amount. Confirm that all the information is accurate and click on the “Confirm” or “Send” button to initiate the transfer.
- Follow Additional Instructions, if Applicable: Depending on the transfer method and the specific requirements of the recipient or platform, you may need to follow additional instructions. For example, you might need to provide a payment reference or attach a memo to the transaction. Ensure you comply with any additional requirements to ensure a smooth transfer process.
- Wait for Confirmation: After initiating the transfer, you may need to wait for the transaction to be confirmed by the Ethereum network. The confirmation time can vary depending on network congestion and the transaction fee you specified. Some wallets or exchanges may provide you with a transaction ID or link to track the progress of the transfer.
- Completion: Once the Ethereum transfer is confirmed and included in the blockchain, the recipient’s Ethereum address will receive the transferred funds. The transaction is now complete, and you have successfully initiated the transfer of Ethereum.
It’s important to note that the time required for the transfer to be confirmed and completed can vary depending on network congestion and the specific transfer method you are using. Some transfers may be completed within minutes, while others may take longer.
During the confirmation process, avoid making any changes or modifications to the transaction details. Altering the transaction details after it has been initiated may result in loss or failure of the transfer.
After initiating the transfer, it’s a good practice to keep a record of the transaction details, including the recipient’s Ethereum address, the amount transferred, and any associated transaction IDs or confirmations. This will help you keep track of your transfers and provide a reference in case of any future inquiries or issues.
Now that you have successfully initiated the Ethereum transfer, proceed to the next step: confirming the transaction to ensure its successful completion.
Step 5: Confirming the Transaction
After initiating the transfer of your Ethereum, it is crucial to confirm the transaction to ensure its successful completion. Confirming the transaction involves monitoring its progress, verifying its confirmation on the Ethereum blockchain, and ensuring that the transferred funds reach the intended recipient. Follow these steps to confirm your Ethereum transaction:
- Transaction ID or Hash: If your wallet or exchange provides a transaction ID or hash, make a note of it. The transaction ID is a unique identifier assigned to your Ethereum transfer on the blockchain. It allows you to track the progress and status of the transaction.
- Use a Blockchain Explorer: Visit a blockchain explorer like Etherscan or Ethplorer, which allows you to view real-time information about Ethereum transactions. Enter the transaction ID or hash from step 1 in the search bar and perform a search.
- Transaction Status: The blockchain explorer will display the transaction details, including its status. Verify that the transaction has been mined and confirmed on the Ethereum blockchain. Look for confirmation indicators such as block height, timestamp, and the number of confirmations.
- Recipient Confirmation: Communicate with the recipient and confirm that they have received the Ethereum in their wallet. Share the transaction ID or hash with them to provide evidence of the transfer.
- Double-check the Recipient’s Ethereum Address: Review the recipient’s Ethereum address once again to ensure it matches the address used for the transaction. This step is crucial to confirm that the funds have reached the intended recipient securely and accurately.
- Transaction Receipt: Some wallets and exchanges provide users with transaction receipts or confirmation emails. Check your wallet or email inbox for any transaction receipts that confirm the successful transfer of Ethereum.
- Keep Records: Maintain a record of the transaction details, including the transaction ID, recipient’s Ethereum address, and the date and time of the transfer. Having a record of the transaction will serve as a reference and proof of the transfer in the future, if necessary.
Confirming the transaction is essential to ensure that the Ethereum transfer has been successfully completed and that the recipient has received the funds. It also provides peace of mind and verification of the accuracy of the transfer.
If any issues or discrepancies arise during the confirmation process, promptly contact your wallet provider, exchange, or the recipient to address and resolve the situation. The transaction confirmation is a critical step to ensure the integrity and success of your Ethereum transfer, and prompt action can help resolve any potential concerns.
Now that you have confirmed the transaction and verified its successful completion, proceed to the final step: tracking the transfer to ensure that the Ethereum reaches the recipient securely.
Step 6: Tracking the Transfer
After confirming the successful completion of your Ethereum transfer, it’s important to track the progress of the transfer to ensure that the Ethereum reaches the recipient securely. Tracking the transfer helps provide transparency and allows you to monitor its journey on the Ethereum blockchain. Follow these steps to track your Ethereum transfer:
- Transaction ID or Hash: Retrieve the transaction ID or hash associated with your Ethereum transfer. This unique identifier is typically provided by your wallet, exchange, or blockchain explorer.
- Use a Blockchain Explorer: Access a reliable blockchain explorer such as Etherscan or Ethplorer. These explorers allow you to enter the transaction ID or hash in their search bar to track the details of the transfer.
- Data and Confirmation: The blockchain explorer will display information about your Ethereum transfer, including the block number, timestamp, and the number of confirmations. The confirmations represent the number of blocks that have been added to the blockchain since the transaction was included, indicating the level of security and immutability.
- Block Confirmations: As additional blocks are added to the blockchain, the number of confirmations will increase. A higher number of confirmations indicates a more secure and settled transaction. Some platforms or recipients may require a specific number of confirmations before considering the transfer as successful and finalized.
- Estimated Completion Time: The blockchain explorer may provide an estimated completion time for the transfer based on the current network conditions. However, please note that the completion time is subject to variations in network congestion.
- Monitor Changes: Continuously track the blockchain explorer for any updates or changes to the transfer status. This will help you stay informed about the progress of your Ethereum transfer.
- Recipient Confirmation: Reach out to the recipient and ask them to confirm the receipt of the Ethereum. Sharing the transaction ID or hash with them serves as proof and provides additional assurance that the funds have been successfully delivered.
- Keep Records: Maintain a record of the transaction details, including the transaction ID or hash, the number of confirmations, and any communication with the recipient regarding the transfer. These records will serve as evidence and references in case of any future inquiries or concerns.
Tracking the progress of your Ethereum transfer allows you to stay informed about its status and provides peace of mind that the funds have been securely delivered to the recipient. It also adds an extra layer of transparency to the transaction process.
If any issues or delays occur during the tracking process or if you have concerns about the status of the transfer, contact your wallet provider, exchange, or the recipient to address and resolve the situation promptly.
Now that you have tracked the transfer and ensured its successful completion, the Ethereum transfer process is complete. Congratulations on successfully transferring Ethereum to the recipient!
Conclusion
Transferring Ethereum is a fundamental skill for anyone involved in the world of cryptocurrencies. Whether you want to send funds to a friend, exchange Ethereum for another currency, or engage in decentralized applications, knowing how to transfer Ethereum is essential.
In this guide, we covered the step-by-step process of transferring Ethereum. We began by setting up a wallet, discussing different wallet options such as desktop, mobile, hardware, and web wallets. We then explored three common methods of transferring Ethereum: sending it via wallet, using a cryptocurrency exchange, and leveraging a peer-to-peer trading platform. Each method comes with its own advantages and considerations, and it’s important to choose the method that best suits your needs.
We then discussed the importance of verifying transaction details, ensuring the accuracy of the recipient’s Ethereum address, and double-checking the amount being sent. Confirming the transaction helps to avoid errors and ensure a successful transfer.
Once the transaction was initiated, we emphasized the significance of confirming the transaction on the Ethereum blockchain. By using a blockchain explorer, tracking the transfer’s progress, and obtaining confirmations, you can ensure that the Ethereum reaches the intended recipient securely.
Throughout this guide, we highlighted the importance of security, communication, and attention to detail. It is essential to use reputable wallet applications, be mindful of potential scams, and double-check all information before initiating a transfer. Effective communication with the recipient and thorough record-keeping are also key components of a successful Ethereum transfer.
By following these steps and guidelines, you can confidently transfer Ethereum and navigate the decentralized world of cryptocurrencies. Remember to stay informed, keep your wallets and devices secure, and always exercise caution when handling digital assets.
Now that you have a solid understanding of how to transfer Ethereum, you can apply this knowledge and make your transactions with confidence. Embrace the possibilities that Ethereum offers, whether it’s sending funds, participating in decentralized finance, or engaging with the thriving Ethereum ecosystem.