Introduction
As the cryptocurrency space continues to evolve, new platforms and technologies are being developed to improve scalability and transaction speed. One such platform is Matic, a layer 2 scaling solution built on top of the Ethereum network.
Ethereum, the second-largest cryptocurrency by market capitalization, has gained popularity for its ability to support decentralized applications (dApps) and smart contracts. However, the scalability issues of Ethereum’s mainnet have become a hindrance, causing delays and high transaction costs.
Matic, on the other hand, aims to address these challenges by providing faster and cheaper transactions. With the Matic mainnet, users can take advantage of the benefits offered by Matic Network, such as instant confirmations, low gas fees, and increased throughput.
Transferring Matic tokens from the Ethereum mainnet to the Matic mainnet allows users to leverage the performance and cost-efficiency of the Matic Network. This process enables seamless integration with Matic’s ecosystem and access to decentralized finance (DeFi) applications and other services built on the Matic platform.
In this guide, we will walk you through the step-by-step process of transferring Matic from the Ethereum mainnet to the Matic mainnet. Whether you are a beginner or an experienced cryptocurrency enthusiast, this guide will help you navigate the transfer process with ease.
Before we dive into the details, make sure you have a compatible wallet that supports Matic and Ethereum wallets. This will ensure a smooth and secure transfer process.
Now, let’s get started on how to transfer your Matic tokens from the Ethereum mainnet to the Matic mainnet.
What is Matic?
Matic, also known as Polygon, is a layer 2 scaling solution for the Ethereum blockchain. It was designed to address the scalability and usability challenges faced by Ethereum, allowing for faster and cheaper transactions.
By leveraging a combination of sidechains, plasma chains, and a decentralized network of validators, Matic aims to provide a seamless experience for users and developers while maintaining compatibility with the Ethereum ecosystem. It acts as a bridge between the Ethereum mainnet and layer 2 solutions, enabling efficient and scalable transactions.
One of the key features of Matic is its ability to improve transaction speed. While Ethereum’s mainnet has limited throughput, causing network congestion and slow confirmations, Matic offers near-instant finality and significantly higher throughput. This means that transactions on Matic can be processed and confirmed within seconds, providing a smoother user experience.
Matic also addresses the issue of high transaction fees on Ethereum. In contrast to the Ethereum mainnet, where gas fees can often be exorbitant during times of high network activity, Matic offers low transaction fees that make it more cost-effective for users to interact with decentralized applications (dApps) and conduct transactions.
Furthermore, Matic is compatible with existing Ethereum tools, wallets, and dApps, making it easy for developers to build and deploy applications on the Matic network. This interoperability ensures a seamless transition for Ethereum users and developers, while also providing them with the benefits of Matic’s scalability and low transaction costs.
In summary, Matic is a layer 2 scaling solution that aims to enhance the performance and usability of the Ethereum network. By providing faster transactions, lower fees, and compatibility with Ethereum, Matic offers a solution to the scalability challenges faced by Ethereum, unlocking new possibilities for decentralized applications and facilitating the broader adoption of blockchain technology.
What is Ethereum Mainnet?
Ethereum Mainnet is the primary blockchain network of the Ethereum ecosystem. It is the foundation on which the Ethereum platform operates and facilitates the execution of smart contracts and the deployment of decentralized applications (dApps).
As one of the most popular and widely adopted blockchain networks, Ethereum Mainnet enables developers to create and deploy programmable contracts that can automatically execute predefined actions when certain conditions are met. These contracts, known as smart contracts, have revolutionized various industries by providing trustless and transparent interactions.
On the Ethereum Mainnet, users can send and receive Ether (ETH), the native cryptocurrency of the Ethereum network. ETH serves as the fuel for executing transactions and deploying smart contracts on the Ethereum blockchain.
One of the key characteristics of the Ethereum Mainnet is its decentralized nature. Unlike traditional centralized systems controlled by a single entity, Ethereum Mainnet relies on a global network of nodes spread across the world. These nodes participate in the consensus mechanism, known as Proof of Work (PoW), to validate transactions and secure the network.
However, Ethereum Mainnet has faced challenges related to scalability and transaction speed. As more users and dApps join the network, congestion and high gas fees have become common issues. This limits the number of transactions that can be processed within a given time, causing delays and increasing costs for users.
To address these limitations, developers and researchers have been exploring various scaling solutions, such as layer 2 protocols like Matic, to improve the scalability and overall performance of the Ethereum network.
In summary, Ethereum Mainnet is the backbone of the Ethereum platform, providing the infrastructure for executing smart contracts and powering decentralized applications. While it offers a robust and decentralized environment, scalability issues have prompted the development of layer 2 solutions like Matic to enhance transaction speed and reduce costs on the Ethereum network.
What is Matic Mainnet?
Matic Mainnet, also known as Polygon Mainnet, is the primary network of the Matic ecosystem. It serves as a layer 2 scaling solution built on top of the Ethereum network, aiming to address the scalability challenges faced by Ethereum’s mainnet.
Matic Mainnet operates as a sidechain to Ethereum, providing a parallel blockchain network that offers faster and more cost-effective transactions. It leverages a unique architecture that combines the security and decentralization of Ethereum with the scalability and efficiency of layer 2 solutions.
By utilizing the Matic Mainnet, users can benefit from near-instant finality and significantly higher throughput compared to the Ethereum mainnet. This means that transactions can be processed and confirmed within seconds, providing a seamless user experience and eliminating the delays associated with congestion on the Ethereum network.
In addition to faster transactions, Matic Mainnet offers significantly lower transaction fees. Ethereum’s mainnet often suffers from high gas fees during times of network congestion, making it expensive for users to interact with decentralized applications (dApps) and conduct transactions. Matic Mainnet addresses this issue by providing cost-effective transactions, making it more accessible for users to participate in the Matic ecosystem.
Matic Mainnet is also designed to ensure compatibility with Ethereum. This allows users to seamlessly transfer assets, including tokens and NFTs (Non-Fungible Tokens), between the Ethereum mainnet and the Matic Mainnet. Developers can easily deploy their Ethereum-based applications on Matic Mainnet without significant modifications, expanding the reach and capabilities of their dApps.
Moreover, Matic Mainnet has a vibrant and growing ecosystem of dApps, protocols, and services built on top of it. This includes decentralized exchanges (DEXs), lending platforms, gaming applications, and much more. The Matic Mainnet opens up new possibilities for users to explore and engage with decentralized finance (DeFi) and other innovative applications.
In summary, Matic Mainnet is a layer 2 scaling solution built on top of the Ethereum network. It provides a faster, more cost-effective, and scalable ecosystem for users and developers, enabling seamless integration with the Ethereum ecosystem while delivering enhanced transaction speed and reduced fees.
Why Transfer Matic from Ethereum Mainnet to Matic Mainnet?
Transferring Matic tokens from the Ethereum mainnet to the Matic mainnet offers several compelling reasons and benefits for users.
1. Speed: The Ethereum mainnet, due to its congestion and limited throughput, often experiences delays in transaction confirmations. By transferring Matic to the Matic mainnet, users can take advantage of its near-instant finality, allowing for faster and more efficient transactions. This is particularly beneficial for traders, dApps, and users requiring quick and seamless interactions.
2. Lower Transaction Fees: Ethereum’s mainnet is notorious for its high gas fees, especially during periods of network congestion. By transferring Matic to the Matic mainnet, users can enjoy significantly lower transaction fees. This not only makes it more cost-effective to transact but also encourages wider adoption and participation in the Matic ecosystem.
3. Enhanced Scalability: While Ethereum’s mainnet has made significant contributions to the world of decentralized applications, it has struggled with scalability issues. Matic Mainnet, as a layer 2 scaling solution, addresses these challenges by offering increased throughput and improved scalability. By transferring Matic to the Matic mainnet, users can benefit from a more scalable network, empowering them to participate in the growing ecosystem of Matic-based dApps and services.
4. Seamless Integration with Matic Ecosystem: The Matic mainnet provides a platform for developers to build and deploy applications that can seamlessly interact with the Matic ecosystem. By transferring Matic, users gain access to a wide array of decentralized finance (DeFi) protocols, gaming applications, NFT marketplaces, and other innovative projects built on Matic. This opens up a whole new world of opportunities for users to engage with and explore.
5. Interchangeability: Matic tokens are interoperable between the Ethereum mainnet and the Matic mainnet. This means that users can transfer their Matic tokens back and forth as needed, with the flexibility to leverage the advantages of each network. This allows users to choose the most suitable platform based on their specific needs, without being locked into a single network.
Overall, transferring Matic tokens from the Ethereum mainnet to the Matic mainnet provides users with faster transactions, lower fees, enhanced scalability, seamless integration, and the ability to interchange between networks. These benefits contribute to a smoother and more efficient user experience while unlocking the full potential of the Matic ecosystem.
Step-by-Step Guide: How to Transfer Matic from Ethereum Mainnet to Matic Mainnet
Transferring Matic tokens from the Ethereum mainnet to the Matic mainnet is a straightforward process. Follow these step-by-step instructions to ensure a successful transfer:
- Prepare for the transfer: Before initiating the transfer, ensure that you have a compatible wallet that supports both Ethereum and Matic. Popular options include MetaMask and Trust Wallet.
- Connect your wallet to the Ethereum Mainnet: Open your wallet and switch to the Ethereum network. Ensure that you have enough Ether (ETH) in your wallet to cover the gas fees for the transfer.
- Check your Matic balance on Ethereum Mainnet: Verify that you have sufficient Matic tokens on the Ethereum mainnet for the transfer. You can check your balance on your wallet or by using blockchain explorers like Etherscan.
- Initiate the transfer process: Navigate to the Matic Bridge website (bridge.matic.network) and click on the ‘Transfer’ tab.
- Approve the transfer: Enter the amount of Matic tokens you wish to transfer and the destination address on the Matic mainnet. Review the transaction details, including the gas fee, and confirm the transfer.
- Wait for the confirmation: Once you have approved the transfer, wait for the transaction to be processed and confirmed on the Ethereum network. This may take a few minutes, depending on network congestion.
- Connect your wallet to the Matic Mainnet: Switch your wallet’s network to the Matic network. You can usually do this by selecting “Custom RPC” and entering the Matic Mainnet details, including the RPC URL.
- Check your Matic balance on Matic Mainnet: After connecting to the Matic Mainnet, verify that your Matic tokens have been successfully transferred. You can check your balance in your wallet or through Matic’s block explorer.
It is important to note that transferring Matic from the Ethereum mainnet to the Matic mainnet incurs gas fees. Ensure that you have sufficient Ether in your wallet to cover these fees.
By following the above steps, you can seamlessly transfer your Matic tokens from the Ethereum mainnet to the Matic mainnet, allowing you to take advantage of faster transactions, lower fees, and the vibrant ecosystem offered by Matic.
Prepare for the Transfer
Before initiating the transfer of your Matic tokens from the Ethereum mainnet to the Matic mainnet, it’s important to make the necessary preparations to ensure a smooth and successful transaction. Here are the key steps to follow when preparing for the transfer:
a. Choose a Compatible Wallet: Make sure you have a wallet that supports both Ethereum and Matic networks. Popular wallets that are compatible include MetaMask, Trust Wallet, and MyEtherWallet. Install and set up the wallet if you haven’t already.
b. Backup Your Wallet: Safeguard your wallet by creating a backup. This ensures that you can restore your wallet and access your funds in case of any unforeseen circumstances. Follow the backup instructions provided by the wallet provider.
c. Verify Sufficient ETH: To cover the gas fees associated with the transfer, ensure that you have enough Ether (ETH) in your wallet on the Ethereum mainnet. Gas fees vary, so it’s a good practice to have a sufficient amount of ETH to avoid any transaction failures due to insufficient funds.
d. Confirm Matic Token Balance: Check your Matic token balance on the Ethereum mainnet. You can do this by logging into your wallet and navigating to the token section or by using blockchain explorers like Etherscan. Verify that you have the desired amount of Matic tokens available for the transfer.
e. Ensure Network Connectivity: Stable and reliable internet connectivity is crucial when performing the transfer. Verify that your internet connection is working properly to prevent any disruptions during the transaction process.
f. Familiarize Yourself with Transaction Details: Before initiating the transfer, familiarize yourself with the process, including the steps involved, gas fees, and any other relevant information. This knowledge will help you navigate the transfer process confidently.
By taking these preparatory steps, you can ensure that you have a compatible wallet, sufficient funds to cover the gas fees, and a clear understanding of the transfer process. This will help facilitate a smooth and successful transfer of your Matic tokens from the Ethereum mainnet to the Matic mainnet.
Connect your Wallet to the Ethereum Mainnet
Before you can initiate the transfer of your Matic tokens from the Ethereum mainnet to the Matic mainnet, you need to connect your wallet to the Ethereum network. This step ensures that you can access your Matic tokens and interact with the appropriate blockchain. Here’s a step-by-step guide to connecting your wallet to the Ethereum Mainnet:
- Open your Ethereum-compatible wallet: Launch the wallet application or extension that you have chosen, such as MetaMask, Trust Wallet, or MyEtherWallet.
- Ensure you are on the correct network: Confirm that your wallet is set to the Ethereum mainnet. Most wallets will display the network name or logo at the top of the interface, indicating which blockchain you are currently connected to.
- Switch networks (if needed): If your wallet is currently connected to a different network, such as a testnet or a different blockchain altogether, navigate to the network settings and switch to the Ethereum mainnet.
- Connect your wallet to the Ethereum Mainnet: Depending on your wallet, look for the “Connect”, “Unlock”, or “Connect Wallet” button. Click on it to initiate the connection process.
- Unlock your wallet: Follow the prompts provided by your wallet to unlock it. This typically involves entering your wallet password, using biometric authentication, or confirming the connection on your mobile device.
Once you have successfully connected your wallet to the Ethereum mainnet, you will be able to view your Ethereum address and access your Matic tokens. This connection will enable you to interact with the Ethereum blockchain and proceed with the transfer process.
Note that different wallets may have slightly different interfaces or terminologies, but the general steps for connecting to the Ethereum mainnet remain the same. Always refer to the specific instructions provided by your chosen wallet provider if you encounter any difficulties during the connection process.
Now that your wallet is connected to the Ethereum mainnet, you are ready to check your Matic token balance and proceed with transferring your Matic tokens to the Matic mainnet.
Check your Matic Balance on the Ethereum Mainnet
Before initiating the transfer of your Matic tokens from the Ethereum mainnet to the Matic mainnet, it is crucial to verify your Matic token balance on the Ethereum network. This step ensures that you have sufficient funds available for the transfer. Here is a step-by-step guide on how to check your Matic balance on the Ethereum mainnet:
- Open your Ethereum-compatible wallet: Launch your chosen wallet application or extension, such as MetaMask, Trust Wallet, or MyEtherWallet.
- Ensure you are connected to the Ethereum mainnet: Confirm that your wallet is currently connected to the Ethereum mainnet. This ensures that you are viewing the correct blockchain and token information.
- Navigate to the ‘Tokens’ or ‘Assets’ section: In most wallets, there will be a section dedicated to managing and viewing your token balances. Locate and click on the ‘Tokens’ or ‘Assets’ tab within your wallet interface.
- Search for Matic (MATIC) in the token list: Within the ‘Tokens’ or ‘Assets’ section, search for Matic or its symbol, MATIC, in the list of supported tokens. If you cannot find it, you may need to add the Matic token contract address manually.
- View your Matic token balance: Once you have located the Matic token in your wallet, you should be able to see your Matic token balance displayed alongside its symbol. Verify that the balance reflects the desired amount of Matic tokens you intend to transfer.
- Double-check the accuracy: Take a moment to ensure that the Matic token balance shown is accurate and matches your expectations. Verify that you have the necessary funds available for the transfer.
By following these steps, you can effectively check your Matic token balance on the Ethereum mainnet. This verification is essential to ensure that you have the correct amount of Matic tokens available before proceeding with the transfer to the Matic mainnet.
If you encounter any difficulties or are unable to locate your Matic token balance, make sure that you have added the correct Matic token contract address to your wallet. Additionally, consult the specific instructions provided by your chosen wallet provider as the interface and process may vary slightly between different wallet applications.
Once you have verified your Matic token balance on the Ethereum mainnet, you are ready to initiate the transfer process and proceed with moving your Matic tokens to the Matic mainnet.
Initiate the Transfer Process
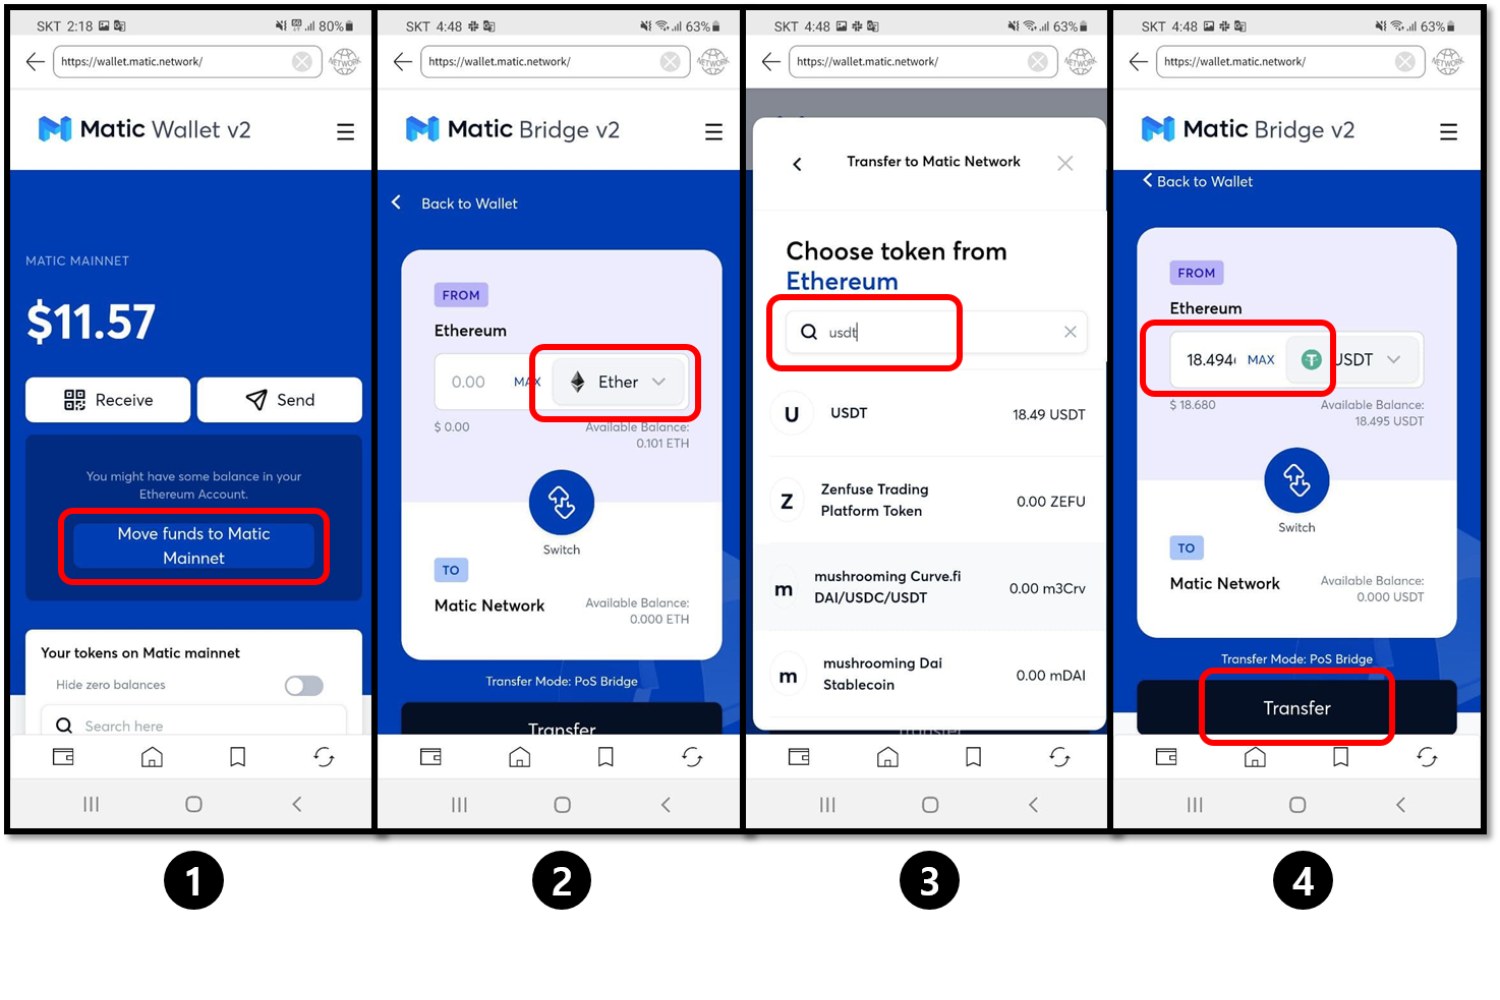
Once you have confirmed your Matic token balance on the Ethereum mainnet, you can proceed to initiate the transfer process to move your Matic tokens to the Matic mainnet. Follow these steps to initiate the transfer:
- Visit the Matic Bridge website: Open your web browser and navigate to the Matic Bridge website (bridge.matic.network).
- Select the ‘Transfer’ tab: Once on the Matic Bridge website, locate and click on the ‘Transfer’ tab. This will direct you to the transfer interface.
- Enter the transfer details: In the transfer interface, you will be prompted to enter the necessary details for the transfer. This includes the amount of Matic tokens you wish to transfer and the destination address on the Matic mainnet. Double-check that the destination address is correct before proceeding.
- Review the transaction details: Take a moment to review the transaction details displayed on the transfer interface. Ensure that the transaction fee (gas fee) is reasonable and acceptable to you. Gas fees can fluctuate depending on network congestion, so be prepared for any potential variations.
- Confirm the transfer: Once you have reviewed the transaction details and are satisfied, click on the ‘Confirm’ or ‘Transfer’ button to initiate the transfer process.
It is important to note that during the transfer process, you may be prompted to sign the transaction using your wallet. This is to authenticate and authorize the transfer of your Matic tokens. Follow the prompts provided by your wallet and confirm the transaction to proceed with the transfer.
After initiating the transfer, the transaction will be broadcasted to the Ethereum network for processing. You will need to wait for the transaction to be confirmed and included in a block by Ethereum miners. The time it takes for confirmation can vary depending on network congestion and other factors. You can track the progress of the transaction using blockchain explorers like Etherscan.
Once the transaction is confirmed on the Ethereum mainnet, your Matic tokens will be ready to be transferred to the Matic mainnet. In the next steps, you will need to approve the transfer and connect your wallet to the Matic mainnet to complete the process.
Continue to the following steps to learn how to approve the transfer and connect your wallet to the Matic mainnet.
Approve the Transfer
After initiating the transfer of your Matic tokens from the Ethereum mainnet to the Matic mainnet, the next step is to approve the transfer. Approving the transfer is a necessary step to authorize the movement of your Matic tokens. Here’s how you can complete this process:
- Access your wallet: Open your Ethereum-compatible wallet, such as MetaMask or Trust Wallet, and ensure that you are connected to the Ethereum mainnet.
- Locate the pending transaction: In your wallet interface, navigate to the pending transactions section or the transaction history page. Look for the transaction that corresponds to the Matic token transfer you initiated in the previous step.
- Click on the transaction: Click on the transaction to open the details and additional options associated with it.
- Approve the transfer: Within the transaction details, you should see an option to approve or confirm the transfer. Click on this option to approve the transfer of your Matic tokens from the Ethereum mainnet to the Matic mainnet.
- Confirm the transaction: Depending on your wallet, you may be prompted to confirm the transfer again by signing the transaction. Follow the prompts provided by your wallet and verify the details of the transaction before confirming.
Once you have approved the transfer, the transaction will be submitted to the Ethereum network for processing. You will need to wait for the transaction to be confirmed and included in a block by Ethereum miners. This confirmation process can take some time, especially during periods of high network activity.
During this waiting period, it is important to ensure that your wallet remains connected to the Ethereum mainnet and that you have a stable internet connection. Disconnecting your wallet or losing internet connectivity could result in transaction failures or delays.
Once the transaction is confirmed on the Ethereum mainnet, your Matic tokens will be available on the Matic mainnet. The next steps involve connecting your wallet to the Matic mainnet and checking your Matic token balance on the Matic network.
Continue to the following steps to learn how to connect your wallet to the Matic mainnet and check your Matic balance on the Matic network.
Wait for the Confirmation
After approving the transfer of your Matic tokens from the Ethereum mainnet to the Matic mainnet, you need to be patient and wait for the confirmation of the transaction. The confirmation process involves the validation and inclusion of your transaction into a block on the Ethereum network. Here’s what you need to do during this waiting period:
- Monitor the transaction status: Keep an eye on the status of your transaction. You can track its progress by using blockchain explorers like Etherscan and entering your wallet address or the transaction hash. These tools will provide details about the transaction, including the number of confirmations.
- Wait for confirmations: Each transaction on the Ethereum network needs a certain number of confirmations to be considered final. The block confirmations ensure that the transaction is verified and added to the blockchain. The number of confirmations required can vary depending on network congestion, but typically six confirmations are considered sufficient for most transactions.
- Be patient: The confirmation process may take some time since it depends on various factors, such as network congestion and the gas fees you selected for the transaction. It is essential to remain patient during this waiting period and avoid unnecessary interactions or attempts to speed up the process.
While waiting for the confirmation, it is crucial to keep your wallet connected to the Ethereum mainnet and maintain a stable internet connection. Disconnecting your wallet or experiencing internet connectivity issues can interrupt the confirmation process and may result in delays or transaction failures.
Once your transaction receives the required number of confirmations, it is considered finalized on the Ethereum mainnet. At this point, you can proceed to the next steps to connect your wallet to the Matic mainnet and check your Matic token balance on the Matic network.
Now that you have patiently waited for the confirmation, continue to the following steps to learn how to connect your wallet to the Matic mainnet and check your Matic balance on the Matic network.
Connect your Wallet to the Matic Mainnet
After the necessary confirmations on the Ethereum mainnet, you are now ready to connect your wallet to the Matic mainnet. This connection is crucial to access and manage your Matic tokens on the Matic Network. Follow these steps to connect your wallet to the Matic Mainnet:
- Open your Ethereum-compatible wallet: Launch your chosen wallet application or extension, such as MetaMask or Trust Wallet.
- Navigate to the network settings: From the wallet interface, look for the network settings or network switcher. It is often represented by a dropdown menu or an icon indicating the current network you are connected to.
- Select ‘Custom RPC’ or ‘Networks’: In the network settings, choose the option to add a custom network or manage networks. This will allow you to add the Matic mainnet as a custom network.
- Add Matic Mainnet details: Fill in the necessary details to add the Matic mainnet. This includes the mainnet name (Matic), the RPC URL for the Matic Mainnet, and the chain ID (e.g., 137 for the Matic Mainnet).
- Save and connect to Matic Mainnet: Once you have entered the Matic mainnet details, save the settings and select the newly added Matic Mainnet network. Your wallet will now be connected to the Matic mainnet.
It is important to note that the RPC URL and chain ID for the Matic mainnet may vary. Make sure to refer to the official Matic documentation or the trusted sources provided by the Matic team to get the most accurate and up-to-date information on the Matic Mainnet settings.
Once you have successfully connected your wallet to the Matic mainnet, you will be able to access your Matic tokens and interact with the Matic Network. This connection will allow you to check your Matic token balance on the Matic mainnet and continue with any further transactions or interactions within the Matic ecosystem.
Proceed to the following step to learn how to check your Matic token balance on the Matic mainnet.
Check your Matic Balance on Matic Mainnet
After connecting your wallet to the Matic mainnet, the next step is to check your Matic token balance on the Matic Network. This will confirm that your Matic tokens have been successfully transferred from the Ethereum mainnet to the Matic mainnet. Here’s how you can check your Matic balance on the Matic mainnet:
- Access your wallet: Open your Ethereum-compatible wallet, such as MetaMask or Trust Wallet.
- Ensure you are connected to the Matic mainnet: Verify that your wallet is currently connected to the Matic mainnet. The network name should indicate that you are on the Matic Mainnet.
- Navigate to the ‘Tokens’ or ‘Assets’ section: In your wallet interface, locate and click on the ‘Tokens’ or ‘Assets’ tab.
- Search for Matic (MATIC) in the token list: Look for Matic or its symbol, MATIC, in the list of supported tokens. If it is not visible, you may need to add the Matic token contract address manually.
- View your Matic token balance: Once you have located the Matic token in your wallet, you should be able to see your Matic token balance displayed next to its symbol. Verify that the balance reflects the amount you transferred from the Ethereum mainnet.
- Double-check the accuracy: Take a moment to ensure that the Matic token balance shown is accurate and matches your expectations. This confirms that your Matic tokens have been successfully transferred to the Matic mainnet.
If you encounter any difficulties or cannot locate your Matic token balance, ensure that you have the correct Matic token added to your wallet. You can also use blockchain explorers like Maticscan to verify your token balance by entering your wallet address.
Now that you have checked your Matic token balance on the Matic mainnet, you can confidently proceed with using your Matic tokens within the Matic ecosystem. You can explore decentralized applications (dApps), participate in decentralized finance (DeFi) protocols, or engage in other activities supported on the Matic network.
Remember to always double-check the security and legitimacy of the applications or services you interact with on the Matic mainnet before proceeding with any transactions or sharing sensitive information.
Conclusion
Transferring your Matic tokens from the Ethereum mainnet to the Matic mainnet opens up a world of possibilities, providing you with faster transactions, lower fees, and access to a vibrant ecosystem of decentralized applications (dApps) and services. The step-by-step guide outlined above has provided you with the necessary information to successfully navigate the transfer process.
By leveraging the Matic mainnet, you can overcome the scalability challenges of Ethereum’s mainnet and enjoy near-instant transaction confirmations. The reduced transaction fees on the Matic mainnet make it more cost-effective for you to interact with dApps and conduct various transactions. Additionally, the increased scalability of the Matic mainnet empowers you to participate in the growing ecosystem of Matic-based projects and protocols.
Remember to prepare for the transfer by ensuring you have a compatible wallet, verifying your Matic token balance on the Ethereum mainnet, and having sufficient ETH for gas fees. Connect your wallet to the Ethereum mainnet, initiate the transfer, approve the transaction, and patiently wait for the confirmation. Once confirmed, connect your wallet to the Matic mainnet and check your Matic token balance on the Matic network.
The Matic mainnet offers an efficient and seamless experience, giving you the ability to leverage the benefits of fast, low-cost transactions within the Matic ecosystem. As you explore the opportunities provided by Matic, remember to exercise caution, conduct due diligence, and follow best security practices to protect your digital assets.
Now that you have successfully transferred your Matic tokens to the Matic mainnet, you can begin exploring the various projects, dApps, and DeFi protocols available on Matic, unlocking new realms of decentralized possibilities.