Introduction
Welcome to the world of cryptocurrency! If you are new to the exciting realm of Ethereum and are wondering how to transfer your Ethereum from Coinbase to Gdax, you’ve come to the right place. This guide will walk you through the process step by step, ensuring a seamless and secure transfer of your funds.
Ethereum is a popular digital currency that has gained significant traction in recent years. Coinbase and Gdax, both owned by the same company, provide a user-friendly platform for buying, selling, and storing cryptocurrencies. While Coinbase is ideal for beginners with its simple interface, Gdax offers advanced trading features for more experienced users.
Transferring Ethereum from Coinbase to Gdax has several advantages. Gdax charges lower fees for trading and withdrawals, making it a cost-effective choice for frequent traders. Additionally, Gdax offers more advanced trading options, including limit and stop orders, which may be appealing to users looking to execute more sophisticated trading strategies.
Before we dive into the transfer process, it’s important to note that both Coinbase and Gdax require you to create an account and complete the verification process before you can start trading. This is a standard procedure to ensure the security and compliance of the platforms.
Now that we have a brief overview let’s get started with the first step: creating an account on both Coinbase and Gdax. Follow along, and soon you’ll be transferring your Ethereum like a pro!
Step 1: Creating an account on both Coinbase and Gdax
Before you can transfer Ethereum from Coinbase to Gdax, you need to have accounts on both platforms. Creating an account is a straightforward process and should only take a few minutes. Here’s how you can do it:
- Visit the Coinbase website at www.coinbase.com and click on the “Sign Up” button. Fill in your basic information, including your name, email address, and password. Accept the terms of service and click “Create Account”.
- Once your account is created, Coinbase will send you a verification email. Open the email and click on the verification link to confirm your email address.
- After confirming your email, Coinbase will prompt you to set up two-factor authentication (2FA) to enhance the security of your account. You can choose between using an authenticator app or receiving SMS codes.
- Next, Coinbase will ask you to verify your identity. This step is necessary to comply with regulations and prevent fraud. Provide the required information, such as your full name, date of birth, address, and a photo ID (driver’s license or passport).
- Once you have completed the identity verification process, your Coinbase account is ready to use.
- Now, let’s move on to creating an account on Gdax. Visit the Gdax website at www.gdax.com. Click on “Create Account” and sign in using the same credentials you used for Coinbase.
- Similar to Coinbase, Gdax will ask you to set up 2FA for added security. Choose your preferred method and follow the instructions to enable it.
- Gdax may also prompt you to complete additional identity verification if it deems necessary. Follow the provided instructions to complete the process.
- Once your Gdax account is set up and verified, you are ready to proceed to the next step of depositing Ethereum into your Coinbase account.
By successfully creating accounts on both Coinbase and Gdax, you have taken the first crucial step towards transferring your Ethereum. The next step will guide you on depositing Ethereum into your Coinbase account, so you can initiate the transfer to Gdax.
Step 2: Verifying your identity on both platforms
Once you have created your accounts on Coinbase and Gdax, the next step is to verify your identity on both platforms. This is a necessary step to ensure the security and compliance of the platforms. Here’s how you can verify your identity:
- Verifying your identity on Coinbase: Log in to your Coinbase account and navigate to the account settings. Look for the “Identity Verification” section, where you will be prompted to provide your personal information.
- Enter your full name, date of birth, and address as requested. Make sure the information matches the details on your official document (such as a passport or driver’s license) that you will need to provide for verification.
- Upload a clear photo of your document. Coinbase accepts government-issued identification documents, such as passports or driver’s licenses. Follow the instructions to ensure the photo is of high quality and all relevant details are visible.
- Once you have uploaded your document, Coinbase will initiate the verification process. It may take some time, but you will receive a notification once your identity is verified.
- Verifying your identity on Gdax: Log in to your Gdax account using your Coinbase credentials.
- Find the account settings or profile section in Gdax. Look for the verification options or identity verification.
- Follow the instructions provided by Gdax to complete the identity verification process. This may involve providing similar information as you did for Coinbase, such as your full name, date of birth, and address. You may also be required to upload a copy of your ID document.
- Once you have submitted the necessary information, Gdax will review and verify your identity. You will be notified once the verification process is complete.
Verifying your identity on both Coinbase and Gdax is essential for ensuring the security and legality of your cryptocurrency transactions. It may take some time for the verification process to be completed, but once it’s done, you can proceed to the next step: depositing Ethereum into your Coinbase account.
Step 3: Depositing Ethereum into your Coinbase account
Now that your Coinbase and Gdax accounts are set up and your identity is verified, it’s time to deposit Ethereum into your Coinbase account. By depositing Ethereum into Coinbase, you will have the necessary funds to transfer to Gdax later on. Here’s how you can deposit Ethereum into your Coinbase account:
- Log in to your Coinbase account using your credentials.
- Navigate to the “Accounts” tab, where you will see a list of available cryptocurrencies.
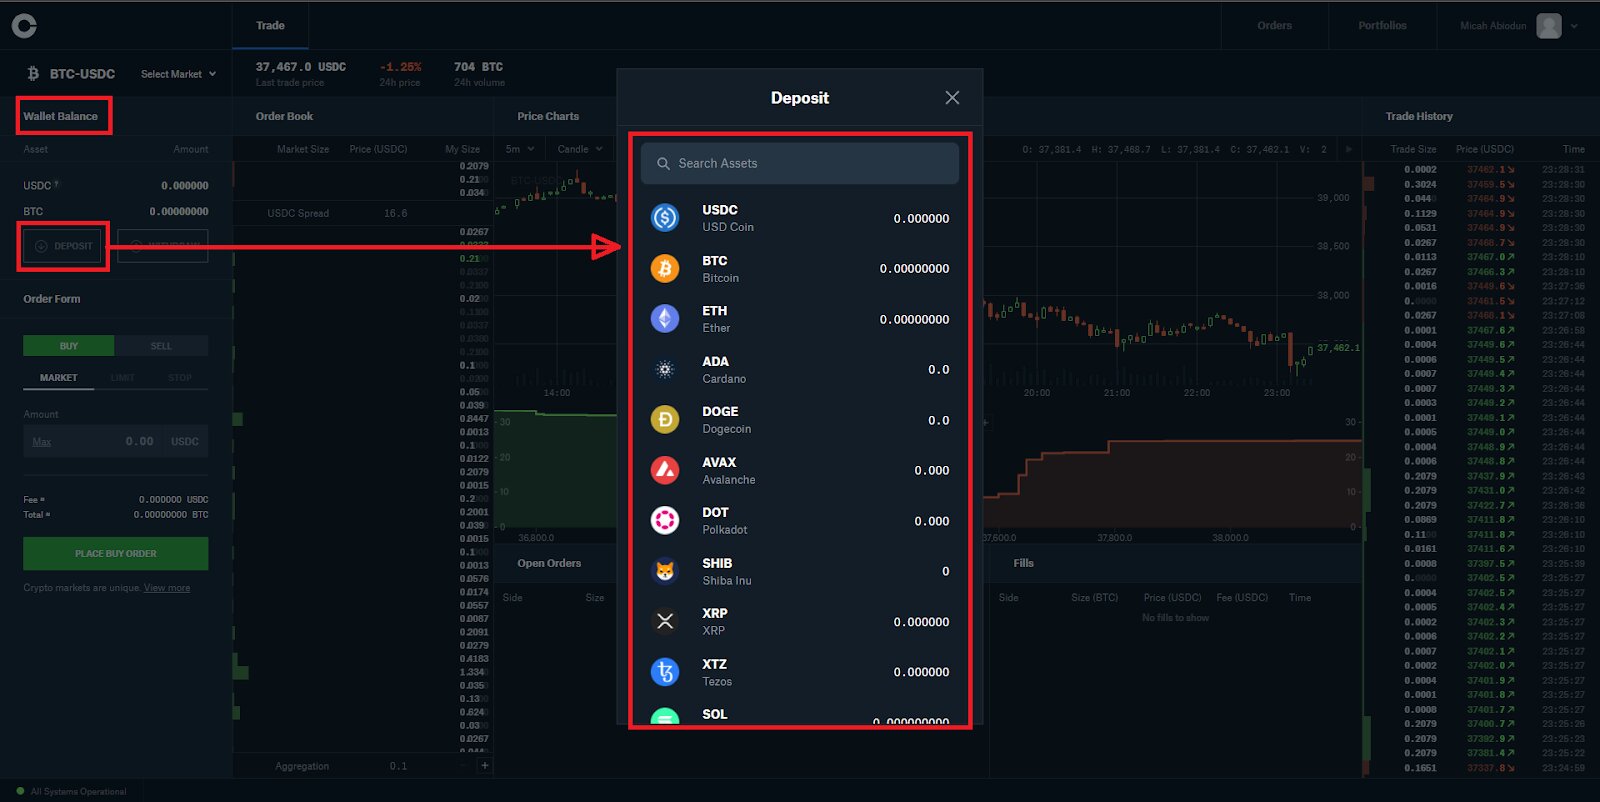
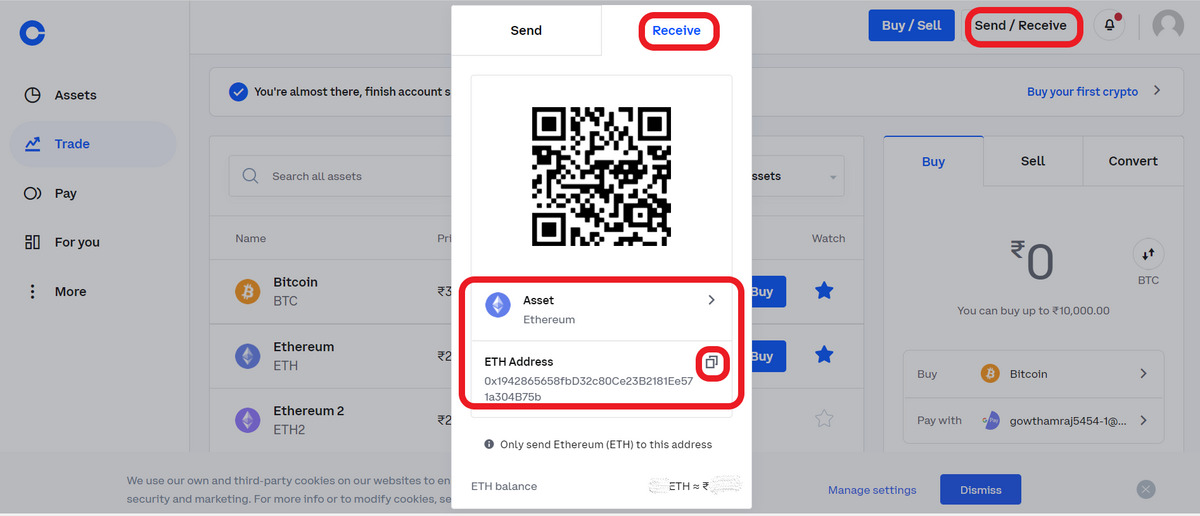
- Find the Ethereum (ETH) wallet in the list and click on it.
- Click on the “Receive” button or the “Deposit” button to reveal your unique Ethereum wallet address.
- Copy the Ethereum wallet address provided by Coinbase. This is the address where you will send your Ethereum from another wallet or exchange.
- Open your preferred Ethereum wallet or the exchange where you currently hold your Ethereum.
- Initiate a new transaction and enter the Ethereum wallet address copied from Coinbase as the recipient address.
- Specify the amount of Ethereum you want to transfer to your Coinbase account.
- Once you have confirmed the transaction details, submit the transaction and wait for it to be processed.
It’s important to note that the time it takes for your Ethereum deposit to appear in your Coinbase account can vary depending on network congestion and processing times. Generally, Ethereum transactions are processed relatively quickly, but in some cases, it may take some time for the deposit to be reflected in your account.
Once the Ethereum deposit is successfully credited to your Coinbase account, you are ready to proceed to the next step: transferring Ethereum from Coinbase to Gdax. We will cover this step in detail in the next section.
Step 4: Transferring Ethereum from Coinbase to Gdax
Now that you have Ethereum in your Coinbase account, it’s time to transfer it to your Gdax account. Transferring Ethereum from Coinbase to Gdax is a quick and straightforward process. Follow the steps below:
- Log in to your Gdax account using your credentials.
- In the top left corner of the Gdax dashboard, click on the drop-down menu under “Select Market” and choose Ethereum (ETH).
- Click on the “Deposit” button located on the left-hand side of the screen.
- You will be directed to a page with deposit options. Choose the “Coinbase Account” option.
- Enter the amount of Ethereum you want to transfer from Coinbase to Gdax. You can either enter a specific amount or select the “Max” option to transfer the maximum amount available in your Coinbase account.
- Click on the “Deposit” button to initiate the transfer.
- A confirmation window will appear asking you to confirm the transfer. Double-check the details of the transfer, including the amount and the receiving account.
- Once you have reviewed the details, click on the “Confirm” button to proceed with the transfer.
- Wait for the transfer to be processed. The transfer from Coinbase to Gdax is typically instant and should reflect in your Gdax account shortly.
It’s important to note that transferring Ethereum from Coinbase to Gdax is free and does not incur any transaction fees. This makes Gdax an attractive option for traders who frequently move funds between the two platforms.
Once the transfer is complete, you will be able to see your Ethereum balance in your Gdax account. Now, you can take advantage of the advanced trading features and lower fees offered by Gdax to execute your desired trading strategies.
Congratulations! You have successfully transferred Ethereum from Coinbase to Gdax. In the next step, we will cover how to check the transfer status to ensure that the process is completed smoothly.
Step 5: Checking the transfer status
After transferring Ethereum from Coinbase to Gdax, it’s important to check the transfer status to ensure that everything has been completed successfully. Here’s how you can check the transfer status:
- Log in to your Gdax account using your credentials.
- On the Gdax dashboard, navigate to the “Accounts” tab.
- Look for the Ethereum (ETH) wallet in the list of available cryptocurrencies.
- Click on the Ethereum wallet to view the transaction history.
- Find the recent transaction that corresponds to the transfer from Coinbase.
- Check the status of the transaction. If it shows as “Completed” or “Confirmed,” this indicates that the transfer has been successfully processed.
- If the status is “Pending” or “Unconfirmed,” it means that the transfer is still being processed and may take some time to complete. In such cases, it’s recommended to wait for a while and check again later.
- If you notice any issues or discrepancies with the transfer status, it’s advisable to reach out to the support team of Gdax for assistance. They will be able to investigate and provide you with the necessary guidance.
Checking the transfer status allows you to have peace of mind and ensure that your Ethereum has been securely transferred from Coinbase to Gdax. It’s important to note that blockchain transactions can sometimes be subject to network congestion or delays, which might affect the speed of the transfer process. However, these delays are usually temporary and should not cause significant concerns.
By regularly checking the transfer status, you can stay informed about the progress of your transfer and take appropriate action if any issues arise. Now that you’ve successfully completed all the steps, you can confidently navigate and utilize the features offered by Gdax to further enhance your cryptocurrency trading experience.
Conclusion
Transferring Ethereum from Coinbase to Gdax is a simple and efficient process that allows you to take advantage of the advanced trading features and lower fees offered by Gdax. By following the steps outlined in this guide, you can securely transfer your Ethereum and have it available for trading on Gdax in no time.
First, you created accounts on both Coinbase and Gdax, ensuring that your information is verified and your accounts are secure. After that, you deposited Ethereum into your Coinbase account, providing you with the necessary funds for the transfer. Then, you transferred Ethereum from Coinbase to Gdax, taking advantage of the instant and fee-free transfer between the two platforms.
Lastly, you checked the transfer status to ensure that the process was completed successfully. By regularly monitoring the transaction, you can stay informed and address any potential issues that may arise.
With your Ethereum safely transferred to Gdax, you can now explore the advanced trading options, execute various trading strategies, and take advantage of the lower fees offered by the platform. Gdax provides a robust trading environment for cryptocurrency enthusiasts who seek more control and flexibility in their trades.
Remember to keep your account information secure and be cautious when dealing with cryptocurrency. Always double-check transaction details and be aware of potential phishing attempts or scams. By staying vigilant, you can enjoy a safe and rewarding experience in the world of cryptocurrency trading.
We hope this guide has provided you with the necessary information to transfer Ethereum from Coinbase to Gdax. Now it’s time for you to take the next steps and discover the exciting opportunities that await you on the Gdax platform. Happy trading!