Introduction
Welcome to our step-by-step guide on how to send digital currency from Coinbase to GDAX for free. If you’re new to the world of cryptocurrencies or looking for a more advanced trading platform, Coinbase and GDAX are two popular options worth considering.
Coinbase is a user-friendly digital currency exchange where you can buy, sell, and store various cryptocurrencies, such as Bitcoin, Ethereum, and Litecoin. On the other hand, GDAX (Global Digital Asset Exchange) is a more advanced platform aimed at traders who are seeking additional features and functionality.
Transferring digital currency from Coinbase to GDAX is a seamless process that allows you to take advantage of the lower fees associated with GDAX trading. By following the steps outlined in this guide, you will be able to transfer your digital assets quickly and without incurring any transaction fees.
It is important to note that to proceed with this guide, you will need to have existing accounts on both Coinbase and GDAX. If you haven’t created an account on either platform yet, we will walk you through the process in the next step.
Now let’s dive into the steps required to send digital currency from Coinbase to GDAX, enabling you to make more informed trading decisions and maximize your investment potential.
Step 1: Create Accounts on Coinbase and GDAX
The first step in sending digital currency from Coinbase to GDAX is to create accounts on both platforms. If you already have existing accounts on both platforms, you can skip this step and proceed to the next one.
To create an account on Coinbase, follow these simple steps:
- Visit the Coinbase website (coinbase.com) and click on the “Sign Up” button.
- Enter your email address and create a strong password. Make sure to choose a password that is unique and not easily guessable.
- Click on the verification email sent to your registered email address and follow the prompts to verify your account.
- Once your account is verified, you will be asked to provide some personal information, including your full name and phone number. This step may vary depending on your location and the local regulations.
- Complete the KYC (Know Your Customer) process by uploading a copy of a valid government-issued ID. This is necessary to comply with regulatory requirements for identity verification.
- After your identity is verified, you can set up two-factor authentication (2FA) for added security. This can be done using an authenticator app or via text message.
Once you have successfully created an account on Coinbase, you can proceed to create an account on GDAX by following these steps:
- Visit the GDAX website (gdax.com) and click on the “Create Account” button.
- Enter the same email address and password that you used for your Coinbase account, as GDAX is a subsidiary of Coinbase.
- Verify your account by clicking on the confirmation link sent to your registered email address.
Congratulations! You have successfully created accounts on both Coinbase and GDAX. Now you are ready to proceed with the next step, which involves verifying your identity on both platforms to unlock all the available features and trading limits.
Step 2: Verify Your Identity on Coinbase and GDAX
Before you can fully utilize the features and benefits of Coinbase and GDAX, it is necessary to go through the process of verifying your identity. This is a standard procedure that ensures compliance with regulations and helps protect against fraud and money laundering.
Follow these steps to verify your identity on Coinbase:
- Log in to your Coinbase account using your registered email address and password.
- Click on your profile icon located at the top right corner of the screen and select “Settings” from the drop-down menu.
- Click on the “Limits & Features” tab and navigate to the “Identity Verification” section.
- Provide the required information, including your full name, date of birth, and residential address.
- Follow the prompts to submit a clear photo of a valid government-issued ID. Coinbase accepts passports, driver’s licenses, and identity cards.
- Once your identity verification is submitted, Coinbase will review the information and notify you of the status via email. This process can take a few minutes to a few days, depending on the volume of verification requests.
To verify your identity on GDAX, follow these steps:
- Log in to your GDAX account using your Coinbase credentials.
- Click on your profile icon located at the top right corner of the screen and select “Settings” from the drop-down menu.
- Navigate to the “Identity Verification” section and click on “Verify ID.”
- Provide the necessary information, including your full name, date of birth, and residential address.
- Follow the prompts to submit a clear photo of a valid government-issued ID. GDAX accepts passports, driver’s licenses, and identity cards, just like Coinbase.
- GDAX will review your identity verification and notify you of the status via email. The verification process typically takes a similar period of time as Coinbase.
Once your identity is verified on both Coinbase and GDAX, you will have access to all the available features and trading limits on both platforms. Now you are ready to proceed with the next step, which involves transferring your digital currency from Coinbase to GDAX.
Step 3: Transfer Digital Currency from Coinbase to GDAX
Now that you have created and verified your accounts on both Coinbase and GDAX, it’s time to transfer your digital currency from Coinbase to GDAX. This process allows you to take advantage of GDAX’s lower fees and advanced trading features.
Follow these steps to transfer your digital currency:
- Log in to your Coinbase account using your registered email address and password.
- Click on the “Accounts” tab located at the top of the screen.
- Scroll down and select the digital currency you wish to transfer from Coinbase to GDAX. For instance, if you want to transfer Bitcoin, click on the “Bitcoin” wallet.
- Click on the “Send” button located right beneath the balance of your selected currency.
- In the recipient field, enter your GDAX deposit address. You can find this address by logging into your GDAX account and navigating to the “Deposit” section, specific to the digital currency you wish to transfer.
- Specify the amount of digital currency you want to transfer from Coinbase to GDAX. You can either enter the amount manually, or you can choose to transfer your entire balance.
- Double-check the details of the transaction to ensure accuracy.
- Click on the “Send” button to initiate the transfer.
It’s important to note that transfers from Coinbase to GDAX are usually completed instantly and do not incur any transaction fees.
Once the transfer is initiated, you can monitor the progress by clicking on the “Accounts” tab in Coinbase and selecting the “Recent Activity” option for the digital currency you transferred.
Now you have successfully transferred your digital currency from Coinbase to GDAX. This allows you to take advantage of the advanced trading features and lower fees offered by GDAX. However, please note that your digital currency will still be held within the GDAX platform, and you can proceed to the next step to confirm the transfer.
Step 4: Confirm the Transfer on GDAX
After transferring your digital currency from Coinbase to GDAX, it is essential to confirm the transfer on the GDAX platform. This step ensures that the transferred funds are available for trading and other activities on GDAX.
Follow these steps to confirm the transfer on GDAX:
- Log in to your GDAX account using your registered email address and password.
- Click on the “Accounts” tab located at the top of the screen.
- Find the digital currency you transferred from Coinbase in the list of available wallets.
- Click on the “Deposit” button next to the digital currency you transferred.
- Make sure the deposit address matches the address you provided when initiating the transfer from Coinbase.
- Compare the amount of digital currency shown in your GDAX wallet to the amount you transferred from Coinbase. Ensure that the transferred amount matches your expectations.
- If the transferred amount and address match, you can consider the transfer confirmed.
Confirming the transfer on GDAX ensures that your digital currency is securely stored within your GDAX wallet and available for trading or other actions you may wish to take on the platform.
If you encounter any issues or discrepancies during the confirmation process, it is advisable to contact GDAX customer support for further assistance. They will be able to address any concerns or resolve any technical difficulties you may experience.
Now that you have successfully confirmed the transfer on GDAX, you can proceed to the final step, where you will review and complete the transfer process.
Step 5: Review and Complete the Transfer
Now that you have transferred your digital currency from Coinbase to GDAX and confirmed the transfer on the GDAX platform, it’s time to review and complete the transfer process. This step ensures that everything is in order before proceeding with any trading or other activities on GDAX.
Follow these steps to review and complete the transfer:
- Review the details of the transfer, including the digital currency, the amount transferred, and the deposit address. Ensure all the information is accurate and matches your intentions.
- If everything is correct, you can consider the transfer process complete.
It is essential to take a moment to review the transfer details carefully, as any mistakes or discrepancies may result in irreversible transactions or loss of funds. Double-checking all the information ensures a smooth and secure transfer process.
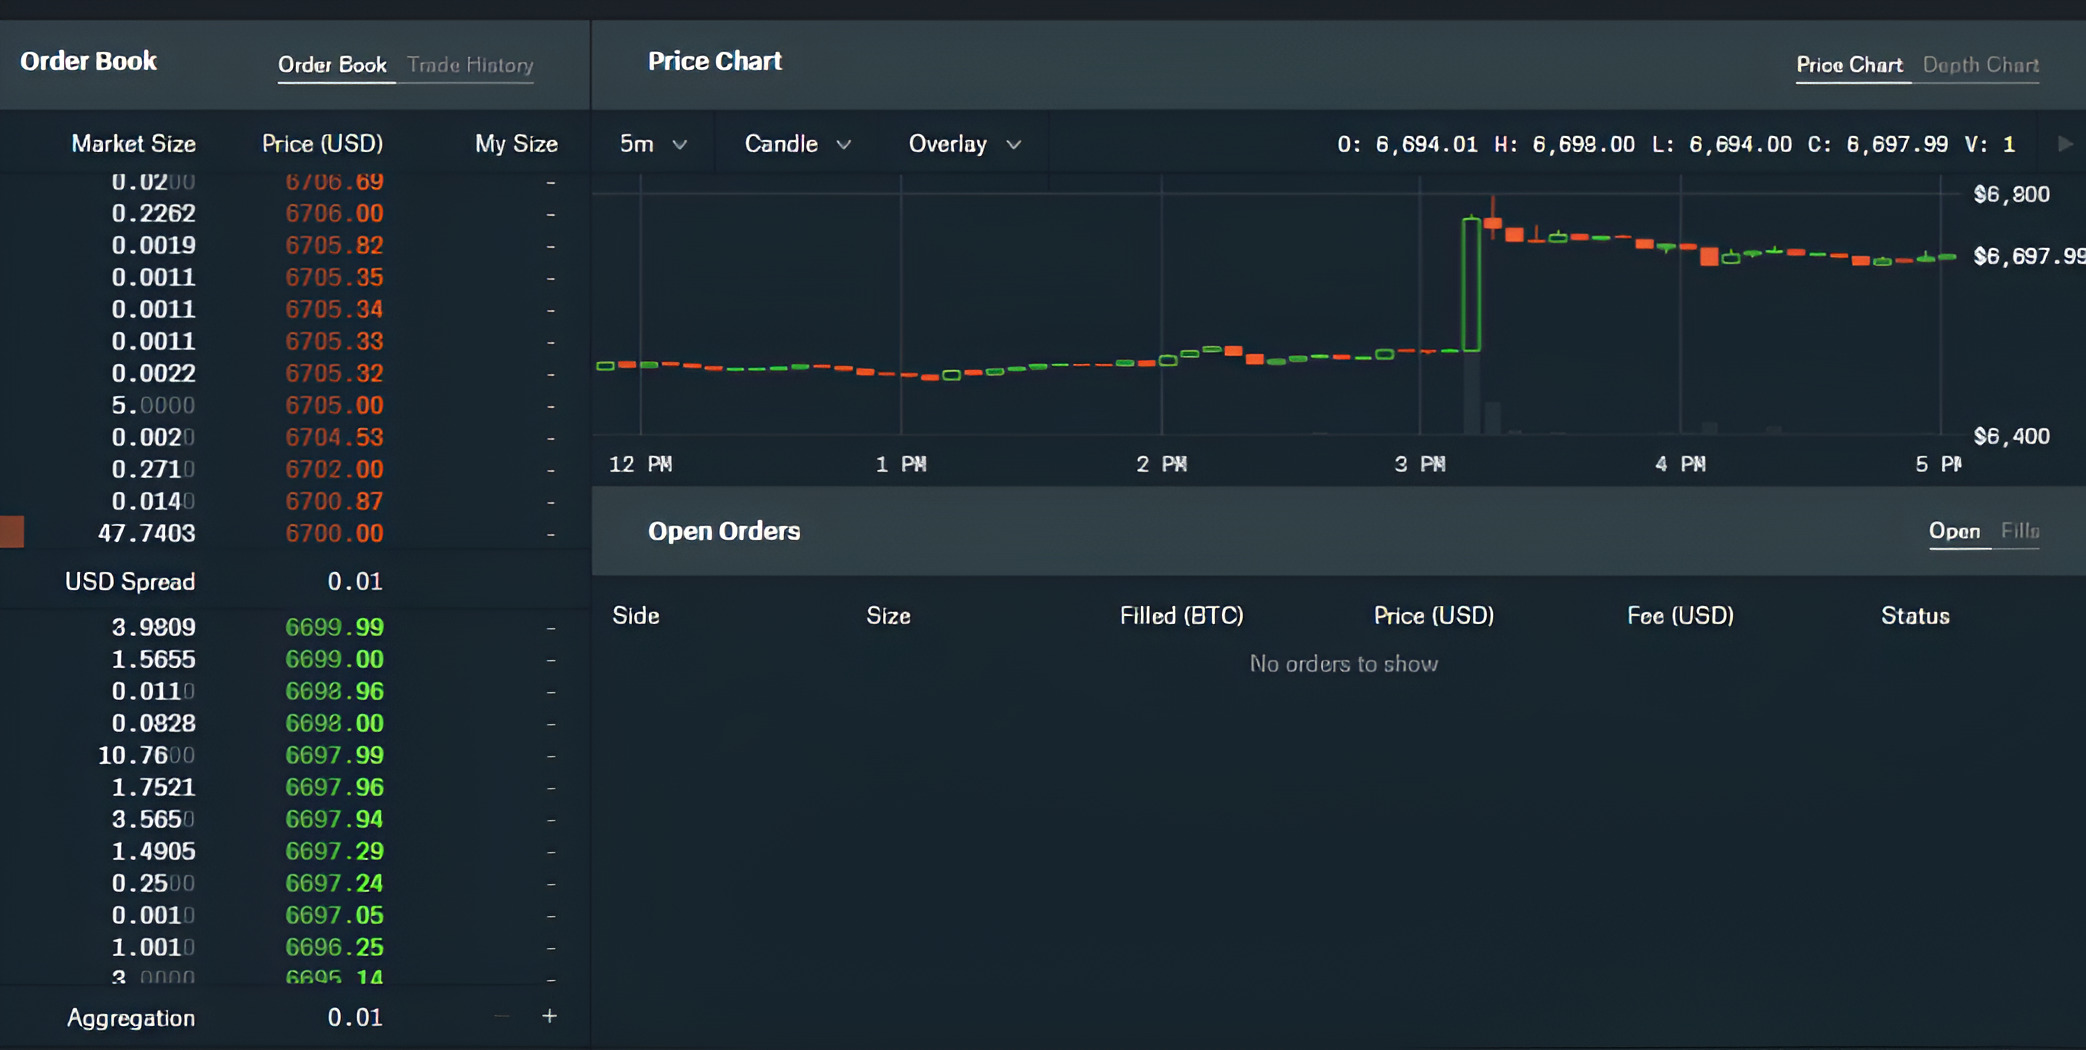
Once you have reviewed and confirmed the transfer, you can proceed to explore the various features and trading options available on the GDAX platform. GDAX offers advanced trading tools, charts, and order types for more experienced traders. Take some time to familiarize yourself with the platform’s functionalities to make the most of your digital currency holdings.
Remember, GDAX operates as a separate platform from Coinbase, although they are both owned by the same company. It’s important to keep this in mind when navigating between the two platforms and conducting transactions.
Congratulations! You have successfully reviewed and completed the transfer process from Coinbase to GDAX. You are now ready to take advantage of the advanced trading features and benefits offered by GDAX.
As you engage in trading or other activities on GDAX, it’s crucial to stay updated with the latest market trends, news, and security practices to make informed investment decisions and protect your digital assets.
Thank you for following our step-by-step guide on how to send digital currency from Coinbase to GDAX for free. We hope this guide has been helpful in enabling you to maximize your trading potential and navigate the cryptocurrency landscape with confidence.
Conclusion
Congratulations! You have successfully learned how to send digital currency from Coinbase to GDAX for free. This step-by-step guide has provided you with the necessary information to create accounts, verify your identity, transfer your digital currency, and confirm the transfer on GDAX. By following these steps, you can take advantage of GDAX’s advanced trading features and lower fees.
Remember, Coinbase and GDAX are both reputable and trusted platforms for buying, selling, and storing digital currency. Coinbase is more user-friendly and suitable for beginners, while GDAX offers a more advanced trading environment for experienced traders.
When transferring digital currency from Coinbase to GDAX, it’s important to double-check all the details to ensure accuracy. Confirm that the deposit address matches what you provided during the transfer process and review the transferred amount before completing the transfer. Taking these precautions will help prevent any potential issues or loss of funds.
Furthermore, as with any form of investment or trading, it’s important to stay informed about market trends, news, and security practices. Keep track of the latest developments in the cryptocurrency world to make well-informed investment decisions and protect your digital assets.
We hope this guide has empowered you to take advantage of GDAX’s advanced trading capabilities while minimizing transaction costs. Feel free to refer back to this guide whenever you need a refresher on transferring digital currency from Coinbase to GDAX.
Thank you for joining us on this journey and we wish you success in your future digital currency endeavors!