Introduction
Welcome to our guide on RAM placement. When it comes to upgrading or installing RAM in your computer, knowing where to put it is crucial for optimal performance. RAM, or Random Access Memory, plays a vital role in how your computer processes and stores data. Placing it in the correct slots can maximize the efficiency and speed of your system.
RAM placement refers to the specific slots on your motherboard where the RAM modules should be installed. The proper arrangement ensures that the memory is utilized in the most effective way, allowing your computer to handle multiple tasks simultaneously without slowing down.
In this guide, we will discuss the significance of RAM placement, the various RAM slot configurations, and the optimal RAM placement for different scenarios. Whether you are a casual user looking to improve your computer’s performance or a tech enthusiast building your own rig, understanding RAM placement is crucial to achieving the best possible performance from your system.
Before we dive into the details, it is important to note that RAM placement can vary depending on several factors, including the motherboard model and the type of memory configuration you have. However, there are some general principles that can help you ensure that you are making the most of your RAM modules.
Now, let’s explore the reasons why RAM placement is important and the different configurations you may encounter.
Why is RAM Placement Important?
RAM placement plays a crucial role in the overall performance of your computer. It determines how efficiently data is transferred between the RAM modules and the CPU, allowing for faster and smoother operations. Here are a few reasons why RAM placement is important:
1. Memory Bandwidth
The arrangement of RAM modules in specific slots on the motherboard can impact the memory bandwidth. Memory bandwidth refers to the speed at which data can be read from or written to the RAM. Placing the RAM modules in the recommended slots can ensure that the memory operates at its maximum bandwidth, resulting in faster data transfer rates.
2. Dual-Channel Memory
Motherboards often support dual-channel memory configurations, which effectively doubles the memory bandwidth. This is achieved by placing matched pairs of RAM modules in specific slots. Installing the RAM modules correctly in these slots allows the system to take full advantage of dual-channel memory, enhancing overall performance.
3. Compatibility and Stability
Correct RAM placement is also important for compatibility and stability. Different motherboard models may have specific requirements for RAM placement, and not following these guidelines can lead to compatibility issues or system instability. It is essential to consult the motherboard manual or specifications to ensure proper RAM module arrangement.
4. Expansion Possibilities
If you plan to upgrade your RAM in the future, proper RAM placement allows for easy expansion. By following the recommended arrangement, you can easily add more RAM modules without disturbing the existing ones. This flexibility ensures future scalability and helps you get the most out of your system.
5. Overclocking Potential
Overclocking enthusiasts who want to push their systems to the limit also need to consider RAM placement. Optimal RAM placement allows for better stability and higher overclocking potential. By ensuring the RAM modules are correctly installed, you can achieve higher frequencies and tighter timings, maximizing the performance gains from overclocking.
In summary, RAM placement plays a critical role in memory bandwidth, compatibility, stability, expansion capabilities, and even overclocking potential. By understanding and following the recommended RAM placement guidelines, you can optimize the performance of your computer and ensure smooth and efficient operations.
RAM Slot Configuration
The RAM slot configuration on your motherboard determines the arrangement and organization of the RAM modules. The most common slot configurations are single-channel and dual-channel memory setups.
Single-Channel Memory
In a single-channel memory configuration, the RAM modules are placed in slots of the same color or labeled as “DIMM0” or “DIMM1”. This configuration is commonly seen in entry-level motherboards or systems with only two RAM slots. While single-channel memory is the simplest setup, it provides lower memory bandwidth compared to dual-channel configurations.
Dual-Channel Memory
In a dual-channel memory configuration, the RAM modules are arranged in pairs and placed in slots of the same color or labeled as “DIMM0” and “DIMM1” for the first pair, and “DIMM2” and “DIMM3” for the second pair. This configuration effectively doubles the memory bandwidth and improves overall system performance.
It’s important to note that not all motherboards support dual-channel memory. Therefore, it is essential to check your motherboard’s manual or specifications to determine the supported memory configuration.
Optimal RAM Placement for Different Configurations
For single-channel memory configurations, you should install the RAM module in the first slot, usually labeled as “DIMM0” or the slot of the same color as the first slot. However, if you have two modules and four slots, it is generally recommended to install them in slots 1 and 3, or slots 2 and 4, depending on the motherboard manufacturer’s instructions.
For dual-channel memory configurations, it’s crucial to install the RAM modules in the correct slots to maximize performance. The first pair of modules should be installed in slots 1 and 3 or in slots labeled “DIMM0” and “DIMM1”. The second pair should be installed in slots 2 and 4 or in slots labeled “DIMM2” and “DIMM3”. This arrangement ensures that the paired modules work together, providing the benefits of dual-channel memory.
Keep in mind that the specific placement instructions may vary depending on the motherboard manufacturer. Therefore, it’s important to consult the motherboard manual or specifications for the recommended RAM slot configuration.
In the next section, we will discuss RAM placement for different motherboard models and address common mistakes to avoid.
Dual-Channel Memory
Dual-channel memory configuration is a popular choice among computer enthusiasts and gamers as it provides increased memory bandwidth, resulting in improved system performance. Understanding how dual-channel memory works and how to properly set up your RAM modules can make a significant difference in your computer’s speed and responsiveness.
How Dual-Channel Memory Works
In dual-channel memory, the system accesses two RAM modules simultaneously, effectively doubling the memory bandwidth compared to single-channel configurations. The paired modules work in tandem, allowing for faster data transfer rates between the RAM and the CPU. This can greatly enhance multitasking capabilities, gaming performance, and overall system responsiveness.
Identifying Dual-Channel Slots
To take advantage of dual-channel memory, you need to place the RAM modules in the correct slots on your motherboard. These slots are typically labeled or color-coded to indicate their pairing.
For example, imagine you have four RAM slots labeled “DIMM0”, “DIMM1”, “DIMM2”, and “DIMM3”. The first pair of dual-channel slots might be “DIMM0” and “DIMM1”, while the second pair is “DIMM2” and “DIMM3”. Alternatively, the slots may be color-coded, with the first pair being one color and the second pair being another color.
Proper Placement of Dual-Channel RAM Modules
To set up your dual-channel memory correctly, you should insert a RAM module into each slot of the first pair or color, as well as the second pair or color, depending on your motherboard’s configuration. Placing the modules in non-paired slots will result in the system operating in single-channel mode, reducing the potential performance gains of dual-channel memory.
Most motherboards recommend populating the first pair of slots before filling the second pair, though some systems may require specific sequencing or have restrictions based on the number of modules used. Checking the motherboard manual or specifications will provide the precise installation instructions for your system.
Benefits of Dual-Channel Memory
Dual-channel configurations offer several advantages, including:
- Increased Memory Bandwidth: The simultaneous data transfer between the RAM modules and CPU increases the performance of memory-intensive tasks.
- Improved Multitasking: Dual-channel memory allows for smoother multitasking, enabling you to run multiple applications simultaneously without significant performance degradation.
- Better Gaming Performance: Games, especially those with higher memory requirements, can benefit from the increased memory bandwidth of dual-channel configurations, resulting in smoother gameplay and reduced lag.
- Enhanced Overall System Responsiveness: Whether you are editing videos, working with graphics, or running resource-intensive software, dual-channel memory can significantly improve your system’s responsiveness.
By properly configuring your RAM modules in dual-channel mode, you can fully harness the benefits of increased memory bandwidth and optimize your computer’s performance.
In the next section, we’ll explore the optimal RAM placement for different motherboard models and address common mistakes to avoid.
Single-Channel Memory
Single-channel memory configuration is the most straightforward setup for installing RAM modules. While it may not deliver the same level of performance as dual-channel configurations, it is still a viable option for certain systems. Understanding how single-channel memory works and how to optimize your RAM placement can ensure efficient utilization of your computer’s resources.
How Single-Channel Memory Works
In a single-channel memory configuration, the RAM modules are installed in slots of the same color or labeled as “DIMM0” and “DIMM1”. Unlike dual-channel configurations, single-channel memory allows for the use of a single RAM module without requiring an additional module for pairing. The memory controller accesses the RAM modules sequentially rather than simultaneously, resulting in a lower memory bandwidth compared to dual-channel setups.
Proper Placement of Single-Channel RAM Modules
For systems with two RAM slots, the single-channel memory configuration is straightforward. You should insert the RAM module into either the “DIMM0” slot or the slot with the same color as the first slot, depending on the motherboard’s labeling or color code scheme. This ensures optimal utilization of the single memory channel.
If you have four RAM slots on your motherboard, it is generally recommended to populate slots 1 and 3 or slots 2 and 4, depending on the manufacturer’s instructions. Placing the modules in this arrangement allows for better memory access and potential future expansion without interrupting the existing setup.
Considerations for Single-Channel Memory
While single-channel memory may not deliver the same level of performance as dual-channel configurations, it can still be suitable for certain scenarios, including:
- Budget-Build Systems: If you are building a budget-friendly system and do not require high-performance memory, a single-channel setup can be a cost-effective choice.
- Basic Computing: For everyday computing tasks such as web browsing, word processing, and light multitasking, single-channel memory is generally sufficient.
- Specific Software Requirements: In some cases, single-channel memory may be preferred or required for specific software applications or hardware compatibility reasons.
It’s important to note that single-channel configurations may limit the memory bandwidth and overall system performance, particularly in memory-intensive tasks or applications. If you require higher performance or plan to engage in activities such as gaming, video editing, or running resource-intensive software, opting for a dual-channel configuration is recommended.
By understanding the principles of single-channel memory and properly placing your RAM modules, you can ensure efficient memory utilization for your specific system requirements.
In the next section, we will explore the optimal RAM placement for different motherboard models and address common mistakes to avoid.
Optimal RAM Placement for Different Configurations
The optimal placement of RAM modules can vary depending on the specific configuration of your motherboard and the type of memory setup you have. To achieve the best performance and ensure compatibility, it is important to follow the recommended RAM placement guidelines for different configurations.
Single-Channel Memory Placement
For systems with only two RAM slots, such as entry-level motherboards, the optimal placement is straightforward. You should insert the RAM module into either the “DIMM0” slot or the slot with the matching color as the first slot. This configuration allows for efficient use of the single memory channel.
If you have a motherboard with four RAM slots, it is generally recommended to populate slots 1 and 3 or slots 2 and 4, depending on the manufacturer’s instructions. This placement ensures optimal memory access and potential future expansion without disturbing the existing setup.
Dual-Channel Memory Placement
For dual-channel memory configurations, proper placement of RAM modules is crucial to maximize performance and take full advantage of the increased memory bandwidth. The specific placement may vary depending on the motherboard manufacturer, but the general principles are as follows:
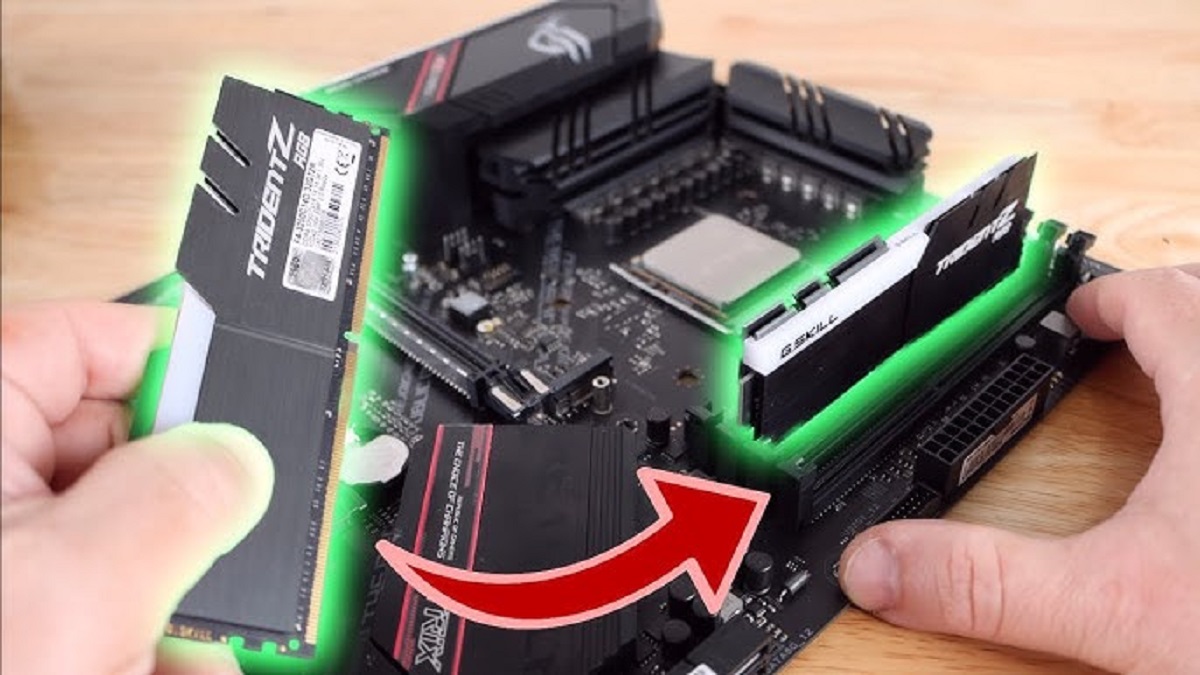
- First Pair: Install the first pair of RAM modules in slots 1 and 3 or in slots labeled “DIMM0” and “DIMM1”. These slots are typically color-coded or labeled to indicate their pairing. This arrangement ensures that the paired modules work together in dual-channel mode.
- Second Pair: If you have additional RAM modules and your motherboard supports four slots for dual-channel memory, place the second pair of modules in slots 2 and 4 or in slots labeled “DIMM2” and “DIMM3”. Make sure to consult the motherboard manual or specifications for the exact placement instructions.
It is important to note that some motherboards may have specific sequencing requirements or limitations based on the number of modules used. Checking the motherboard manual will provide the precise installation instructions for your system.
Consulting the Motherboard Manual
Given the various motherboard models and manufacturers, it is always recommended to consult the motherboard manual or specifications for specific RAM placement guidelines. These documents provide detailed instructions, illustrations, and compatibility information that are crucial for optimal RAM placement.
By following the recommended RAM placement guidelines for different configurations, you can ensure efficient memory utilization, maximize performance, and avoid potential compatibility and stability issues.
In the next section, we will address common RAM placement mistakes and provide tips for installing RAM.
RAM Placement for Different Motherboard Models
RAM placement can vary across different motherboard models due to differences in design and layout. It is important to consult the specific manual or specifications for your motherboard to determine the recommended RAM placement. However, there are some general guidelines that can help you understand the variations you may encounter.
Standard ATX Form Factor
For motherboards following the standard ATX form factor, the RAM slots are typically arranged in a linear pattern near the CPU socket. The numbering or labeling of the slots may vary, but the general principle remains the same. Starting from the CPU socket, the slots are usually numbered or labeled as “DIMM0,” “DIMM1,” “DIMM2,” and so on. Consult the motherboard manual to understand the specific placement instructions, such as which slot to populate first or how to configure dual-channel memory.
Micro-ATX and Mini-ITX Form Factors
Smaller form factor motherboards, such as Micro-ATX and Mini-ITX, have a more compact layout due to their reduced size. This can affect the placement of the RAM slots. In some cases, the slots may be positioned parallel to the motherboard’s edge, while in others, they may be oriented perpendicular to it. Additionally, the number and configuration of RAM slots can differ. Refer to the motherboard manual or specifications for the correct RAM placement instructions specific to your motherboard model.
High-End Gaming and Enthusiast Motherboards
High-end gaming and enthusiast motherboards often come with advanced features and multiple RAM slots. These models may support quad-channel memory configurations or even more than four RAM modules. The exact configuration and placement instructions for these motherboards can vary significantly. To ensure proper RAM placement, it is essential to thoroughly review the motherboard manual and consult the manufacturer’s specifications.
Non-Standard or Proprietary Motherboards
In some cases, there may be non-standard or proprietary motherboards that have unique RAM slot configurations. These motherboards, commonly found in pre-built systems or specialized hardware, may require specific RAM placement instructions provided by the manufacturer. If you have a non-standard or proprietary motherboard, it is crucial to consult the documentation or contact the manufacturer for guidance on RAM placement.
Remember, each motherboard model can have its own specific requirements for RAM placement. Following the recommended guidelines outlined in the motherboard manual or specifications is essential to ensure compatibility, stability, and optimal performance for your specific motherboard model.
In the next section, we will discuss common mistakes to avoid when placing RAM and provide tips for a successful RAM installation.
Common RAM Placement Mistakes
When it comes to installing RAM, there are several common mistakes that people can make. These mistakes can negatively impact system performance, stability, and even prevent the system from booting up properly. By being aware of these mistakes, you can ensure a successful RAM installation and avoid potential issues. Here are some of the most common RAM placement mistakes to avoid:
1. Mixing Different Types or Speeds of RAM:
Using different types or speeds of RAM modules together can cause compatibility issues and may result in system instability. It is best to use RAM modules of the same type, speed, and capacity to ensure optimal performance.
2. Incorrect Placement in Dual-Channel Configurations:
In dual-channel memory configurations, placing the RAM modules in non-paired slots can prevent the system from utilizing dual-channel mode. Make sure to follow the recommended placement guidelines provided by the motherboard manufacturer.
3. Failing to Seat the RAM Modules Properly:
It is important to properly seat the RAM modules in the slots until they click into place. Failing to do so can result in poor contact, leading to frequent system crashes and instability.
4. Installing RAM in the Wrong Slots:
Installing the RAM modules in the wrong slots, especially in motherboards with specific slot configuration requirements, can lead to compatibility issues or prevent the system from booting up. Always consult the motherboard manual for the recommended RAM slot placement.
5. Ignoring BIOS Settings:
After installing new RAM modules, it is crucial to enter the BIOS and ensure that the correct settings are configured for the new RAM, such as enabling XMP (Extreme Memory Profile) for high-performance RAM modules. Failing to adjust these settings can result in the RAM running at lower speeds than intended.
6. Overloading the Memory Slots:
Overloading the memory slots beyond the motherboard’s maximum supported capacity can cause instability or prevent the system from booting. Always check the maximum supported capacity and adhere to it when installing RAM modules.
7. Neglecting Proper Grounding:
When handling RAM modules, static electricity can damage them. By properly grounding yourself by touching a grounded metal object or wearing an anti-static wristband, you can minimize the risk of damaging the RAM modules.
By avoiding these common RAM placement mistakes, you can ensure smooth installation, optimal performance, and long-term stability of your computer system.
In the next section, we will provide some tips for successful RAM installation to further assist you in this process.
Tips for Installing RAM
Installing RAM is a relatively simple process, but it’s important to follow certain steps to ensure a successful installation. By keeping these tips in mind, you can avoid potential issues and optimize the performance of your system:
1. Read the Motherboard Manual:
Before installing RAM, thoroughly read the motherboard manual or specifications. This will provide you with important information regarding RAM compatibility, supported configurations, and recommended installation guidelines specific to your motherboard model.
2. Check RAM Compatibility:
Ensure that the RAM modules you are purchasing are compatible with your motherboard. Check for factors such as memory type (e.g., DDR4, DDR3), speed, and capacity limitations to avoid any compatibility issues.
3. Power Off and Unplug:
Prior to installing or removing RAM modules, always power off your computer and disconnect it from the power source. This prevents any electrical damage and ensures your safety during the installation process.
4. Ground Yourself:
To prevent static electricity from damaging the RAM modules, ground yourself by touching a grounded metal object or using an anti-static wristband before handling the RAM. This protects the sensitive components from potential harm.
5. Remove the Side Panel:
If necessary, remove the side panel of your computer case to access the motherboard effectively. Refer to the computer case manual for instructions on how to remove the side panel safely.
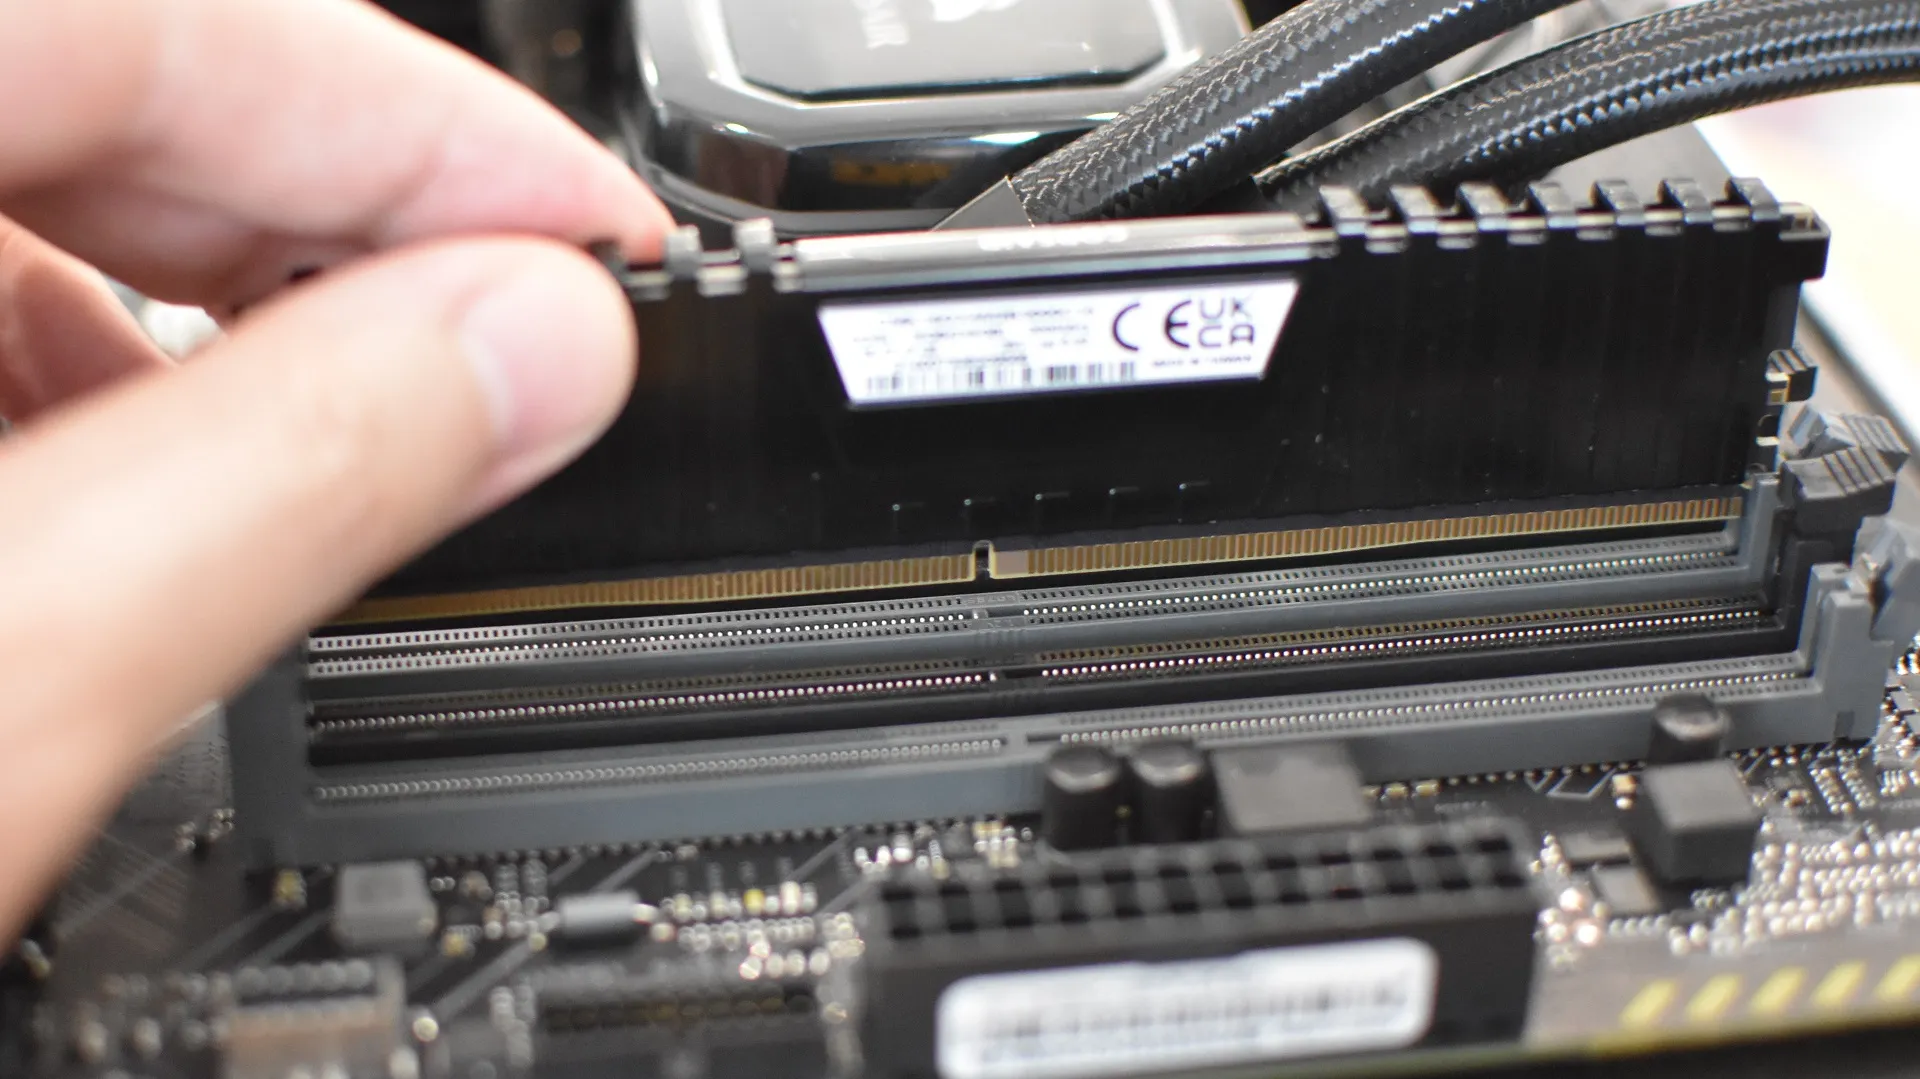
6. Identify the RAM Slots:
Locate the RAM slots on your motherboard. They are typically long, rectangular slots, often color-coded or numbered for ease of identification.
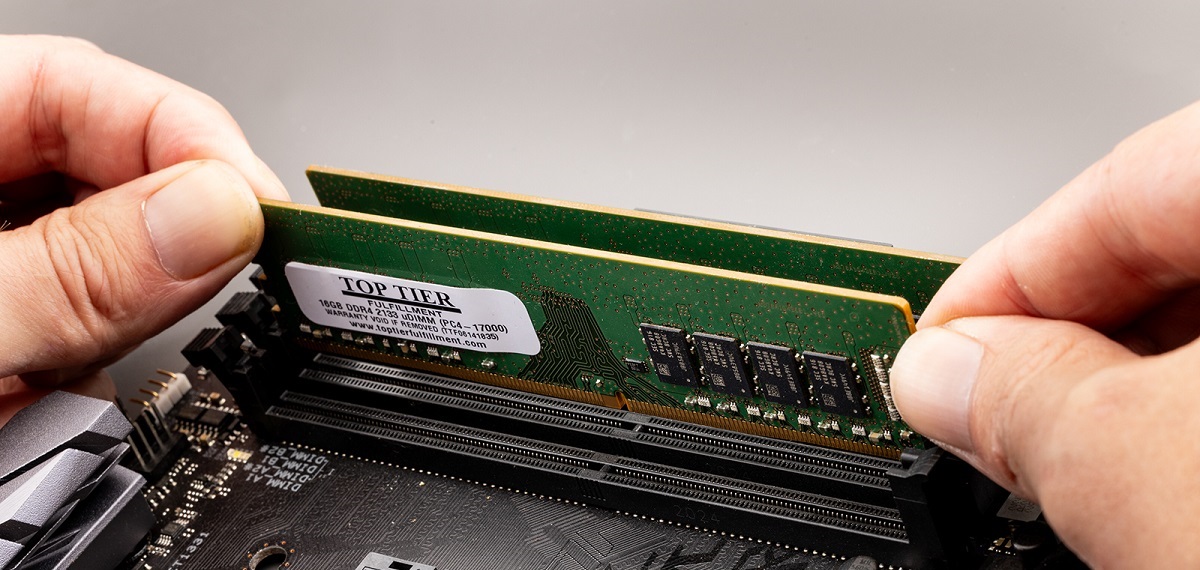
7. Align and Insert the RAM Modules:
Hold the RAM module carefully by its edges, align the notch on the module with the corresponding notch on the RAM slot, and gently insert it, applying even pressure until it clicks into place. Ensure that the module is fully seated and secure in the slot.
8. Use Equal Pressure:
When installing multiple RAM modules, apply equal pressure to each module to ensure they are all properly seated. This helps to avoid uneven contact or potential instability.
9. Replace the Side Panel:
After installing the RAM, replace the computer case’s side panel and secure it using the appropriate screws or latches. This ensures the integrity of the system and protects the internal components.
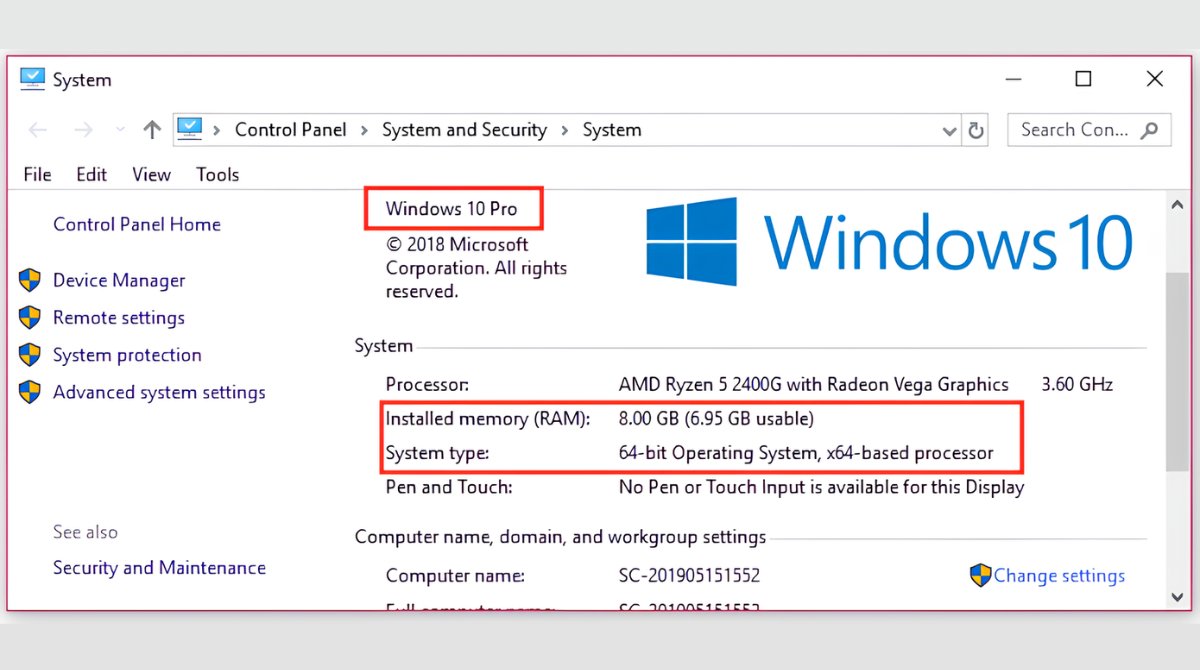
10. Power On and Verify:
Once you have completed the RAM installation, reconnect the power cord to your computer and power it on. Enter the BIOS settings to verify that the RAM is detected properly and adjust any necessary settings, such as enabling XMP for optimal performance.
Following these tips will help ensure a successful and trouble-free RAM installation, allowing you to enjoy the improved performance and responsiveness of your computer system.
In the next section, we will conclude our guide on RAM placement and leave you with some final thoughts.
Conclusion
Proper RAM placement is a crucial aspect of optimizing your computer’s performance. By understanding the importance of RAM placement, the different slot configurations, and the specific recommendations for your motherboard model, you can ensure that your system operates at its full potential.
We explored the significance of RAM placement in maximizing memory bandwidth, enhancing compatibility and stability, enabling expansion possibilities, and unlocking overclocking potential. Whether you have a single-channel or dual-channel memory configuration, following the recommended RAM placement guidelines will allow you to make the most of your system’s capabilities.
It is important to consult your motherboard manual or specifications for the precise RAM placement instructions and any specific requirements for your motherboard model. Every motherboard can have different slot configurations and guidelines, and adhering to these recommendations helps to avoid potential compatibility issues and instability.
We also discussed common RAM placement mistakes to avoid, such as mixing different types or speeds of RAM, installing RAM in the wrong slots, or failing to properly seat the RAM modules. Following the provided tips for successful RAM installation, such as reading the motherboard manual, checking compatibility, grounding yourself, and handling the modules with care, will help ensure a trouble-free installation process.
By properly placing your RAM modules, you can unlock the full potential of your system’s performance. It allows for faster data transfer rates, smoother multitasking, improved gaming performance, and enhanced overall system responsiveness.
Remember, RAM placement is just one aspect of optimizing your computer’s performance. It is also important to consider factors such as the amount of RAM installed, the clock speed, and the overall system configuration. Regularly maintaining and upgrading other hardware components, such as the CPU and storage drives, can further enhance your system’s performance.
We hope this guide has provided you with valuable insights and guidance on RAM placement. By following the recommended guidelines and best practices, you can ensure that your computer operates smoothly, efficiently, and with optimal performance.