Introduction
Welcome to our guide on where to find Google Authenticator! In today’s digital age, maintaining the security of our online accounts has become more important than ever. With the increasing prevalence of cyber attacks and data breaches, it’s crucial to ensure that our personal information remains secure.
One of the most effective ways to protect our online accounts is by enabling two-factor authentication (2FA). Google Authenticator is a popular tool that provides an extra layer of security by requiring users to enter a temporary code in addition to their password when logging in.
In this article, we will walk you through the process of finding and setting up Google Authenticator on various devices. Whether you’re using an Android, iOS, Windows Phone, or Blackberry device, we’ve got you covered.
But before we delve into the specifics, let’s take a closer look at what Google Authenticator is and why it’s important for your online security.
What is Google Authenticator
Google Authenticator is a free app developed by Google that adds an additional layer of security to your online accounts by providing a two-factor authentication (2FA) mechanism. It works by generating time-based one-time passwords (TOTPs) that are used to verify your identity during the login process.
When you enable 2FA on an account that supports Google Authenticator, you will be prompted to enter a verification code in addition to your regular password when logging in. This code is generated by the app and changes every 30 seconds, making it incredibly difficult for attackers to gain unauthorized access to your accounts.
One of the biggest advantages of using Google Authenticator is that it works offline. Unlike other authentication methods that rely on an internet connection, Google Authenticator generates codes locally on your device. This means that even if you don’t have access to the internet, you can still securely log in to your accounts.
Google Authenticator can be used with a wide range of online services, including email providers, social media platforms, banking apps, and more. By implementing this extra layer of security, you significantly reduce the risk of your accounts being compromised.
It’s important to note that Google Authenticator is just one implementation of the Time-based One-Time Password (TOTP) algorithm. This means that you are not limited to using Google’s app alone. There are alternative apps available that offer similar functionality and can be used with services that support the TOTP standard.
Now that you have a basic understanding of what Google Authenticator is and how it enhances your online security, let’s explore how to set it up on various devices.
Setting up Google Authenticator
Setting up Google Authenticator is a straightforward process that requires a few simple steps. Here’s a step-by-step guide on how to get started:
- First, you’ll need to download the Google Authenticator app onto your device from the respective app store. It’s available for both Android and iOS devices.
- Once the app is installed, open it and follow the on-screen instructions to set it up.
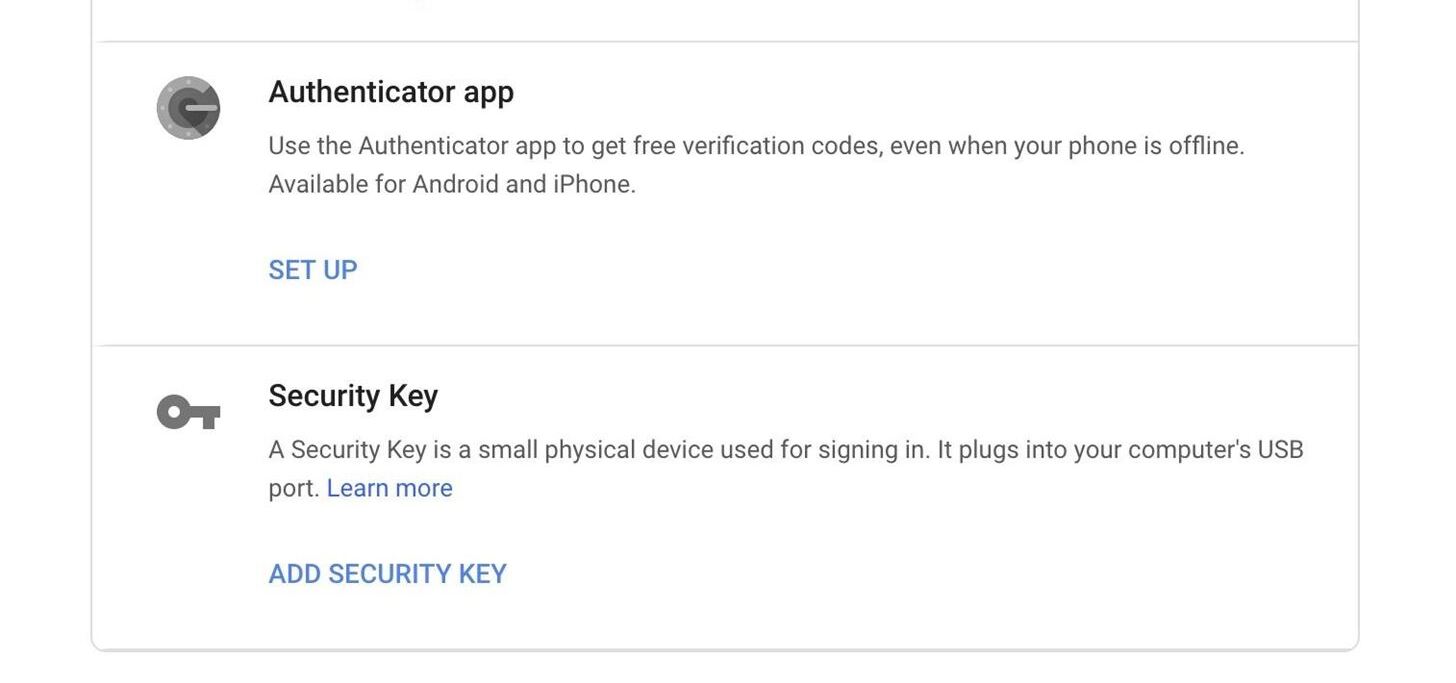
- Next, you’ll need to link your Google Authenticator app with the online service or account you wish to protect. Most services that support Google Authenticator will have an option to enable 2FA in their security settings.
- In the account settings of the service you’re connecting, select the option to enable two-factor authentication or similar. This will usually involve scanning a QR code displayed on the screen using the Google Authenticator app.
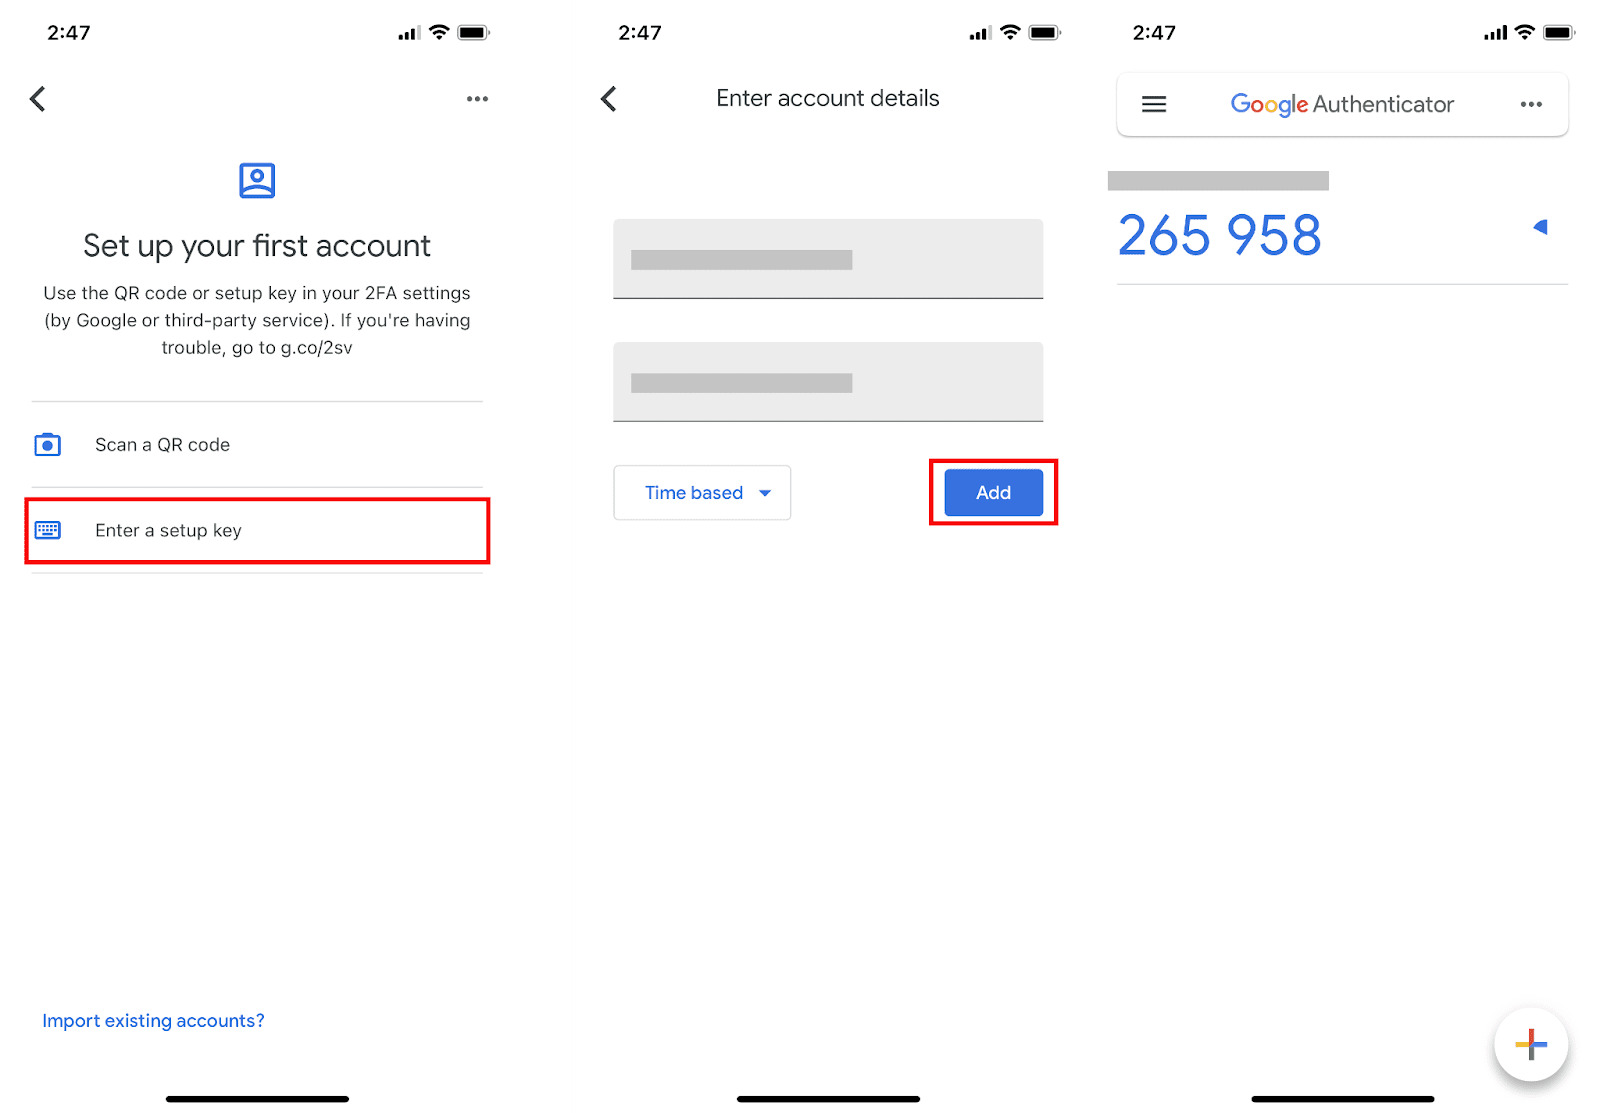
- Open the Google Authenticator app and tap the “+” symbol to add a new account.
- Choose the option to scan a barcode, and point your device’s camera at the QR code displayed on the service’s website or enter the provided key manually.
- Once the code is scanned or entered, the app will automatically generate a unique verification code for your account. Enter this code into the appropriate field on the service’s website.
- After the code is entered successfully, the app and the service will be linked. The Google Authenticator app will now display a time-based one-time password (TOTP) for the linked account every 30 seconds.
- To finalize the setup, test the Google Authenticator by entering the generated code in the appropriate field on the service’s website, and confirm that it is accepted.
It’s important to note that when setting up Google Authenticator, it’s recommended to enable backup and recovery options provided by the service you are linking. This will ensure that you can regain access to your account in case your device is lost, stolen, or reset.
Now that you have successfully set up Google Authenticator, let’s explore how to use it on different devices.
Using Google Authenticator on Android
If you’re using an Android device, follow these steps to use Google Authenticator:
- Open the Google Authenticator app on your Android device.
- Tap on the account for which you want to get the verification code.
- The app will display the current time-based one-time password (TOTP) for that account.
- Enter this code on the login screen of the service you’re trying to access to complete the verification process.
- Remember that the code will change every 30 seconds, so make sure to enter it quickly.
It’s recommended to enable the “Remember verification for this computer” option on trusted devices. This way, you don’t have to enter the verification code every time you log in from that device.
In case you lose your Android device or need to switch to a new one, it’s crucial to have a backup for your Google Authenticator codes. You can enable cloud backup in the Google Authenticator settings to automatically sync your codes with your Google account. This will make it easier to restore them on a new device.
Additionally, you can also manually transfer your Google Authenticator codes to a new device by configuring each account from scratch. Ensure that you disable the cloud backup option on your old device before transferring the codes to prevent any conflicts.
Using Google Authenticator on an Android device is a convenient and secure way to protect your online accounts. Now, let’s explore how to use Google Authenticator on iOS devices.
Using Google Authenticator on iOS
If you’re using an iOS device, follow these steps to use Google Authenticator:
- Launch the Google Authenticator app on your iOS device.
- Select the account for which you want to generate the verification code.
- The app will display the current time-based one-time password (TOTP) for that account.
- Enter this code on the login screen of the service you’re trying to access to complete the verification process.
- Keep in mind that the code will change every 30 seconds, so be sure to enter it promptly.
On iOS, you also have the option to enable Face ID or Touch ID for an added layer of security. This will require biometric authentication before accessing the Google Authenticator app.
Similar to Android devices, it’s essential to have a backup plan for your Google Authenticator codes on iOS. You can enable iCloud Keychain or another cloud backup service to store your codes securely in case you need to restore them on a new device.
If you’re switching to a new iOS device, you can either enable the cloud backup option on your old device and restore from the backup during the setup of your new device, or manually transfer the codes to the new device by setting up each account again.
Using Google Authenticator on iOS devices offers a reliable and convenient way to protect your online accounts. Now, let’s explore how to use Google Authenticator on Windows Phone.
Using Google Authenticator on Windows Phone
If you’re using a Windows Phone device, follow these steps to use Google Authenticator:
- Download and install the Authenticator app from the Microsoft Store on your Windows Phone device.
- Open the app and tap on the “Add” button to add a new account.
- Choose the option to scan a barcode and point your device’s camera at the QR code displayed on the service’s website.
- Alternatively, you can enter the secret key provided by the service manually.
- The app will generate a time-based one-time password (TOTP) for the linked account.
- Enter this code on the login screen of the service you’re trying to access to complete the verification process.
Windows Phone users can also enable a feature called Transparent Live Tile, which will display the verification codes directly on the app’s tile on the home screen. This allows for quick access to the codes without opening the app.
As a Windows Phone user, it’s important to note that the Google Authenticator app for Windows Phone is a third-party application and not developed by Google. However, it still provides the same functionality as the official Google Authenticator app on other platforms.
If you’re switching to a new Windows Phone device or need to reinstall the app, you can simply set up each account again by scanning the QR codes or manually entering the secret keys.
Using Google Authenticator on Windows Phone offers a secure and convenient way to protect your online accounts. Now, let’s explore how to use Google Authenticator on Blackberry devices.
Using Google Authenticator on Blackberry
If you’re using a Blackberry device, here’s how you can use Google Authenticator:
- Go to the Blackberry World store and download the Google Authenticator app.
- Launch the app and select the “Add” button to add a new account.
- Choose the option to scan a barcode and scan the QR code displayed on the service’s website.
- If the QR code scanning feature is not available, you can manually enter the provided secret key.
- The app will generate a time-based one-time password (TOTP) for the linked account.
- Enter this code on the login screen of the service you’re trying to access to complete the verification process.
While Blackberry devices may have their specific limitations and differences compared to other platforms, the Google Authenticator app is designed to work seamlessly on Blackberry devices, providing the same level of security and convenience.
When using Google Authenticator on a Blackberry device, ensure that you regularly check for updates to the app to benefit from the latest security enhancements and bug fixes. Keeping the app up to date will ensure optimal performance and compatibility with your device.
In case you need to switch to a new Blackberry device or reinstall the app, you can simply set up each account again by scanning the QR codes or manually entering the secret keys. It’s recommended to disable the cloud backup option on your old device before transferring the codes to prevent any conflicts.
Using Google Authenticator on Blackberry devices is a reliable way to add an extra layer of security to your online accounts. Now that you know how to use Google Authenticator on various devices, let’s explore backup and recovery options.
Backup and Recovery for Google Authenticator
Backup and recovery options are vital when using Google Authenticator to ensure you can regain access to your accounts in case of device loss, damage, or theft. Here are some recommended backup and recovery methods:
Enable Cloud Backup: Many online services that support Google Authenticator provide the option to enable cloud backup. By enabling this feature, your Google Authenticator codes will be securely stored and synchronized with your cloud account. This allows for easy restoration of your codes on a new device should the need arise.
Manual Transfer: If cloud backup is not available or you prefer not to use it, you can manually transfer your Google Authenticator codes to a new device. To do this, you will need to set up each account again on the new device. Make sure to disable the cloud backup option on your old device before transferring the codes to avoid any conflicts.
Alternative Authentication Methods: Some online services offer alternative authentication methods in addition to Google Authenticator. It’s a good idea to set up backup methods such as SMS-based codes, backup codes, or backup email addresses. These options can help you regain access to your accounts even if you don’t have access to your Google Authenticator app.
Print or Write Down Backup Codes: Many online services provide backup codes that can be printed or written down and stored in a safe place. These codes can be used as a backup option in case you lose access to your Google Authenticator app. Make sure to keep these codes in a secure location, separate from your device.
Remember to regularly review and update your backup and recovery options to ensure they are up to date and aligned with your current accounts and devices. It’s also advisable to test your backup and recovery methods periodically to verify that they are functioning correctly.
By implementing backup and recovery options for Google Authenticator, you can have peace of mind knowing that you have a plan in place to safeguard your access to the accounts protected by the app.
Now that we’ve covered backup and recovery options, let’s summarize what we’ve discussed so far.
Conclusion
In today’s digital landscape, protecting our online accounts is crucial, and Google Authenticator is a valuable tool for enhancing the security of our digital identities. In this guide, we explored the process of finding and setting up Google Authenticator on various devices.
We started by understanding what Google Authenticator is and why it is essential for online security. We learned how it generates time-based one-time passwords (TOTPs) and provides an extra layer of protection through two-factor authentication (2FA).
Next, we explored the steps to set up Google Authenticator on different devices, including Android, iOS, Windows Phone, and Blackberry. We discussed how to link accounts, scan QR codes, and enter verification codes, ensuring that the setup process is seamless and straightforward.
We also covered the usage of Google Authenticator on different platforms, including Android, iOS, Windows Phone, and Blackberry. Understanding how to access and enter the time-based one-time passwords (TOTPs) is vital for using Google Authenticator effectively.
To ensure you never lose access to your accounts, we discussed the importance of implementing backup and recovery options for Google Authenticator. Whether through cloud backup, manual transfer, alternative authentication methods, or backup codes, having a reliable backup plan is essential for peace of mind.
Remember to regularly review and update your backup options and stay vigilant with the security of your Google Authenticator app and codes.
In conclusion, Google Authenticator is a powerful tool that helps protect your online accounts with an extra layer of security. By following the steps outlined in this guide, you can successfully set up and use Google Authenticator on your preferred device, ensuring that your digital identity remains safe and secure.