Introduction
When it comes to the fascinating world of 3D printing, there are many factors to consider that contribute to the quality and functionality of the printed object. One crucial element in this process is the infill, which plays a vital role in determining the strength, weight, and overall performance of a 3D printed part.
Put simply, infill refers to the internal structure or pattern that fills the empty spaces within a 3D printed object. While the outer shell provides the external shape and structure of the printed item, the infill is responsible for giving it strength and stability. It serves as a supportive framework that holds the outer layers together, ensuring the integrity of the 3D printed object.
The choice of infill pattern and density can greatly influence the performance and characteristics of the final printed object. By adjusting the infill settings, 3D printing enthusiasts and professionals can achieve the ideal balance between strength, material usage, printing speed, and other factors.
Understanding the importance of infill in 3D printing is essential for obtaining high-quality prints and optimizing the printing process. In this article, we will delve deeper into the intricacies of infill, explore different infill patterns, discuss factors to consider when choosing infill options, and provide tips for optimizing infill settings. By the end of this article, you will have a solid understanding of why infill is a critical component of the 3D printing process.
Definition of Infill
Infill is a term commonly used in the 3D printing industry to describe the internal structure or pattern that fills the empty space inside a 3D printed object. It is the bridge between the outer shell and the internal support structure, providing strength and stability to the printed part.
When a 3D model is sliced into layers for printing, the infill is essentially the pattern that is repeated throughout each layer, creating a solid framework. This internal structure can vary in density, pattern, and geometry, depending on the desired properties and requirements of the printed object.
The infill serves multiple purposes in 3D printing. First and foremost, it prevents the printed object from being hollow, which would make it weak and prone to breakage. By filling the empty spaces inside the object, the infill creates a more solid and robust structure, enhancing its overall stability and durability.
Furthermore, infill plays a crucial role in optimizing material usage. Without infill, a large amount of material would be wasted, as the printer would only be printing the outer shell of the object. By filling the interior with a lattice-like pattern or solid structure, the infill reduces material consumption, resulting in cost savings and more efficient printing.
Another important function of infill is to enhance the structural integrity of the printed object. By providing a supportive framework, it helps distribute and absorb the stress and forces exerted on the part. This is particularly valuable for objects that require strength and rigidity, such as functional prototypes, mechanical parts, or structural components.
Overall, the infill is an essential component of the 3D printing process, as it influences the strength, weight, material usage, and performance of the printed object. Understanding the concept of infill and its potential applications is crucial for achieving optimal results in 3D printing projects.
Importance of Infill in 3D Printing
The infill is a critical aspect of the 3D printing process, as it directly impacts the strength, weight, and overall performance of the printed object. Let’s explore why infill is important in 3D printing:
Strength and Stability: The infill provides internal support to the printed object, improving its structural integrity. Without infill, the object would be hollow and susceptible to breakage. By filling the empty spaces with a solid or lattice-like pattern, the infill reinforces the object and enables it to withstand external forces and stress.
Material Efficiency: Infill plays a crucial role in optimizing material usage. Without infill, 3D printers would only print the outer shell of the object, resulting in excessive material wastage. By filling the interior with a patterned structure, the infill reduces material consumption, leading to cost savings and sustainable printing practices.
Weight Reduction: Infill allows for the reduction of overall weight in 3D printed objects, which is particularly beneficial for applications such as aerospace or automotive industries. By adjusting the infill density and pattern, designers can customize the level of weight reduction while maintaining the necessary strength and functionality.
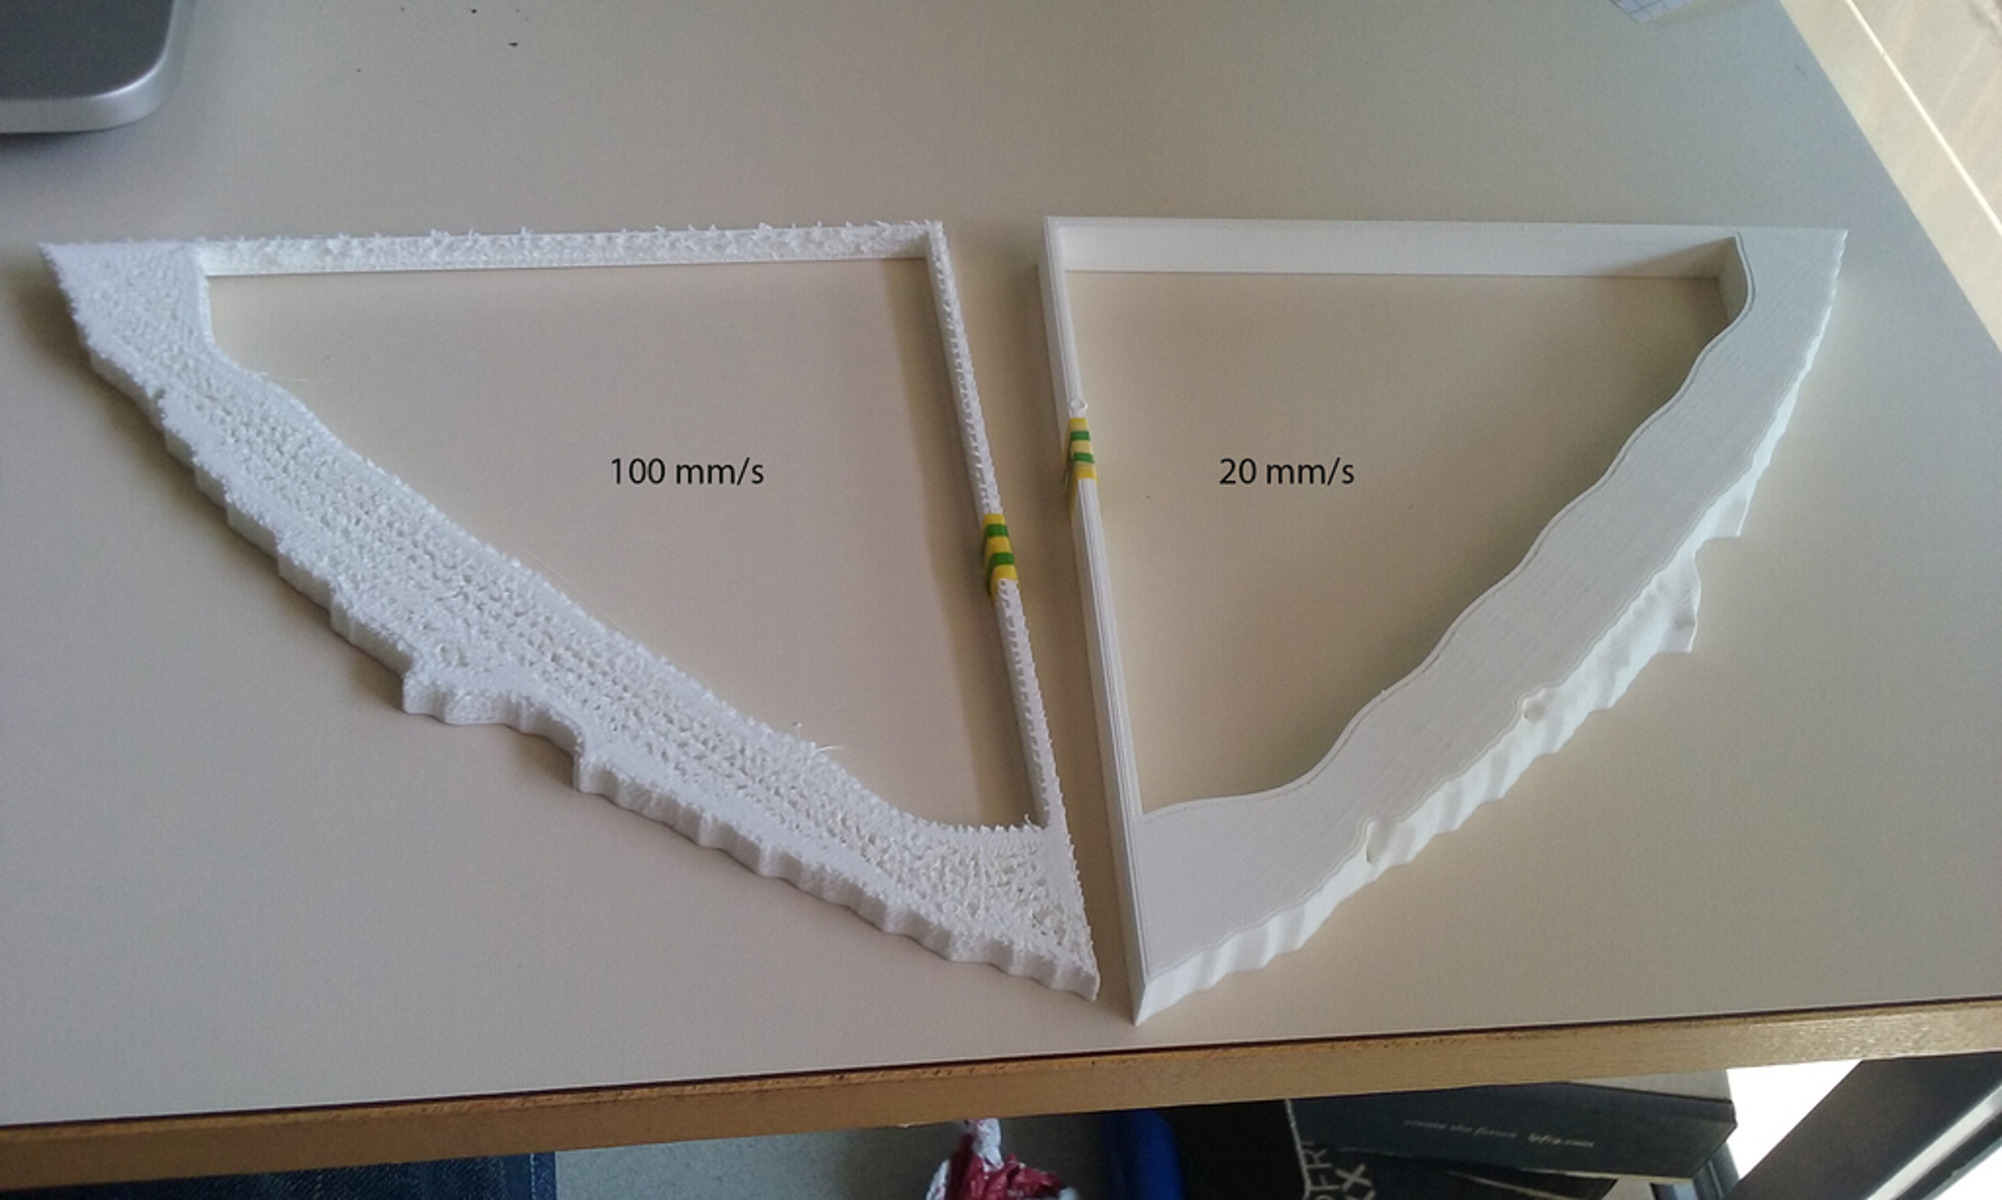
Print Speed: The infill also affects the printing speed. A higher infill percentage means more material is used, resulting in a longer print time. However, a lower infill density can lead to weaker objects. Striking the right balance between infill density and print speed is crucial for achieving optimal results.
Printing Cost: Infill can significantly impact the cost of 3D printing. A higher infill density requires more material, which increases the printing cost. On the other hand, using a lower density reduces material usage and lowers the cost. Understanding the relationship between infill density, strength, and cost is essential for cost-effective 3D printing.
Customization and Flexibility: Another advantage of infill is its ability to be customized and tailored to meet specific requirements. Manufacturers can choose from various infill patterns, such as honeycomb, grid, triangles, or custom shapes, depending on the desired properties of the printed object. This flexibility allows for optimized designs and improved performance.
Surface Finish: The infill affects the surface finish of the printed object. A higher infill density can result in smoother surfaces due to more material being laid down. However, excessive infill density may cause over-extrusion and negatively impact the surface quality. Finding the right balance between strength and surface finish is crucial for achieving desired results.
With all these factors in mind, it is clear that the infill is an integral part of the 3D printing process. It not only enhances the strength, stability, and overall performance of the printed object but also allows for material efficiency, weight reduction, and customization. Choosing the right infill pattern, density, and settings is crucial for achieving optimal results in 3D printing projects.
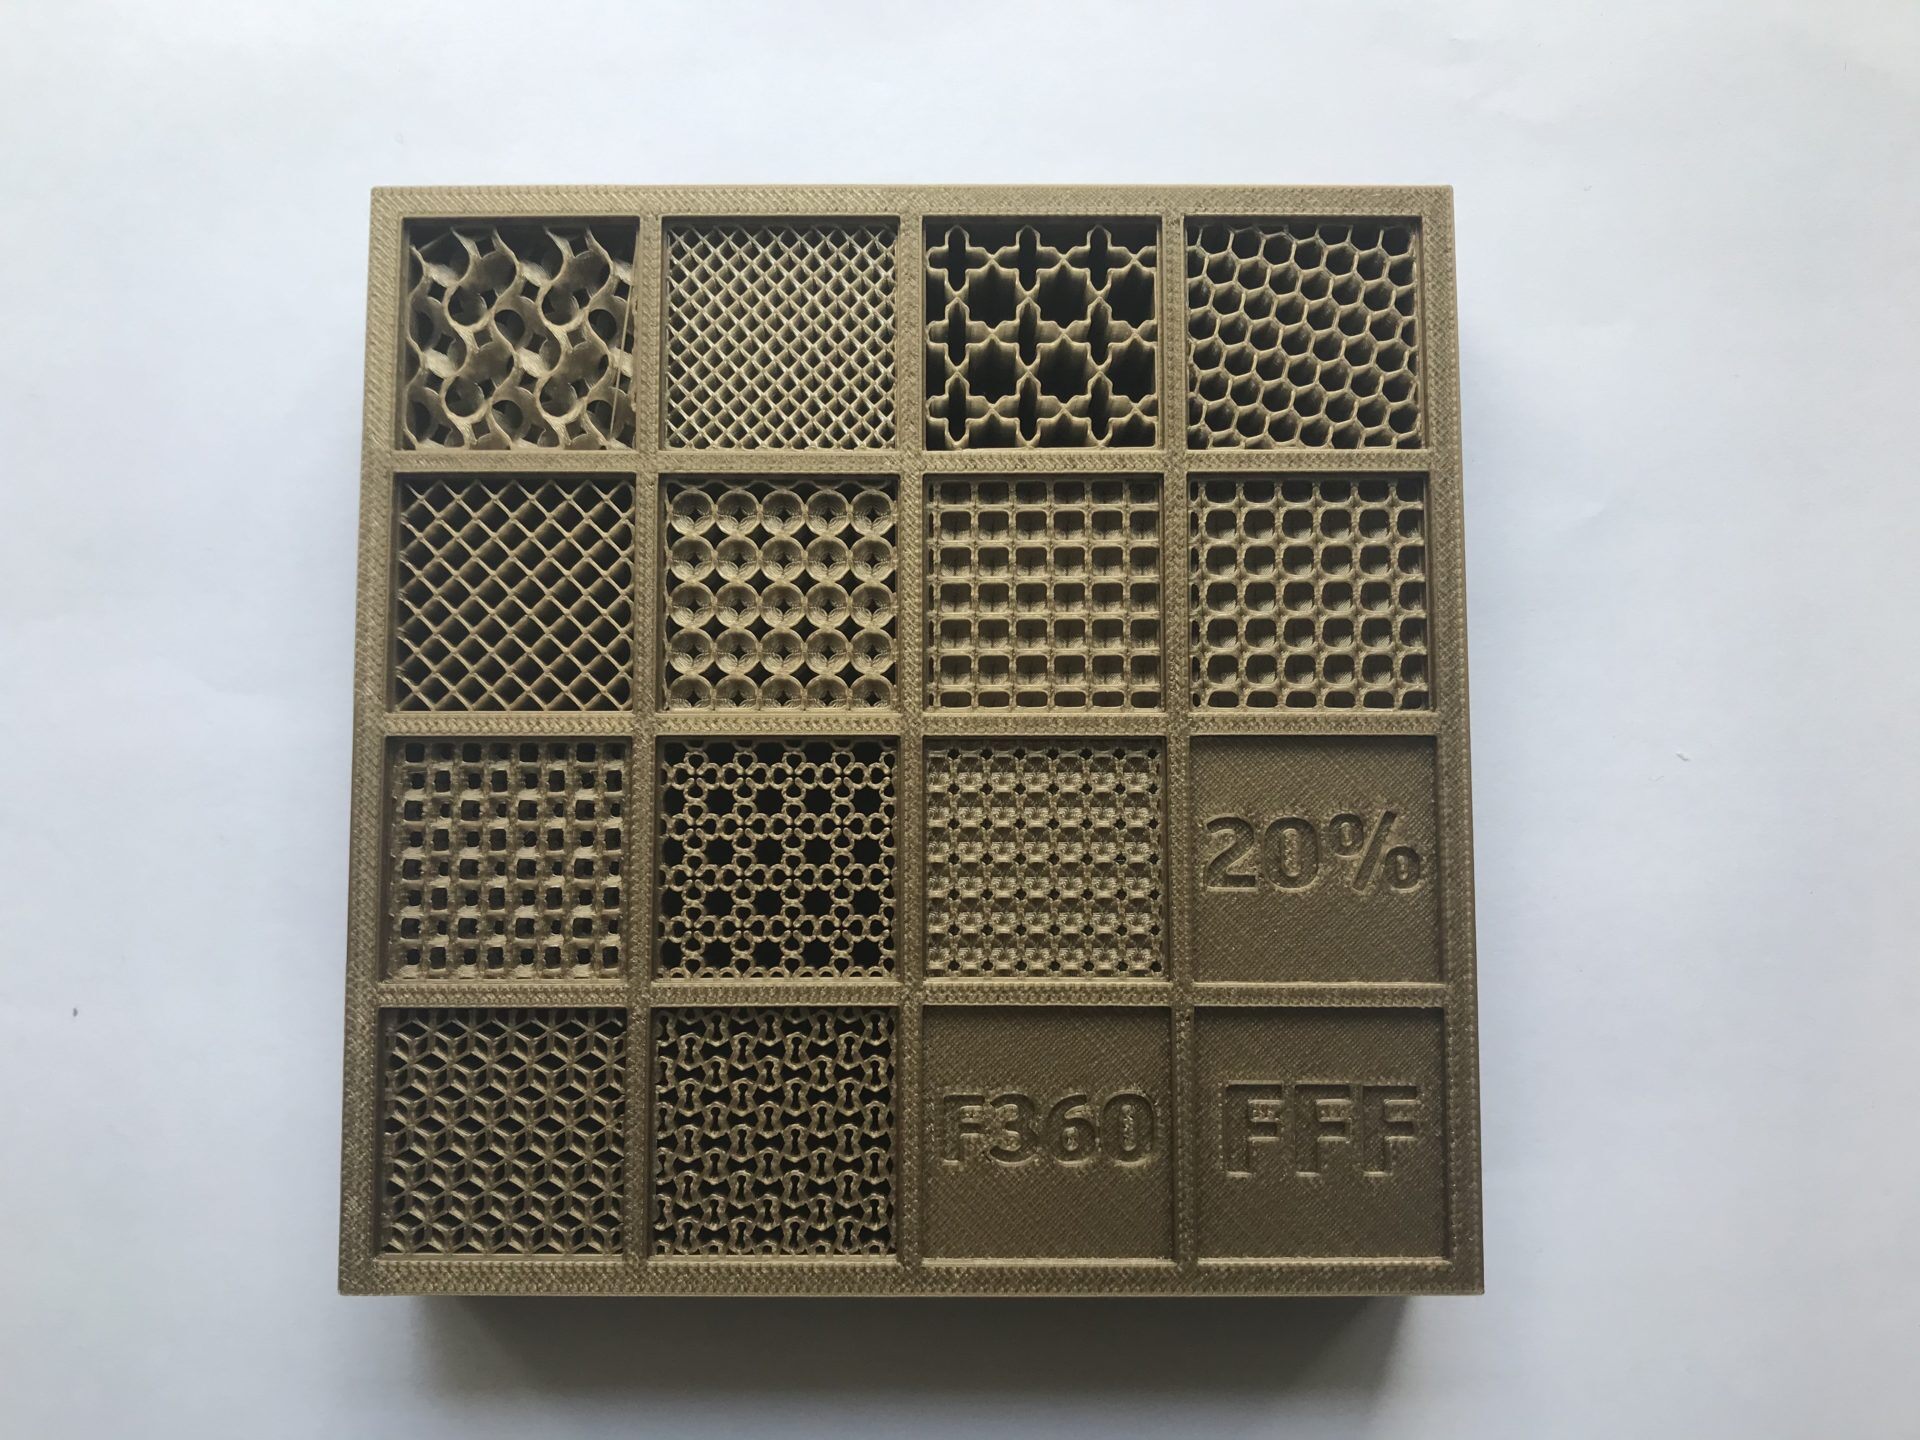
Different Infill Patterns
When it comes to infill in 3D printing, there are numerous patterns to choose from, each with unique characteristics and properties. Let’s explore some of the common infill patterns used in 3D printing:
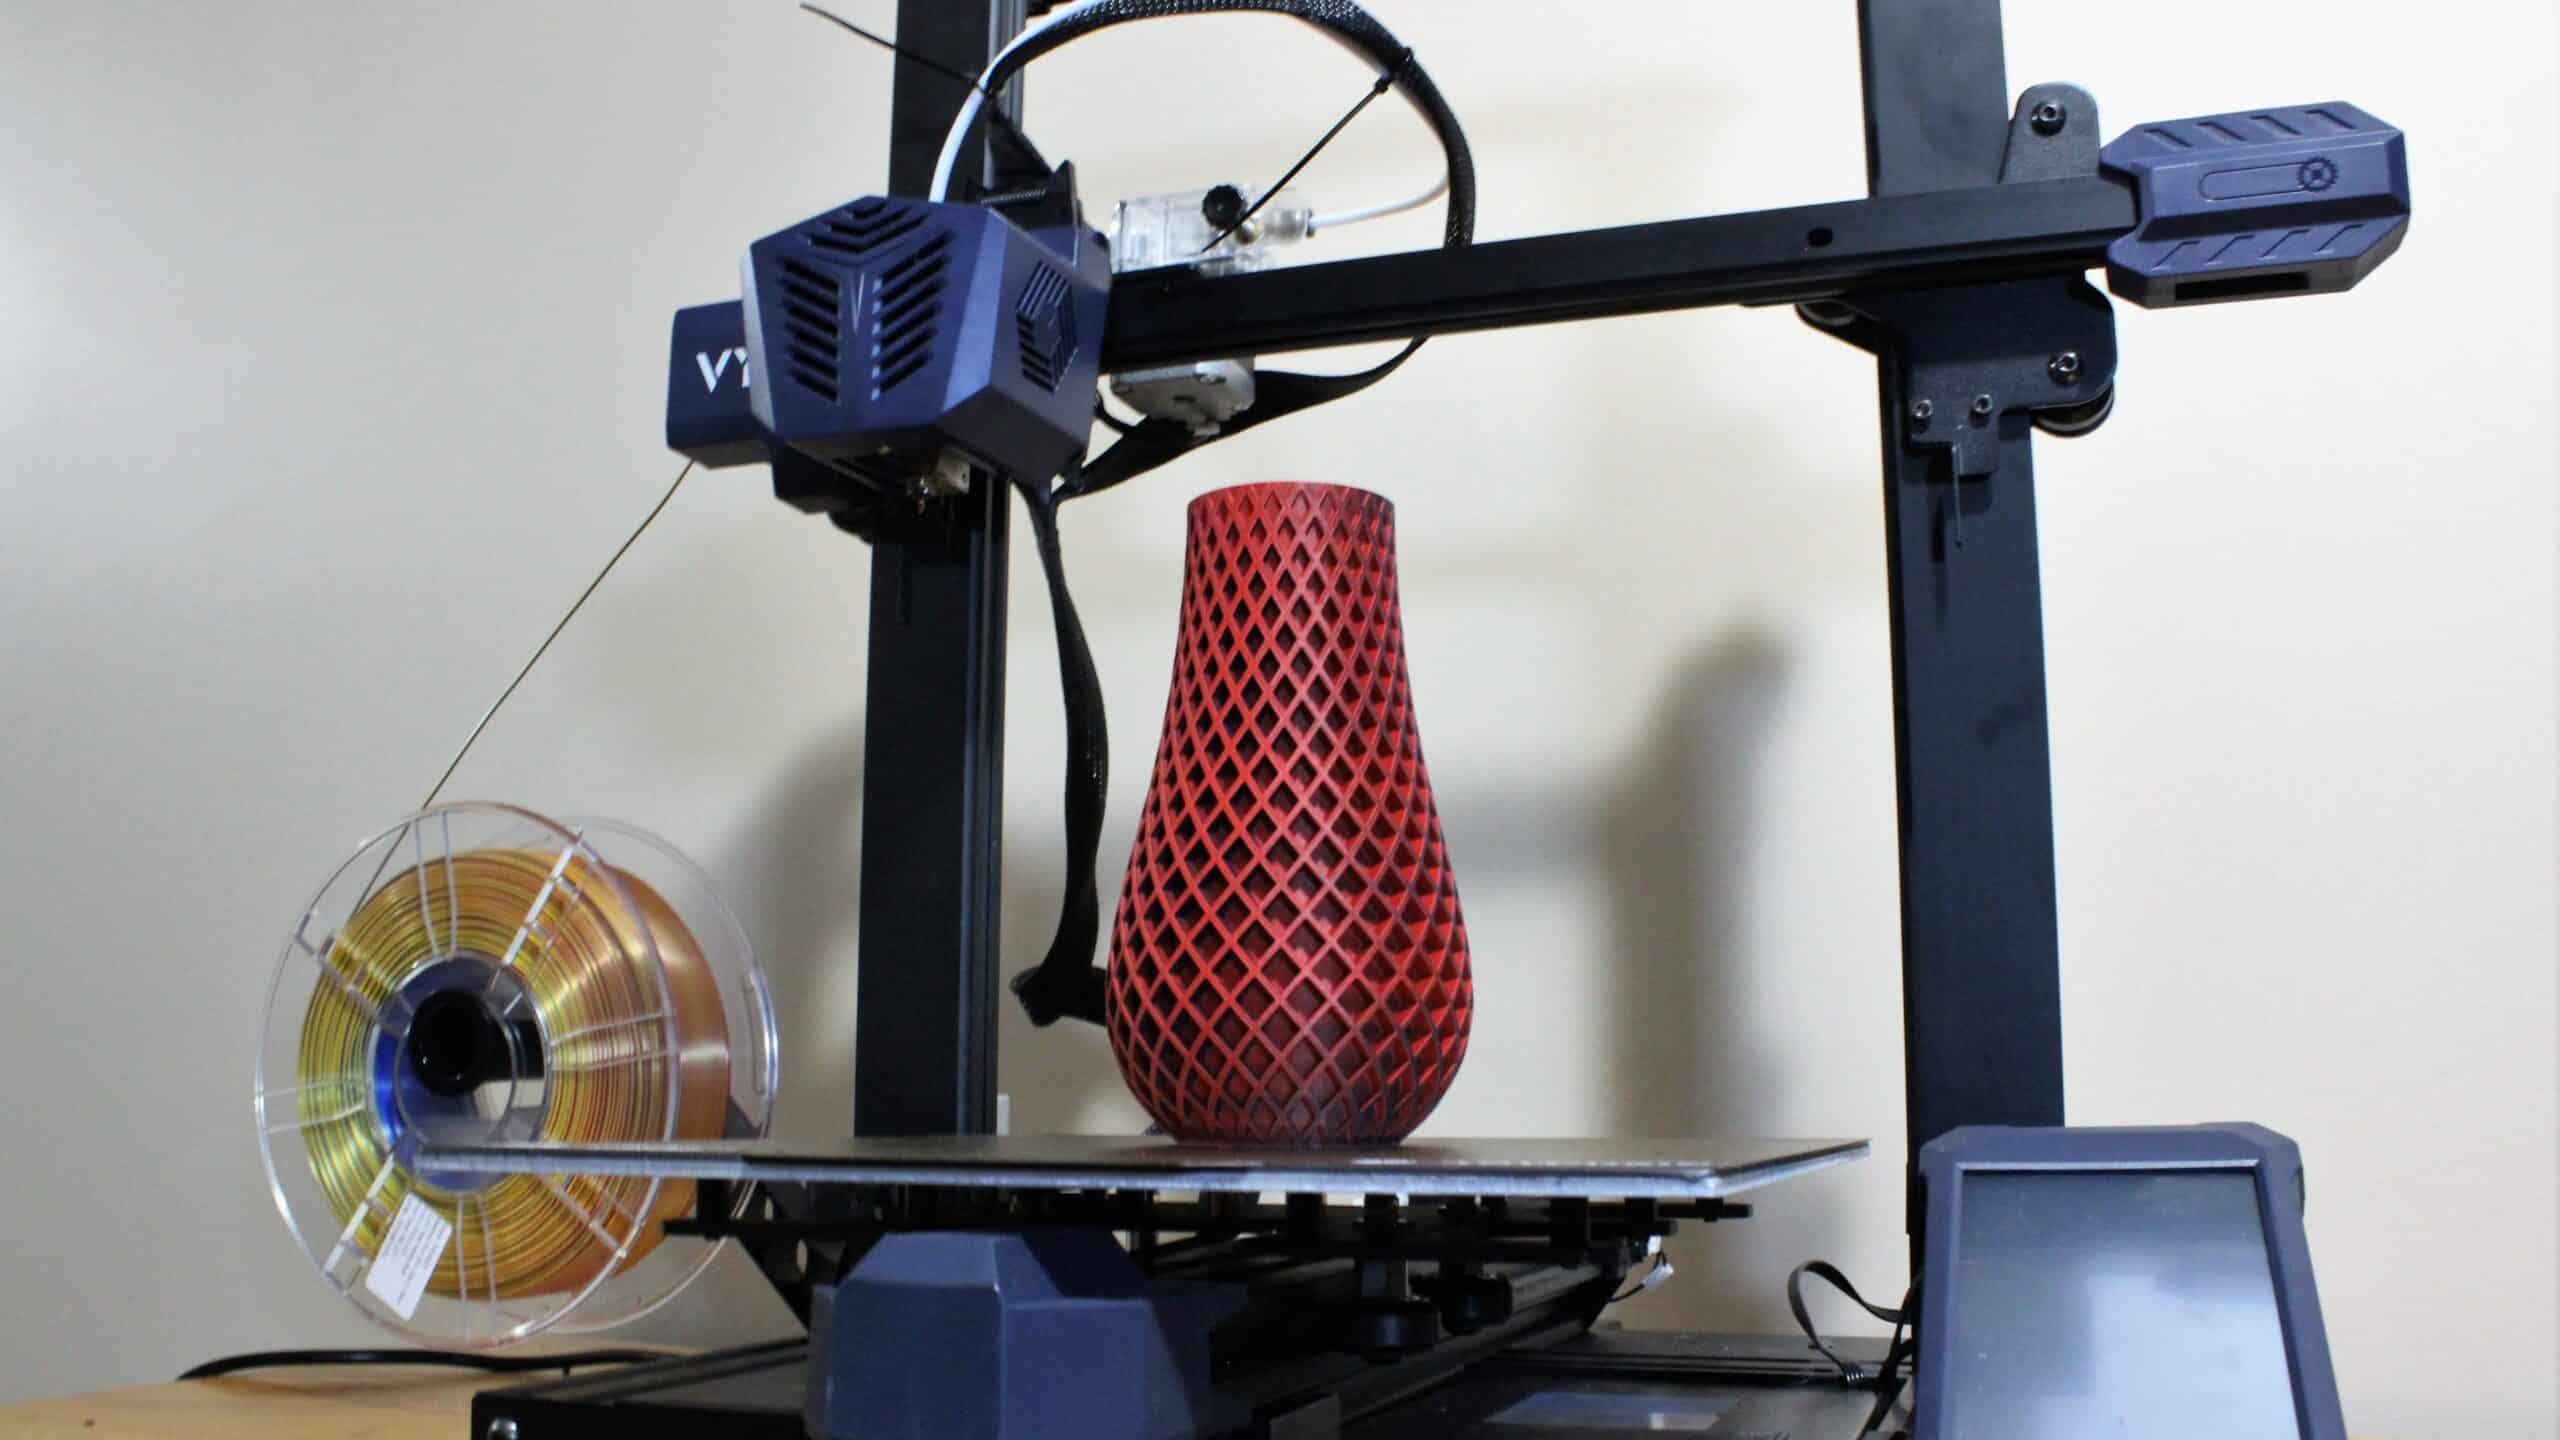
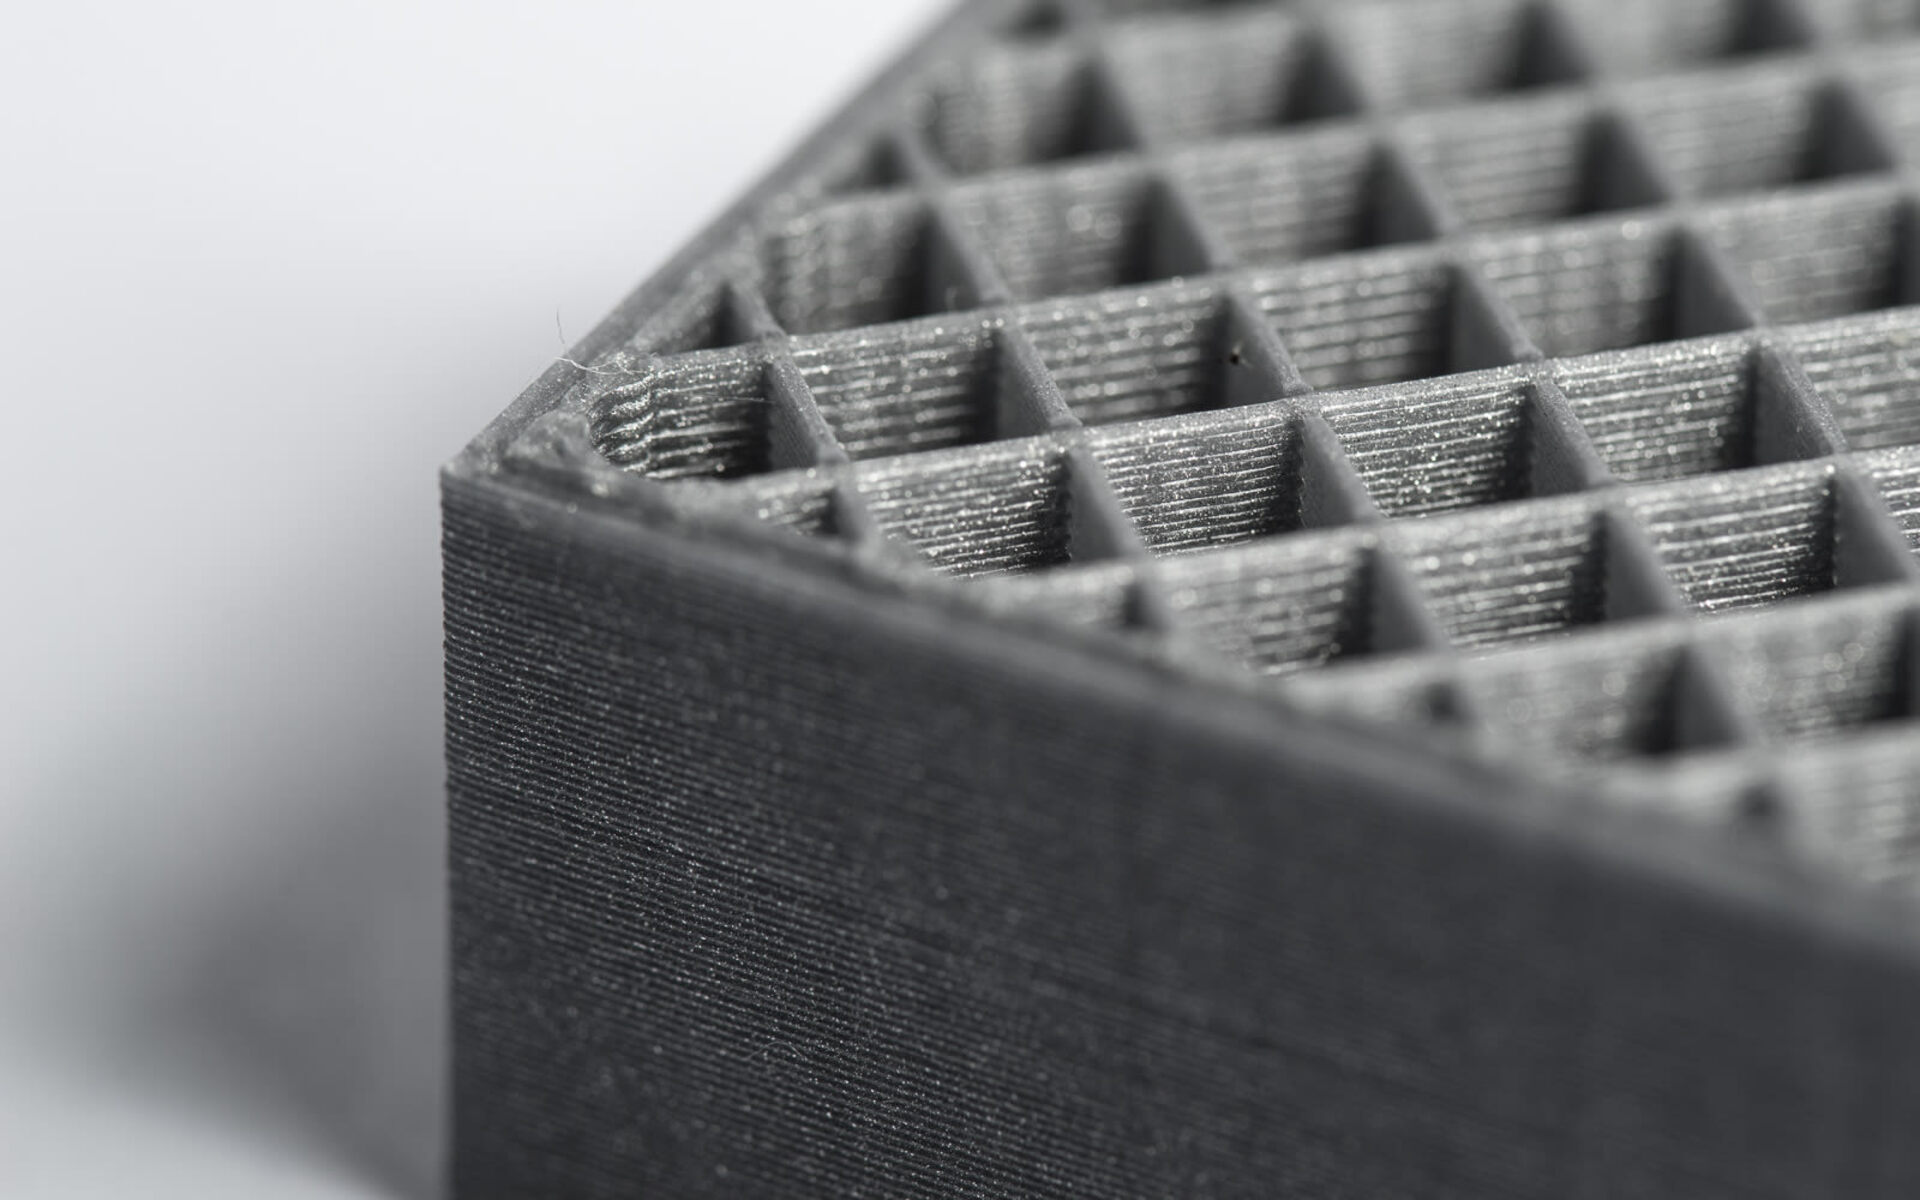
Honeycomb: The honeycomb pattern is one of the most popular choices for infill due to its excellent strength-to-weight ratio. It consists of hexagonal cells that provide stability while minimizing material usage. The honeycomb pattern also allows for efficient distribution of forces, making it ideal for lightweight but sturdy prints.
Grid: The grid pattern consists of a simple orthogonal grid structure. It offers good structural integrity and allows for consistent material distribution. The grid pattern is versatile and suitable for a wide range of applications, balancing strength and material efficiency.
Triangles: The triangular infill pattern is known for its exceptional strength and rigidity. It utilizes a series of interconnected triangles to create a stable structure. Triangular infill is commonly used in objects that require high load-bearing capabilities and robust support.
Rectilinear: The rectilinear infill pattern is characterized by vertical and horizontal lines forming a grid-like pattern. It provides a good balance between strength and material usage. The rectilinear pattern is often used for objects that require moderate strength and stability.
Orthogonal: The orthogonal infill pattern consists of alternating vertical and horizontal lines, similar to a checkerboard. It offers stability and even distribution of forces, making it suitable for objects that require consistent strength in all directions.
Custom Shapes: Some advanced 3D printers allow for the creation of custom infill patterns, where users can design their own structures to meet specific needs. This level of customization provides greater flexibility and allows for optimized support and strength in complex geometries.
Each infill pattern has its advantages and best-use scenarios, depending on the requirements of the printed object. It is important to consider factors such as strength, weight, printing time, material efficiency, and surface finish when choosing the appropriate infill pattern for a particular 3D printing project.
Experimentation with different infill patterns is encouraged to find the ideal balance between strength, material usage, printing speed, and other factors. Ultimately, the choice of infill pattern should be based on the specific needs and desired outcome of the 3D printed object.
Factors to Consider When Choosing Infill Options
Choosing the right infill options is crucial for achieving the desired strength, weight, and performance in 3D printed objects. Here are some important factors to consider when selecting infill options:
Object Function and Use: Consider the intended function and use of the 3D printed object. If it requires high load-bearing capabilities, a stronger infill pattern such as triangular or honeycomb may be more suitable. For objects that don’t require as much strength, a lighter infill pattern like rectilinear or grid can be sufficient.
Material and Material Properties: Different materials have varying properties, such as flexibility, strength, and weight. Consider the characteristics of the material being used and choose an infill pattern that complements and enhances those properties. For example, a flexible material may benefit from a lighter infill pattern to maintain its elasticity.
Strength Requirements: Evaluate the strength requirements of the object. Are there specific areas that require higher strength, such as load-bearing joints or connection points? In such cases, adjusting the infill density or using a stronger pattern in those areas can help improve the overall strength of the object.
Print Time: Consider the time constraints for 3D printing. The infill density directly affects the print time, with higher densities requiring more time to complete the print. Balancing the desired strength with print time is important, as a higher infill density may not always be necessary for every object.
Material Usage and Cost: Evaluate the material usage and cost implications. Higher infill densities require more material, which can increase material costs. Consider the balance between strength requirements and material efficiency to optimize cost-effective 3D printing without compromising on performance.
Surface Finish: The infill pattern can influence the surface finish of the printed object. A higher infill density can result in smoother surfaces due to more material being deposited. However, excessive infill density may lead to over-extrusion and negatively impact the surface quality. Consider the desired surface finish and adjust the infill density accordingly.
Print Thickness and Layer Height: The print thickness and layer height can also impact the choice of infill options. Thicker prints may require a higher infill density for added strength, while thinner prints might be suitable with a lower density to optimize material usage and print time.
By considering these factors when choosing infill options, 3D printing enthusiasts and professionals can make informed decisions that result in high-quality prints with the optimal balance of strength, weight, material usage, and performance.
Tips for Optimizing Infill Settings
Optimizing the infill settings in your 3D printing projects is crucial for achieving the best results. Here are some helpful tips to consider when fine-tuning your infill settings:
Start with Default Settings: If you’re new to 3D printing or unfamiliar with a particular material, it’s recommended to start with the default infill settings provided by your slicing software. These default settings have typically been tested and optimized for general use and can serve as a good starting point for most projects.
Consider Object Requirements: Evaluate the specific requirements of the printed object. How much strength is needed? Can weight reduction be beneficial? Consider these factors when adjusting infill settings. For objects that require high strength, increasing the infill density or choosing a stronger infill pattern may be necessary. For lightweight objects, reducing the infill density can help achieve weight reduction.
Experiment with Infill Density: Varying the infill density can significantly impact the resulting print. Higher densities offer increased strength but can also increase material consumption and print time. Lower infill densities can save material and reduce print time but may sacrifice some structural integrity. Experiment with different infill densities to find the optimal balance for your specific project.
Modify Infill Patterns: Consider adjusting the infill pattern to suit your needs. Some models have areas that require different levels of strength. Some slicing software allows you to modify the infill pattern within specific regions of the object. By customizing the infill pattern, you can achieve targeted reinforcement where it is needed most.
Use Variable Infill Density: Certain slicer software tools allow for variable infill density throughout the object. This means you can have higher infill densities in critical areas and lower densities in less crucial regions. This technique optimizes material usage and strength distribution in your prints.
Combine Different Infill Patterns: Another option is to combine different infill patterns within the same model. For instance, you can use a strong pattern in load-bearing areas and a lighter pattern in less critical sections. This technique leverages the strengths of different infill patterns to achieve the desired balance of strength, weight, and material efficiency.
Consider Infill Angle: Experimenting with the infill angle can also affect the overall strength of the printed object. By adjusting the angle, you can potentially align the infill with the anticipated force loading to maximize the strength and stability of the object.
Regularly Inspect and Test: Regularly inspect and test the printed objects to ensure they meet the desired requirements. Evaluate the strength, weight, and surface finish to determine if adjustments to the infill settings are necessary. Keep notes of successful prints and their corresponding infill settings for future reference.
Remember, optimizing infill settings is an iterative process. It may require multiple test prints and adjustments to achieve the desired results. By considering the specific requirements of your printed objects and experimenting with different infill options, you can optimize your infill settings for a successful and high-quality 3D printing experience.
Benefits of Using Infill in 3D Printing
Infill plays a crucial role in the 3D printing process, offering numerous benefits that enhance the quality, performance, and efficiency of printed objects. Here are some key benefits of using infill in 3D printing:
Strength and Structural Integrity: By filling the empty spaces inside a 3D printed object, infill provides essential internal support and reinforcement. This strengthens the structure, improving its overall durability and resistance to external forces. Infill ensures that the printed object maintains its shape and integrity, preventing issues such as warping or deformation.
Material Efficiency and Cost Savings: Infill patterns optimize material usage, reducing waste and saving costs. Rather than printing objects that are completely solid, infill patterns allow for a lighter internal structure. By using less material, infill reduces material consumption and waste, resulting in cost savings for 3D printing projects.
Weight Reduction: Infill enables the reduction of the overall weight of 3D printed objects. By strategically adjusting the infill density and pattern, designers can create lightweight objects without compromising strength and functionality. This is particularly advantageous in applications where weight reduction is critical, such as aerospace, automotive, or wearable technology.
Customizable Strength and Flexibility: With infill, users have the ability to customize the strength and flexibility of their printed objects. By selecting the appropriate infill pattern and density, the desired mechanical properties can be achieved. This flexibility allows for the creation of objects with varying levels of rigidity, elasticity, or torsional resistance, depending on the specific application.
Printing Speed Optimization: Infill density directly affects the printing speed. By adjusting the infill density, 3D printing enthusiasts can balance the need for strength and print time. Higher infill densities result in stronger objects but increase print time, while lower densities reduce print time but may sacrifice some structural integrity. Optimizing the infill density helps achieve the desired balance between strength and print speed.
Surface Finish and Aesthetics: Infill can influence the surface finish and aesthetics of the printed object. Higher infill densities result in smoother surfaces due to more material being deposited. The chosen infill pattern can also add visual interest to the object, such as the honeycomb or triangular patterns. By selecting the appropriate infill options, users can achieve the desired surface finish and enhance the overall aesthetics of their prints.
Design Optimization and Functionality: Infill provides opportunities for design optimization, thanks to its ability to support specific areas of the object. By adjusting the infill pattern and density within different regions of the model, designers can reinforce critical areas while reducing materials in less crucial sections. This flexibility allows for the creation of complex geometries, efficient structures, and improved functionality.
Given these benefits of using infill in 3D printing, it is clear that infill is not only crucial for achieving optimal structural integrity but also offers advantages in terms of material efficiency, weight reduction, customization, aesthetics, and design optimization. Mastering the utilization of infill leads to stronger, lighter, and more cost-effective 3D printed objects.
Conclusion
Infill is a fundamental component of the 3D printing process, and understanding its importance and implications can greatly enhance the quality and functionality of 3D printed objects. By filling the empty spaces inside the printed object, infill provides internal support and reinforcement, improving overall strength and structural integrity. It also allows for material efficiency, weight reduction, customization, and optimization of design and functionality.
When choosing infill options, it is essential to consider factors such as object requirements, material properties, strength needs, print time, material usage, surface finish, and print thickness. Adjusting the infill pattern, density, and angle can help achieve the desired balance and optimize the properties of the printed object.
Infill offers a range of benefits, including improved strength, cost savings through material efficiency, weight reduction, customizable mechanical properties, optimized printing speed, enhanced surface finish, and opportunities for design optimization. By utilizing infill effectively, 3D printing enthusiasts and professionals can achieve high-quality prints that meet their specific requirements.
As with any aspect of 3D printing, experimentation and trial-and-error are necessary to find the optimal infill settings for different projects. Regular inspection and testing of printed objects are also crucial to ensure they meet the desired specifications and perform as intended.
In summary, infill is crucial for achieving strong and durable 3D printed objects. By understanding the various infill patterns, considering the factors that influence infill options, and optimizing infill settings, one can harness the full potential of infill and unlock the benefits it offers in the world of 3D printing.