Introduction
3D printing has revolutionized the way we design and create objects. From prototypes to intricate sculptures, this innovative technology allows for the production of three-dimensional objects with unparalleled precision. At the core of the 3D printing process is the STL file, an essential component that drives the manufacturing process. So, what exactly is an STL file?
An STL (Standard Tessellation Language) file is a digital representation of a three-dimensional object. It contains information about the shape, structure, and surface geometry of the object, defining its dimensions and features. This file format has become the standard in the 3D printing industry, as it can be easily interpreted by slicing software, which converts it into instructions for the 3D printer.
In simple terms, an STL file is like a blueprint for a 3D printer. It provides the necessary information for the printer to manipulate its nozzle or laser and build the object layer by layer. Without an STL file, the 3D printer would not know how to construct the desired object accurately.
Creating a high-quality STL file is vital for achieving a successful 3D print. Accuracy and precision are key in ensuring that the final object closely matches the original design. Thus, understanding the structure and components of an STL file is crucial for designers, engineers, and anyone involved in the 3D printing process.
In the following sections, we will explore how STL files are created, what information they contain, their importance in 3D printing, and how to open, view, and edit these files. We will also discuss the process of converting an STL file into G-code, a series of instructions that control the movements of the 3D printer. Let’s delve deeper into the world of STL files and unlock the potential of 3D printing.
What is a STL file?
An STL (Standard Tessellation Language) file is a file format commonly used in 3D printing. It serves as a means to accurately represent the geometry and structure of a three-dimensional object. Unlike other file formats such as OBJ or FBX, which can store additional information like colors or textures, the STL file focuses solely on the shape and surface characteristics of the object.
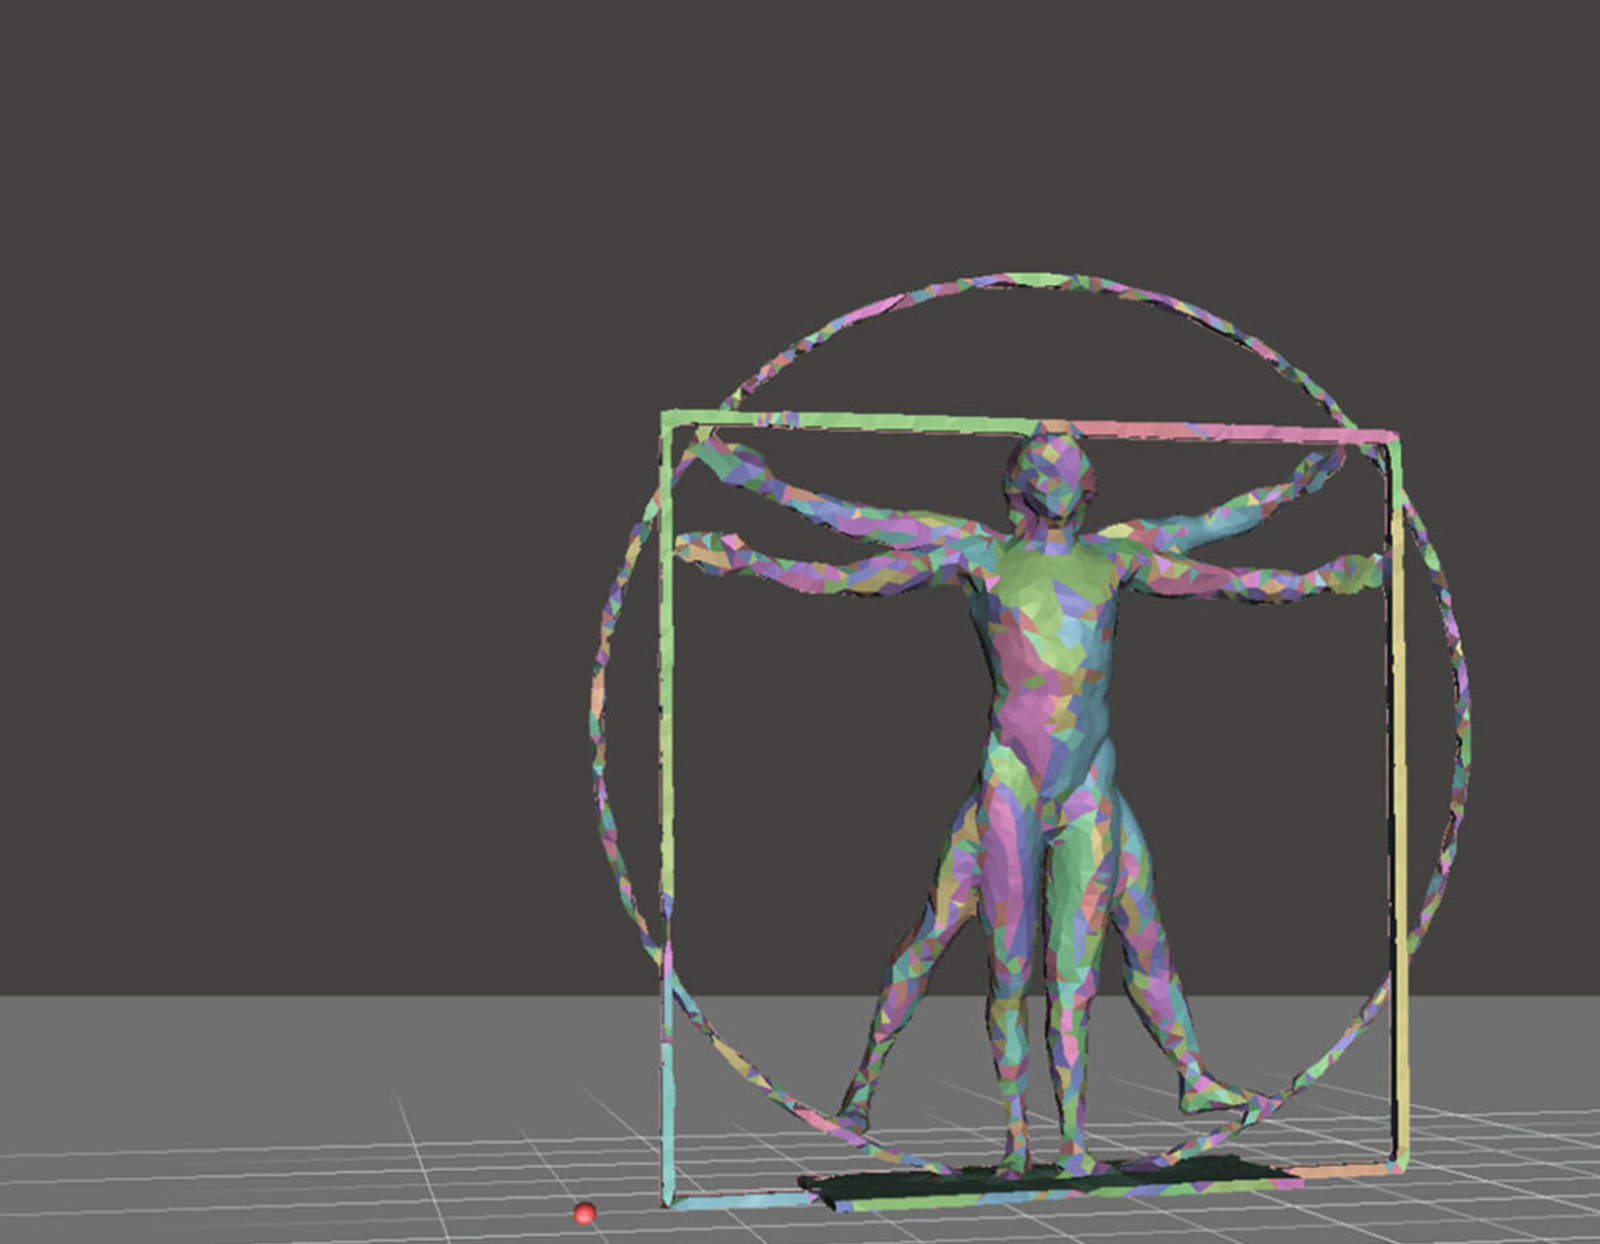
The core concept behind an STL file is triangulation. The surface of the object is divided into a multitude of triangles, creating a mesh or a tessellation. This mesh representation allows for easy interpretation by the 3D printing software and enables the printer to recreate the object layer by layer.
STL files can be either in binary or ASCII format. The binary format is more common due to its smaller file size, which makes it easier and faster to process. On the other hand, the ASCII format is more human-readable and can be modified using simple text editors, although it comes with larger file sizes and longer processing times.
One key aspect of STL files is that they are resolution-independent. This means that the level of detail of the object is determined during the 3D printing process and is not fixed in the file itself. Each triangle in the STL file represents a flat facet on the surface of the object, and the density of these triangles determines the smoothness of the final print.
STL files are widely supported by 3D modeling software and various 3D printers, making them highly compatible and accessible. They have become the standard file format in the 3D printing industry, allowing for seamless communication between designers, software, and printers.
In the next section, we will explore the process of creating an STL file and uncover the tools and techniques involved. Understanding how to generate a high-quality and accurate STL file is crucial for achieving successful 3D prints. Let’s dive into the creation of STL files and discover the intricacies of the process.
How is an STL file created?
Creating an STL (Standard Tessellation Language) file requires a 3D modeling software that supports exporting files in the STL format. There are various software programs available, ranging from free and open-source options like Blender and Tinkercad to professional CAD (Computer-Aided Design) software like SolidWorks and AutoCAD.
The process of creating an STL file involves several steps. Firstly, you need to design the 3D object using the modeling software. This can be done by either creating a model from scratch or importing an existing design. The software provides tools and features for shaping, resizing, and adding details to the object to achieve the desired design.
Once the model is complete, it needs to be converted into a mesh format. This is done by defining the surface of the object using triangles. The software automatically generates the triangles based on the shape and structure of the object. It is important to ensure that the mesh is watertight, meaning there are no gaps or overlapping triangles, as this can lead to printing errors.
After the mesh is generated, the next step is to optimize it by reducing the number of triangles without compromising the shape and details of the object. This is done to reduce the file size and make it more manageable for the 3D printing software. Some modeling software has built-in tools for simplifying the mesh, while others may require the use of additional tools or plugins.
Once the mesh is optimized, the final step is to export the file as an STL file. The software generally provides an option to export the model in the STL format, allowing you to specify the desired resolution or level of detail. Depending on the software, you may also have the choice between exporting in binary or ASCII format. Binary format is often preferred for its smaller file size and faster processing.
It is worth mentioning that creating a high-quality STL file is crucial for achieving accurate and successful 3D prints. Care should be taken to ensure the model is properly designed, the mesh is optimized, and the file is exported correctly. Overlapping or missing triangles, as well as gaps in the mesh, can affect the print quality and may result in errors or distortions in the final object.
In the next section, we will explore the contents of an STL file and understand the information it contains about the 3D object. This knowledge is valuable for any designer or engineer involved in the 3D printing process.
What does an STL file contain?
An STL (Standard Tessellation Language) file contains essential information about the geometry and structure of a three-dimensional object. Although it is a simple file format, it serves as the blueprint for 3D printers to accurately recreate the object layer by layer. Let’s explore the key components of an STL file.
1. Triangle Data: The primary component of an STL file is the collection of triangles that make up the surface of the object. Each triangle is defined by three vertices, which represent the coordinates in three-dimensional space. These vertices determine the shape and structure of the object’s surface.
2. Vertex Normals: Along with the triangle data, STL files also include vertex normals for each vertex of the object. Normals define the orientation of each triangle and help the 3D printer determine the surface direction. This information is essential for producing a smooth and accurate print.
3. Units of Measurement: An STL file contains information about the units of measurement used to define the object’s dimensions. It can specify whether the measurements are in millimeters, inches, or any other unit. This ensures that the object is properly scaled during the 3D printing process.
4. Binary or ASCII Format: STL files can be stored in two formats – binary and ASCII. The binary format consists of numerical data encoded in binary form, resulting in smaller file sizes compared to the ASCII format. The ASCII format, on the other hand, stores the data as plain text, making it more readable and editable but resulting in larger file sizes.
It’s important to note that an STL file does not contain information about color, texture, or other visual attributes of the object. It focuses solely on the geometric aspects required for the 3D printing process. If additional attributes are needed, they are usually stored in separate files or using alternative file formats.
Understanding the contents of an STL file is crucial for optimizing 3D prints and ensuring accurate results. Designers and engineers can leverage this knowledge to modify the object’s geometry, manage the file size, or make adjustments to the print settings for better quality.
Next, we will explore the importance of STL files in the 3D printing process and how they enable the translation of virtual designs into physical objects.
Why is an STL file important in 3D printing?
An STL (Standard Tessellation Language) file plays a pivotal role in the 3D printing process. It serves as a critical link between the virtual design and the physical object. Let’s explore the importance of STL files in 3D printing.
1. Standardization: The STL file format has become the standard in the 3D printing industry. It is widely supported by 3D modeling software and various 3D printers, ensuring seamless communication and compatibility between different platforms. This standardization allows designers, engineers, and manufacturers to easily exchange and share models without worrying about software or hardware compatibility issues.
2. Geometry Representation: An STL file accurately represents the geometry and surface characteristics of a three-dimensional object. It defines the shape, size, and structure of the object, providing the necessary information for the 3D printer to recreate it layer by layer. Without an STL file, the 3D printer would not have the instructions it needs to accurately produce the desired object.
3. Precise Dimensions: An STL file specifies the dimensions of the object in a 3D coordinate system. This ensures that the physical print matches the virtual design. By defining the size and scale of the object, designers can create functional prototypes, artistic sculptures, or even architectural models with precision and accuracy.
4. Layer-by-Layer Printing: 3D printers create objects by building them layer by layer. The STL file provides the necessary information for the printer to determine the boundaries and structure of each layer. This layer-by-layer approach enables the printer to accurately reproduce complex designs and intricate details that would be challenging to achieve with traditional manufacturing methods.
5. Optimization and Adjustments: The STL file allows for optimization and adjustments in the printing process. Designers and engineers can modify the object’s geometry, adjust the thickness of the walls, or add support structures to ensure stability during printing. These adjustments can be made directly in the STL file or using dedicated software, providing flexibility and control over the final print.
6. Slicing Software: STL files are processed by slicing software, which converts the virtual model into a series of instructions known as G-code. The G-code contains information about extruder movement, layer height, print speed, and other factors that affect the printing process. Without an STL file, the slicing software would not have the necessary input to generate accurate G-code.
In summary, the STL file is the foundation of 3D printing. It defines the geometry, structure, and dimensions of the object, enabling precise and accurate replication. Its standardization and compatibility ensure seamless communication in the 3D printing workflow, allowing for efficient design iterations and optimizations. The STL file is a key element that bridges the gap between virtual designs and physical objects in the exciting realm of 3D printing.
How to open and view a STL file?
Opening and viewing an STL (Standard Tessellation Language) file is relatively straightforward, thanks to the widespread compatibility of this file format. There are several software options available, ranging from standalone viewers to 3D modeling software. Let’s explore some common methods for opening and viewing STL files.
1. Dedicated STL Viewers: There are numerous standalone software programs specifically designed for opening and viewing STL files. These viewers provide basic functionalities such as rotating, scaling, and zooming in on the 3D model. Some popular options include Autodesk’s Meshmixer, FreeCAD, and PrusaSlicer. These viewers are simple to use and provide a user-friendly interface for inspecting and analyzing STL files.
2. 3D Modeling Software: Many 3D modeling software packages, such as Blender, SketchUp, and Fusion 360, support opening and viewing STL files. These software tools not only allow you to visualize the STL file but also offer advanced capabilities for editing and modifying the model. While 3D modeling software may have a steeper learning curve, they provide greater flexibility and functionality for working with STL files.
3. Online STL Viewers: Several websites provide online STL viewers that allow you to upload and view STL files directly in your web browser. These platforms are useful when you don’t have access to dedicated software or prefer a quick and hassle-free method to inspect the contents of an STL file. Simply upload your file to the website, and the viewer will display the 3D model with basic navigation controls.
Once you have opened an STL file using one of these methods, you can explore and interact with the 3D model. Most viewers allow you to rotate, pan, and zoom in or out to examine the object from different angles. Some software even provides additional features like measurement tools, cross-section views, and annotations, enhancing the overall viewing experience.
It’s important to note that opening and viewing an STL file gives you a visual representation of the 3D model but does not provide the capability to edit or modify the geometry. For that, you would need to use 3D modeling software or specialized editing tools.
In the next section, we will explore how to edit or modify an STL file, allowing you to make adjustments to the geometry or add additional details to the 3D model.
How to edit or modify an STL file?
Editing or modifying an STL (Standard Tessellation Language) file allows you to make changes to the geometry, refine details, or add new elements to the 3D model. While the STL format is primarily intended for 3D printing, there are several methods and software tools available for editing STL files. Let’s explore some common approaches to editing and modifying STL files.
1. 3D Modeling Software: Utilizing 3D modeling software like Blender, SketchUp, or SolidWorks gives you the ability to import an STL file and edit its geometry. These software tools offer a wide range of tools and features for manipulating objects, including scaling, rotating, translating, and adding or removing elements. While these software packages may have a learning curve, they provide comprehensive control over the STL file and enable advanced modifications.
2. Mesh Editing Tools: Dedicated mesh editing software, such as MeshLab, provides specific features for modifying STL files. These tools allow you to sculpt, smooth, or subdivide the mesh, repair any imperfections, or even merge multiple STL files together. Mesh editing software works directly on the polygons that make up the 3D object, providing precise control over the surface geometry.
3. Parametric Modeling: Some 3D modeling software, such as Fusion 360 or SolidWorks, support parametric modeling. This approach allows you to modify the STL file using parametric design features, such as dimensions, constraints, and parameters. Parametric modeling enables non-destructive editing, making it easier to change dimensions or update the design while maintaining the integrity of the object.
4. CAD Conversion: Another method to edit or modify an STL file is to convert it to a CAD (Computer-Aided Design) format. CAD software, such as AutoCAD or SolidWorks, provides a robust set of tools for design and modification. By converting the STL file to a CAD format, you can take advantage of the extensive functionality available in CAD software to make precise edits to the 3D model.
Once you have made the desired edits or modifications to the STL file, you can export it back to the STL format or save it in another compatible file format. It’s important to note that modifying an STL file may require expertise in 3D modeling or CAD software, especially when making complex changes to the design.
In the next section, we will explore the process of converting an STL file to G-code, a necessary step for initiating the 3D printing process.
Converting an STL file to G-code
After editing or modifying an STL (Standard Tessellation Language) file, the next step in the 3D printing process is to convert it to G-code. G-code is a machine-readable language that provides instructions for the 3D printer on how to build the object layer by layer. Let’s explore the process of converting an STL file to G-code.
1. Slicing Software: To convert an STL file to G-code, you need slicing software. Slicing software takes the 3D model from the STL file and slices it into thin layers. It then generates G-code instructions based on parameters such as layer height, print speed, and infill density. Popular slicing software options include Ultimaker Cura, PrusaSlicer, and Simplify3D.
2. Importing the STL File: The first step is to import the STL file into the slicing software. This is usually done by selecting the “import” or “open” option and navigating to the file location on your computer. The software will then load the STL file and display the 3D model on the build platform.
3. Configuring Print Settings: After importing the STL file, you need to configure the print settings. This includes selecting the printer model, specifying the filament type, adjusting the layer height, infill density, print speed, and other parameters according to your desired print quality and project requirements. These settings will affect the generation of G-code instructions.
4. Slicing the Model: Once the print settings are configured, you can proceed to slice the model. This involves specifying the desired layer height and determining the number of layers based on the model’s geometry. The slicing software will then calculate the movement paths and generate the G-code instructions for each layer.
5. Preview and Analysis: Most slicing software provides a preview mode that allows you to visualize the sliced layers and examine how the 3D printer will build the object. This preview can help identify potential issues, such as overhangs or gaps, before initiating the actual print. Additionally, some software offers analysis tools to check for potential print problems like collisions or support structure requirements.
6. Exporting G-code: Once you are satisfied with the slicing settings and preview, you can export the G-code file. This is typically done by selecting the “export” or “save” option in the slicing software and choosing the desired destination on your computer. The software will then generate the G-code file, which can be transferred to an SD card or sent directly to the 3D printer for printing.
Converting an STL file to G-code is a crucial step in the 3D printing process, as it determines how the printer will construct the object. It is important to carefully configure the print settings, preview the sliced layers, and verify the G-code instructions to ensure a successful print.
In the next section, we will wrap up our exploration of STL files and their significance in the world of 3D printing.
Conclusion
STL (Standard Tessellation Language) files are the backbone of the 3D printing process, serving as the bridge between virtual designs and physical objects. They contain essential information about the geometry, structure, and dimensions of a 3D model, enabling 3D printers to accurately replicate the object layer by layer.
Understanding STL files is crucial for designers, engineers, and manufacturers involved in the 3D printing industry. Knowing how to create, open, view, edit, and convert STL files opens up a world of possibilities for creating custom products, prototypes, and artistic designs.
Creating a high-quality STL file starts with using 3D modeling software to design and define the object’s geometry. Mesh optimization ensures that the file is manageable and suitable for 3D printing. Opening and viewing STL files can be done with dedicated viewers or 3D modeling software, enabling a visual inspection of the 3D model from different angles.
Editing or modifying STL files allows for personalized adjustments, refinements, and additions to the design. 3D modeling software and mesh editing tools provide the means to sculpt, scale, rotate, and manipulate the STL file to achieve the desired changes.
The conversion of an STL file to G-code is the final step before initiating the 3D printing process. Slicing software slices the model into layers and generates the machine-readable G-code instructions that the 3D printer follows to construct the object.
With the widespread adoption of the STL file format and its compatibility with various software and hardware, the possibilities of 3D printing continue to expand. From engineering prototypes to customized products and artistic creations, the precise and accurate replication made possible by STL files revolutionizes manufacturing and design.
As technology advances, STL files will continue to evolve, incorporating additional features, such as color information or texture mapping, to enhance the fidelity and realism of 3D printed objects. The ongoing development and improvement of STL files and associated software open new doors for innovation and creativity.
In conclusion, STL files play a central role in the 3D printing process, enabling designers and engineers to transform their virtual creations into tangible objects. Their standardization, compatibility, and versatility empower users to explore the boundaries of 3D printing and revolutionize the way we design, create, and manufacture in the modern world.