Introduction
Welcome to the digital age, where our TVs are smarter than ever and offer a plethora of features. But with all these advancements, sometimes all we want is simplicity. If you just want one remote to control your OLED TV and streamline the whole experience, you’re in the right place. In this article, we will guide you through the process of setting up a universal remote for your OLED TV.
Having one remote to rule them all can bring convenience and eliminate the hassle of juggling multiple remotes. Whether you’re watching your favorite movies, playing games, or streaming content, the simplicity of having a single remote to control everything is undeniable. Plus, it can help declutter your entertainment area and make your setup look much cleaner.
Before we dive into the process, it’s essential to ensure that your OLED TV is compatible with a universal remote. While most modern OLED models are compatible, it’s always wise to double-check the user manual or the manufacturer’s website for compatibility information. Once you’ve confirmed compatibility, you can proceed with the setup process.
In the following steps, we’ll cover everything you need to know to set up your universal remote and have full control over your OLED TV. From connecting the HDMI devices to configuring the TV settings and troubleshooting, we’ve got you covered. So, let’s get started and simplify your TV-watching experience with just one remote!
Step 1: Check for Compatibility
Before you invest in a universal remote for your OLED TV, it’s essential to ensure compatibility. Most modern OLED TVs are compatible with universal remotes, but it’s always wise to double-check.
Start by referring to the user manual that came with your TV. Look for information on compatible universal remote models or specific instructions on setting up a universal remote. If you don’t have the manual, you can usually find it online by searching for your TV model number and “user manual.”
Another reliable source of information is the manufacturer’s website. Visit the website of the TV manufacturer and navigate to the support or product page for your specific model. Here, you may find a list of recommended universal remotes or detailed compatibility information.
If you’re unable to find compatibility information in the user manual or on the manufacturer’s website, don’t despair. You can also reach out to the customer support of the TV manufacturer for assistance. They will be able to provide you with the necessary information and guide you in selecting a compatible universal remote.
When checking for compatibility, keep an eye out for any specific features or functions you require. For example, if you use additional devices like a soundbar, gaming console, or Blu-ray player, ensure that the universal remote can control these devices as well. It’s also worth considering if you want features like voice control or backlighting on the remote.
Once you have confirmed compatibility and identified the universal remote that best meets your needs, it’s time to proceed with the setup process. In the following steps, we’ll guide you through connecting the HDMI devices, configuring the TV settings, and setting up the universal remote. So let’s move on to step 2 and simplify your TV-watching experience!
Step 2: Connect the HDMI Devices
Before you can set up your universal remote, it’s important to connect the HDMI devices that you want to control with a single remote. HDMI (High-Definition Multimedia Interface) is the standard connection interface for most modern TVs and audio/video devices.
Here are the steps to connect your HDMI devices:
- Identify the HDMI ports on your OLED TV. These ports are usually labeled as HDMI 1, HDMI 2, and so on.
- Connect one end of the HDMI cable to the HDMI output port of the device you want to connect (e.g., a cable/satellite box, Blu-ray player, gaming console).
- Connect the other end of the HDMI cable to the corresponding HDMI input port on your OLED TV.
- Repeat the process for each device you want to connect.
Ensure that the HDMI cables are securely plugged into both the device and the TV. A loose connection can result in audio/video issues.
Once all your HDMI devices are connected to your OLED TV, you’re ready to move on to the next step.
Note: If you have an HDMI-CEC (Consumer Electronics Control) compatible device, such as a Blu-ray player or gaming console, you may be able to control it using the HDMI-CEC feature on your TV. This allows you to control multiple HDMI-CEC devices connected to your TV with a single remote. Check your TV’s user manual or the manufacturer’s website for instructions on enabling and configuring HDMI-CEC settings.
Now that you have successfully connected your HDMI devices, let’s proceed to step 3 and power on the devices.
Step 3: Power on the Devices
Now that you have connected all your HDMI devices to your OLED TV, it’s time to power them on and ensure they are ready for setup. Here’s how you can power on the devices:
- Make sure all the devices are plugged into power outlets and turned on. This includes your TV, cable/satellite box, gaming console, Blu-ray player, and any other connected devices.
- Using the respective power buttons or remote controls of each device, turn on each device individually. Wait for each device to properly boot up before moving on to the next one.
- Once all the devices are powered on, you should see their respective startup screens or the TV input screen on your OLED TV.
Ensure that the HDMI input on your TV is set to the correct input source for each device. Use the TV remote or the TV menu to switch between input sources if needed. The input source can be named HDMI 1, HDMI 2, or any other labeling depending on your TV model.
It’s advisable to familiarize yourself with the specific startup process of each device to ensure proper functionality and to resolve any initial setup prompts or on-screen instructions.
If you have any devices that require network connections, such as a smart TV or gaming console, make sure they are connected to your Wi-Fi network or Ethernet for online features and updates.
Once all your devices are powered on and ready for setup, you’re ready to proceed to the next step and configure the TV settings.
Note: If you encounter any issues during the power-on process, such as devices not turning on or not displaying properly on your TV, make sure all the connections and cables are secure. Refer to the user manuals of the respective devices for troubleshooting steps or contact customer support for further assistance.
Now that you have successfully powered on your devices, let’s move on to step 4 and configure the TV settings.
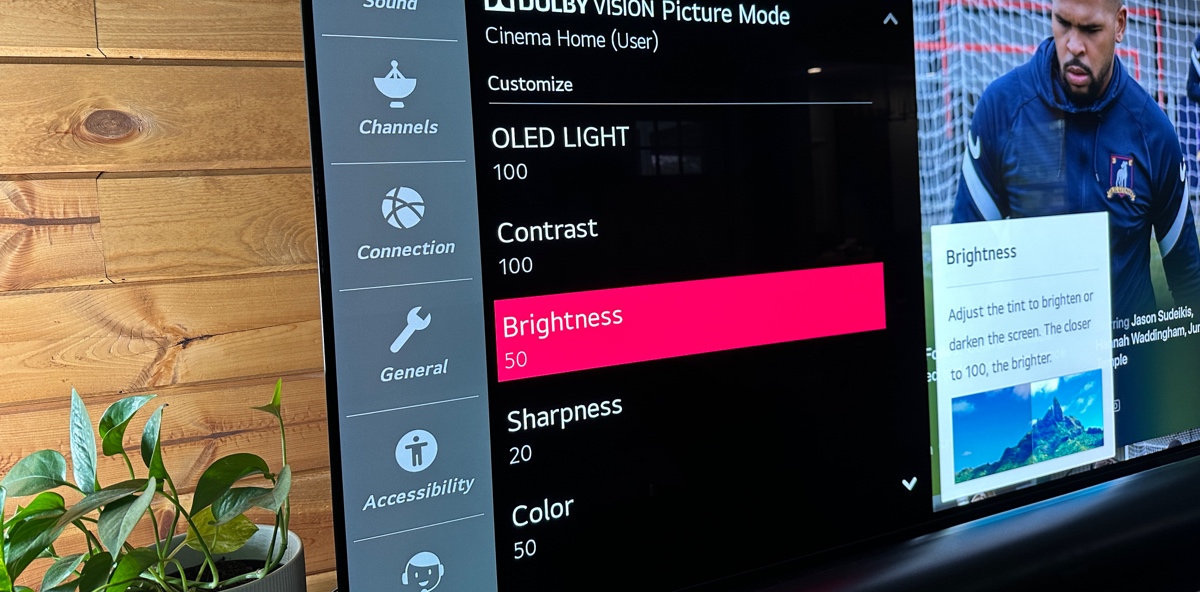
Step 4: Configure the TV Settings
Once all your HDMI devices are powered on and displaying properly on your OLED TV, it’s time to configure the TV settings to ensure optimal performance and compatibility with the universal remote. Here are the steps to configure the TV settings:
- Access the TV settings menu on your OLED TV. The exact method may vary depending on your TV model, but it’s typically done by pressing the “Menu” or “Settings” button on your TV remote.
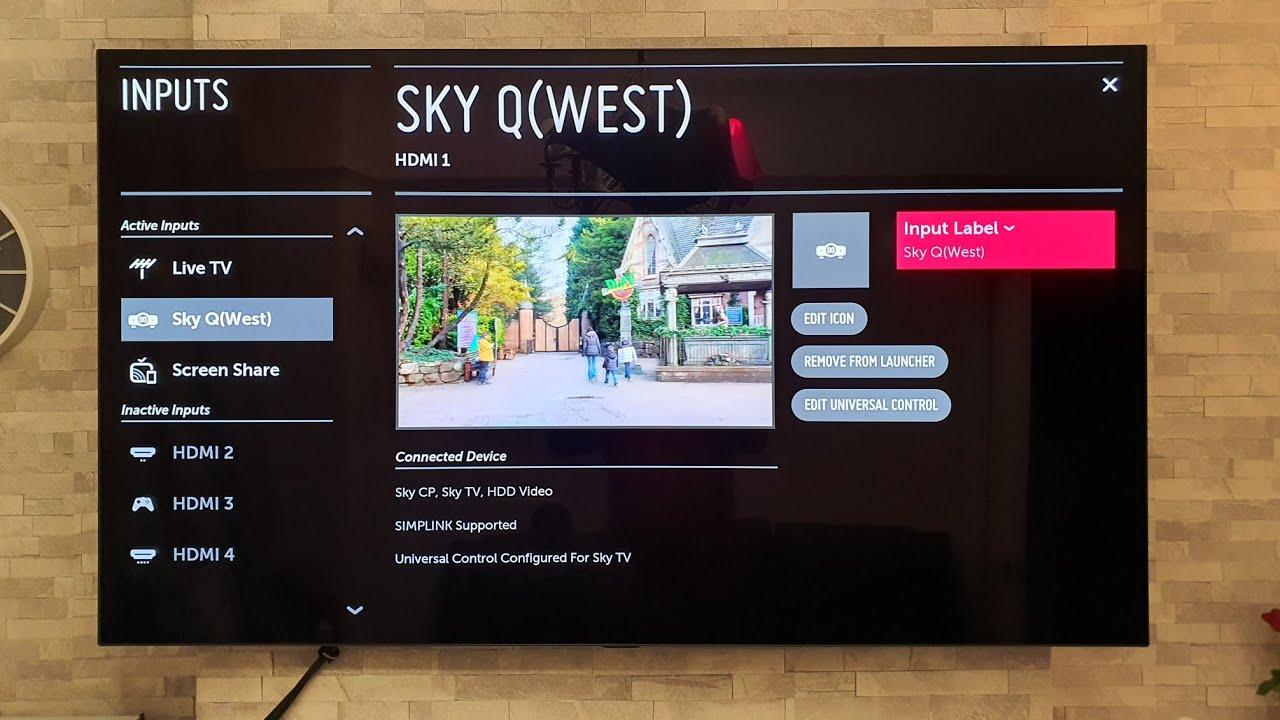
- Navigate to the “Input” or “Source” settings within the TV menu. Here, you’ll find the list of connected HDMI devices.
- Select each HDMI device one by one and assign a recognizable name to them. This step is crucial for easy identification and control using the universal remote. You can use labels such as “Cable Box,” “Gaming Console,” or “Blu-ray Player.”
- Next, explore the “Control” or “Remote Control” settings in the TV menu. Look for options related to external devices or universal remote control.
- Ensure that the “Control” or “Remote Control” setting is enabled for each connected HDMI device. This allows the TV to communicate with the devices and enables control through the universal remote.
- If your TV has HDMI-CEC functionality (mentioned in step 2), check if the HDMI-CEC setting is enabled. This feature allows your TV to control other HDMI-CEC devices connected to it. Enable this setting if you want the universal remote to control those devices as well.
- Once you’ve made the necessary settings adjustments and configurations, exit the TV settings menu. Your TV is now ready for the next step of setting up the universal remote.
Note: The TV settings menu and options may vary depending on your specific TV model and brand. If you encounter any difficulties while navigating or configuring the settings, refer to the TV’s user manual or contact customer support for guidance.
Now that you have successfully configured the TV settings, it’s time to proceed to step 5 and set up the universal remote. Let’s simplify your TV-watching experience even further!
Step 5: Set up the Universal Remote
Now that you have connected and configured your HDMI devices, it’s time to set up the universal remote for your OLED TV. Follow these steps to complete the setup process:
- Identify the specific universal remote model that you have purchased or plan to use. Ensure that it is compatible with your OLED TV by referring to the user manual or manufacturer’s website.
- Install the batteries into the universal remote according to the instructions provided.
- Turn on your OLED TV using either the TV’s power button or the existing TV remote.
- Locate the setup instructions for the universal remote. This information is typically included in the user manual or provided by the manufacturer.
- Follow the setup instructions step by step. This usually involves entering a specific code or performing a series of button presses in a specific order to sync the universal remote to your TV.
- Once you have successfully completed the setup process, test the universal remote’s functionality by using it to control additional devices connected to your OLED TV. Ensure that the commands are being correctly transmitted and received by each device.
- If there are any additional features or settings available on the universal remote, such as backlighting or programming macros, familiarize yourself with these options for enhanced control and customization.
If you encounter any difficulties during the setup process, consult the user manual or contact the manufacturer’s customer support for assistance. They can provide specific troubleshooting steps or guide you through any technical challenges you may face.
Now that you’ve successfully set up the universal remote for your OLED TV, you can enjoy the convenience of controlling multiple devices with just one remote. Sit back, relax, and enjoy your favorite shows, movies, and games without the hassle of juggling multiple remotes!
In the next step, we will guide you on how to test and troubleshoot the universal remote, ensuring smooth and seamless operation. Let’s move on to step 6!
Step 6: Test and Troubleshoot
After setting up the universal remote for your OLED TV, it’s essential to test its functionality and troubleshoot any potential issues that may arise. Follow these steps to ensure smooth operation:
- Start by testing the basic functions of the universal remote. Check if you can successfully adjust the volume, switch channels, and navigate through the TV menu using the universal remote.
- Next, test the control of other HDMI devices connected to your OLED TV. Verify if the universal remote can power on/off the cable/satellite box, gaming console, Blu-ray player, and any other devices you have connected.
- If you have enabled HDMI-CEC settings (as mentioned in step 4), test if the universal remote can control those devices as well. Check if you can navigate menus, play/pause content, and perform other functions using the universal remote.
- If you experience any issues with the universal remote not functioning correctly, first ensure that the batteries are installed correctly and have sufficient charge.
- Check for any possible obstructions or interference that may be blocking the infrared (IR) or radio frequency (RF) signals between the universal remote and the devices. Remove any obstacles and try again.
- If the universal remote is still not working properly, consult the user manual or contact the manufacturer’s customer support for further assistance. They can provide specific troubleshooting steps based on the model and address any technical issues that may be causing the problem.
- Additionally, make sure that your OLED TV’s firmware and the universal remote’s firmware, if applicable, are up to date. Keeping the firmware updated ensures compatibility and can resolve any known issues or bugs.
Remember that troubleshooting can vary depending on the specific model of the universal remote and the TV. Therefore, it’s important to consult the relevant resources provided by the manufacturer for the most accurate and up-to-date guidance.
By thoroughly testing and troubleshooting the universal remote, you can identify and resolve any issues, ensuring that you have a seamless and effortless control experience for your OLED TV and connected devices.
Now that you’ve successfully set up and tested the universal remote, you’re all set to enjoy your favorite entertainment without the hassle of multiple remotes. Sit back, relax, and experience the convenience of streamlined control with just one remote!
Conclusion
Setting up a universal remote for your OLED TV can greatly simplify your entertainment experience by providing seamless control over multiple devices with just one remote. Throughout this guide, we have walked you through the process of setting up a universal remote, from checking compatibility to configuring TV settings and troubleshooting.
Starting with checking compatibility, it’s crucial to ensure that your OLED TV is compatible with the universal remote you plan to use. Refer to the user manual, manufacturer’s website, or contact customer support for detailed information.
After confirming compatibility, you can proceed to connect your HDMI devices and power them on. Make sure to properly connect the HDMI cables and check that all devices are powering on and displaying correctly on your OLED TV. Configuring the TV settings is the next step, which involves assigning names to the connected devices and enabling control settings.
Once your TV settings are configured, setting up the universal remote is the next step. Follow the manufacturer’s instructions for syncing the remote with your OLED TV. Test and troubleshoot the remote to ensure it works smoothly, and consult the user manual or customer support if you encounter any issues.
By following these steps, you can simplify your TV-watching experience, eliminate the clutter of multiple remotes, and have full control over your OLED TV and connected devices.
Remember, the specific steps and instructions may vary depending on the model of your OLED TV and the universal remote. Always refer to the user manual and manufacturer’s resources for accurate information and troubleshooting steps.
Now, it’s time to sit back, relax, and enjoy your favorite shows, movies, and games with the convenience of a single remote. Say goodbye to the frustration of juggling multiple remotes and experience seamless control with your OLED TV and universal remote.