Introduction
Having multiple volumes on your hard disk drive can be a common occurrence. Whether it’s due to previous installations, partitions, or other reasons, having an extra volume that you no longer need can take up valuable space and potentially lead to confusion. In such cases, it’s important to know how to delete the second volume on your hard disk drive.
This article will guide you through the process, providing different options to delete the second volume on your hard disk drive. We’ll explore both the built-in tools available in Windows and the use of third-party software, ensuring you have various methods to choose from based on your preference and level of expertise.
Before proceeding, it’s essential to understand the potential risks involved when modifying your hard disk drive. Make sure you have a backup of any important data to avoid accidental data loss. Additionally, always double-check that you are working on the correct volume. Deleting the wrong volume can result in irretrievable data loss, so proceed with caution.
Now, let’s dive into the steps for checking and deleting the second volume on your hard disk drive, so you can regain precious storage space and optimize your system’s performance.
Understanding the Problem
Before we explore the methods to delete the second volume on your hard disk drive, let’s first understand the problem at hand. When you open the Windows Disk Management tool, you may notice that there are multiple volumes listed, with one of them being an extra or unnecessary volume that you want to remove.
This additional volume might have been created during the installation of the operating system, or it could be the result of allocating space for another partition that is no longer required. Regardless of the reason, having an extra volume can lead to confusion, reduce available storage space, and make managing your hard disk drive more complicated.
By deleting the second volume, you can streamline your storage setup and optimize your system’s performance. However, it’s crucial to assess the situation carefully before taking any action.
Ensure that the volume you want to delete is truly unnecessary and doesn’t contain any important files or data. Double-check that you have backups of any important data stored on the volume or retrieve them to another location to avoid accidental loss.
It’s also important to note that deleting a volume will allocate its space as unallocated, meaning it will be available for future use or to expand an existing volume. However, any data stored on the volume will be permanently deleted, so it’s crucial to back up or transfer any necessary files before proceeding with the deletion.
Now that we have a clear understanding of the problem, let’s move on to the next step: checking your hard disk drive to identify the second volume.
Checking Your Hard Disk Drive
Before proceeding with deleting the second volume on your hard disk drive, it’s important to properly identify which volume you want to remove. Here are the steps to check your hard disk drive to determine the second volume:
1. Open “Disk Management” by right-clicking the Start button and selecting “Disk Management” from the context menu. Alternatively, you can press the Windows key + X and choose “Disk Management” from the list.
2. Once the Disk Management window opens, you’ll see a list of your disk drives and their corresponding volumes. Take note of the sizes and labels displayed to identify the volume you wish to delete.
3. It’s important to double-check the contents of the volume you plan to delete to ensure that it doesn’t contain any important files or data. Right-click on the volume and select “Open” to explore its contents.
4. If you find that the volume you want to delete is indeed the second volume and doesn’t contain any necessary data, you can proceed with the deletion process.
Remember, it’s crucial to be absolutely certain about the volume you want to delete. Deleting the wrong volume can lead to permanent data loss. If you have any doubts or uncertainties, it’s best to seek assistance from a knowledgeable individual or professional.
Now that you have confirmed which volume to delete, let’s move on to the various methods you can use to delete the second volume from your hard disk drive.
Deleting the Second Volume
Once you have identified the second volume on your hard disk drive that you wish to delete, there are several methods you can use to accomplish this task. Here are three common options:
Option 1: Using Disk Management
The Disk Management tool, built into Windows, provides a straightforward way to delete the second volume. Here’s how:
- Open Disk Management by right-clicking the Start button, selecting “Disk Management” from the context menu, or pressing the Windows key + X and choosing “Disk Management.”
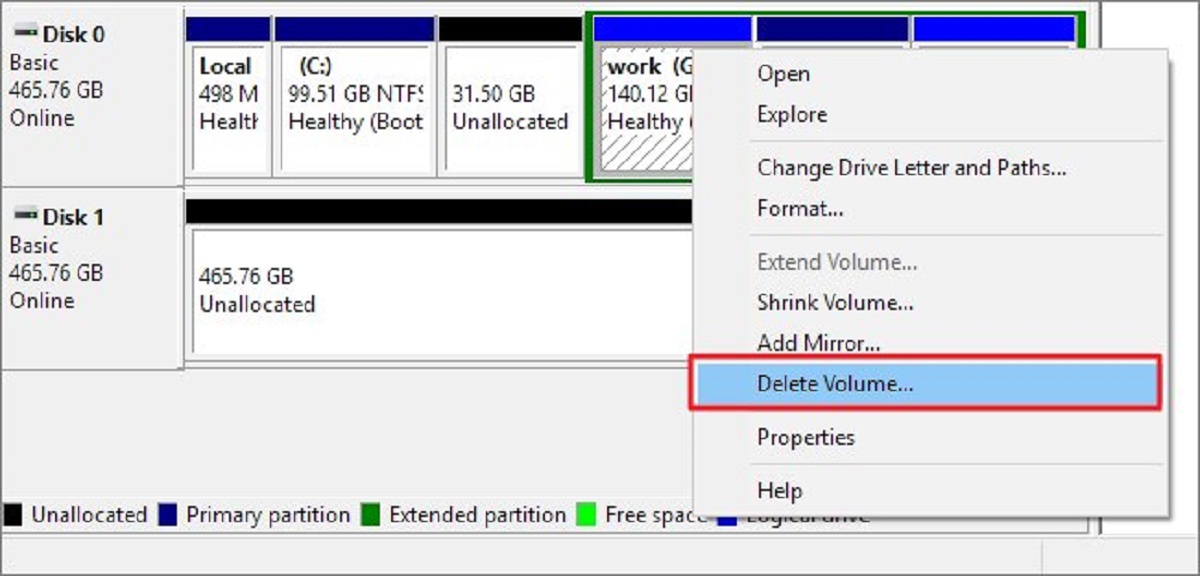
- In the Disk Management window, locate the volume you want to delete. Right-click on it and select “Delete Volume” from the context menu.
- Confirm the deletion by clicking “Yes” in the pop-up window. Note that this action will permanently delete all data on the volume.
- Once the process is complete, the volume will be removed, and the space will be shown as unallocated.
Option 2: Using Command Prompt
If you prefer using the command line interface, you can delete the second volume using Command Prompt. Follow these steps:
- Open Command Prompt by typing “cmd” into the search bar or pressing Windows key + R to open the Run dialog, then typing “cmd” and pressing Enter.
- In the Command Prompt window, type “diskpart” and press Enter to open the DiskPart tool.
- Type “list volume” and press Enter to display a list of volumes on your system. Identify the volume number of the second volume you want to delete.
- Type “select volume X” (replace X with the volume number) and press Enter.
- Finally, type “delete volume” and press Enter to remove the selected volume. Confirm the deletion if prompted.
Option 3: Using Third-Party Software
If you prefer a more user-friendly approach or if the Disk Management tool does not meet your needs, you can use third-party partition management software. These tools often provide more advanced features for managing your hard disk drive. Some popular options include EaseUS Partition Master, MiniTool Partition Wizard, and AOMEI Partition Assistant.
Ensure you carefully follow the software’s instructions for deleting a volume to avoid any unintended consequences. Note that third-party software may have different interfaces and features, so refer to the specific documentation or user guide provided.
Now that you are aware of different methods to delete the second volume, choose the option that best suits your preferences and requirements. Make sure to proceed with caution and have backups of any important data before deleting any volume on your hard disk drive.
Option 1: Using Disk Management
Disk Management is a built-in tool in Windows that allows you to manage your disk drives and volumes. It provides a simple and straightforward method to delete the second volume on your hard disk drive. Here’s how you can do it:
- To open Disk Management, right-click on the Start button and select “Disk Management” from the context menu. Alternatively, you can press the Windows key + X and choose “Disk Management” from the list.
- In the Disk Management window, you will see a list of your disk drives and their corresponding volumes. Carefully identify the second volume that you want to delete.
- Right-click on the second volume and select “Delete Volume” from the context menu.
- A pop-up window will appear, asking you to confirm the deletion. It’s important to note that deleting a volume will permanently erase all the data stored within it. Ensure that you have a backup of any important files before proceeding.
- Click “Yes” to confirm the deletion.
- Once the deletion process is complete, the second volume will be removed, and the space it occupied will be shown as unallocated.
It’s crucial to exercise caution when using Disk Management to delete a volume. Double-check that you have selected the correct volume, as deleting the wrong one can result in permanent data loss. Take the time to assess the contents of the volume and perform a backup if necessary.
Additionally, keep in mind that Disk Management has some limitations. For example, it may not allow you to delete volumes that contain system files or are currently in use. In such cases, you may need to use alternative methods like Command Prompt or third-party software.
By utilizing Disk Management, you can easily delete the second volume on your hard disk drive and regain valuable storage space. Remember to exercise caution, backup important data, and double-check your actions to avoid any unintended consequences.
Option 2: Using Command Prompt
If you prefer using the command line interface, you can delete the second volume on your hard disk drive using Command Prompt. Here’s how you can do it:
- To open Command Prompt, type “cmd” into the search bar or press the Windows key + R to open the Run dialog. Type “cmd” and press Enter.
- Once Command Prompt opens, type “diskpart” and press Enter. This will launch the DiskPart utility.
- In the DiskPart window, type “list volume” and press Enter. This command will display a list of all the volumes on your system.
- Look for the volume number that corresponds to the second volume you want to delete. Take note of this volume number.
- Type “select volume X” (replace X with the volume number) and press Enter to select the second volume.
- Finally, type “delete volume” and press Enter. This will initiate the deletion process for the selected volume.
- If prompted to confirm the deletion, type “y” and press Enter to proceed.
It’s important to exercise caution when using Command Prompt to delete a volume. Ensure that you have selected the correct volume by double-checking the volume number. Deleting the wrong volume can result in irreversible data loss.
Command Prompt provides a more advanced and precise way to delete volumes, but it also requires familiarity with command-line operations. Be sure to follow the steps carefully and double-check your actions.
If you encounter any issues or receive error messages during the process, it’s advisable to seek assistance or consult Microsoft’s official documentation for DiskPart commands.
Using Command Prompt to delete the second volume on your hard disk drive offers a command-line alternative to traditional graphical interfaces, giving you more control over the process. Take the necessary precautions, backup essential data, and proceed with confidence.
Option 3: Using Third-Party Software
If you prefer a more user-friendly approach or if the built-in tools like Disk Management or Command Prompt do not meet your specific requirements, you can consider using third-party partition management software to delete the second volume on your hard disk drive.
There are several reputable third-party software options available that provide advanced features and intuitive interfaces for managing your disk drives and volumes. Some popular choices include EaseUS Partition Master, MiniTool Partition Wizard, and AOMEI Partition Assistant.
Here’s a general guide on how to use third-party software to delete the second volume:
- Download and install the preferred third-party partition management software on your computer.
- Launch the software and locate the option to manage or manipulate volumes and partitions. This may vary depending on the specific software you choose.
- Select the hard disk drive containing the second volume you want to delete.
- Locate the second volume within the software’s interface, typically represented as a graphical representation of the disk and its partitions.
- Choose the option to delete the selected volume. The software will usually provide a clear and intuitive interface for this function.
- Confirm the deletion when prompted, ensuring that you have selected the correct volume and are ready to permanently remove its contents.
- Wait for the software to complete the deletion process. Once finished, the second volume will be removed, and the space will be marked as unallocated.
It’s important to note that different third-party software may have varying interfaces, features, and terminology. Refer to the specific documentation or user guide provided by the software developer for more detailed instructions on deleting volumes.
Always exercise caution when using third-party software and make sure to back up any important data before deleting any volume on your hard disk drive.
Using third-party software allows for more advanced functionalities and user-friendly interfaces, making the process of deleting the second volume on your hard disk drive more streamlined and convenient. Select the software that best fits your needs and preferences, and follow the instructions carefully to ensure a successful deletion.
What to Do if You’re Unsure about Deleting the Volume
If you find yourself unsure about deleting the volume on your hard disk drive, it’s important to proceed with caution to avoid any potential data loss or unintended consequences. Here are a few steps you can take if you’re uncertain about deleting the volume:
1. Back up Your Data: Before making any changes to your disk drives, it’s essential to create a backup of any important files or data stored on the volume you’re considering deleting. This ensures that even if something goes wrong during the deletion process, you’ll still have a copy of your critical information.
2. Seek Professional Assistance: If you lack experience or are unsure about the implications of deleting the volume, it’s best to consult a knowledgeable individual or professional for guidance. They can analyze your specific situation, assess the importance of the volume, and provide you with appropriate advice on whether or not to proceed with deletion.
3. Research and Consult Resources: Take the time to research and consult reputable resources, such as official documentation, forums, or support communities, to gain insights into the potential consequences of deleting the volume. Understanding the potential risks and scenarios can help you make an informed decision.
4. Create a Test Environment: If possible, consider creating a test environment to simulate the deletion process. This can be done by using virtualization software or working on a separate drive. By doing so, you can assess the impact of deleting the volume without putting your actual data at risk. However, exercise caution, as the test environment may not perfectly mirror your actual system configuration.
5. Seek a Second Opinion: If you’re still uncertain after conducting your own research, consider seeking a second opinion from another expert or professional. Obtaining different perspectives can provide you with a more comprehensive understanding of the situation and help you make a well-informed decision.
Remember, deleting a volume will permanently erase the associated data stored within it. It’s crucial to assess the importance of the volume, the potential risks involved, and the availability of backups before deciding to delete it. When in doubt, it’s always safer to err on the side of caution and seek expert advice.
By taking these steps and being diligent in your decision-making process, you can ensure that you make the right choice regarding the deletion of the volume on your hard disk drive.
Conclusion
Deleting the second volume on your hard disk drive can help you optimize storage space, streamline your system, and improve overall performance. However, it’s essential to approach the process with caution and make informed decisions.
We discussed several options for deleting the second volume. Using the built-in Disk Management tool provides a user-friendly interface, while Command Prompt offers a command-line alternative for those comfortable with command-line operations. Third-party partition management software offers advanced features and intuitive interfaces for more control and flexibility.
Before proceeding, it’s crucial to properly identify the volume you want to delete and ensure that it doesn’t contain any important files or data. Backing up essential data is highly recommended to avoid accidental loss.
If you’re uncertain about deleting the volume, take the time to research, seek professional assistance, create a test environment, and obtain a second opinion. These steps will help you make an informed decision based on your specific needs and circumstances.
Remember, always exercise caution, as deleting the wrong volume can result in permanent data loss. Double-check your actions and proceed with confidence.
By following the guidelines outlined in this article, you can safely and effectively delete the second volume on your hard disk drive, optimizing your storage and enhancing your system’s performance.