Introduction
Welcome to this tutorial on how to use pagination in PHP with Ajax. Pagination is a crucial technique when it comes to displaying large amounts of data in a structured and user-friendly manner. Whether you have a blog with hundreds of posts, an e-commerce website with numerous product listings, or any other online platform that deals with a substantial amount of content, implementing pagination can greatly enhance the user experience.
But what exactly is pagination? In simple terms, pagination is the division of content into separate pages or sections, making it easier for users to navigate through the information. Instead of overwhelming the user with all the data at once, pagination allows you to display a limited number of records per page, with navigation links to move between the different pages of content.
So, why should you use pagination in PHP? The answer is straightforward: efficiency and user-friendliness. By breaking up your content into multiple pages, you can significantly improve the loading time of your pages. This is especially important when handling large datasets, as it prevents slow loading times and optimizes the user experience.
Moreover, pagination allows users to navigate through your content more easily. Instead of having to scroll endlessly, users can simply click on the pagination links to jump to the desired section of content. This improves usability, making it more convenient for visitors to find the information they are looking for.
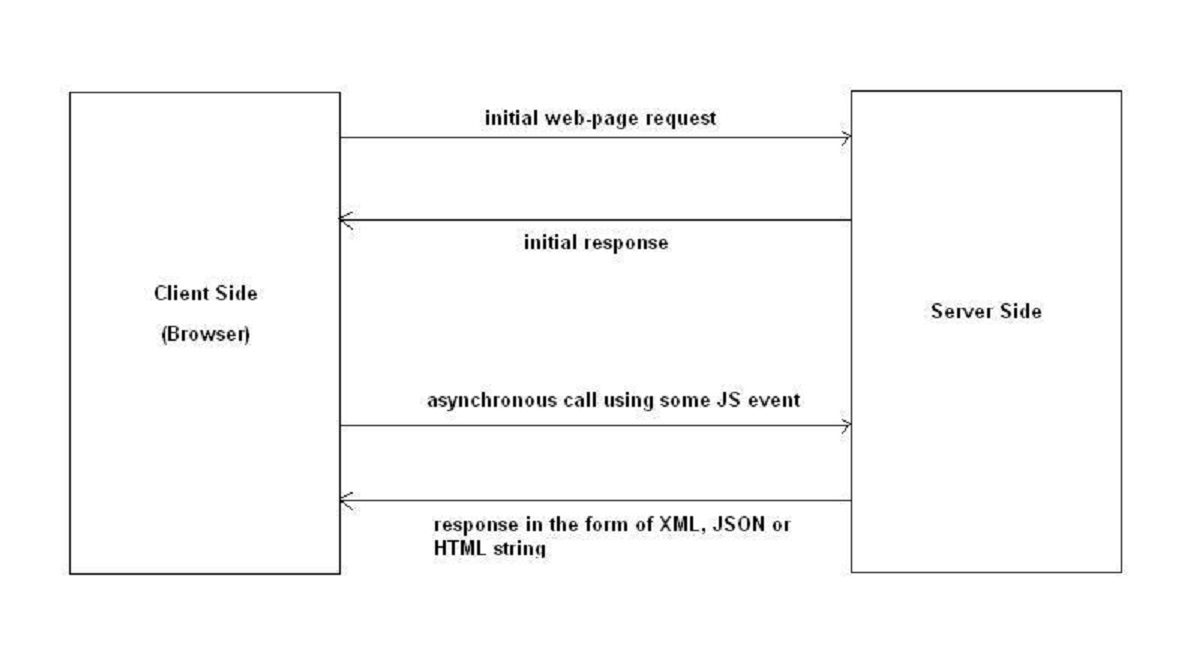
In this tutorial, we will guide you through the process of implementing pagination in PHP using Ajax. Ajax (Asynchronous JavaScript and XML) allows you to update parts of a webpage without having to refresh the entire page, enhancing the user experience with smooth and seamless content loading.
So, let’s dive into the steps of setting up pagination in PHP with Ajax, starting with the basics of how pagination works and the necessary database setup. By the end of this tutorial, you will have a solid understanding of how to implement pagination on your website and improve its performance and usability.
What is Pagination?
Pagination is a technique used to break up large sets of data into smaller, more manageable sections or pages. It is commonly employed in websites and applications that deal with a large volume of content, such as blogs, e-commerce platforms, forums, and search results pages.
When a web page contains a substantial amount of data, presenting it all at once can result in slow loading times and a cluttered user interface. Pagination solves this problem by dividing the content into separate pages, with a limited number of records displayed per page. This not only makes the page load faster but also improves the overall user experience by making the content more easily navigable.
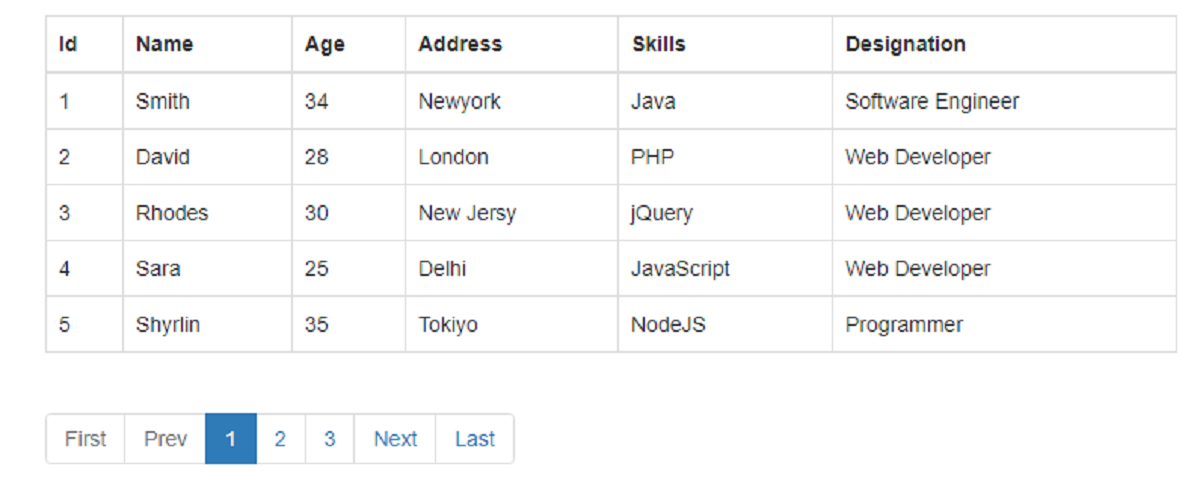
At its core, pagination involves organizing data into smaller chunks and providing navigation links to move between these chunks. Typically, a pagination system includes links such as “Previous,” “Next,” and numerical page links, allowing users to navigate through the different sections of content.
Implementing pagination involves several important components:
- Data Division: The data is divided into smaller segments based on a predetermined number of records per page. For example, if you have 100 blog posts and set the pagination limit to 10, each page will display 10 blog posts.
- Pagination Links: Navigation links are generated and displayed at the bottom of the page, allowing users to move between different sections of content. These links provide a convenient way to access specific pages.
- Dynamic Content Display: As users click on the pagination links, the content is dynamically updated to display the appropriate records for the selected page. This is typically done using JavaScript and Ajax to ensure a seamless and responsive user experience.
By implementing pagination, you can significantly enhance the user experience on your website or application. Users can quickly navigate through your content, easily find what they are looking for, and avoid endlessly scrolling through long lists or pages. Additionally, pagination improves the loading speed of your pages, making them more efficient and reducing the chances of visitors abandoning your site due to slow performance.
In the next section, we will explore why pagination is essential in PHP and discuss its benefits in more detail.
Why Use Pagination in PHP?
Pagination is a vital technique in PHP to handle and display large amounts of data effectively. It offers several key benefits that improve the performance, usability, and overall user experience of your website or application.
Here are some compelling reasons why you should use pagination in PHP:
- Optimized Performance: When dealing with a significant amount of data, retrieving and displaying everything on a single page can slow down the loading time and put a strain on server resources. With pagination, you can efficiently break up the data into smaller portions, reducing the load on the server and improving the loading time of your pages. This helps to provide a smooth and responsive browsing experience for your users.
- Enhanced Usability: Pagination makes it easier for users to navigate through your content. By dividing the data into pages, users can quickly jump to the desired section without scrolling indefinitely. Moreover, the inclusion of navigation links like “Previous,” “Next,” and page numbers allows users to navigate directly to specific pages, giving them more control over the content they want to access.
- Improved User Experience: With pagination, you can present your data in a more organized and digestible format. Instead of overwhelming users with long lists or pages that seem endless, you can display a manageable number of records per page, making it easier for users to find what they are looking for. This streamlined presentation enhances the user experience and increases engagement on your website.
- Scalability: Pagination is especially crucial when dealing with large-sized datasets that continuously grow over time. By implementing pagination, you ensure that your website can handle an expanding volume of content without sacrificing performance. Users can navigate your content seamlessly, regardless of the size of the dataset.
- Search Engine Optimization (SEO): Paginating your content helps search engines better crawl and index your pages. By displaying a limited number of records and providing appropriate navigation links, search engines can easily discover and index your content, improving its visibility in search results. This can lead to increased organic traffic and better search engine rankings for your website.
By incorporating pagination into your PHP-based website or application, you can optimize performance, enhance usability, improve the user experience, ensure scalability, and boost your SEO efforts. It is an essential feature to consider, especially when dealing with large datasets or content-rich platforms.
In the next section, we will delve into how pagination works and the steps involved in setting it up in PHP.
How Pagination Works
Pagination is a process of dividing a large dataset into smaller, more manageable sections or pages. It involves organizing the data and providing navigation links to allow users to move between these pages. Here’s an overview of how pagination works:
- Data Division: The first step in implementing pagination is dividing your data into smaller chunks or pages. This is typically done by specifying the number of records to be displayed per page. For example, if you have 100 blog posts and set the pagination limit to 10, you will have 10 pages, with each page displaying 10 blog posts.
- Pagination Links: Once your data is divided into pages, the next step is to generate navigation links to allow users to navigate through the pages. These links are usually placed at the bottom of the page and can include options such as “Previous,” “Next,” and numerical page links. These links provide convenient ways for users to access specific pages and move back and forth between the different sections of content.
- Dynamic Content Display: As users interact with the pagination links, the content on the page needs to be dynamically updated to reflect the selected page. This can be achieved using JavaScript and Ajax techniques. When a pagination link is clicked, an Ajax request is sent to the server to retrieve the appropriate set of data for the selected page. The server responds with the requested data, and the JavaScript code updates the page content, replacing the current content with the new set of records.
It’s important to note that pagination is not limited to simply displaying a list of records. Depending on your specific requirements, you may also include additional features, such as sorting options or search functionality, within each pagination section. These additional features can provide further control and customization for users, allowing them to refine their search or view the data in a preferred order.
Implementing pagination in PHP involves utilizing database queries to retrieve the appropriate data for each page. By incorporating SQL statements and limit-offset parameters, you can fetch the necessary records to populate each page. Additionally, you’ll need to handle the generation of pagination links and manage the dynamic content update using JavaScript and Ajax.
In the next sections, we will guide you through the essential steps of setting up pagination in PHP with Ajax. We’ll cover the database setup, displaying pagination links, implementing Ajax, and updating the page content dynamically. By the end of this tutorial, you’ll have a complete understanding of how to implement pagination in your PHP projects.
Setting up the Database
Before implementing pagination in PHP, it is essential to set up the database to store and retrieve the data you want to paginate. The database structure and query optimization will play a crucial role in efficiently retrieving the necessary data for each page. Here’s a step-by-step guide to setting up the database for pagination:
- Create a Table: Determine the structure of your data and create a table in your database to store it. For example, if you are creating a blog platform, you might have a “posts” table with columns like “id,” “title,” “content,” and “date_published.” Ensure that the table is properly indexed to improve query performance.
- Populate the Table: Insert the relevant data into the table. This can be done manually or through an automated process, depending on the size and complexity of your dataset.
- Optimize Query Performance: To ensure efficient pagination, optimize your database queries. Use appropriate indexes on columns that are frequently used in your pagination queries, such as the “id” or “date_published.” This will help speed up the retrieval of data and improve overall query performance.
When implementing pagination, you will need to use SQL queries to fetch the data for each page. The queries should include the necessary limit and offset parameters to select the correct range of records. For example, if you want to display 10 records per page and the user is on page 3, you would need to use a query like:
SELECT * FROM posts ORDER BY date_published DESC LIMIT 10 OFFSET 20;In this example, the LIMIT clause specifies that only 10 records should be returned, while the OFFSET clause skips the first 20 records (representing the first two pages) to retrieve the records for page 3.
It is also essential to handle edge cases, such as what happens when a user tries to access a page that does not exist (e.g., page 100 in a database with only 50 records). You can handle this by checking the total number of records and dynamically adjusting the pagination links or redirecting the user to an error page.
By setting up your database properly and optimizing your queries, you can ensure efficient data retrieval and smooth pagination functionality. In the next section, we will explore how to display the pagination links on your PHP web page.
Displaying the Pagination Links
Once you have set up the database and retrieved the necessary data for pagination, the next step is to display the pagination links on your PHP web page. These links provide navigation options for users to move between different sections of the paginated content. Here’s how you can display the pagination links:
- Calculate the Total Number of Pages: To determine the total number of pages in your paginated dataset, divide the total number of records by the number of records you want to display per page. Use the
ceilfunction to round up the result, ensuring that any remainder records are displayed as an additional page. For example, if you have 100 records and want to display 10 records per page, you will have a total of 10 pages. - Generate the Pagination Links: Using HTML and PHP, generate the pagination links based on the total number of pages. These links typically include navigation options such as “Previous,” “Next,” and numerical page links. The current page should be visually highlighted to provide feedback to the user. You can use a loop to generate the numerical page links dynamically. For example, if you have 10 pages, you might generate links like
<a href="?page=1">1</a>,<a href="?page=2">2</a>, and so on. - Handle Pagination Link Clicks: When a user clicks on a pagination link, your PHP code needs to extract the page number from the URL query string and adjust the database query accordingly. This can be done using the
$_GETsuperglobal variable to retrieve the page parameter. You then modify your query to retrieve the specific range of records for the selected page using theLIMITandOFFSETclauses.
When generating pagination links, it is critical to consider the current page’s URL structure and how it integrates with the pagination logic. You can use URL rewriting techniques or query string parameters to provide clean and user-friendly URLs. For example, instead of example.com?page=2, you might have example.com/page/2 or example.com/posts/page/2 to indicate the second page of the posts section.
Additionally, styling the pagination links to make them visually appealing and easy to navigate enhances the user experience. Use CSS to format the links, highlight the current page, and provide a clear indication of the available navigation options.
By displaying pagination links, users can easily navigate through the different pages of your paginated content. They can jump to specific pages, move to the previous or next page, or go back to the first or last page as needed. In the next section, we will explore how to implement Ajax to update the page content dynamically without refreshing the entire page.
Implementing Ajax
Ajax (Asynchronous JavaScript and XML) is a powerful technology that allows web pages to update specific sections of content without requiring a full page refresh. By implementing Ajax with pagination, you can enhance the user experience by dynamically loading and updating the page content as users navigate through the different pages. Here’s how you can implement Ajax in your pagination:
- Set up an Event Listener: Attach an event listener to the pagination links, such as a click event, to handle user interactions. This event will trigger the Ajax functionality and prevent the default behavior of the links.
- Create an Ajax Request: When a pagination link is clicked, create an Ajax request object using JavaScript. This request will be sent to the server to fetch the data for the selected page without refreshing the entire page. You can use the
XMLHttpRequestobject or a library like jQuery to simplify the Ajax implementation. - Send the Ajax Request: Configure the Ajax request with the necessary parameters, including the URL to the server-side script that retrieves the data, the request method (typically
GET), and any additional data to be sent with the request, such as the selected page number. Once configured, send the request to the server. - Handle the Ajax Response: Define a callback function that will be executed when the server responds to the Ajax request. In this function, update the appropriate section of the page with the new content received from the server. This can be done by manipulating the HTML or using JavaScript templating libraries like Mustache or Handlebars.
By implementing Ajax, the page content updates dynamically without requiring a full page reload. The user experience is significantly improved, as the content is seamlessly replaced with the data for the selected page, providing a smooth and responsive browsing experience.
When implementing Ajax with pagination, it is important to handle potential errors or issues gracefully. You can display loading spinners or progress indicators during the Ajax request to provide feedback to the user. Additionally, consider implementing error handling mechanisms to handle cases where the server response is not as expected or encounters a problem while retrieving the data.
Ajax provides a robust and efficient way to update your page content without disruption. It can greatly enhance the user experience and make your paginated content feel more dynamic and interactive.
In the next section, we will delve into the details of creating the Ajax call and updating the page content dynamically with the retrieved data.
Creating the Ajax Call
In order to implement Ajax pagination, you need to create an Ajax call that will retrieve the data for the selected page from the server. This call will be responsible for sending the request, handling the response, and updating the page content dynamically. Here is how you can create the Ajax call for pagination:
- Attach Click Event: Attach a click event listener to the pagination links using JavaScript or a JavaScript library like jQuery. This event listener will be triggered when a pagination link is clicked.
- Prevent Default Behavior: In the click event handler, prevent the default behavior of the link, which would normally cause a page refresh or navigate to a different URL. You can use the
preventDefault()function to achieve this. - Create Ajax Request: Inside the event handler, create an instance of the
XMLHttpRequestobject or use a library like jQuery to create the Ajax request. Set the URL of the server-side script that will handle the request and retrieve the appropriate data for the selected page. - Set Request Parameters: Configure the Ajax request method to be
GET, as you are retrieving data from the server. Include any necessary data in the request, such as the selected page number, to send to the server for processing. - Send the Request: Send the Ajax request to the server using the
send()method. The request will be asynchronously sent to the server, allowing the page to continue functioning without being blocked. - Handle the Response: Define a callback function to handle the server response when it is received. In this function, retrieve the response data and update the appropriate section of the page with the new content using JavaScript or a templating library.
It is important to consider error handling in your Ajax call implementation. Handle cases where the server response encounters an error or does not return the expected data. You can include error handling logic within the callback function to handle different scenarios and provide a user-friendly error message if necessary.
By creating an Ajax call for pagination, you can retrieve the data for the selected page without refreshing the entire page. This enables a smooth and dynamic user experience as the content is updated seamlessly. In the next section, we will discuss how to update the page content with the retrieved data.
Updating the Page Content with Ajax
Once the Ajax call is made and the server responds with the data for the selected page, the next step is to update the page content dynamically. This process involves extracting the relevant data from the response and replacing the existing content on the page. Here’s how you can update the page content with Ajax:
- Define a Callback Function: Within the Ajax call, define a callback function that will handle the server response. This function will be executed once the response is received from the server.
- Parse the Response Data: Inside the callback function, extract the relevant data from the server response. This could be in various formats such as JSON, XML, or plain text, depending on how the server is configured to send the data.
- Update the Page Content: Once the data is extracted, update the appropriate section of the page with the new content. This could involve replacing the existing HTML markup with the new data or using JavaScript templating libraries like Mustache or Handlebars to dynamically generate the content based on the retrieved data.
- Handle Error Cases: Implement error handling logic within the callback function to handle any potential errors in the server response. Display appropriate error messages or fallback content if the response does not match the expected format or encounters an error during retrieval.
When updating the page content, consider the different elements that might need to be updated, such as the list of records, pagination links, or any additional information related to the current page. By targeting specific sections of the page and updating only those areas, you can ensure a smooth and seamless user experience without disrupting other parts of the page.
In order to provide a better user experience, you may also consider incorporating loading spinners or progress indicators during the Ajax request. These visual cues help indicate to the user that the page content is being updated and that the system is actively processing their request.
Updating the page content dynamically with Ajax allows for a seamless browsing experience. Users can navigate through the paginated content without page reloads, resulting in fast and responsive content loading. In the next section, we will summarize the key points covered in this tutorial.
Conclusion
In this tutorial, we have explored the process of implementing pagination in PHP with Ajax. Pagination is a crucial technique for handling large amounts of data and improving the user experience on websites or applications. By dividing the data into manageable sections and providing navigation links, users can easily navigate through the content without overwhelming scrolling.
We discussed the importance of using pagination in PHP, including the benefits of improved performance, enhanced usability, and optimized user experience. By breaking up your content into pages, you can significantly improve loading times and allow users to find the information they need efficiently.
We looked at how pagination works, including data division, generating pagination links, and dynamically updating the content with Ajax. Setting up the database to store the data, optimizing the queries for pagination, and displaying the pagination links were all covered in detail. We also discussed the implementation of Ajax calls to retrieve and update the page content without refreshing the entire page.
By following the steps outlined in this tutorial, you can implement pagination effectively in your PHP projects. Remember to optimize your database queries, generate pagination links dynamically, and handle Ajax requests to provide a seamless browsing experience for your users.
Implementing pagination with Ajax enhances the user experience by enabling dynamic content updates without page reloads. Users can navigate through the paginated content smoothly, improving overall engagement and satisfaction on your website.
Now that you are equipped with the knowledge of pagination in PHP with Ajax, you can apply this technique to various projects such as blogs, e-commerce platforms, or any other application that deals with a large amount of data. Remember to continually evaluate and improve your pagination implementation as your data and user needs evolve.