Introduction
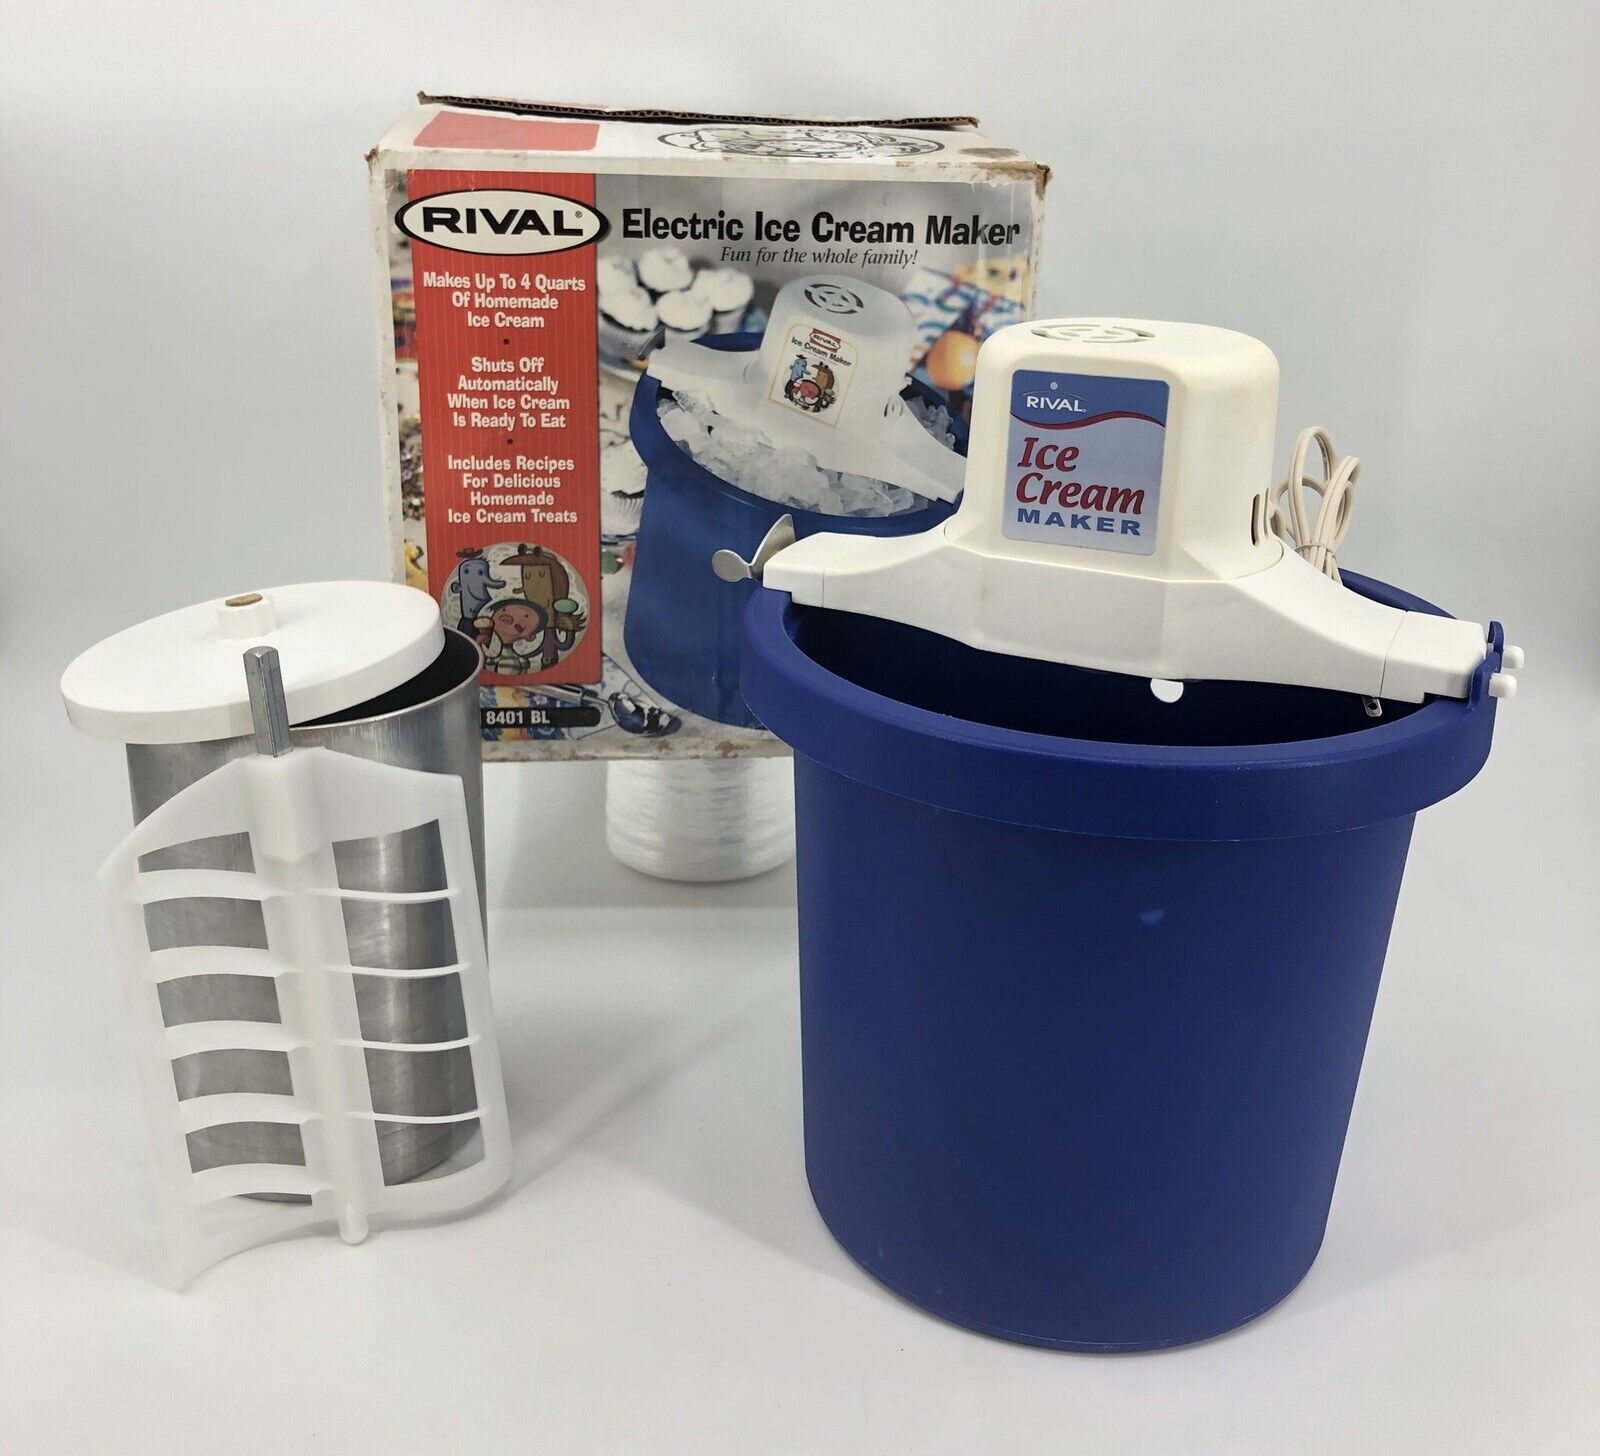
Welcome to the world of homemade ice cream with the Rival 4 Quart Ice Cream Maker! If you’ve been craving delicious, creamy ice cream with your own personal touch, this is the perfect appliance for you. With its simple and user-friendly design, you can create a variety of flavors and experiment with different mix-ins to create your own signature frozen treats.
In this guide, we will walk you through the process of using the Rival 4 Quart Ice Cream Maker, from preparation to clean-up. No prior ice cream making experience is required – with just a little time and effort, you’ll be enjoying velvety-smooth homemade ice cream that rivals your favorite ice cream parlor.
Whether you’re planning a family gathering, a summer barbecue, or just a sweet indulgence for yourself, the Rival 4 Quart Ice Cream Maker is here to make the experience fun and easy. Once you’ve mastered the basics, you can start getting creative and experimenting with different flavors, mix-ins, and textures to delight your taste buds.
So, join us as we embark on this ice cream making adventure with the Rival 4 Quart Ice Cream Maker. Get ready to indulge in the creamy goodness of homemade ice cream that is sure to impress your family and guests. Let’s dive in and discover the joy of creating icy cold delights right in your own kitchen!
Getting Started
Before you start making your delicious homemade ice cream, there are a few things you need to do to get set up and ensure a successful ice cream-making experience with the Rival 4 Quart Ice Cream Maker.
1. Read the instruction manual: Take some time to read through the instruction manual that comes with your Rival 4 Quart Ice Cream Maker. This will give you a good understanding of the machine’s features, operation, and any specific instructions or precautions you need to follow.
2. Gather your ingredients: Check the recipe you plan to use and gather all the necessary ingredients. This typically includes milk, cream, sugar, and any flavorings or mix-ins you desire. It’s best to use fresh and high-quality ingredients for the best results.
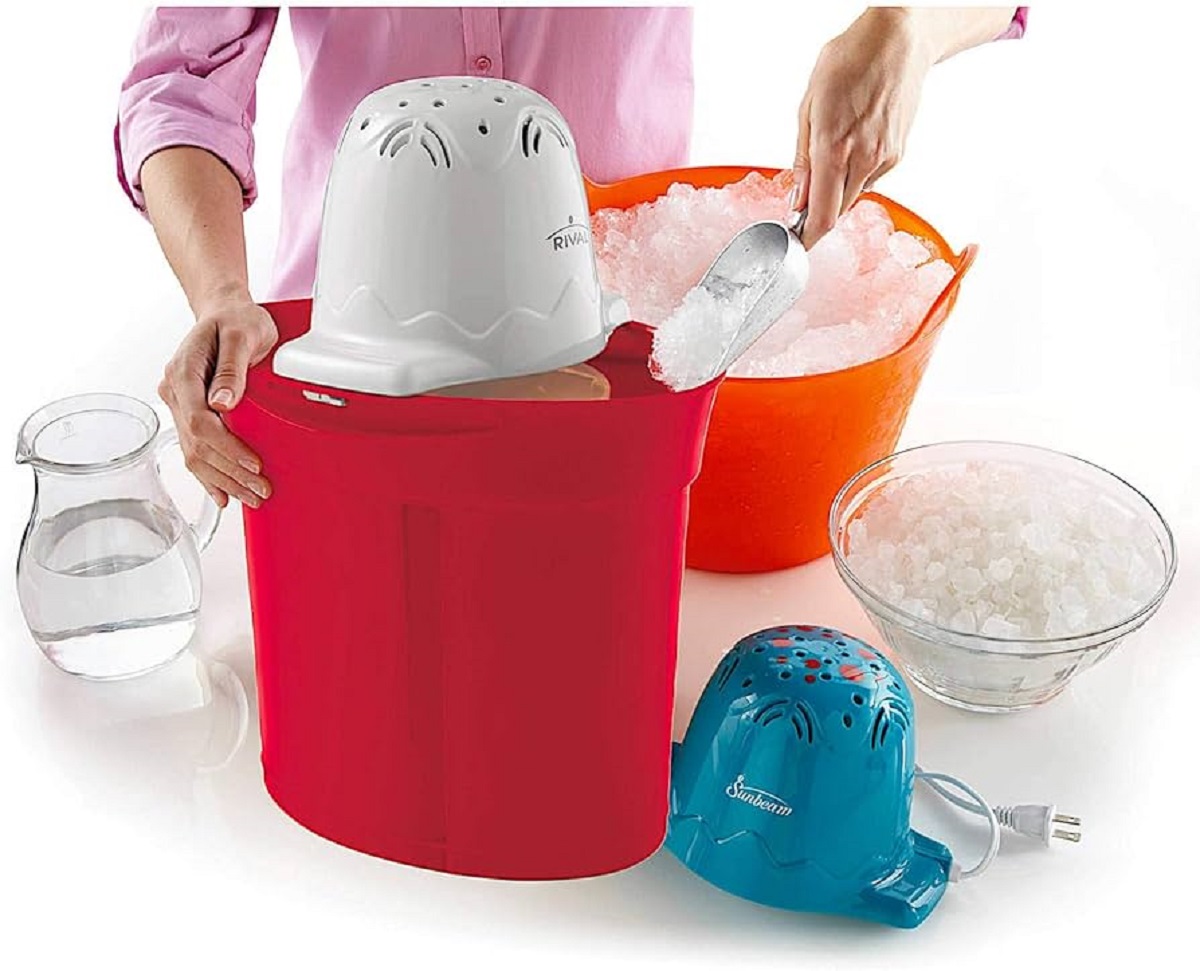
3. Freeze the canister: The Rival 4 Quart Ice Cream Maker utilizes a freezer canister to churn the ice cream. Make sure to freeze the canister according to the manufacturer’s instructions. It is recommended to freeze it overnight or for at least 12 hours prior to using it. This step is crucial as it ensures that the canister is frozen solid and ready to create creamy ice cream.
4. Prepare your workspace: Find a clean and spacious area in your kitchen where you can comfortably set up the ice cream maker. Make sure you have enough room for the machine, ingredients, and any additional items you may need, such as measuring cups and spoons.
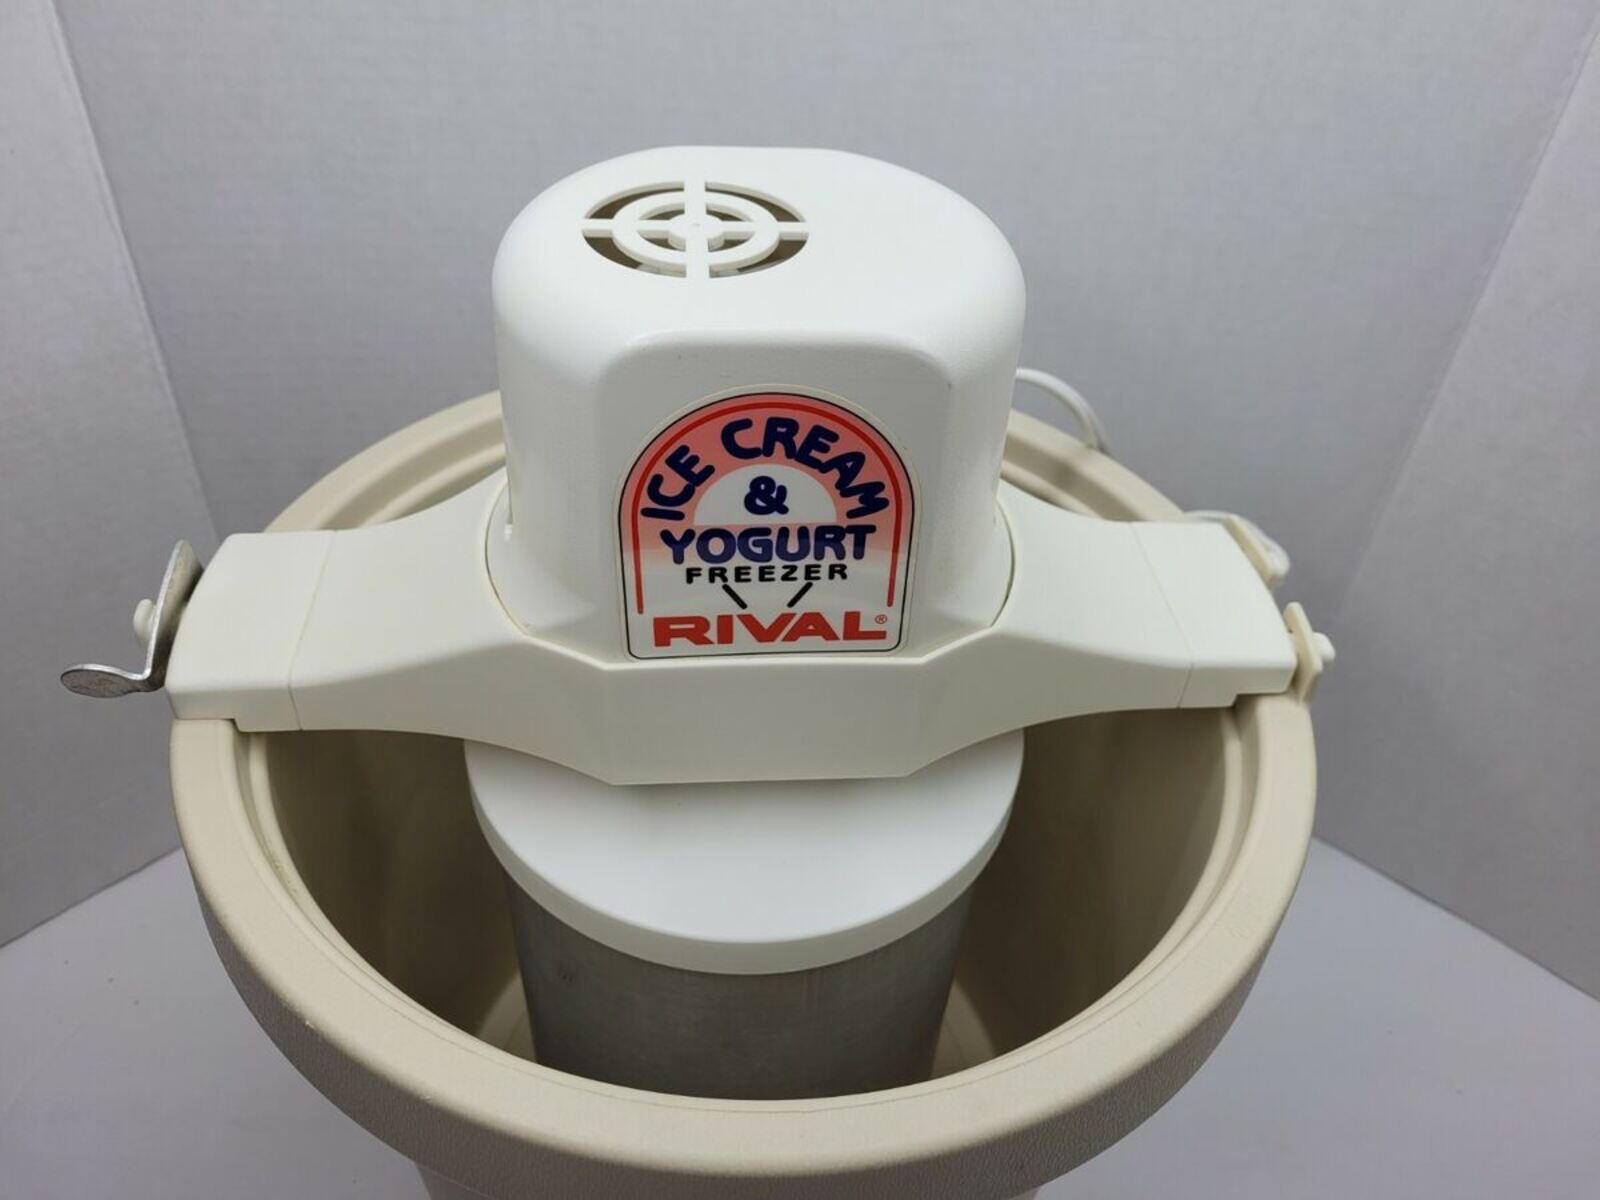
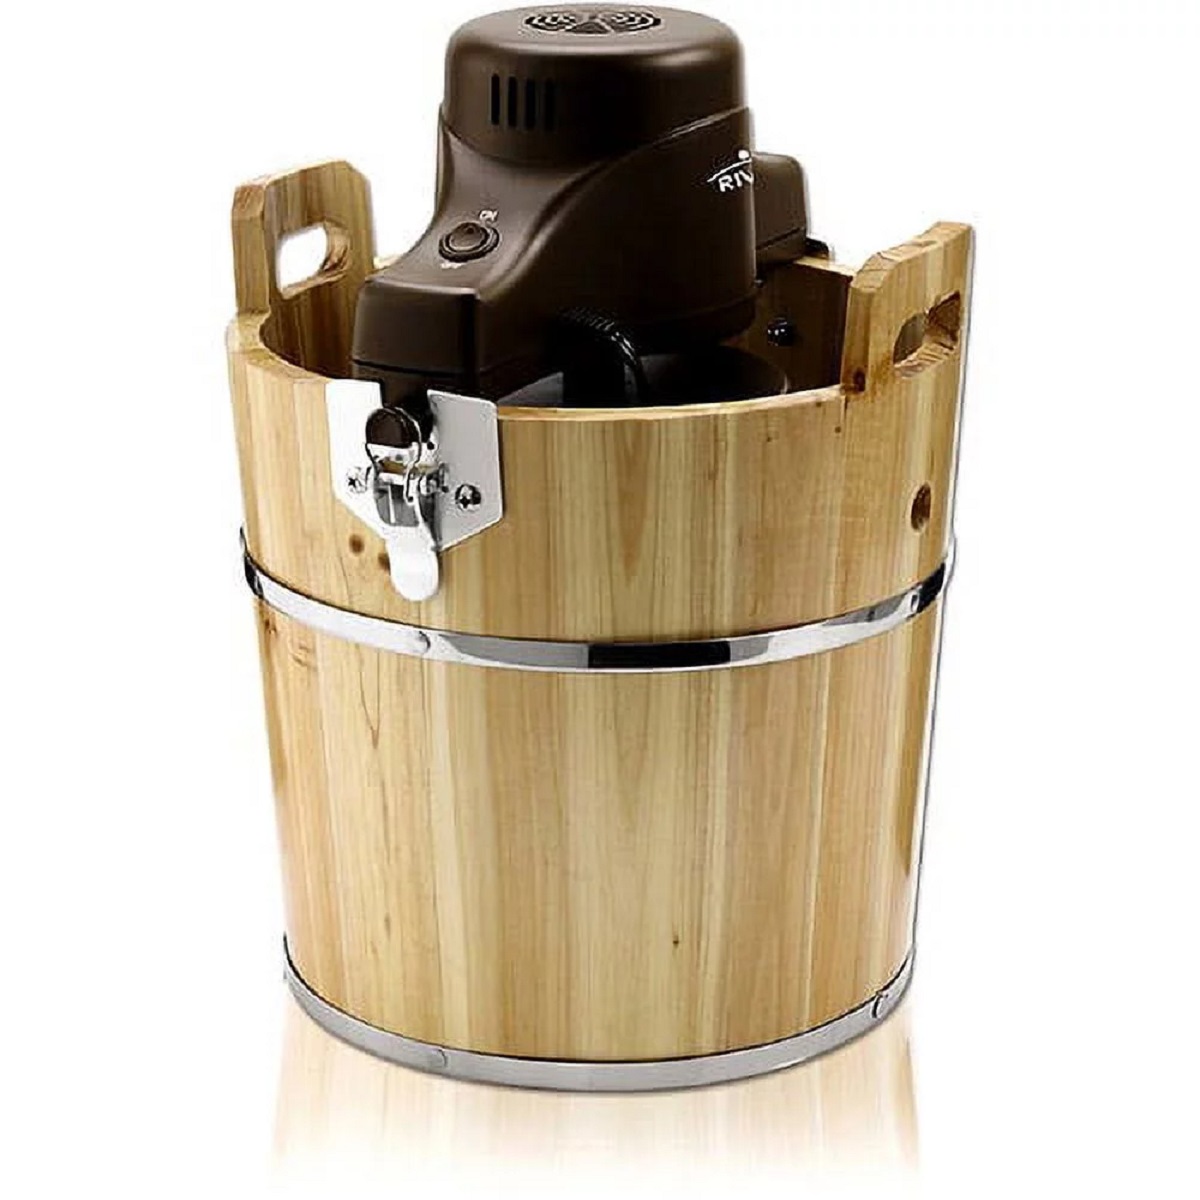
5. Assemble the ice cream maker: Once you have everything ready, assemble the ice cream maker according to the instructions provided. This usually involves attaching the motor base to the canister and securing it in place.
6. Familiarize yourself with the controls: Take a moment to understand the controls and settings of your Rival 4 Quart Ice Cream Maker. This will help you operate the machine efficiently and make any necessary adjustments during the freezing process.
By following these initial steps, you’ll be well-prepared to start making your own homemade ice cream with the Rival 4 Quart Ice Cream Maker. Now that you’re all set up, it’s time to move on to the next steps, which involve preparing the ice cream maker and selecting a recipe!
Preparing the Ice Cream Maker
Now that you’ve gathered all your ingredients and set up your workspace, it’s time to prepare the Rival 4 Quart Ice Cream Maker for the ice cream-making process. Following these steps will ensure optimal performance and delicious results.
1. Clean the machine: Before using the ice cream maker, make sure all the parts are clean and free of any residue from previous use. Follow the manufacturer’s instructions for cleaning and drying the machine thoroughly.
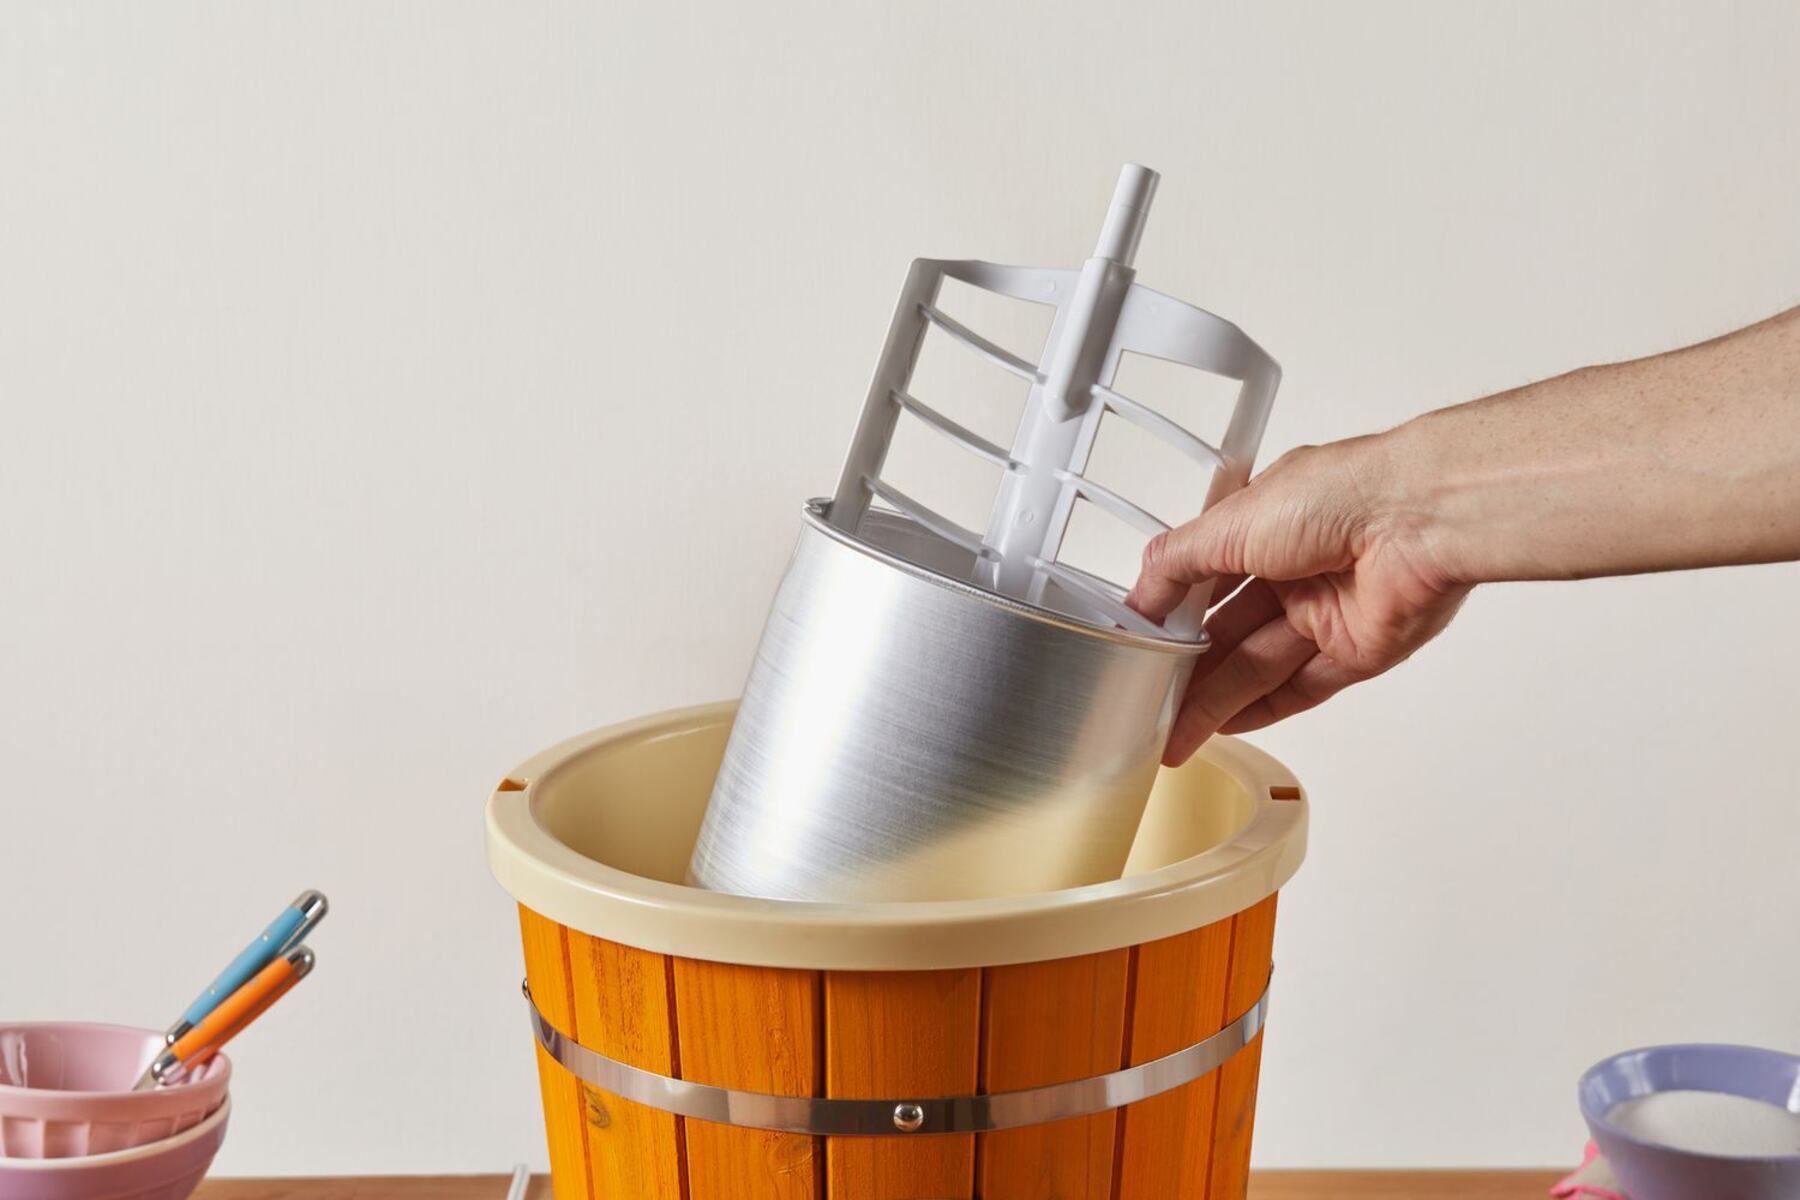
2. Insert the frozen canister: Take the frozen canister out of the freezer and insert it into the machine. Ensure that it is securely in place and the motor base is attached to the canister correctly.
3. Set up the dasher: The dasher is the paddle or blade that churns the ice cream mixture inside the canister. Attach the dasher onto the motor shaft inside the canister and make sure it is positioned properly.
4. Secure the lid: Place the lid firmly on top of the canister, ensuring that it is securely fastened. This will prevent any mixture from spilling out during the churning process.
5. Plug in the machine: Connect the ice cream maker to a power source and make sure it is properly plugged in. Check that the power switch is in the “off” position before moving on to the next step.
6. Pre-freeze the canister: Leave the machine with the canister in place, plugged in, and switched off for about 5-10 minutes. This step helps to further chill the canister and maintain a consistent temperature once the ice cream mixture is added.
By following these steps, you’ll have your Rival 4 Quart Ice Cream Maker prepared and ready to start churning delicious ice cream. With everything set up correctly, it’s time to move on to the next exciting step – choosing a recipe!
Choosing a Recipe
One of the most exciting aspects of making homemade ice cream is the endless variety of flavors and combinations you can create. When choosing a recipe for your Rival 4 Quart Ice Cream Maker, consider your preferences and the preferences of those you’ll be serving. Here are some tips to help you select the perfect recipe:
- Classic flavors: If you’re new to making ice cream or want to stick to something familiar, consider classic flavors like vanilla, chocolate, or strawberry. These timeless favorites are sure to please everyone.
- Seasonal inspiration: Take advantage of the bounty of each season and choose a recipe that showcases seasonal fruits or flavors. For example, lemon sorbet in the summer or pumpkin spice ice cream in the fall.
- Unique and creative: If you’re feeling adventurous, try out unique flavor combinations or ingredients to create a one-of-a-kind ice cream experience. Think outside the box with flavors like lavender honey, salted caramel, or even avocado lime.
- Dietary preferences: Consider any dietary restrictions or preferences when selecting a recipe. There are plenty of delicious options available for those following a vegan or dairy-free diet, such as coconut milk-based ice creams or fruit sorbets.
- Mix-ins and toppings: Don’t forget about mix-ins! Add crushed cookies, chocolate chips, nuts, or fresh fruit chunks to your ice cream for extra texture and flavor. And when it comes to toppings, the possibilities are endless – hot fudge, caramel sauce, whipped cream, sprinkles, or even a cherry on top!
Once you’ve chosen a recipe, gather all the necessary ingredients and have them ready. It’s important to follow the recipe instructions precisely to achieve the best results with your Rival 4 Quart Ice Cream Maker. With your recipe selected, it’s time to move on to the next step – gathering your ingredients and supplies.
Gathering Ingredients and Supplies
Now that you have chosen a recipe for your homemade ice cream, it’s time to gather all the necessary ingredients and supplies. Here’s a checklist to ensure you have everything you need before you start making your icy treat with the Rival 4 Quart Ice Cream Maker:
Ingredients:
- Base ingredients: Depending on your recipe, you will need a combination of milk, cream, and sugar as the base of your ice cream. Make sure to have the appropriate quantities of each ingredient.
- Flavorings: Choose the flavorings that are required for your recipe, such as vanilla extract, cocoa powder, or fruit puree. These will add the delicious taste and aroma to your ice cream.
- Mix-ins: If your recipe calls for any mix-ins, gather them as well. This could include crushed cookies, chocolate chunks, nuts, or fresh fruit. The mix-ins will add texture and extra flavor to your ice cream.
- Toppings: Consider any desired toppings, such as hot fudge sauce, caramel sauce, sprinkles, or whipped cream, to enhance the presentation and taste of your ice cream.
Make sure to check your recipe for specific ingredient quantities and any additional requirements.
Supplies:
- Measuring tools: Have measuring cups and spoons on hand to accurately measure your ingredients. This will ensure the correct proportions and help achieve the desired consistency in your ice cream.
- Mixing bowls: Use mixing bowls to combine the ingredients for your ice cream base and any additional mix-ins. Make sure the bowls are large enough to accommodate the quantity of ingredients.
- Whisk or spatula: These utensils will come in handy for mixing and incorporating the ingredients smoothly.
- Freezer-safe container: Prepare a container to transfer and store your freshly made ice cream. Make sure it is freezer-safe and has a tight-fitting lid to prevent ice crystals from forming.
- Ice and rock salt: If your Rival 4 Quart Ice Cream Maker requires the use of ice and rock salt, make sure you have these on hand. They will be used in the freezing process to create the proper temperature for churning the ice cream.
By gathering all the necessary ingredients and supplies beforehand, you’ll be well-prepared to begin the exciting ice cream-making process with your Rival 4 Quart Ice Cream Maker. The next step is mixing the ice cream base – let’s get started!
Mixing the Ice Cream Base
With all your ingredients and supplies gathered, it’s time to start mixing the ice cream base for your Rival 4 Quart Ice Cream Maker. This step is crucial as it lays the foundation for the flavor and texture of your homemade treat. Follow these steps to create a smooth and creamy ice cream base:
- Follow the recipe: Carefully read and follow the instructions provided in your chosen recipe. This ensures that you add the correct quantities of each ingredient and mix them in the proper order.
- Combine the milk and cream: In a mixing bowl, combine the milk and cream according to the recipe’s instructions. You can use a whisk or spatula to gently stir the ingredients together until well blended.
- Add the sugar and flavorings: Gradually add the sugar while continuously stirring the mixture. This helps the sugar dissolve and incorporate evenly. If your recipe calls for flavorings like vanilla extract or cocoa powder, add them at this stage as well.
- Whisk or mix until fully combined: Use a whisk or electric mixer on low speed to combine the ingredients thoroughly. This helps dissolve the sugar and ensures a smooth, homogeneous mixture. Be careful not to over-mix, as this can lead to excessive air incorporation and affect the texture of the final ice cream.
- Taste and adjust: Take a small spoonful of the ice cream base and give it a taste. Adjust the flavorings or sweetness, if necessary, to achieve your desired taste. Remember that the flavors will be more pronounced once the ice cream is frozen.
Once you’ve mixed the ice cream base according to the recipe’s instructions and achieved a smooth and well-blended mixture, you’re ready to move on to the next step – churning the ice cream with your Rival 4 Quart Ice Cream Maker. The churning process transforms the base into a delightful frozen treat by incorporating air and creating a creamy texture. Let’s continue!
Churning the Ice Cream
The moment has arrived to churn your ice cream with the Rival 4 Quart Ice Cream Maker! This step is where the magic happens as the machine freezes and churns the ice cream base, creating a smooth and creamy texture. Follow these steps to churn your ice cream to perfection:
- Ensure the canister is frozen: Check that the canister has been properly frozen according to the manufacturer’s instructions. It should be frozen solid to achieve the desired results.
- Attach the motor and dasher: Place the frozen canister back into the Rival 4 Quart Ice Cream Maker and attach the motor and dasher onto the canister. Ensure they are securely in place.
- Pour in the ice cream base: Carefully pour your mixed ice cream base into the frozen canister, filling it to the recommended level specified by the manufacturer. Avoid overfilling, as the mixture will expand as it freezes and churns.
- Attach the lid: Place the lid securely on top of the canister, making sure it is snugly fitted to prevent any leakage during the churning process.
- Turn on the machine: Plug in the ice cream maker, switch it on, and set it to the desired churning speed, if applicable. Some models have adjustable speeds, while others have a fixed churning speed.
- Let it churn: Allow the machine to churn the ice cream for the recommended time indicated in your recipe or the manufacturer’s instructions. This usually takes around 20 to 30 minutes, but the time may vary depending on the specific machine.
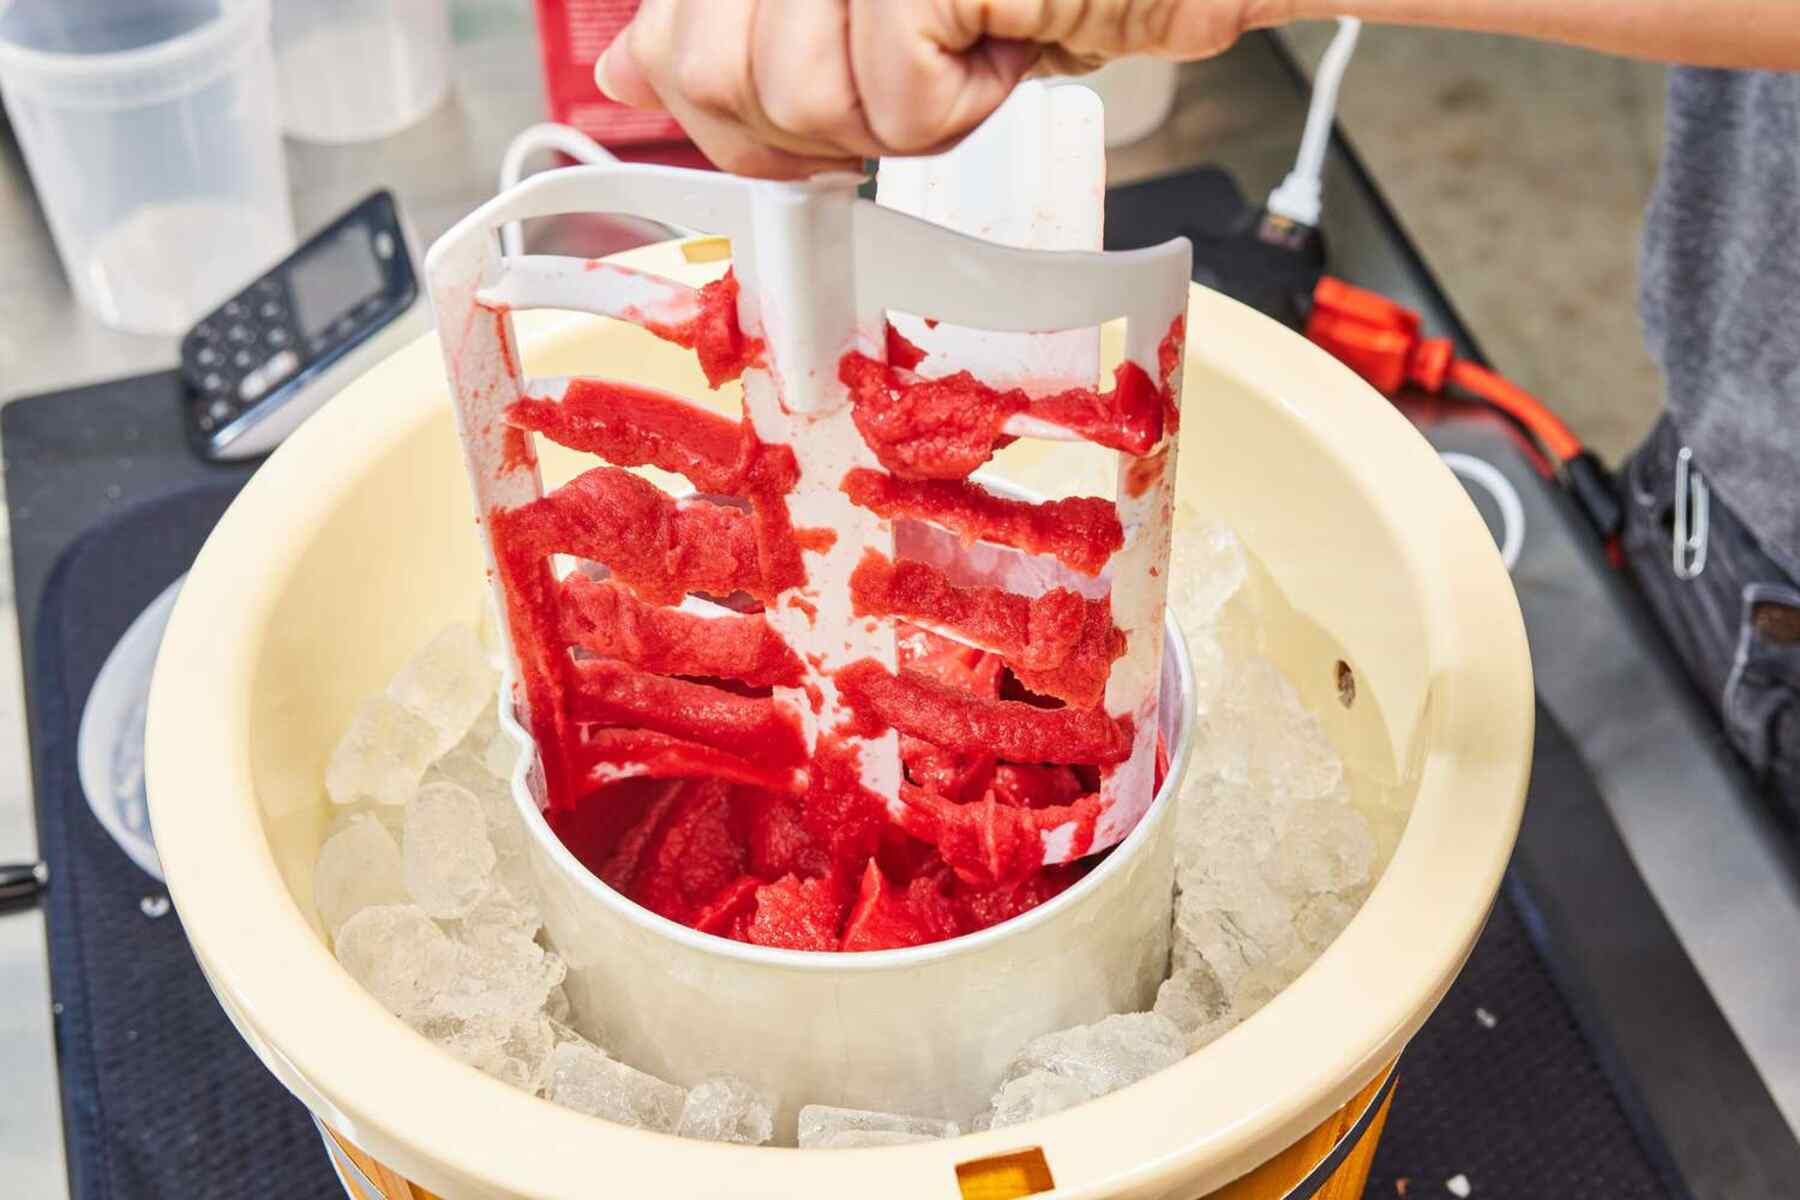
- Monitor the consistency: Keep an eye on the ice cream’s consistency throughout the churning process. It will initially have a soft-serve consistency, gradually thickening and firming up as it churns.
- Check for doneness: To determine if the ice cream is done churning, peek inside the canister through the lid or remove the dasher momentarily to check the texture. It should have a smooth and creamy consistency, akin to that of soft-serve ice cream.
Once you’re satisfied with the consistency and texture of the churned ice cream, it’s time to move on to the next step – adding mix-ins and flavors to customize your frozen creation. Keep in mind that the ice cream will still be relatively soft at this stage, and it will need further freezing to achieve a firmer consistency. Let’s continue on this delicious journey!
Adding Mix-ins and Flavors
Now comes the fun part – adding mix-ins and flavors to elevate your homemade ice cream to the next level of deliciousness with the Rival 4 Quart Ice Cream Maker. This step allows you to get creative and customize your frozen treat exactly to your liking. Follow these steps to add mix-ins and flavors:
- Prepare your mix-ins: If you’re using mix-ins like chocolate chips, nuts, or fruit chunks, make sure they’re ready to go. Chop, crush, or prepare them according to your preference and the recipe’s instructions.
- Add mix-ins during churning: Once the ice cream has been churning for a few minutes and has thickened slightly, it’s time to add your mix-ins. Pour in the prepared mix-ins through the opening in the lid of the ice cream maker while it continues to churn. This ensures that the mix-ins are evenly distributed throughout the ice cream.
- Experiment with flavors: If you’re looking to add additional flavors, consider adding extracts, syrups, or sauces. Popular choices include chocolate syrup, caramel sauce, or even a swirl of peanut butter. Add them in small quantities at a time while the ice cream is churning, tasting as you go to achieve the desired flavor intensity.
- Be mindful of the machine’s capacity: Ensure that you do not exceed the recommended capacity of your Rival 4 Quart Ice Cream Maker. Overloading the machine can affect the churn and result in inconsistent freezing and mixing of the ice cream base.
- Continue churning until desired consistency: Let the ice cream maker continue churning until the desired consistency is reached. The mix-ins and flavors will be thoroughly incorporated, resulting in a delightful combination of textures and tastes.
Adding mix-ins and flavors allows you to customize your ice cream, making it uniquely yours. From decadent chunks of chocolate to refreshing fruit swirls, the possibilities are endless. Once you’re satisfied with the mix-ins and flavors, it’s time to move on to the next step – freezing and storing your homemade ice cream to enjoy later. Let’s keep the excitement going!
Freezing and Storing the Ice Cream
After you’ve completed the churning process with your Rival 4 Quart Ice Cream Maker, it’s time to freeze and store your homemade ice cream to enjoy whenever you want. Properly freezing and storing the ice cream will help maintain its texture and flavor. Follow these steps to ensure the best results:
- Transfer to a freezer-safe container: Once the ice cream has reached your desired consistency, promptly transfer it to a freezer-safe container. Use a spatula or spoon to scrape all the ice cream into the container, ensuring that no delicious remnants are left behind.
- Smooth the surface: Use the back of the spoon or spatula to smooth the surface of the ice cream, creating an even layer. This helps prevent ice crystals from forming on top.
- Seal the container: Seal the container tightly with its lid to prevent air from entering and freezer burn from occurring. Make sure the lid is secure and snug to maintain the ice cream’s freshness.
- Label and date: To keep track of the ice cream’s freshness, label the container with the flavor and date of preparation. This will help you easily identify it and ensure you consume it within a reasonable time frame.
- Freeze the ice cream: Place the container of ice cream in the coldest part of your freezer. Allow it to freeze for at least 4-6 hours, or until it reaches a firm and scoopable consistency. For best results, freeze it overnight.
- Keep the temperature steady: To maintain the ice cream’s quality, keep your freezer at a consistent temperature of around 0°F (-18°C). Avoid frequent temperature fluctuations by minimizing the frequency of opening the freezer door.
When you’re ready to enjoy your homemade ice cream, remove it from the freezer and let it sit at room temperature for a few minutes to soften slightly. This makes scooping easier and enhances the creamy texture. Serve it in bowls, cones, or your preferred serving vessel, and savor every delicious bite!
Now that you know how to freeze and store your ice cream, it’s time to move on to the final steps – cleaning and maintaining your Rival 4 Quart Ice Cream Maker. Let’s keep this appliance in pristine condition and ready for your next ice cream-making adventure!
Cleaning and Maintenance
To keep your Rival 4 Quart Ice Cream Maker in excellent working condition and ready for your next batch of homemade delights, proper cleaning and maintenance are essential. Follow these steps to ensure your ice cream maker stays clean and functional:
- Unplug the machine: Before cleaning, make sure the ice cream maker is unplugged from the power source to ensure safety.
- Disassemble the removable parts: Take apart any removable parts, such as the canister, dasher, lid, and motor base. Check the instruction manual for specific instructions on how to disassemble the ice cream maker.
- Hand wash the parts: Wash the removable parts with warm, soapy water. Use a gentle dish soap and a sponge or cloth to clean off any residue. Avoid using harsh abrasives or scouring pads, as they can scratch the surfaces.
- Rinse and dry thoroughly: Rinse the parts with clean water to remove any soap residue. Allow them to air dry completely before reassembling or storing to prevent the growth of mold or bacteria.
- Clean the motor base: Use a damp cloth to wipe down the motor base. Be careful not to get water into the motor area to avoid damage. Dry the base thoroughly once cleaned.
- Store in a clean and dry place: Once all parts are clean and dry, reassemble the ice cream maker or store the individual components separately in a clean and dry place. This ensures that the ice cream maker remains in good condition and is ready for future use.
- Regular maintenance: In addition to cleaning, perform regular maintenance checks on your ice cream maker. This may include inspecting the cord for any signs of damage, ensuring the motor is running smoothly, and checking for any loose or worn-out parts. Consult the instruction manual for specific maintenance recommendations.
By following these cleaning and maintenance steps, you’ll keep your Rival 4 Quart Ice Cream Maker in optimal condition, ensuring that it continues to churn out delicious homemade ice cream for years to come.
Now that you know how to clean and maintain your ice cream maker, you’re well-prepared to embark on many more frozen adventures. With a clean machine and your newfound ice cream-making skills, the possibilities are endless. Enjoy the process, get creative with flavors and mix-ins, and savor the sweet rewards of your homemade ice cream!
Troubleshooting Tips
While using the Rival 4 Quart Ice Cream Maker, you may encounter some challenges along the way. Don’t worry, as most issues can be easily addressed with a few troubleshooting tips. Here are some common problems and their solutions:
- Ice cream not freezing: If your ice cream is not freezing properly, it could be due to insufficient freezing time for the canister. Make sure the canister is completely frozen before adding the ice cream base. Also, check that the motor and dasher are functioning correctly.
- Ice cream not thickening: If the ice cream base is not thickening during the churning process, it may be due to the mixture not being cold enough. Ensure that the ice cream base is properly chilled before pouring it into the canister. You can also check that the dasher is securely attached and properly mixing the mixture.
- Ice crystals forming: Ice crystals can form if the ice cream is not churned for a sufficient amount of time or if it is not properly stored. Make sure to follow the recommended churning time for your recipe and store the finished ice cream in an airtight container in the coldest part of your freezer.
- Motor overheating: If the motor of your ice cream maker overheats or stops working during the churning process, allow it to cool down for a few minutes. It may have overheated due to prolonged use or a heavy mixture. If the issue persists, refer to the manufacturer’s instructions or contact customer support.
- Lid leaking or not fitting securely: If the lid of your ice cream maker is leaking or not fitting securely, check for any cracks or damage. Make sure the lid is properly aligned and firmly pressed down onto the canister. If necessary, contact the manufacturer for a replacement lid.
- Inconsistent texture: If your ice cream has an inconsistent texture, it could be due to not mixing the ice cream base thoroughly or adding mix-ins too early or too late during the churning process. Make sure to mix the base ingredients well before pouring them into the canister, and add mix-ins at the appropriate time indicated in your recipe.
If you encounter any other issues or have questions about your Rival 4 Quart Ice Cream Maker, consult the instruction manual or reach out to the manufacturer’s customer support for assistance. With a little troubleshooting and patience, you’ll be able to overcome any obstacles and continue to enjoy homemade ice cream.
Now armed with these troubleshooting tips, you’re ready to tackle any challenges that may arise during the ice cream-making process. Don’t let a minor setback dampen your enthusiasm – the satisfaction of creating your own decadent frozen treats is well worth it!
Conclusion
Congratulations! You have successfully learned how to use the Rival 4 Quart Ice Cream Maker to create delectable homemade ice cream. By following the steps outlined in this guide, you can now embark on a journey of endless flavor possibilities and frozen delights.
We started by introducing you to the Rival 4 Quart Ice Cream Maker, highlighting its user-friendly design and the joy of creating your own ice cream right at home. We then walked you through the essential steps, from preparing the ice cream maker and choosing a recipe to mixing the ice cream base, churning the mixture, and adding mix-ins and flavors to customize your masterpiece.
Remember to follow the instructions in your chosen recipe to ensure the best results. Experiment with different flavors, mix-ins, and toppings to create unique combinations that suit your taste preferences. And don’t forget about proper freezing and storage techniques to maintain the texture and flavor of your homemade ice cream.
We also shared valuable troubleshooting tips to help you overcome any potential issues that may arise during the ice cream-making process. By addressing these challenges, you can ensure that your ice cream turns out smooth, creamy, and utterly enjoyable.
With the Rival 4 Quart Ice Cream Maker, the possibilities are endless. From classic vanilla and chocolate to innovative flavors and creative mix-ins, you have the power to unleash your culinary creativity and impress family and friends with your homemade frozen creations.
So, grab your ingredients, fire up the ice cream maker, and indulge in the delight of homemade ice cream. Get ready to savor the rewards of your efforts and create lasting memories with loved ones as you share this delightful frozen treat. Enjoy the journey, and may every scoop bring you pure joy and satisfaction!