Introduction
PC case fans are an essential component of any computer system, as they help to dissipate heat and maintain optimal operating temperatures. However, there may be situations where you need to slow down the speed of your PC case fan. Whether it’s to reduce noise levels, improve airflow, or fine-tune your system’s cooling performance, slowing down a 3-wire PC case fan can be a useful technique.
In this article, we will explore different methods to effectively slow down a 3-wire PC case fan. We will discuss the advantages and limitations of each method, as well as the safety precautions to keep in mind while implementing these techniques.
Before we delve into the methods, it’s important to note that PC case fans are typically designed to operate at specific speeds to maintain optimal cooling. Altering the speed of a fan may impact the cooling performance of your system, so it’s crucial to carefully consider the reasons for slowing down your fan and understand the potential implications.
Now, let’s explore the various methods you can use to slow down a 3-wire PC case fan, so you can make an informed decision based on your specific requirements.
Why Slow Down a PC Case Fan?
There are several reasons why you might want to slow down a PC case fan:
- Noise Reduction: PC case fans can sometimes generate excessive noise, especially at higher speeds. This can be distracting and disrupt the overall user experience. By slowing down the fan speed, you can significantly reduce the noise levels, resulting in a more peaceful and quieter environment.
- Energy Efficiency: Running a fan at full speed constantly may consume more power than necessary, leading to higher energy bills. By slowing down the fan, you can achieve a balance between cooling performance and energy efficiency, ensuring that your system remains cool without unnecessary power consumption.
- Customization of Cooling Performance: Slowing down a PC case fan allows you to fine-tune the cooling performance of your system. Depending on your specific requirements, you can adjust the fan speed to increase or decrease the airflow within your computer case. This can be particularly useful when overclocking your system or optimizing the cooling for specific components.
- Improved Airflow: In some cases, an overly fast-spinning fan can disrupt the airflow within the computer case. By slowing down the fan speed, you can promote better air circulation and ensure that each component receives sufficient cooling.
It’s important to note that while slowing down a PC case fan can address these issues, there are certain considerations to keep in mind. Slowing down the fan speed too much may result in inadequate cooling, potentially leading to higher temperatures and decreased system performance. Therefore, it’s crucial to find the right balance between noise reduction and cooling efficiency when adjusting the fan speed.
Now that we understand the reasons why you might want to slow down a PC case fan, let’s explore the different methods available to achieve this customization.
Method 1: Using a Fan Speed Controller
One of the most effective and convenient methods to control and slow down the speed of a PC case fan is by using a fan speed controller. A fan speed controller is a device that allows you to manually adjust the speed of your fan, giving you complete control over its performance.
To use a fan speed controller, follow these steps:
- Choose a Fan Speed Controller: Select a fan speed controller that is compatible with your PC case fan. There are various types of fan speed controllers available, including manual knobs, switches, or even software-based controllers.
- Installation: Depending on the type of fan speed controller you have chosen, you will need to install it in your computer case. This may involve connecting the controller to a spare fan header on your motherboard or directly to the power supply.
- Setup and Configuration: Once the fan speed controller is installed, power on your computer and access the controller’s interface. Follow the instructions provided by the manufacturer to configure the speed settings. Typically, you will have options to adjust the fan speed manually or set predefined profiles.
- Testing and Fine-tuning: After configuring the initial settings, test the fan speed and make adjustments as desired. Monitor the temperature of your system components to ensure that adequate cooling is maintained while achieving the desired noise reduction.
Using a fan speed controller offers a high level of control and flexibility, allowing you to easily adjust the fan speed to match your specific needs. However, it’s important to keep in mind a few considerations:
- Make sure the fan speed controller you choose is compatible with your PC case fan. Check the specifications and compatibility information provided by the manufacturer before making a purchase.
- Monitor the temperature of your system components regularly to ensure that adequate cooling is maintained. Adjust the fan speed accordingly if you notice any overheating issues.
- Be cautious when setting the fan speed too low, as it may result in inadequate cooling and affect the performance and lifespan of your system.
Now that you know how to use a fan speed controller, let’s explore another method to slow down a PC case fan.
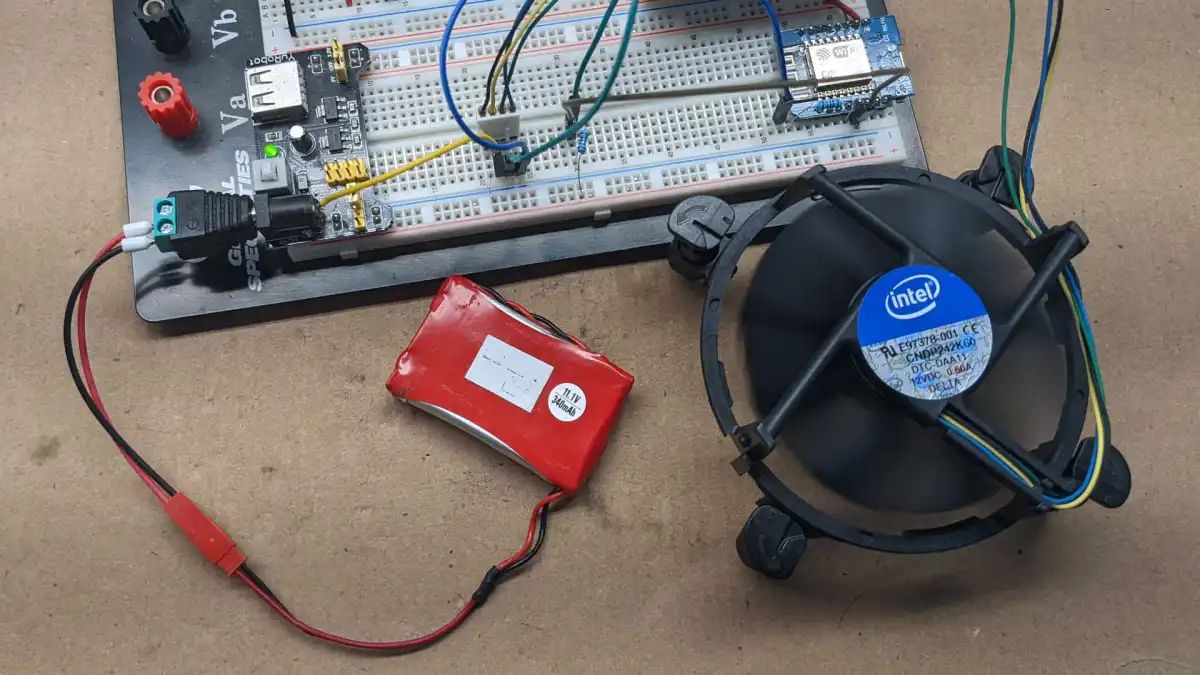
Method 2: Using a Voltage Regulator
Another effective method to slow down a PC case fan is by using a voltage regulator. A voltage regulator allows you to adjust the voltage supplied to the fan, which in turn controls its speed. This method is particularly useful when you don’t have a fan speed controller or when you prefer a more cost-effective solution.
Here’s how you can use a voltage regulator to slow down a PC case fan:
- Choose a Voltage Regulator: Select a voltage regulator that is compatible with your fan’s power requirements. Ensure that the regulator can handle the required voltage range and current of your fan.
- Identify the Fan’s Power Source: Locate the power source that connects your PC case fan. This is typically a 2 or 3-pin connector on the fan itself or a connection on your motherboard or fan controller.
- Connect the Voltage Regulator: Connect the voltage regulator between the fan and the power source. Make sure to match the correct polarity and ensure a secure connection. Refer to the regulator’s documentation for specific installation instructions.
- Adjust the Voltage: Depending on the type of voltage regulator you are using, you may have options to adjust the voltage through knobs, switches, or software controls. Start by lowering the voltage gradually and observe the fan speed. Fine-tune the voltage until you achieve the desired speed reduction.
- Monitor Cooling Performance: Test the fan’s cooling performance after adjusting the voltage. Keep an eye on the temperature levels of your system components to ensure that adequate cooling is maintained. Make further adjustments if necessary.
Using a voltage regulator is a cost-effective method to slow down a PC case fan, but it’s important to consider a few points:
- Ensure that the voltage regulator you choose can handle the power requirements of your PC case fan. Check the specifications and compatibility information provided by the manufacturer.
- If you are using a voltage regulator connected to your motherboard, consult your motherboard’s documentation to ensure compatibility and proper voltage regulation.
- Monitor the temperature of your system components regularly and adjust the fan speed if necessary to maintain optimal cooling performance.
Now that you are familiar with using a voltage regulator, let’s move on to another method for slowing down a PC case fan.
Method 3: Using a Resistor
Another simple and cost-effective method to slow down a PC case fan is by using a resistor. A resistor is an electrical component that can be used to limit the current flow in a circuit, which in turn slows down the fan speed.
To use a resistor to slow down a PC case fan, follow these steps:
- Choose a Resistor: Select a resistor with an appropriate resistance value based on your fan’s power requirements. The resistor should be able to handle the power dissipated by the fan.
- Calculate the Resistance: Use Ohm’s Law (R = V/I) to calculate the required resistance. Measure the fan’s operating voltage (V) and current (I) to determine the resistance needed to achieve the desired fan speed reduction.
- Connect the Resistor: Connect the resistor in series with the fan’s power source. Cut the wire on either side of the fan and insert the resistor between the two cut ends. Use wire connectors or solder the connections to ensure a secure and proper electrical connection.
- Test and Fine-tune: Power on your computer and test the fan’s speed after connecting the resistor. Monitor the temperature levels of your system components to ensure that adequate cooling is maintained. Adjust the resistor’s resistance if necessary to achieve the desired speed reduction.
Using a resistor to slow down a PC case fan is a simple and affordable method, but there are a few things to consider:
- Ensure that the resistor you choose can handle the power dissipated by the fan and withstand the heat generated.
- Monitor the fan speed and temperature of your system components regularly. Adjust the resistor’s resistance if necessary to maintain optimal cooling performance.
- Be cautious about using resistors with high resistance values, as they may not provide sufficient power to the fan, leading to inadequate cooling.
Now that you understand how to use a resistor to slow down a PC case fan, let’s move on to discussing the safety precautions you should keep in mind when implementing these methods.
Safety Precautions
While implementing methods to slow down a PC case fan, it’s important to prioritize safety. Here are some essential safety precautions to keep in mind:
- Power Off: Before making any adjustments or modifications to your PC case fan, always ensure that your computer is powered off and unplugged from the electrical outlet. This will prevent any accidental damage or electric shock.
- Handle with Care: Handle the fan speed controller, voltage regulator, or resistor with care. Avoid applying excessive force or dropping them, as this may cause internal damage or affect their functionality.
- Compatibility Check: Double-check the compatibility of the fan speed controller, voltage regulator, or resistor with your PC case fan. Make sure the power requirements, connectors, and installation methods match to avoid any potential issues or damage to your system.
- Monitor Temperatures: Regularly monitor the temperature levels of your system components, especially after making changes to the fan speed. Keep an eye on CPU and GPU temperatures, as well as the overall ambient temperature within your computer case, to ensure that adequate cooling is maintained.
- Watch for Fan Blockage: When adjusting the fan speed, ensure that no cables, wires, or any other obstructions are blocking the fan blades. This will prevent any potential damage to the fan and ensure optimal cooling performance.
- Adequate Ventilation: Ensure that your computer case has proper airflow and ventilation to dissipate heat effectively. Avoid blocking ventilation holes or covering your system with objects that restrict airflow, as this can lead to higher temperatures and potential overheating issues.
- Follow Manufacturer Instructions: Always refer to the manufacturer’s instructions and guidelines for the fan speed controller, voltage regulator, or resistor you are using. Each device may have specific instructions regarding installation, operation, and safety precautions that should be followed for optimal performance and safety.
By following these safety precautions, you can ensure a smooth and safe process while slowing down your PC case fan. Remember, maintaining the right balance between noise reduction and cooling performance is crucial for the overall functionality and longevity of your system.
Now, armed with the knowledge of different methods and safety precautions, you can make an informed decision and choose the most suitable approach to slow down your PC case fan based on your specific needs.
Conclusion
Slowing down a PC case fan can be a useful technique to reduce noise levels, improve airflow, and customize the cooling performance of your system. In this article, we explored three effective methods: using a fan speed controller, a voltage regulator, and a resistor.
A fan speed controller offers the highest level of control and flexibility, allowing you to easily adjust the fan speed to match your specific needs. Using a voltage regulator provides a cost-effective solution to slow down the fan by adjusting the voltage supplied. Alternatively, using a resistor is a simple and affordable method to limit the current flow to the fan.
Regardless of the method you choose, it’s important to consider the implications on cooling performance and monitor the temperature levels of your system components. Maintaining adequate cooling is crucial to ensuring optimal performance and preventing overheating issues.
When implementing these methods, it’s essential to prioritize safety. Remember to power off your computer, handle the components with care, double-check compatibility, monitor temperatures, watch for fan blockage, ensure adequate ventilation, and follow manufacturer instructions.
By following the methods and safety precautions discussed in this article, you can effectively slow down your PC case fan and achieve a balance between noise reduction, energy efficiency, and cooling performance. Find the best approach that suits your needs and enjoy a quieter and well-cooled computer system.