Introduction
Welcome to our step-by-step guide on how to set up out of office in Google Workspace. Whether you’re going on vacation, attending a conference, or simply need some time away from your inbox, setting up an out of office message is a great way to inform your contacts that you may not be available to respond immediately.
Google Workspace provides a user-friendly interface that allows you to configure your out of office settings quickly and easily. By following these simple steps, you can seamlessly activate your out of office message and ensure that your contacts receive an automatic reply notifying them of your absence.
With the out of office feature, you can customize your message, specify the duration of your absence, forward emails to an alternative address, and even set up out of office notifications. These options enable you to maintain effective communication while you’re away.
In this guide, we will walk you through each step of the process, providing detailed instructions and helpful tips along the way. By the end, you’ll have your out of office settings configured and be ready to enjoy your time off, knowing that your contacts are well-informed about your availability.
So, let’s get started with accessing your Google Workspace settings and setting up an automatic reply.
Step 1: Accessing your Google Workspace Settings
Before you can set up your out of office message in Google Workspace, you need to access your account settings. Follow these simple steps to get started:
- Open your web browser and sign in to your Google Workspace account.
- In the top right corner of the screen, click on the profile picture or initial icon. A drop-down menu will appear.
- Select the “Settings” option from the list. This will take you to your account settings page.
- On the left-hand side of the page, you will see a navigation menu. Scroll down and click on the “See all settings” link.
- You will now be taken to the main settings page for your Google Workspace account. This is where you can customize various features, including your out of office settings.
Once you have successfully accessed your account settings, you’re ready to move on to the next step and set up your automatic reply.
Remember to save any changes you make to the settings before moving on to the next step. This will ensure that your out of office message is activated and ready to go.
Now that you’ve accessed your Google Workspace settings, it’s time to proceed to step 2 and set up your automatic reply. Let’s dive in!
Step 2: Setting up an Automatic Reply
Setting up an automatic reply is essential to inform your contacts that you are currently out of the office and may not be able to respond to their emails immediately. Follow these steps to configure your automatic reply:
- From the main settings page, scroll down until you find the “Automatic Reply” section. It is usually located under the “General” tab.
- Toggle the switch to enable the automatic reply feature.
- Enter the subject of your out of office message in the designated field. This typically indicates that you are currently away from the office or on vacation.
- Compose the body of your automatic reply message. Be sure to provide details such as the dates of your absence, alternative contacts, and when you expect to return.
- Optional: Customize the appearance of your automatic reply by formatting the text, adding links, or including a company logo if applicable.
Remember, your automatic reply should be concise, informative, and professional. It is a good practice to thank the sender for their email and let them know you will respond to their message as soon as you return.
Once you have finished composing your automatic reply, take a moment to review it for any typos or errors. This will ensure that your message is clear and effectively communicates your availability. When you are satisfied with the content, proceed to the next step to create a custom out of office message.
Now, let’s move on to step 3 and learn how to create a custom out of office message to make your automatic reply more personal and engaging.
Step 3: Creating a Custom Out of Office Message
While the automatic reply serves as a general notification of your absence, creating a custom out of office message allows you to add a personal touch. Let’s explore how to create a custom out of office message in Google Workspace:
- In the “Automatic Reply” section of your settings page, look for the option to create a custom out of office message.
- Click on the provided link or button to access the customization options.
- Choose from pre-designed templates or start from scratch to create your own unique out of office message. Remember to keep it professional and friendly.
- Consider including any additional information you want to share, such as alternative contact methods or useful resources for urgent matters.
- Preview your custom out of office message to ensure it appears as intended.
When crafting your message, it’s important to strike a balance between professionalism and friendliness. It should reflect your personality and maintain a positive tone while still conveying the necessary information.
Once you are satisfied with your custom out of office message, save the changes and proceed to the next step to specify the date and time range for your out of office settings.
Now that you have created a custom out of office message, let’s move on to step 4 and learn how to specify the date and time range for your out of office settings.
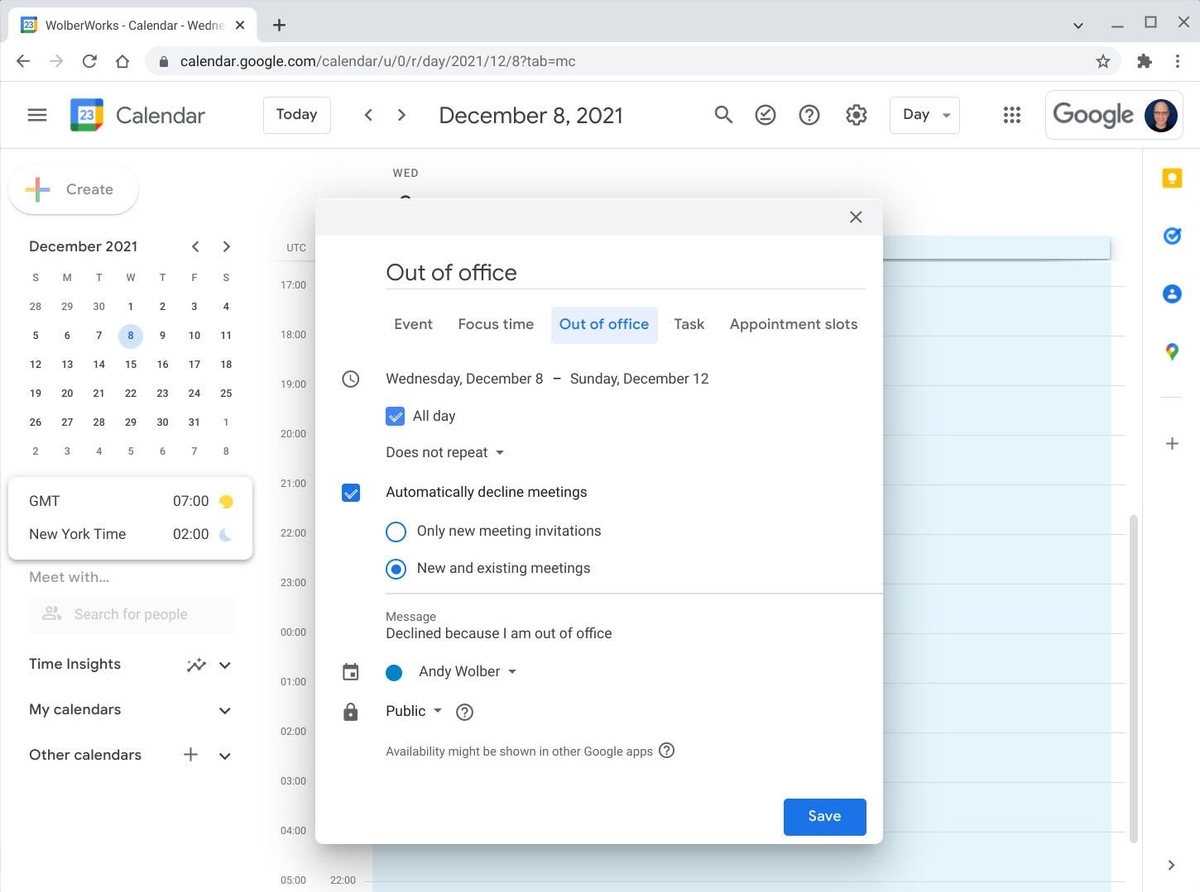
Step 4: Specifying Date and Time Range for Out of Office
To ensure that your out of office settings are active only during the desired period, it’s important to specify the date and time range. Follow these steps to set the duration of your out of office status:
- In the “Automatic Reply” section of your Google Workspace settings, locate the date and time range options.
- Select the start date for your out of office status. This is usually the day you will be leaving or when you want the automatic reply to start.
- Choose the end date for your out of office status. This will be the day when you expect to return to work.
- Specify the start and end times if you want to set a specific time range within each day.
By specifying the date and time range, you can ensure that your automatic reply is activated and deactivated according to your schedule. This is particularly useful if you plan to return to work before the end of a specified day.
Once you have set the date and time range for your out of office, it’s time to move on to step 5 and learn how to forward emails during your absence.
Now that you have specified the date and time range for your out of office, let’s proceed to step 5 and learn how to forward emails during your absence.
Step 5: Forwarding Emails during Out of Office
During your out of office period, you may want to ensure that important emails are not missed. Google Workspace allows you to set up email forwarding to a designated address. Follow these steps to forward emails while you are away:
- In the “Automatic Reply” section of your Google Workspace settings, locate the email forwarding options.
- Enable the email forwarding feature by selecting the appropriate checkbox.
- Enter the email address to which you want your incoming messages to be forwarded.
- Consider enabling the option to leave a copy of forwarded messages in your workspace account to access them later.
By setting up email forwarding, you can redirect important emails to a colleague or an alternative email address, ensuring that they are handled promptly during your absence.
Remember to review and confirm the forwarding settings before saving your changes. This will ensure that your incoming emails are properly redirected while your out of office message is active.
Now that you’ve learned how to forward emails during your out of office period, let’s move on to step 6 and explore how to set up out of office for specific contacts.
Step 6: Setting Up Out of Office for Specific Contacts
While you may want to set a general out of office message for all your contacts, there could be specific individuals or groups whom you want to handle differently. Google Workspace allows you to customize your out of office settings for specific contacts. Follow these steps to set up out of office for specific contacts:
- In the “Automatic Reply” section of your Google Workspace settings, look for the option to customize out of office settings for specific contacts.
- Select the option to add specific contacts or groups to your customized settings.
- Choose whether these contacts will receive a different out of office message or if they will be excluded from receiving any automatic reply at all.
- Select the contacts or groups you want to customize, either by entering their email addresses or selecting them from your contact list.
Customizing out of office settings for specific contacts allows you to provide personalized responses or exclude certain individuals from receiving an automated reply altogether. This can be useful when dealing with high-priority contacts or sensitive information.
Remember to save your changes once you have selected and customized the desired contacts. This will ensure that your out of office settings are applied correctly across your chosen audience.
Now that you’ve learned how to set up out of office for specific contacts, let’s proceed to step 7 and explore how to enable out of office notifications.
Step 7: Enabling Out of Office Notifications
Enabling out of office notifications allows you to receive alerts when someone sends you an email during your absence. This ensures that you stay informed about important messages even when you’re away. Follow these steps to enable out of office notifications in Google Workspace:
- In the “Automatic Reply” section of your Google Workspace settings, locate the option for out of office notifications.
- Toggle the switch to enable the notifications feature.
- Select your preferred notification method. You can choose to receive notifications via email, SMS, or both.
- Specify the email address or phone number where you want to receive the notifications.
Enabling out of office notifications ensures that you promptly receive alerts when important emails are sent to your workspace account during your absence. This allows you to stay connected and stay on top of urgent matters.
Remember to review and confirm the notification settings before saving your changes. This will ensure that you receive the desired alerts while your out of office message is active.
Now that you’ve enabled out of office notifications, let’s move on to step 8 and learn how to save and activate your out of office settings.
Step 8: Saving and Activating Out of Office Settings
After configuring all the necessary settings for your out of office message in Google Workspace, the final step is to save and activate your settings. Follow these steps to ensure that your out of office message is ready to go:
- Review all the settings and customization options you have applied to your out of office message.
- If you have made any changes, double-check the content of your automatic reply, custom message, date and time range, email forwarding, specific contacts, and notification preferences.
- Once you are satisfied with the settings, click on the “Save” or “Apply” button, usually located at the bottom or top-right corner of the settings page.
- Verify that your out of office message is now active by sending a test email to your workspace account from another email address.
- Check that the automatic reply is being sent, and all the configured settings are working as intended.
- If any adjustments are needed, go back to the settings and make the necessary changes until everything is set up correctly.
By saving and activating your out of office settings, you ensure that your contacts are informed about your absence and receive an appropriate response during the specified date and time range. This helps to manage expectations and maintain clear communication while you are away.
Now that you have successfully saved and activated your out of office settings, you can enjoy your time off with the confidence that your email communications are being managed smoothly. And when you return, don’t forget to disable the out of office message and adjust your settings accordingly.
That wraps up our step-by-step guide on how to set up out of office in Google Workspace. We hope this guide has been helpful to you in configuring your out of office message effectively. Remember to review and update your settings as needed to ensure that everything is up to date and relevant.
Conclusion
Setting up an out of office message in Google Workspace is a simple and effective way to inform your contacts about your absence and manage your email communications while you’re away. By following the eight-step process outlined in this guide, you can ensure that your out of office settings are configured correctly and tailored to your specific needs.
From accessing your Google Workspace settings to setting up an automatic reply, creating a custom out of office message, specifying the date and time range, forwarding emails, customizing settings for specific contacts, enabling notifications, and finally, saving and activating your settings, each step plays a crucial role in ensuring a smooth and professional out of office experience.
Remember to review and adjust your settings as needed, especially if your plans or availability change during your absence. Regularly checking for any important or time-sensitive messages that have been forwarded to you is also essential.
By effectively setting up your out of office message, you can provide your contacts with the necessary information, manage their expectations, and maintain professional communication even when you’re not available.
Now that you have the knowledge to navigate Google Workspace and set up your out of office message with ease, you can confidently enjoy your time away, knowing that your email communications are being handled efficiently and effectively.