Introduction
Welcome to this guide on how to set the SD card as the default storage on your Samsung tablet. If you’re running out of internal storage space on your device, utilizing the SD card as the default storage option can greatly increase the available space for apps, photos, videos, and other files.
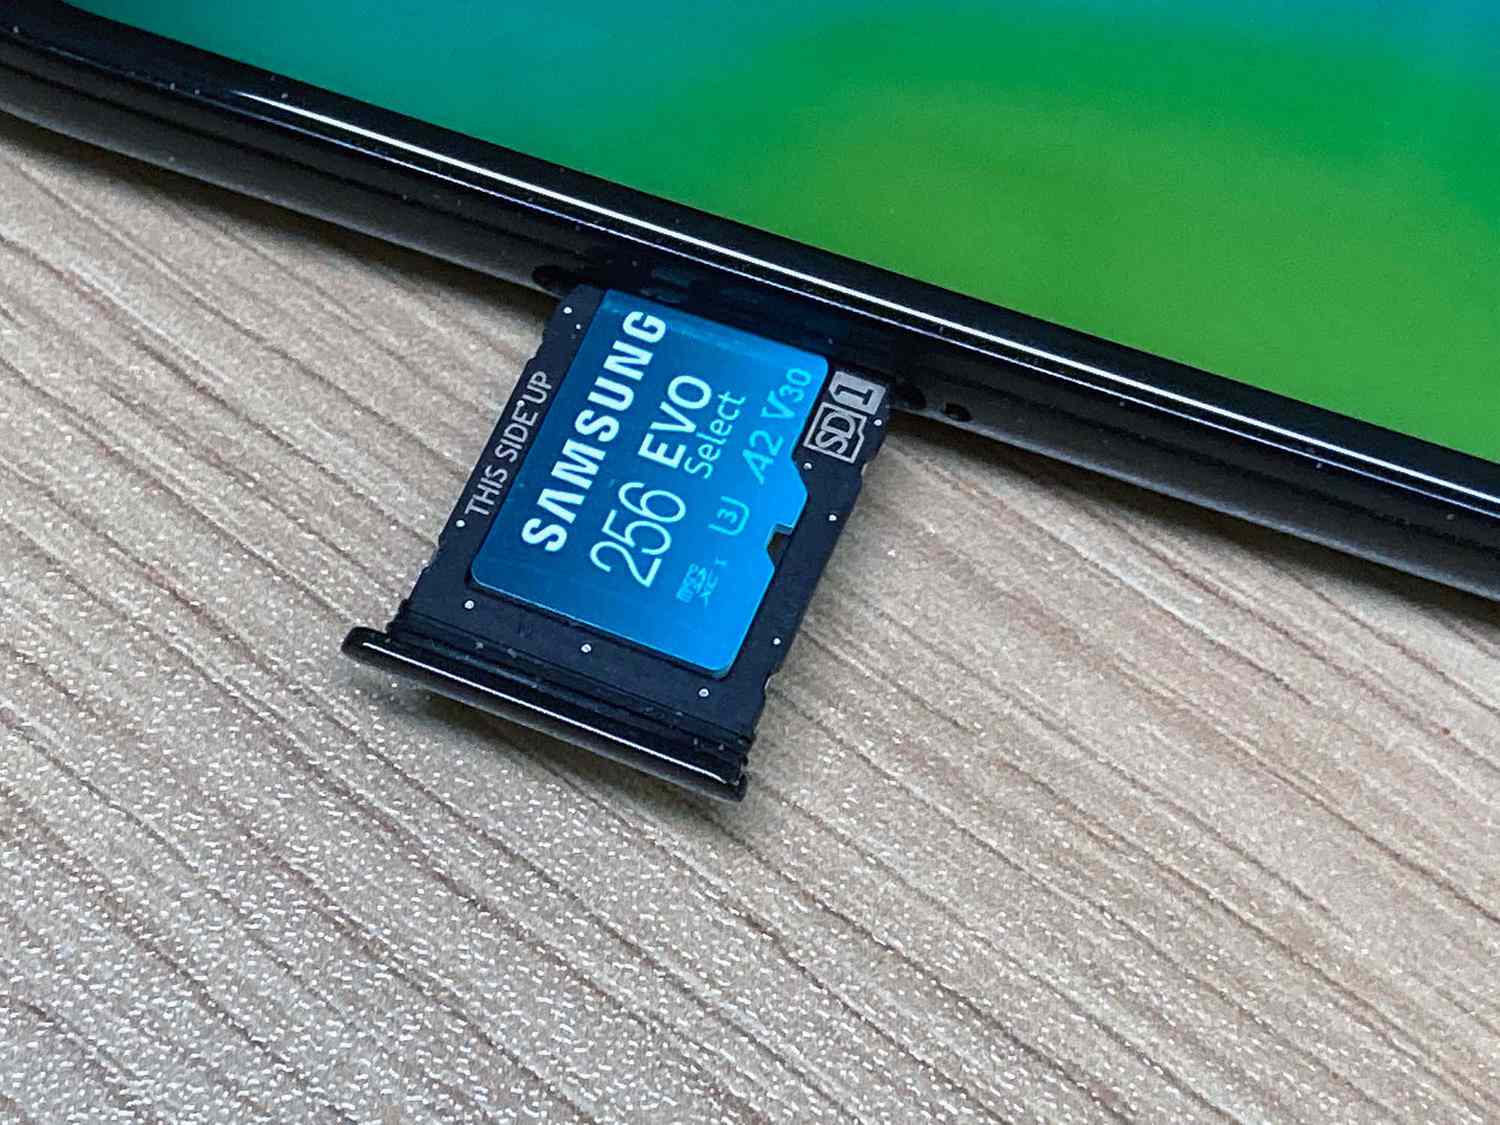
Samsung tablets offer a convenient feature called “Adoptable Storage,” which allows you to format your SD card as an extension of your tablet’s internal storage. This means that the SD card will be seen as an integral part of the device’s storage, eliminating the need to transfer files manually between the internal storage and the SD card.
By following the steps outlined in this guide, you’ll be able to enable the Developer Options and USB Debugging Mode on your tablet, connect it to your computer, download and install the necessary ADB drivers, and format your SD card as internal storage. Additionally, you’ll learn how to set the SD card as the default location for storing apps and data.
Please note that this guide specifically caters to Samsung tablets and may not be compatible with devices from other manufacturers. Furthermore, it’s important to back up any important data on your SD card before proceeding with the formatting process, as it will erase all existing data on the card.
So, without further ado, let’s dive into the steps required to set the SD card as the default storage on your Samsung tablet.
Enable Developer Options
Before proceeding with the process of setting your SD card as the default storage, you need to enable the Developer Options on your Samsung tablet. Here’s how you can do it:
- Go to the ‘Settings’ menu on your Samsung tablet. You can access it by swiping down from the top of the screen and tapping on the gear icon, or by locating the ‘Settings’ app in your app drawer.
- Scroll down and tap on ‘About tablet’ or ‘About device’.
- Look for the ‘Build number’ or ‘Build version’ option. Tap on it repeatedly, about seven times, until you see a message indicating that you’ve unlocked the Developer Options.
- Now, go back to the main ‘Settings’ menu. Scroll down and you should see a new option called ‘Developer Options’.
That’s it! You have successfully enabled the Developer Options on your Samsung tablet. These options are intended for advanced users and developers, so proceed with caution and follow the instructions carefully.
Enabling the Developer Options allows you to access additional settings and features that are not available in the regular settings menu. This includes options for USB debugging, which is necessary for connecting your tablet to your computer and performing various tasks using the Android Debug Bridge (ADB) tool, as we will do in the subsequent steps.
Now that you have enabled the Developer Options on your Samsung tablet, you’re ready to move on to the next step: enabling USB debugging mode. This will further unlock the functionalities required to set your SD card as the default storage.
Enable USB Debugging Mode
In order to connect your Samsung tablet to your computer and perform the necessary steps to set the SD card as the default storage, you need to enable USB debugging mode. Here’s how you can do it:
- Go to the ‘Settings’ menu on your Samsung tablet.
- Scroll down and tap on ‘Developer Options’.
- Toggle the switch to enable the ‘Developer Options’ if it is not already enabled.
- Scroll down and find the ‘USB debugging’ option. Toggle the switch to enable USB debugging mode.
- If prompted, read the warning message and click ‘OK’ to proceed.
Enabling USB debugging mode allows your tablet to communicate with your computer and perform certain tasks using the Android Debug Bridge (ADB) tool. This tool is essential for executing commands on your tablet from your computer.
With USB debugging mode turned on, you can now establish a connection between your Samsung tablet and your computer to proceed with the remaining steps.
Next, we’ll guide you on how to connect your Samsung tablet to your computer.
Connect Your Samsung Tablet to Your Computer
Now that you have enabled USB debugging mode on your Samsung tablet, it’s time to connect it to your computer. This connection is necessary to download and install the required ADB drivers and execute commands using the Android Debug Bridge tool.
Follow these steps to connect your Samsung tablet to your computer:
- Retrieve your USB cable that came with your tablet or a compatible USB cable.
- Connect one end of the USB cable to your Samsung tablet.
- Connect the other end of the USB cable to an available USB port on your computer.
- Your computer will automatically recognize the connected device and install the necessary drivers.
- Wait for the driver installation process to complete.
Ensure that you have a stable and reliable connection between your Samsung tablet and your computer. A proper connection is crucial for the subsequent steps, as it allows you to send commands and perform tasks on your tablet via ADB.
With your Samsung tablet successfully connected to your computer, you’re ready to proceed with the next steps, which involve downloading and installing the ADB drivers required for the process.
Download and Install ADB Drivers
In order to interact with your Samsung tablet and execute commands via the Android Debug Bridge (ADB) tool, you need to download and install the ADB drivers on your computer. Follow these steps to get started:
- Open a web browser on your computer and search for “ADB drivers for [your Samsung tablet model]”.
- Look for a reputable source to download the ADB drivers specific to your tablet model. As an alternative, you can visit the official website of the tablet’s manufacturer.
- Download the ADB drivers file to your computer.
- Once the download is complete, locate the downloaded file and extract its contents if it’s in a compressed format (e.g., ZIP file).
- Open the extracted folder and look for the executable file (e.g., “.exe” file).
- Double-click on the executable file to run the driver installation process.
- Follow the on-screen instructions to complete the installation of the ADB drivers on your computer.
After the drivers are installed, your computer will be able to recognize your Samsung tablet properly and establish a connection via the ADB tool. This connection is essential for executing the necessary commands to set your SD card as the default storage.
Keep in mind that the steps to download and install ADB drivers may vary slightly depending on your tablet model and the operating system of your computer. Be sure to refer to the documentation provided with the ADB drivers or visit the manufacturer’s website for detailed instructions tailored to your specific setup.
Now that you have the ADB drivers installed, you’re prepared for the next steps, which involve opening the command prompt and navigating to the ADB directory.
Open Command Prompt and Navigate to ADB Directory
With the ADB drivers installed on your computer, the next step is to open the command prompt and navigate to the ADB directory. This will allow you to execute commands using the Android Debug Bridge (ADB) tool. Here’s how you can do it:
- On your computer, go to the Start menu and search for “Command Prompt”.
- Click on the Command Prompt app to open it.
- In the command prompt window, type “cd” followed by the path to the ADB directory. For example, if the ADB directory is located in the “C:\ADB” folder, the command would be:
cd C:\ADB. - Press Enter to navigate to the ADB directory.
It’s important to note that the path to the ADB directory may vary depending on where you installed the ADB drivers on your computer. Make sure to enter the correct path to ensure successful navigation to the ADB directory.
Once you have successfully navigated to the ADB directory in the command prompt, you’re now ready to execute commands and perform tasks using the ADB tool. The following steps will guide you through enabling adoptable storage on your Samsung tablet.
Stay tuned and let’s move on to the next steps of the process.
Enable Adoptable Storage
Enabling adoptable storage is a crucial step in setting your SD card as the default storage on your Samsung tablet. Adoptable storage allows your tablet to treat the SD card as an extension of its internal storage, seamlessly integrating it into the device. Follow these steps to enable adoptable storage:
- Ensure that your Samsung tablet is still connected to your computer via USB.
- In the command prompt window, type the following command and press Enter:
adb devices - A list of connected devices will appear in the command prompt. Verify that your Samsung tablet is listed.
- Next, type the following command and press Enter:
adb shell - This command will open a shell session on your Samsung tablet, allowing you to execute commands directly on the device.
- Type the following command and press Enter:
sm list-disks - A list of available disks will be displayed. Take note of the disk ID associated with your SD card.
- Type the following command and press Enter, replacing “disk_id” with the actual disk ID of your SD card:
sm partition disk_id private - This command will format and partition your SD card as adoptable storage, integrating it with the device’s internal storage.
- After the process is complete, you can start using your SD card as the default storage on your Samsung tablet.
Please note that enabling adoptable storage will erase all data on your SD card. Therefore, it’s essential to backup any important files beforehand to avoid losing any valuable information.
Now that you have successfully enabled adoptable storage on your SD card, you’re one step closer to setting it as the default storage on your Samsung tablet. Next, we’ll guide you through connecting your tablet to your computer again and navigating to the ADB directory to complete the remaining steps of the process.
Connect Your Samsung Tablet to Your Computer Again
After enabling adoptable storage on your Samsung tablet, it’s time to connect your tablet to your computer once again to proceed with the next steps. Follow these instructions:
- Ensure that your Samsung tablet is still powered on and unlocked.
- Retrieve the USB cable that you used earlier to connect your tablet to your computer.
- Connect one end of the USB cable to your Samsung tablet.
- Connect the other end of the USB cable to an available USB port on your computer.
- Wait for your computer to recognize the connected device and install the necessary drivers. This may take a few moments.
By reconnecting your Samsung tablet to your computer, you’re establishing a reliable connection that allows you to execute commands using the Android Debug Bridge (ADB) tool. This connection is essential for the final steps of setting your SD card as the default storage on your tablet.
Once your tablet is successfully connected to your computer, we’ll guide you through opening the command prompt and navigating to the ADB directory again, where you will format the SD card as internal storage and set it as the default storage location.
Let’s move on to the next steps and complete the process of setting your SD card as the default storage on your Samsung tablet.
Open Command Prompt and Navigate to ADB Directory Again
With your Samsung tablet connected to your computer, it’s time to open the command prompt and navigate to the ADB directory once again. This will allow you to execute the necessary commands to format the SD card as internal storage and set it as the default storage location. Follow these steps:
- Go to the Start menu on your computer and search for “Command Prompt”.
- Click on the Command Prompt app to open it.
- If the command prompt is already open from a previous step, you can skip the first two steps.
- In the command prompt window, type “cd” followed by the path to the ADB directory and press Enter. For example, if the ADB directory is located in the “C:\ADB” folder, the command would be:
cd C:\ADB. - Press Enter to navigate to the ADB directory.
Just like before, it’s important to ensure that you enter the correct path to the ADB directory to successfully navigate to it. The path may vary depending on where you installed the ADB drivers on your computer.
Once you have successfully navigated to the ADB directory in the command prompt, you’re now ready to execute commands to format your SD card as internal storage and set it as the default storage location.
Stay with us as we guide you through the final steps of the process, formatting the SD card and making it the default storage on your Samsung tablet.
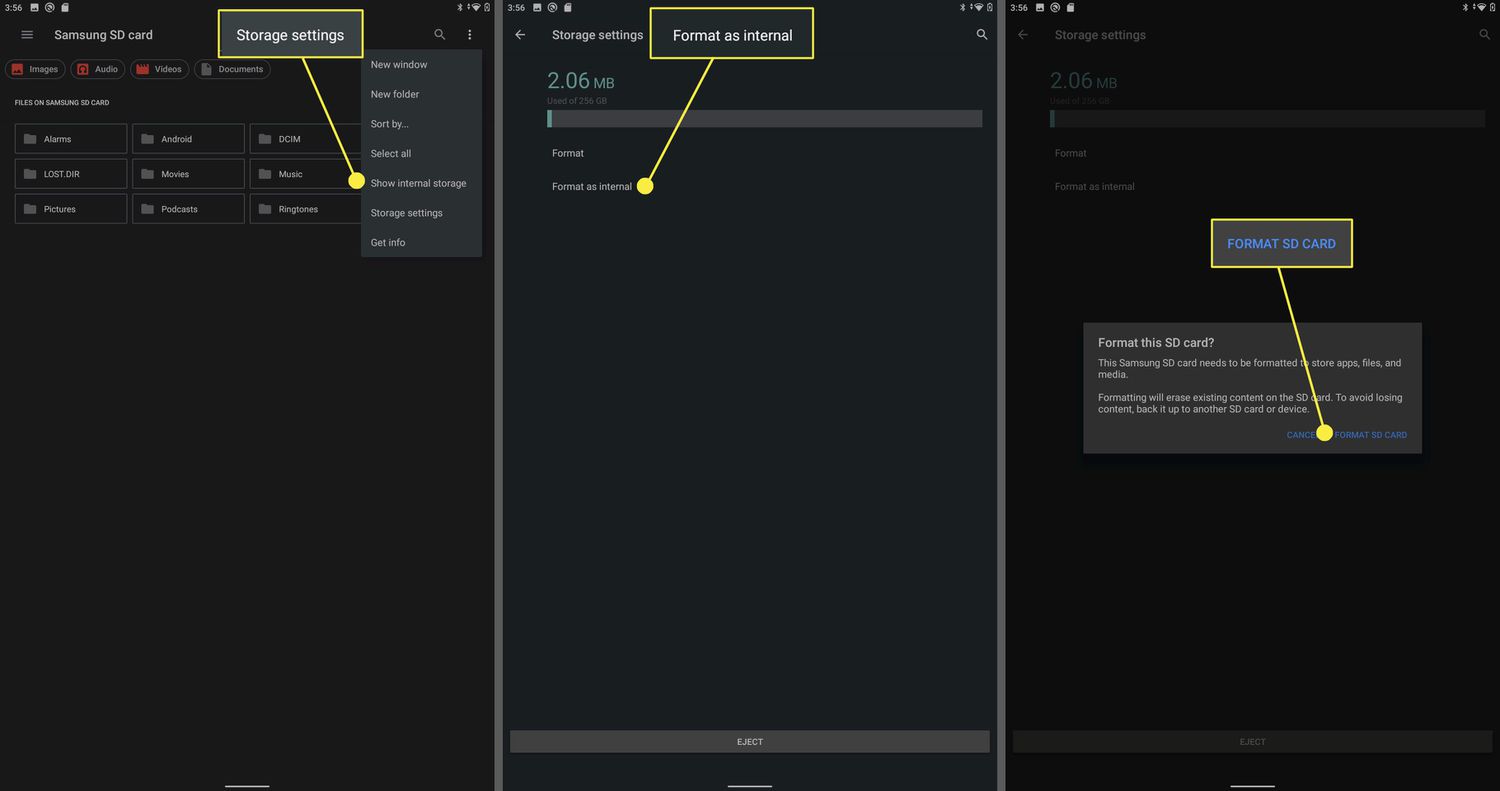
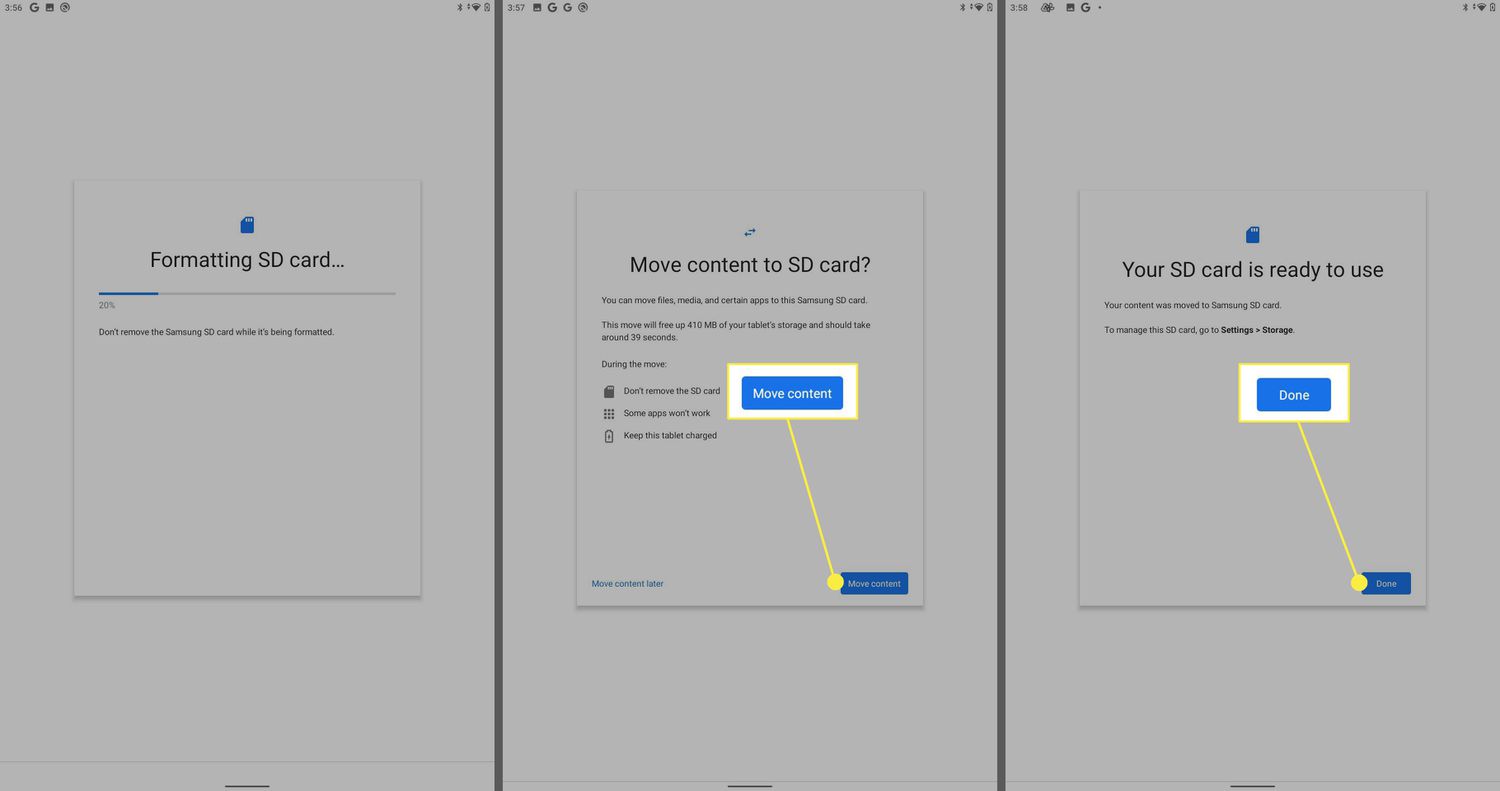
Format the SD Card as Internal Storage
Formatting the SD card as internal storage is the next crucial step to set it as the default storage on your Samsung tablet. This process will integrate the SD card seamlessly into the device’s internal storage, allowing you to use it for apps, data, and other content. Follow these steps to format the SD card:
- Ensure that your Samsung tablet is still connected to your computer and that you have navigated to the ADB directory in the command prompt.
- In the command prompt, type the following command and press Enter:
adb devices - Confirm that your Samsung tablet is listed in the command prompt, indicating a successful connection.
- Next, type the following command and press Enter:
adb shell - This command will open a shell session on your Samsung tablet, enabling you to execute commands directly on the device.
- Now, to format your SD card, type the following command and press Enter:
sm format private - The command will initiate the formatting process for the SD card, which may take a few moments to complete.
- Once the formatting process is finished, your SD card will be formatted as internal storage.
Formatting the SD card as internal storage will erase all existing data on the card. Make sure to back up any important files before proceeding to avoid data loss.
With the SD card successfully formatted as internal storage, you’re now one step away from setting it as the default storage on your Samsung tablet. In the next section, we’ll guide you through the process of configuring your tablet to use the SD card as the primary storage location.
Let’s move on to the final steps and complete the process of setting your SD card as the default storage on your Samsung tablet.
Set SD Card as Default Storage
Now that your SD card has been formatted as internal storage, the final step is to set it as the default storage on your Samsung tablet. By doing so, any new apps, files, or data will be automatically saved to the SD card. Follow these steps to set the SD card as the default storage:
- Ensure that your Samsung tablet is still connected to your computer and that you have navigated to the ADB directory in the command prompt.
- In the command prompt window, type the following command and press Enter:
adb shell - This command will open a shell session on your Samsung tablet.
- Next, type the following command and press Enter:
sm set-force-adoptable true - Now, enter the following command and press Enter:
sm set-default-installer-package com.android.vending - This command sets the Google Play Store as the default installer package to ensure that apps are installed directly on the SD card.
- Finally, to verify that your SD card is set as the default storage, enter the following command and press Enter:
sm get-primary-storage-uuid - The command will provide the UUID of the default storage, which should match the UUID of your SD card.
With these commands, you have successfully set your SD card as the default storage on your Samsung tablet. Any new apps, files, or data will now be automatically saved to the SD card, freeing up precious internal storage space.
It’s important to remember that some apps may still store data on the internal storage by default. However, you can manually move apps and data to the SD card through the settings on your tablet. Additionally, note that certain apps may not be movable to the SD card due to restrictions imposed by the app developers.
Now that you have set your SD card as the default storage on your Samsung tablet, you can enjoy the increased storage space and better organization of your files. Remember to regularly backup your data to prevent any potential data loss.
Congratulations! You have successfully completed the process of setting your SD card as the default storage on your Samsung tablet. Enjoy the expanded storage capacity and improved functionality of your device!
Conclusion
Congratulations on successfully setting your SD card as the default storage on your Samsung tablet! By following the steps outlined in this guide, you have expanded your device’s storage capacity and gained the ability to store apps, files, and data directly on the SD card.
Enabling adoptable storage, formatting the SD card as internal storage, and setting it as the default storage location provide numerous benefits. Not only will you free up valuable internal storage space, but you’ll also enjoy seamless integration of the SD card into your tablet’s storage system.
Remember to regularly backup your important files and data to avoid any potential data loss. While adopting the SD card as internal storage offers convenience, it’s essential to be mindful of the limitations. Some apps may not be movable to the SD card, and certain restrictions may be imposed by the app developers.
In case you encounter any issues or need further assistance, consult the documentation provided by Samsung or reach out to their customer support team for guidance specific to your device model.
We hope that this guide has been helpful in setting your SD card as the default storage on your Samsung tablet. Enjoy the additional storage space and optimize the functionality of your device to better suit your needs!