Introduction
Welcome to the world of puzzle pictures on iMessage! If you’re looking to add a unique twist to your conversations, puzzle pictures are the perfect way to do it. With puzzle picture apps, you can transform your ordinary photos into captivating puzzles that will engage and entertain your friends and family.
So, what exactly are puzzle pictures? These are images that have been fragmented into pieces, resembling a jigsaw puzzle. Instead of sending a regular photo, you can send a puzzle picture to spark curiosity and add an element of fun to your conversations.
In this article, we’ll guide you through the process of sending puzzle pictures on iMessage. We’ll show you how to download a puzzle picture app, generate puzzle pictures, and share them with your contacts seamlessly. It’s time to take your messaging experience to the next level!
Before we dive into the step-by-step guide, there are a few puzzle picture apps available on the App Store that you can choose from. Each app offers different puzzle styles, difficulty levels, and customization options. Feel free to explore and experiment with different apps until you find the one that suits your preferences.
Now, let’s get started on our puzzle picture adventure and learn how to impress your friends with mind-boggling images!
What are Puzzle Pictures?
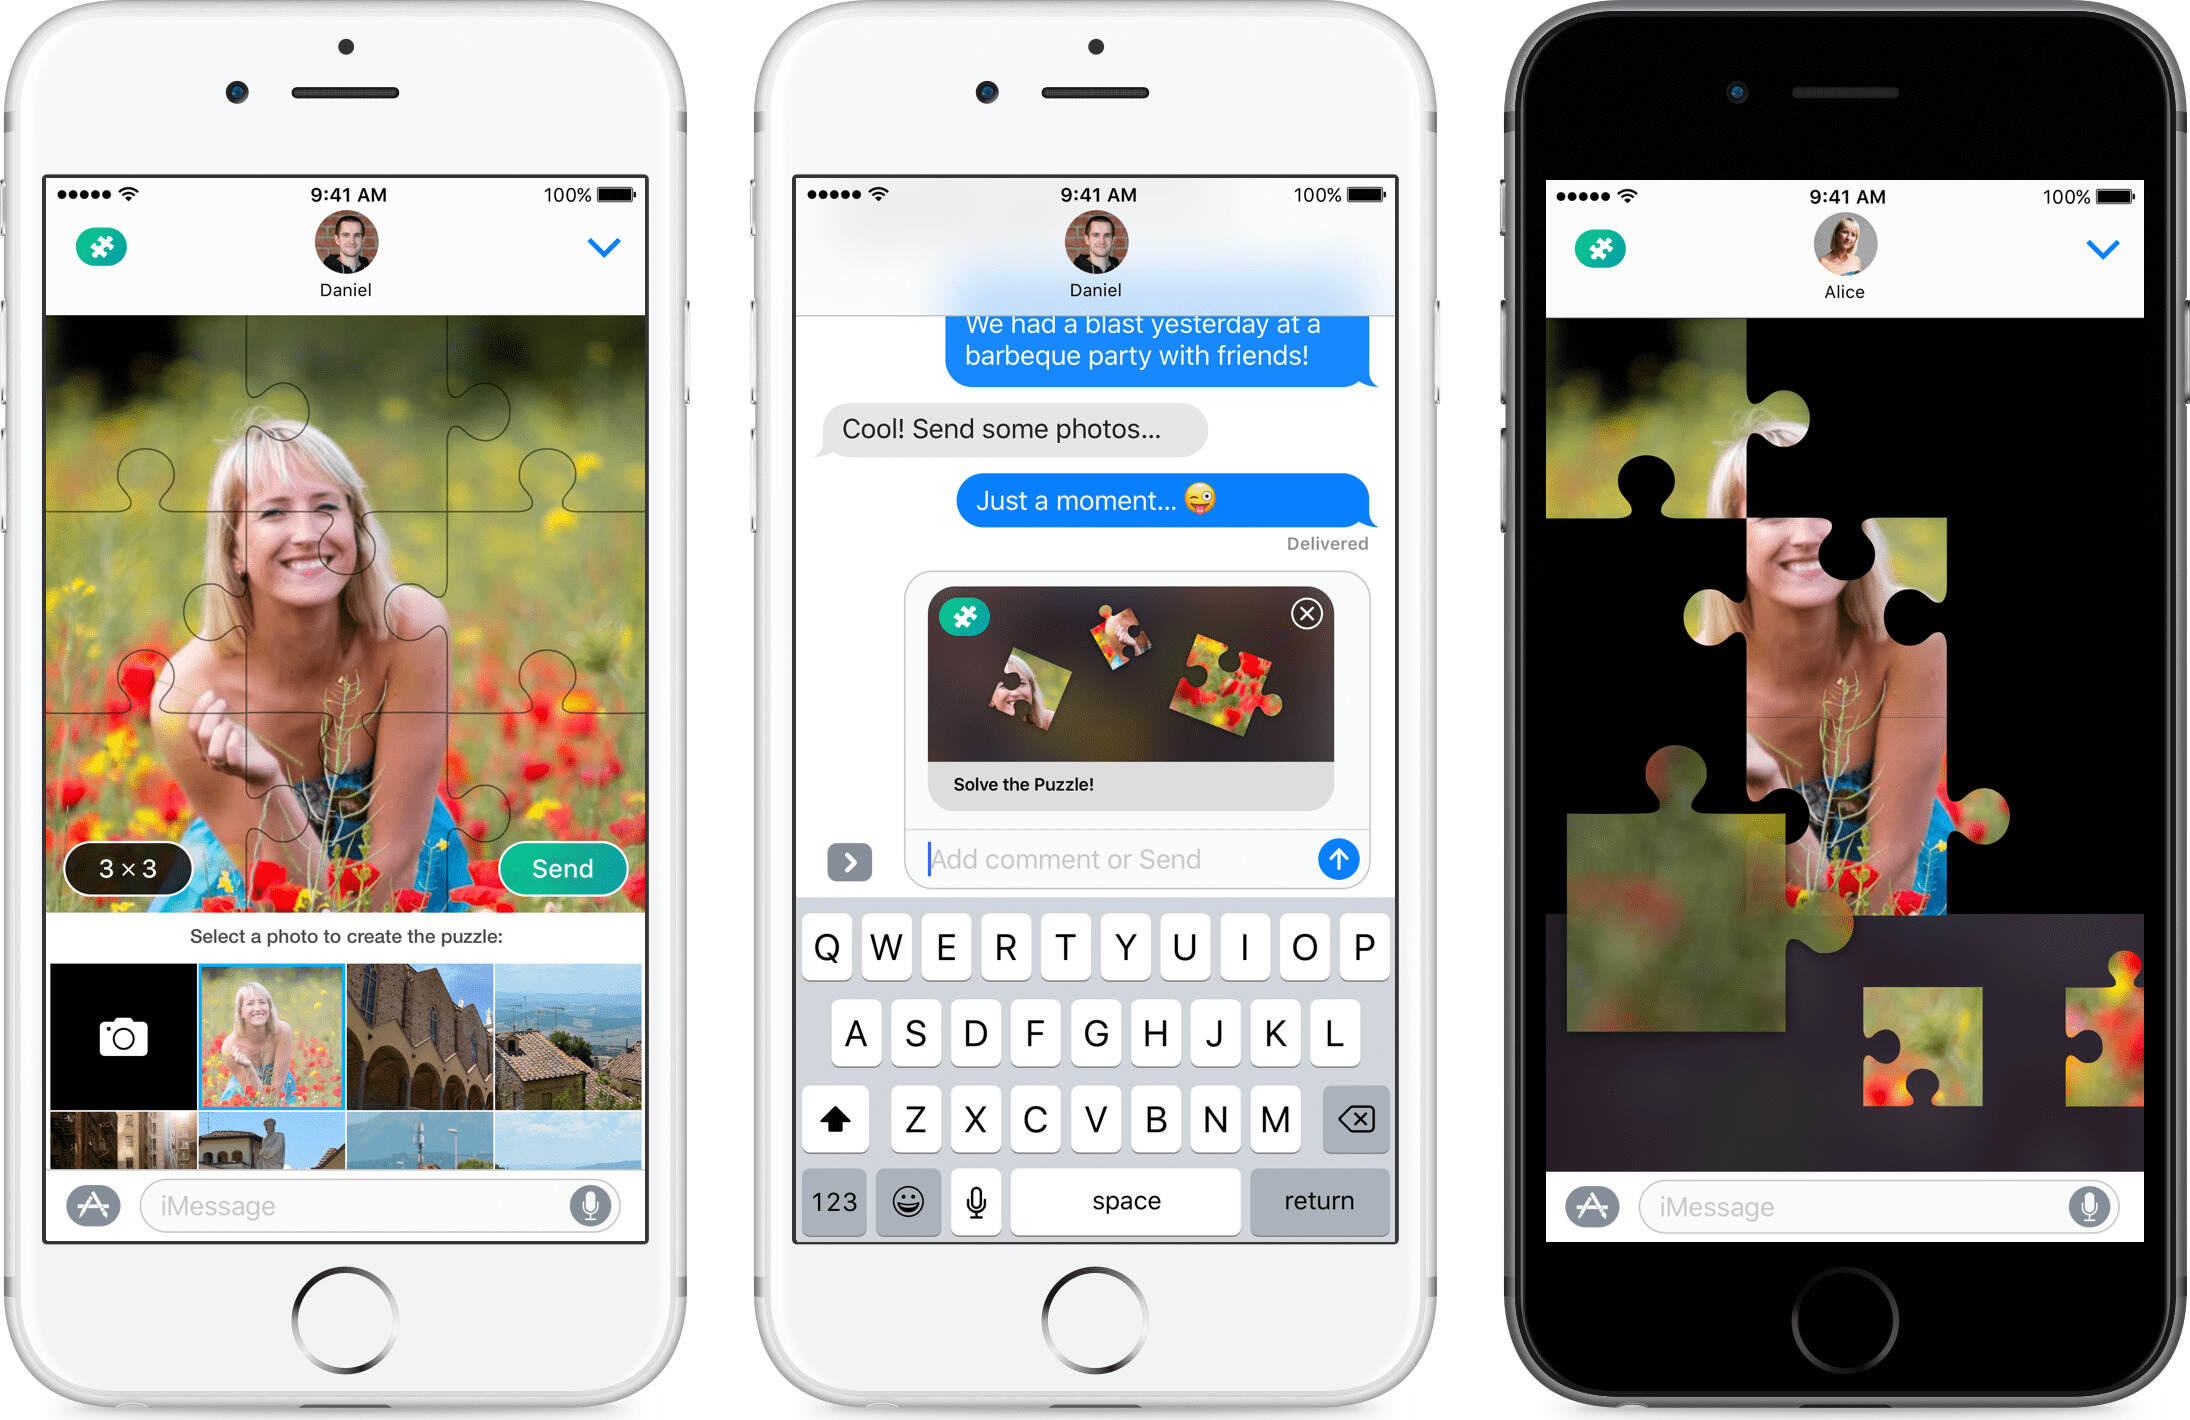
Puzzle pictures are a creative and interactive way to share images with your friends and family. Instead of sending a regular photo, puzzle pictures add an extra layer of intrigue and enjoyment to your conversations. These images are fragmented into various puzzle pieces, resembling a jigsaw puzzle, and require the recipient to solve the puzzle to reveal the complete picture.
One of the main advantages of puzzle pictures is that they engage the recipient and encourage active participation. It’s a fun challenge to piece together the scattered fragments and discover the hidden image. Puzzle pictures can be a great icebreaker, conversation starter, or a way to surprise someone with a unique and personalized message.
With puzzle picture apps, you can easily create these captivating images from your own photos or choose from a library of pre-made puzzle templates. These apps provide a range of customization options, allowing you to select the puzzle style, difficulty level, and even add text or stickers to your puzzle picture.
Puzzle pictures can be used in various scenarios, such as sending birthday wishes, sharing vacation memories, or teasing a surprise announcement. You can even use them to convey a secret message by encrypting it within the puzzle. The possibilities are endless, and the creative freedom is in your hands.
Whether you’re looking to add some excitement to your conversations or simply want to showcase your artistic side, puzzle pictures are a fantastic choice. They combine the joy of solving puzzles with the visual appeal of photography, making them a unique and engaging form of communication.
Now that you have a better understanding of what puzzle pictures are, let’s explore how you can create and send them on iMessage using puzzle picture apps.
Using Puzzle Picture Apps
Puzzle picture apps are the key to creating and sending captivating puzzle pictures on iMessage. These apps provide a user-friendly interface and a wide range of customization options to make your puzzle pictures truly unique. Here’s a step-by-step guide on how to use puzzle picture apps:
Step 1: Download a Puzzle Picture App
First, head to the App Store on your iPhone and search for puzzle picture apps. Select one that catches your eye and download it onto your device. Some popular puzzle picture apps include Puzzle Pic, Jigsaw Puzzle Creator, and Puzzle Art.
Step 2: Take or Select a Picture
Once you have the app installed, open it and either take a new photo using your device’s camera or choose an existing photo from your camera roll. This can be any picture you want to transform into a puzzle.
Step 3: Choose a Puzzle Style
Next, select the puzzle style you want to apply to your picture. Puzzle picture apps offer a variety of puzzle styles, such as traditional jigsaw puzzles, mosaic puzzles, or even sliding block puzzles. Pick the style that suits your preferences and the image you’re working with.
Step 4: Set the Puzzle Difficulty
Now it’s time to decide on the difficulty level of your puzzle. Puzzle picture apps often provide options to adjust the number of puzzle pieces or the complexity of the puzzle, allowing you to make it easier or more challenging depending on your intended audience.
Step 5: Generate the Puzzle Picture
Once you’ve customized the puzzle style and difficulty, tap on the “Generate” or “Create” button to transform your image into a puzzle. The app will automatically break your picture into puzzle pieces, ready to be solved.
Step 6: Save the Puzzle Picture to Your Device
Before sending the puzzle picture, make sure to save it to your device’s camera roll. This will allow you to access it easily when sending it through iMessage.
Now that you have created your puzzle picture, it’s time to send it to your friends and family. In the next section, we will guide you through the process of sending the puzzle picture on iMessage.
Step 1: Download a Puzzle Picture App
The first step in creating and sending puzzle pictures on iMessage is to download a puzzle picture app from the App Store. These apps provide the necessary tools and features to transform your ordinary photos into captivating puzzle images. Here’s how to download a puzzle picture app:
1. Open the App Store on your iPhone. You can find the App Store icon on your home screen.
2. Tap on the search icon at the bottom right corner of the App Store.
3. In the search bar at the top of the App Store, type in “puzzle picture app” or specific names of puzzle picture apps you’re interested in, such as “Puzzle Pic” or “Jigsaw Puzzle Creator.”
4. Press the search icon or enter key on the keyboard to initiate the search.
5. The App Store will display a list of results based on your search query. Browse through the options and read the descriptions and reviews to find the puzzle picture app that suits your needs.
6. Once you’ve decided on an app, tap on the “Get” or “Download” button next to its name.
7. If prompted, authenticate the download by providing your Apple ID password or using Touch ID/Face ID.
8. The app will start downloading and installing on your iPhone. Wait for the process to complete.
9. Once the app is successfully installed, you will find its icon on your home screen, ready to be used.
Now that you have successfully downloaded a puzzle picture app, you’re one step closer to creating and sharing unique puzzle pictures on iMessage. Next, we’ll move on to the next step: taking or selecting a picture to turn into a puzzle.
Step 2: Take or Select a Picture
Now that you have downloaded a puzzle picture app, it’s time to choose the image you want to transform into a captivating puzzle. You have two options: take a new photo using your device’s camera or select an existing photo from your camera roll. Follow these steps to take or select a picture:
Taking a New Photo:
1. Open the puzzle picture app you downloaded from the App Store.
2. Look for the camera icon or a button that allows you to access your device’s camera within the app. Tap on it.
3. Your device’s camera will open, allowing you to capture a new photo. Position your subject and tap the shutter button to take the photo.
4. The puzzle picture app may provide additional editing options, such as filters or adjustments to enhance your photo. Explore these features if desired.
5. Once you’re satisfied with the photo, save it within the puzzle picture app or directly to your device’s camera roll.
Selecting an Existing Photo:
1. Open the puzzle picture app on your device.
2. Look for an option that allows you to access your device’s photo library or camera roll. Tap on it.
3. The app will display your photo library, allowing you to scroll through and select the image you want to transform into a puzzle.
4. Tap on the desired photo to choose it for the puzzle.
Whether you decide to take a new photo or use an existing one, make sure it’s a picture that you think will make an interesting and visually appealing puzzle. Once you’ve taken or selected the perfect photo, you’re ready to move on to the next step: choosing a puzzle style to apply to your image.
Step 3: Choose a Puzzle Style
After selecting or taking a photo, the next step in creating a puzzle picture is to choose a puzzle style. Puzzle picture apps offer a variety of styles that determine how the image will be fragmented and reassembled as a puzzle. Follow these steps to choose a puzzle style:
1. Open the puzzle picture app on your device.
2. Look for an option that allows you to customize the puzzle style. This may be labeled as “Styles,” “Puzzle Styles,” or something similar.
3. Tap on the puzzle style selection to explore the available options.
4. The puzzle picture app may provide various choices, such as traditional jigsaw puzzles, mosaic puzzles, sliding block puzzles, or other creative styles.
5. Preview the different puzzle styles by selecting them one by one. This will give you an idea of how your picture will appear as a puzzle in each style.
6. Once you find a puzzle style that resonates with you and suits your image, tap on it to select it.
Keep in mind that the puzzle style you choose will influence the overall look and feel of the puzzle picture. Some styles may be more intricate and challenging, while others may provide a more straightforward and organized puzzle-solving experience. Consider the subject matter of your photo and the intended audience when making your selection.
Experimenting with different puzzle styles can be a fun and creative process. Don’t be afraid to try out various styles to find the one that brings out the best in your image. Once you’ve chosen the puzzle style, you’re ready to move on to the next step: setting the puzzle difficulty level.
Step 4: Set the Puzzle Difficulty
Once you have chosen a puzzle style for your puzzle picture, the next step is to set the puzzle difficulty. The puzzle difficulty level determines how challenging the puzzle will be for the recipient to solve. Here’s how you can set the puzzle difficulty:
1. Open the puzzle picture app on your device.
2. Look for an option that allows you to adjust the puzzle difficulty. This might be labeled as “Difficulty,” “Puzzle Difficulty,” or something similar.
3. Tap on the puzzle difficulty selection to see the available options.
4. Puzzle picture apps usually offer a range of difficulty levels, such as easy, medium, and hard, or provide options to customize the number of puzzle pieces or complexity of the puzzle.
5. Consider the intended recipient and their puzzle-solving skills when selecting the difficulty level. If you’re sending the puzzle picture to someone who enjoys a challenge, you might opt for a more difficult setting. On the other hand, if the recipient is new to puzzle solving or prefers a more relaxed experience, an easier difficulty level would be more suitable.
6. Once you’ve decided on the puzzle difficulty, tap on the desired option to set it.
Setting the puzzle difficulty allows you to tailor the puzzle experience to the preferences and abilities of the recipient. It’s important to strike a balance between providing an enjoyable challenge and ensuring that the puzzle is solvable.
Remember, it’s always a good practice to consider the audience when choosing the puzzle difficulty. If in doubt, you can start with a moderate difficulty level and adjust it in subsequent puzzles based on the feedback and reactions you receive.
Now that you have set the puzzle difficulty level, you’re ready to move on to the next step: generating the puzzle picture from your chosen image and puzzle style.
Step 5: Generate the Puzzle Picture
With the puzzle style and difficulty level chosen, it’s time to generate the puzzle picture from your selected image. This step transforms your photo into a fragmented puzzle that the recipient will need to solve. Follow these steps to generate the puzzle picture:
1. Open the puzzle picture app on your device.
2. Ensure that your chosen photo is still selected or loaded within the app.
3. Look for a button or option that says “Generate,” “Create Puzzle,” or something similar. Tap on it.
4. The puzzle picture app will start the process of breaking your image into puzzle pieces based on the selected puzzle style and difficulty level.
5. Depending on the complexity of the puzzle and the processing power of your device, this step may take a few seconds or longer.
6. Once the puzzle picture is generated, the app will present you with the completed puzzle image broken into pieces or fragments.
7. Take a moment to preview and ensure that the puzzle picture appears as desired. If you’re satisfied with the result, proceed to the next step. Otherwise, you can go back and make adjustments to the puzzle style or difficulty level if needed.
Generating the puzzle picture is an exciting moment, as it transforms your original image into a unique and engaging puzzle. It’s always fun to see how the puzzle pieces come together to form the final picture.
After successfully generating the puzzle picture, you can proceed to the next step: saving the puzzle picture to your device’s camera roll. This will allow you to easily access and share the puzzle picture through iMessage.
Step 6: Save the Puzzle Picture to Your Device
Once you have generated the puzzle picture using the puzzle picture app, the next step is to save it to your device’s camera roll. This will allow you to easily access and share the puzzle picture through iMessage. Follow these steps to save the puzzle picture:
1. With the puzzle picture displayed on your screen, look for an option that allows you to save or export the image. This is typically represented by an icon that resembles a download or arrow pointing downwards.
2. Tap on the save or export option within the puzzle picture app.
3. A pop-up menu or prompt may appear, asking for permission to access your device’s photos. Make sure to grant the necessary permissions.
4. Once permissions are granted, the puzzle picture app will save the completed puzzle picture to your device’s camera roll.
5. After the save process is complete, you can confirm that the puzzle picture has been successfully saved by opening your device’s Photos app or camera roll.
6. In the Photos app, locate the puzzle picture and check that the image is there and correctly saved.
Saving the puzzle picture to your device’s camera roll ensures that you have a copy of the completed puzzle image readily available for sharing. It also allows you to access the puzzle picture later if you want to send it to multiple recipients or use it in future conversations.
Now that you have successfully saved the puzzle picture to your device, you’re ready to move on to the next step: opening iMessage and starting a new conversation to share the puzzle picture with your chosen recipient.
Step 7: Open iMessage and Start a New Conversation
After saving the puzzle picture to your device’s camera roll, the next step is to open iMessage and start a new conversation. iMessage is the default messaging app on iPhones and is pre-installed on all iOS devices. Follow these steps to open iMessage and begin a new conversation:
1. Locate the iMessage app on your device. It is represented by a speech bubble icon with a blue background.
2. Tap on the iMessage app to open it. This will take you to the main iMessage interface.
3. Look for the “New Message” button, often represented by a pencil and a sheet of paper icon, typically located in the top right or bottom right corner of the screen. Tap on it to start a new conversation.
4. A new message screen will appear, prompting you to select a contact or enter a recipient’s name or phone number.
5. Enter the name or number of the person you want to send the puzzle picture to. You can either select a contact from your address book or manually type in the recipient’s details.
6. Once you have entered the recipient’s information, tap on the “Compose” field to proceed to the next step.
Opening iMessage and starting a new conversation provides you with a blank canvas to share your puzzle picture with your chosen recipient. The iMessage platform allows for seamless picture sharing, making it a great choice for sending and receiving puzzle pictures.
Now that you have opened iMessage and begun a new conversation, you’re ready to move on to the next step: accessing the App Store within iMessage to find and use the puzzle picture app.
Step 8: Tap on the App Store Icon
Once you have opened iMessage and started a new conversation, the next step is to access the App Store within iMessage. The App Store allows you to browse and install various apps that can enhance your messaging experience, including puzzle picture apps. Here’s how to tap on the App Store icon:
1. In the iMessage conversation window, look for a grid of icons located near the bottom left corner of the screen. This grid icon represents the App Store.
2. Tap on the grid icon to open the App Store within iMessage. This will reveal a list of available apps and options.
3. Depending on your device and settings, you may need to scroll horizontally to find the App Store icon.
4. If the grid icon is not visible, you can also access the App Store by tapping on the “A” icon, which represents the apps and app drawer.
5. Once you have tapped on the App Store icon, it will open, displaying a range of app categories and featured apps.
6. You can explore the different app categories or use the search function to find the specific puzzle picture app you have downloaded.
7. Tap on the search bar at the top of the App Store screen and enter the name of the puzzle picture app you want to use. Alternatively, you can browse through the app categories or featured sections to find the app.
8. Once you have located the puzzle picture app within the App Store, tap on it to open its app details page.
Tapping on the App Store icon within iMessage allows you to access a variety of apps, including the puzzle picture app you downloaded. This step is crucial for enabling the integration of the puzzle picture app into your iMessage conversation, making it easy to send the puzzle picture to your recipient.
Now that you have accessed the App Store within iMessage, you’re ready to proceed to the next step: locating and selecting the puzzle picture app to use.
Step 9: Locate the Puzzle Picture App and Tap on It
After tapping on the App Store icon within iMessage, the next step is to locate the puzzle picture app you downloaded and tap on it to open it within the messaging platform. This will allow you to access the puzzle picture app’s features and select the puzzle picture you want to send. Here’s how to locate the puzzle picture app and tap on it:
1. Once you are in the App Store within iMessage, you can either browse the different app categories or use the search function to find the puzzle picture app.
2. If you remember the name of the puzzle picture app, tap on the search bar at the top of the App Store screen and enter its name. Alternatively, you can explore the different app categories to find it.
3. Scroll through the search results or app categories to locate the puzzle picture app you downloaded. Look for the app icon and name to identify it.
4. Once you have found the puzzle picture app, tap on it to open its app details page.
5. On the app details page, you will find information about the app, such as its ratings, reviews, and screenshots. Take a moment to review them if desired.
6. Look for a button that says “Open” or “Get.” Tap on it to open the puzzle picture app within iMessage.
7. The puzzle picture app will then open, presenting you with its user interface and options for selecting the puzzle picture you want to send.
Tapping on the puzzle picture app within the App Store in iMessage allows you to seamlessly integrate its features into your messaging experience. From here, you can easily navigate the puzzle picture app and choose the specific puzzle picture that you want to send to your recipient.
Now that you have located and tapped on the puzzle picture app within the App Store, you’re ready to move on to the next step: selecting the puzzle picture you want to send.
Step 10: Select the Puzzle Picture You Want to Send
After opening the puzzle picture app within iMessage, the next step is to select the specific puzzle picture that you want to send to your recipient. This allows you to access your saved puzzle pictures and choose the one that you think will create intrigue and engagement. Here’s how to select the puzzle picture:
1. Once you are in the puzzle picture app within iMessage, you will typically see a grid or gallery view of the puzzle pictures that you have created or saved.
2. Depending on the puzzle picture app’s interface, you may need to scroll horizontally or vertically to browse through the available puzzle pictures.
3. Take your time to review the puzzle pictures and think about which one you want to send. Consider the subject matter, composition, and overall appeal of each puzzle picture.
4. When you have made your decision, tap on the puzzle picture to select it. This will bring up additional options and allow you to customize the message if desired.
5. If the puzzle picture app offers customization options, you can add a caption, text, or stickers to accompany the puzzle picture. This allows you to personalize the message and enhance the experience for the recipient.
6. Once you have finalized your puzzle picture selection and any desired customizations, tap on the send button or arrow symbol. This will send the puzzle picture to your chosen recipient within the iMessage conversation.
Selecting the puzzle picture is an exciting moment, as it allows you to share your creative work and add a touch of mystery to your conversation. With the puzzle picture chosen and customized if desired, you’re ready to send it and delight your recipient with an engaging puzzle experience.
Now that you have selected the puzzle picture you want to send within the puzzle picture app in iMessage, you’re ready to move on to the next step: entering the recipient’s name or phone number.
Step 11: Enter the Recipient’s Name or Number
After selecting the puzzle picture you want to send within the puzzle picture app in iMessage, the next step is to enter the recipient’s name or phone number. This allows you to specify who you want to send the puzzle picture to. Here’s how to enter the recipient’s information:
1. In the iMessage conversation window, locate the text field at the bottom of the screen. This is where you can type your message or add the puzzle picture.
2. Tap on the text field to activate it and make it ready for input.
3. Begin typing the name or phone number of the recipient you want to send the puzzle picture to. As you type, iMessage will display suggestions based on your contacts or recent conversations.
4. If the recipient’s contact information appears in the suggestions, you can tap on it to select it and save time. Alternatively, you can continue typing the full name or number manually.
5. If the recipient is not in your contacts, you can enter their phone number directly. Make sure to include the country code if necessary.
6. Double-check the recipient’s name or number to ensure accuracy. This is important to ensure your puzzle picture reaches the intended recipient.
7. Once you have entered the recipient’s information, you can proceed to the next step: tapping the send button to send the puzzle picture within the iMessage conversation.
Entering the recipient’s name or number is crucial as it determines who will receive your puzzle picture. Remember to verify the accuracy of the information to prevent sending the puzzle picture to the wrong person.
Now that you have entered the recipient’s name or number, you’re ready to move on to the final step: sending the puzzle picture and sharing the excitement with your chosen recipient.
Step 12: Tap the Send Button
After entering the recipient’s name or phone number in the iMessage conversation and selecting the puzzle picture you want to send, the final step is to tap the send button. This action will transmit the puzzle picture to the recipient and complete the process of sharing your unique and engaging creation. Here’s how to tap the send button:
1. In the iMessage conversation window, locate the send button. This button is typically represented by an arrow icon pointing upwards or a paper plane icon. It is usually found on the right-hand side of the text field.
2. Double-check the puzzle picture, recipient’s name or number, and any accompanying message or customizations to ensure they are as you intended.
3. Once you are satisfied with everything, tap on the send button to send the puzzle picture.
4. After tapping the send button, the puzzle picture will be sent to the recipient within the iMessage conversation.
5. You may see a sending indicator, such as a spinning wheel, while the puzzle picture is being transmitted. The sending process typically takes only a few moments, depending on your internet connection and file size.
6. Once the puzzle picture has been sent, you will see a confirmation that it has been delivered successfully. This may include a checkmark or other visual indicator next to the message.
Tapping the send button is an exciting moment as it signifies the completion of the process and the anticipation of the recipient’s reaction. It’s the final step in sharing your puzzle picture and delivering a unique and engaging experience to your chosen recipient.
Congratulations! You have successfully tapped the send button and sent the puzzle picture to your recipient. Now, sit back and enjoy the excitement as they receive and solve the puzzle.
Conclusion
Congratulations! You have learned how to send puzzle pictures on iMessage and add a whole new level of creativity and excitement to your conversations. By following the step-by-step guide, you can easily transform your ordinary photos into captivating puzzles that will engage and entertain your friends and family.
Throughout this process, you have discovered the world of puzzle picture apps and explored the different steps involved in creating and sending puzzle pictures. From downloading a puzzle picture app to selecting the puzzle style, setting the difficulty level, generating the puzzle picture, saving it to your device, and opening iMessage to start a new conversation – each step has brought you closer to delivering a unique and enjoyable messaging experience.
Remember to consider the recipient and their puzzle-solving skills when choosing the difficulty level. Additionally, don’t hesitate to experiment with different puzzle styles and customization options to make your puzzle pictures truly unique and captivating.
Now that you have mastered the art of sending puzzle pictures on iMessage, you can surprise your friends, family, and loved ones with intriguing and visually appealing images. Take advantage of this engaging form of communication to spark curiosity, initiate conversations, or simply provide a delightful challenge.
So, go ahead and get creative! Start creating your own puzzle pictures and share them through iMessage to bring joy and excitement to your conversations. Enjoy the process of challenging the minds of your recipients and creating memorable moments through the power of puzzle pictures.
Happy puzzling and happy messaging!