Introduction
Welcome to the world of email communication! Email has become an indispensable tool, allowing us to connect and communicate with others, whether it’s for personal or professional purposes. Gmail, Google’s popular email service, provides a user-friendly platform that makes sending emails a breeze.
In this article, we will guide you through the process of sending an email on Gmail. Whether you’re new to Gmail or simply want to brush up on your email skills, we’ve got you covered. We’ll cover everything from setting up your Gmail account to managing recipients, formatting your emails, and utilizing useful features like attachments and signatures.
With Gmail’s features and functionalities, you’ll be able to compose, send, and manage your emails with ease. Plus, we’ll share some best practices for email etiquette to ensure your messages are professional and well-received.
So, let’s get started and learn how to send an email on Gmail!
Setting Up Your Gmail Account
Before you can start sending emails on Gmail, you’ll need to set up your Gmail account. If you already have a Google account, you can use that to sign in to Gmail. If not, follow these simple steps to create a new account:
- Go to the Gmail website (www.gmail.com) and click on the “Create account” button.
- Fill out the required information, including your first and last name, desired email address, and password. Make sure to choose a strong password to protect your account.
- Click “Next” and enter your phone number to verify your account. You can also choose to skip this step and verify your account later.
- Once you’ve successfully created your account, you’ll be taken to your Gmail inbox.
After setting up your Gmail account, you can customize your account settings according to your preferences. You can upload a profile picture, set up email forwarding, and modify other account settings by clicking on the “Settings” gear icon in the top-right corner of your inbox.
Additionally, Gmail offers a range of themes to personalize your inbox’s appearance. You can access these themes by clicking on the “Settings” gear icon, selecting “Themes,” and choosing a theme that suits your style.
Now that you have your Gmail account set up and customized, you’re ready to start composing and sending emails. In the next section, we’ll guide you through the process step by step.
Composing and Sending an Email
With your Gmail account ready, it’s time to compose and send your first email. Follow these steps:
- Open your Gmail inbox by signing in to your account.
- Click on the “Compose” button, which is located in the top-left corner of your inbox.
- A new window will appear where you can compose your email.
- Start by entering the recipient’s email address in the “To” field. You can also add multiple recipients by separating their email addresses with commas.
- Next, enter a relevant and concise subject line in the “Subject” field. This helps recipients understand the purpose of your email.
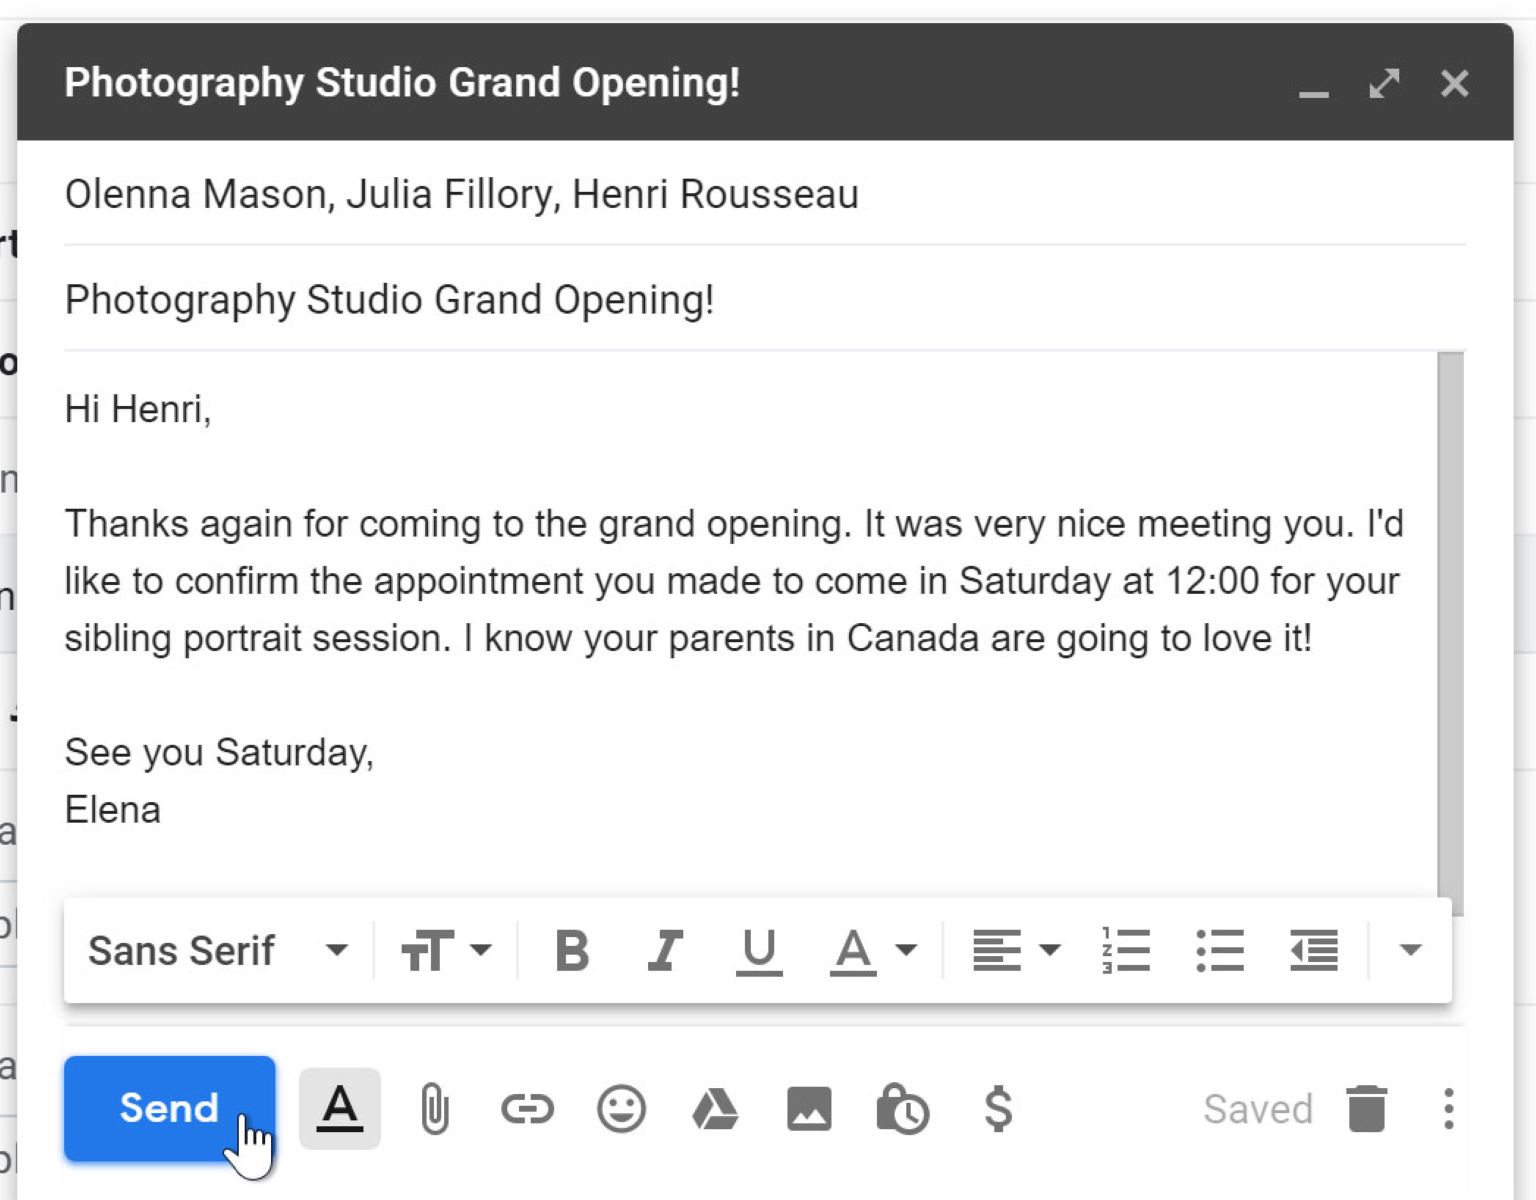
- In the body of the email, type your message. You can format your text using the options available in the formatting toolbar, such as making the text bold, italic, or underlined.
- If you want to include a file or attachment, click on the “Attach files” icon, represented by a paperclip. You can select files from your computer or choose from files stored in Google Drive.
- Once you’re satisfied with your email, click the “Send” button to send it.
Gmail also offers additional features to enhance your email experience. For example, you can add emojis by clicking on the “Insert emoji” icon in the formatting toolbar. Emojis can add some personality and expressiveness to your emails.
Moreover, Gmail has an auto-save feature that periodically saves your email as a draft. This helps prevent any loss of information in the event of an internet disruption or accidental browser closure. If you need to save an email as a draft intentionally, you can click the “Save draft” option to keep it for further editing before sending.
Now that you know how to compose and send an email on Gmail, let’s delve into additional techniques and tips to enhance your email composition.
Adding Attachments
Attaching files to your emails can be incredibly useful when you need to share documents, photos, or other types of files with your recipients. With Gmail, adding attachments is a straightforward process. Here’s how you can do it:
- Start by composing a new email in your Gmail inbox.
- Click on the “Attach files” icon, represented by a paperclip, located in the toolbar above the email body.
- A file explorer window will open, allowing you to navigate through your computer’s files.
- Select the file(s) you want to attach and click “Open.” You can attach multiple files by holding down the Ctrl key (Command key on Mac) and selecting the desired files.
- Gmail will begin uploading the attachments, and a progress bar will show the status of each upload.
- Once the upload is complete, you’ll see a list of the attached files below the email body.
- Optionally, you can add a message or description related to the attached file(s) in the email body.
- When you’re ready to send the email, click the “Send” button, and the email, along with the attachments, will be sent to the recipients.
It’s important to keep in mind that Gmail has a limit on the size of attachments you can send. The maximum attachment size allowed by Gmail is 25MB for regular Gmail accounts, while for Gmail accounts associated with G Suite or Workspace, the limit is 50MB. If your files exceed these limits, you can consider using cloud storage services like Google Drive or compressing the files before attaching them to the email.
In addition to attaching files from your computer, Gmail also provides the option to attach files from Google Drive. Simply click on the “Drive” icon in the toolbar above the email body to access your Google Drive files and select the files you want to attach. This is particularly useful for large files or files that need to be collaborated on.
Now that you’re familiar with attaching files in Gmail, you can easily share important documents, photos, and more with your email recipients. Let’s move on to the next section, where we’ll explore how to effectively manage your email recipients.
Managing Email Recipients
When sending emails, it’s essential to manage your email recipients efficiently to ensure that your message reaches the right people. Gmail offers various features that can help you organize and manage your email recipients effectively. Here are some tips:
- To add recipients to your email, enter their email addresses in the “To” field. You can also include multiple recipients by separating their email addresses with commas.
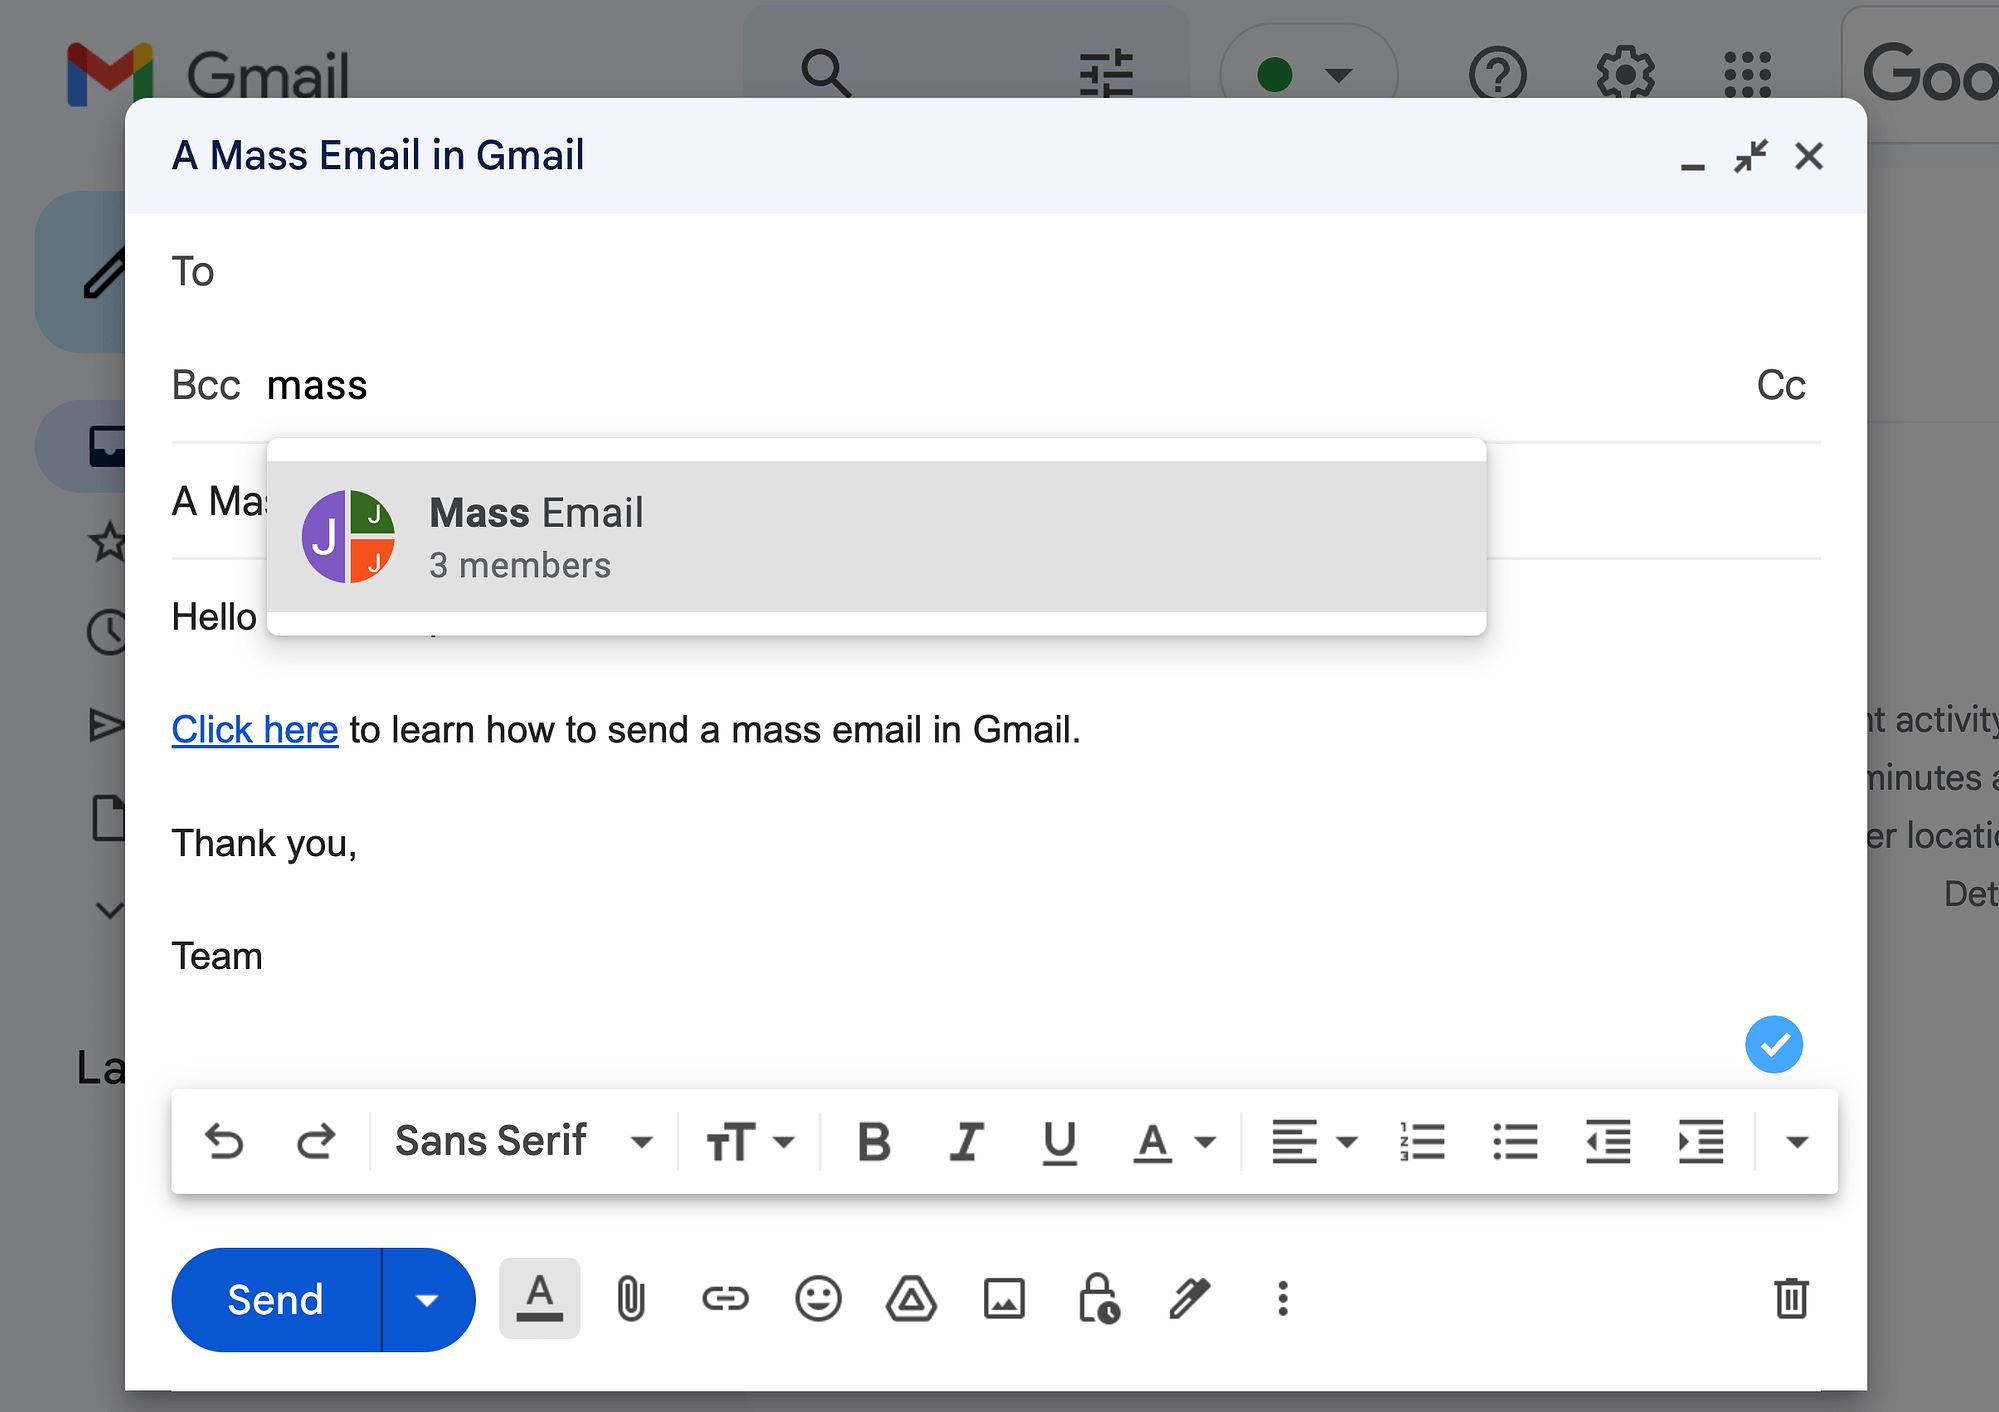
- If you want to keep the email recipients hidden from each other, you can use the “Bcc” (blind carbon copy) field instead of the “To” field. This prevents recipients from seeing who else received the email.
- In some cases, you may want to explicitly include recipients who need to be informed or involved without them being the primary recipients. You can use the “Cc” (carbon copy) field for this purpose. The recipients in the “Cc” field will receive a copy of the email, but it’s not necessary for them to take any immediate action.
- If you need to remove a recipient from the recipient list, click on their email address in the recipient bar and choose “Remove” or press the backspace key.
- When replying to or forwarding an email, Gmail automatically includes the original email’s recipients in the appropriate fields. You can remove or add recipients as necessary before sending the reply or forward.
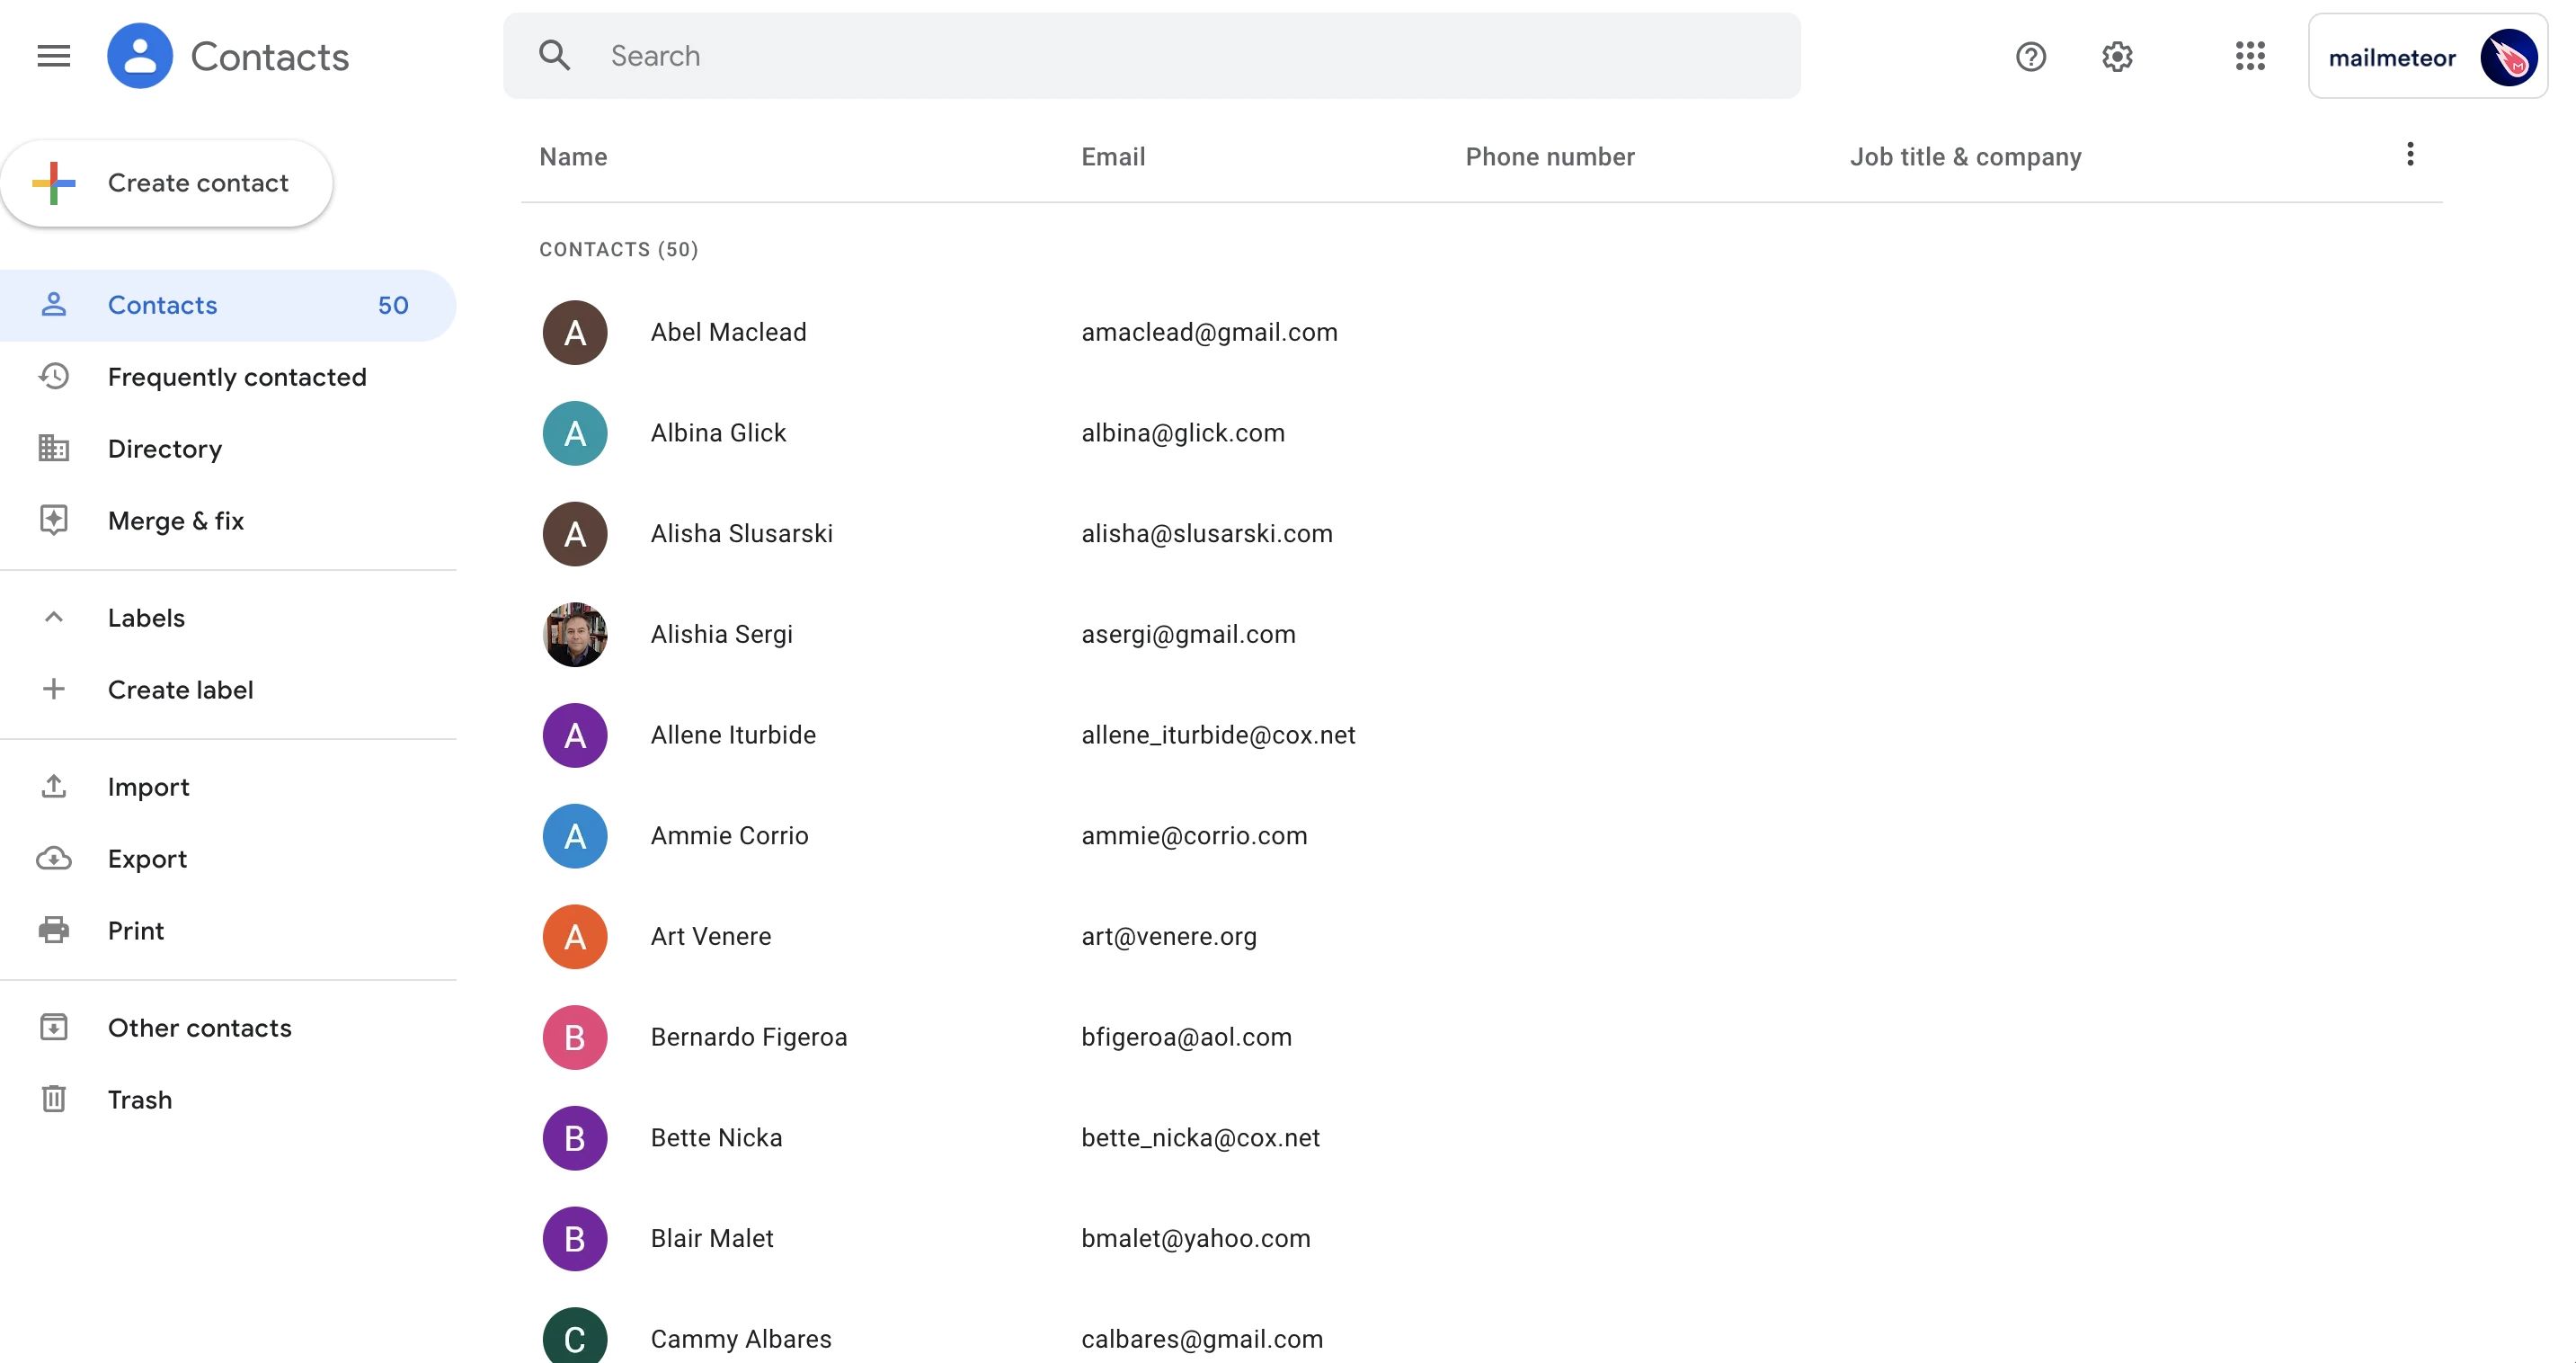
- If you often send emails to a particular group of recipients, you can create a Gmail contact group to easily include them in future emails. To do this, click on the “Google Apps” icon at the top-right corner of your Gmail inbox, select “Contacts,” and then create a new contact group.
Managing your email recipients ensures that your messages are targeted and delivered to the right individuals or groups. It helps maintain privacy, prevents clutter, and ensures efficient communication.
Now that you know how to manage your email recipients effectively, let’s move on to the next section, where we’ll discuss the importance of writing a compelling subject line for your emails.
Writing the Subject Line
The subject line of your email plays a crucial role in capturing the attention of your recipients and giving them a clear idea of what your email is about. A well-crafted subject line can significantly increase the chances of your email being opened and read. Here are some tips for writing an effective subject line:
- Be concise: Keep your subject line short and to the point, ideally around 5-8 words. Long subject lines can be overwhelming and may get cut off in email previews.
- Summarize the content: Use the subject line to provide a brief summary or highlight the main topic of your email. This helps recipients understand the purpose of your email at a glance.
- Grab attention: Make your subject line attention-grabbing by using strong words or posing a question. However, avoid using clickbait or misleading tactics, as this can negatively impact your credibility.
- Personalize when possible: If you are sending an email to a specific individual, consider personalizing the subject line by including their name or referencing a previous conversation. This shows that you have taken the time to craft a personalized message.
- Avoid all caps and excessive punctuation: Using all caps or excessive punctuation in your subject line can come across as shouting or spammy. Stick to proper capitalization and use punctuation sparingly.
- Consider including urgency or deadlines: If your email requires immediate attention or has a specific deadline, mention it in the subject line. This gives recipients a sense of urgency and increases the likelihood of your email being opened and acted upon promptly.
- Use keywords strategically: Incorporate relevant keywords in your subject line to help recipients quickly identify the content and increase the chances of your email appearing in search results.
Remember, the subject line is often the first thing your recipients see, and it can determine whether your email gets opened or ignored. Take the time to craft a clear, compelling subject line that entices recipients to open your email and engage with its contents.
Now that you have the insights on crafting an effective subject line, let’s move on to the next section, where we’ll explore ways to format your email to make it more visually appealing and organized.
Formatting Your Email
Formatting your email properly can make it more visually appealing, organized, and easy to read for your recipients. Gmail provides various formatting options to help you achieve this. Here are some tips for formatting your emails effectively:
- Use paragraphs: Break up your email content into paragraphs to improve readability. Each paragraph should focus on a specific point or topic.
- Emphasize important text: Use formatting options like bold, italic, or underline to emphasize key points or important information in your email. However, use these formatting options sparingly and only when necessary.
- Highlight important information: Consider using bullet points or numbered lists to present information in a clear and organized manner. This helps your recipients quickly grasp crucial details.
- Include hyperlinks: If you need to refer to external websites or provide additional resources, insert hyperlinks in your email. This allows recipients to easily access the linked content with a simple click.
- Consider the use of images: Adding relevant images can enhance the visual appeal of your email and make it more engaging. However, ensure that the file size of the images is optimized to avoid slow loading times.
- Check your email’s readability: Before sending your email, take a moment to read through it and ensure that the formatting is consistent and the text is easy to read. Avoid using excessive formatting or overly complex designs that may distract or confuse your recipients.
Remember, the purpose of formatting your email is to make it clear, organized, and visually appealing. Proper formatting enhances the readability of your email and helps to convey your message effectively.
Now that you have gained insights into formatting your email, let’s move on to the next section, where we’ll discuss the importance of adding a signature to your emails.
Adding a Signature to Your Emails
Adding a signature to your emails is an excellent way to leave a professional and personal touch when communicating with others through Gmail. A signature typically includes your name, contact information, and any additional details you’d like to include. Here’s how you can add a signature to your Gmail account:
- Open your Gmail inbox and click on the “Settings” gear icon in the top-right corner.
- From the drop-down menu, select “See all settings.”
- Navigate to the “General” tab.
- Scroll down to the “Signature” section.
- Check the box that says, “Create a new signature.”
- Type your desired signature in the text box. You can include your name, job title, company, phone number, website, or any other relevant information.
- Use the formatting toolbar to customize the appearance of your signature. You can adjust the font, size, color, and alignment to match your preferences.
- If you want to include an image or logo in your signature, click on the “Insert image” icon and upload the image from your computer or select an image from Google Drive.
- Once you’re satisfied with your signature, scroll down to the bottom of the settings page and click “Save Changes.”
Your signature will now be automatically added to the bottom of each new email you compose. You can also choose to include your signature in email replies or forwards by selecting the appropriate option from the settings page.
Adding a signature to your emails adds professionalism and helps recipients easily identify and contact you. Consider keeping your signature concise and clutter-free to maintain a clean and professional appearance.
Now that you know how to add a signature to your emails, let’s move on to the next section, where we’ll discuss the importance of saving drafts to avoid losing important email content.
Saving Drafts
When composing an email, it’s common to need some time to gather your thoughts or access additional information before sending it. Gmail’s draft feature allows you to save your work in progress, ensuring that you don’t lose any important content. Here’s how you can save drafts in Gmail:
- While composing an email, click on the “Save draft” button located at the bottom-left corner of the email composition window. Alternatively, you can use the keyboard shortcut “Ctrl + S” (Command + S on Mac) to save your draft.
- Gmail will automatically save your email as a draft, and you can continue editing it at any time by accessing the “Drafts” folder located on the left side panel of your inbox.
- To open a previously saved draft, simply click on it in the “Drafts” folder, and your email will load with all your previous content preserved.
In addition to manually saving drafts, Gmail also has an auto-save feature that periodically saves your email as you type. This provides an extra layer of protection against accidental loss of data due to power outages, browser crashes, or internet disruptions.
Using the draft feature can be particularly helpful in situations where you need to revisit or revise your email later. It allows you to take the time to carefully craft your message, proofread it, or make any necessary changes before sending it out.
It’s worth noting that drafts are saved within your Gmail account and can be accessed from any device you use to access your Gmail inbox. This means you can start composing an email on your computer and continue editing it on your mobile device seamlessly.
Now that you’re familiar with saving drafts in Gmail, you can confidently work on your emails at your own pace without worrying about losing your progress. In the next section, we’ll cover how to send a test email to ensure everything looks and functions as expected before hitting that “Send” button.
Sending a Test Email
Before sending an important email to your intended recipients, it’s a good practice to send a test email to yourself or a trusted colleague to ensure everything looks and functions as expected. This gives you an opportunity to review the email’s content, formatting, attachments, and any hyperlinks included. Here’s how you can send a test email in Gmail:
- Compose your email as you would normally, ensuring that all the necessary content, recipients, and attachments are included.
- Instead of entering the actual recipients’ email addresses, enter your own email address or the email address of the colleague you trust to review the email.
- Double-check the subject line and email body for any typos or errors.
- Review any attachments to ensure they are the correct files you want to include.
- Verify that any hyperlinks within the email are working and directing to the intended destinations.
- Click the “Send” button to send the test email to yourself or your colleague.
- Check your inbox or ask your colleague to review the email and provide feedback.
By sending a test email, you have the chance to spot any mistakes, make necessary adjustments, and ensure that your email appears as intended when received by your recipients. It allows you to catch any formatting issues, misspellings, broken links, or any other potential problems before the email reaches the intended recipients.
It’s important to note that when sending a test email, you should inform the recipient that it is a test and not a final version of the email. This prevents any confusion or misunderstanding.
Once you or your trusted colleague has reviewed the test email and provided feedback, you can make any necessary revisions before sending the final version to your intended recipients. This ensures that your email delivers the intended message effectively and professionally.
In the next section, we’ll explore some best practices for email etiquette to help you communicate effectively and maintain professional relationships through email.
Best Practices for Email Etiquette
Email etiquette refers to the set of guidelines and practices that help to ensure effective and professional communication through email. Adhering to email etiquette is important for maintaining positive relationships and conveying your message clearly. Here are some best practices to follow:
- Use a professional tone: When writing emails, maintain a professional and respectful tone. Keep the language formal but friendly, and avoid using slang or jargon that may not be understood by all recipients.
- Keep it concise: Be mindful of your email’s length. People often receive numerous emails daily, so keep your messages concise and to the point. Use bullet points or numbered lists to make information clear and organized.
- Use proper grammar and spelling: Double-check your emails for any grammatical errors, typos, or misspellings before sending. Poor grammar and misspellings can negatively impact the perceived professionalism of your email.
- Respond promptly: Aim to respond to emails within a reasonable timeframe. Even if you cannot provide an immediate response, acknowledge the email and let the sender know when they can expect a more detailed reply.
- Be respectful and courteous: Treat others with respect and courtesy in your email communication. Avoid using offensive or inappropriate language, and do not engage in personal attacks or arguments.
- Avoid using ALL CAPS: Writing in all capital letters may come across as shouting and can be perceived as rude. Use capitalization appropriately, such as for emphasis or proper nouns.
- Use meaningful subject lines: Create subject lines that accurately reflect the content of your email. This helps recipients quickly understand the purpose and importance of your email.
- Think before using “Reply All”: When replying to an email sent to a group of people, consider whether everyone needs to see your response. Be mindful of using the “Reply All” function only when necessary to avoid cluttering inboxes.
- Proofread before sending: Take a moment to review your email for any errors or unintended meanings. Read it from the perspective of the recipient to ensure your message is clear and won’t be misinterpreted.
Following these email etiquette best practices demonstrates professionalism, respect, and effective communication. It helps to maintain positive relationships, avoid misunderstandings, and convey your messages clearly and professionally.
Now that you’re well-versed in email etiquette, let’s move on to the next section, where we’ll discuss how to check sent messages and ensure successful email delivery.
Checking Sent Messages
After sending an email, it’s essential to check your sent messages to ensure that they have been successfully delivered to the recipients. Gmail provides a straightforward way to review your sent messages and verify their status. Here’s how you can check your sent messages in Gmail:
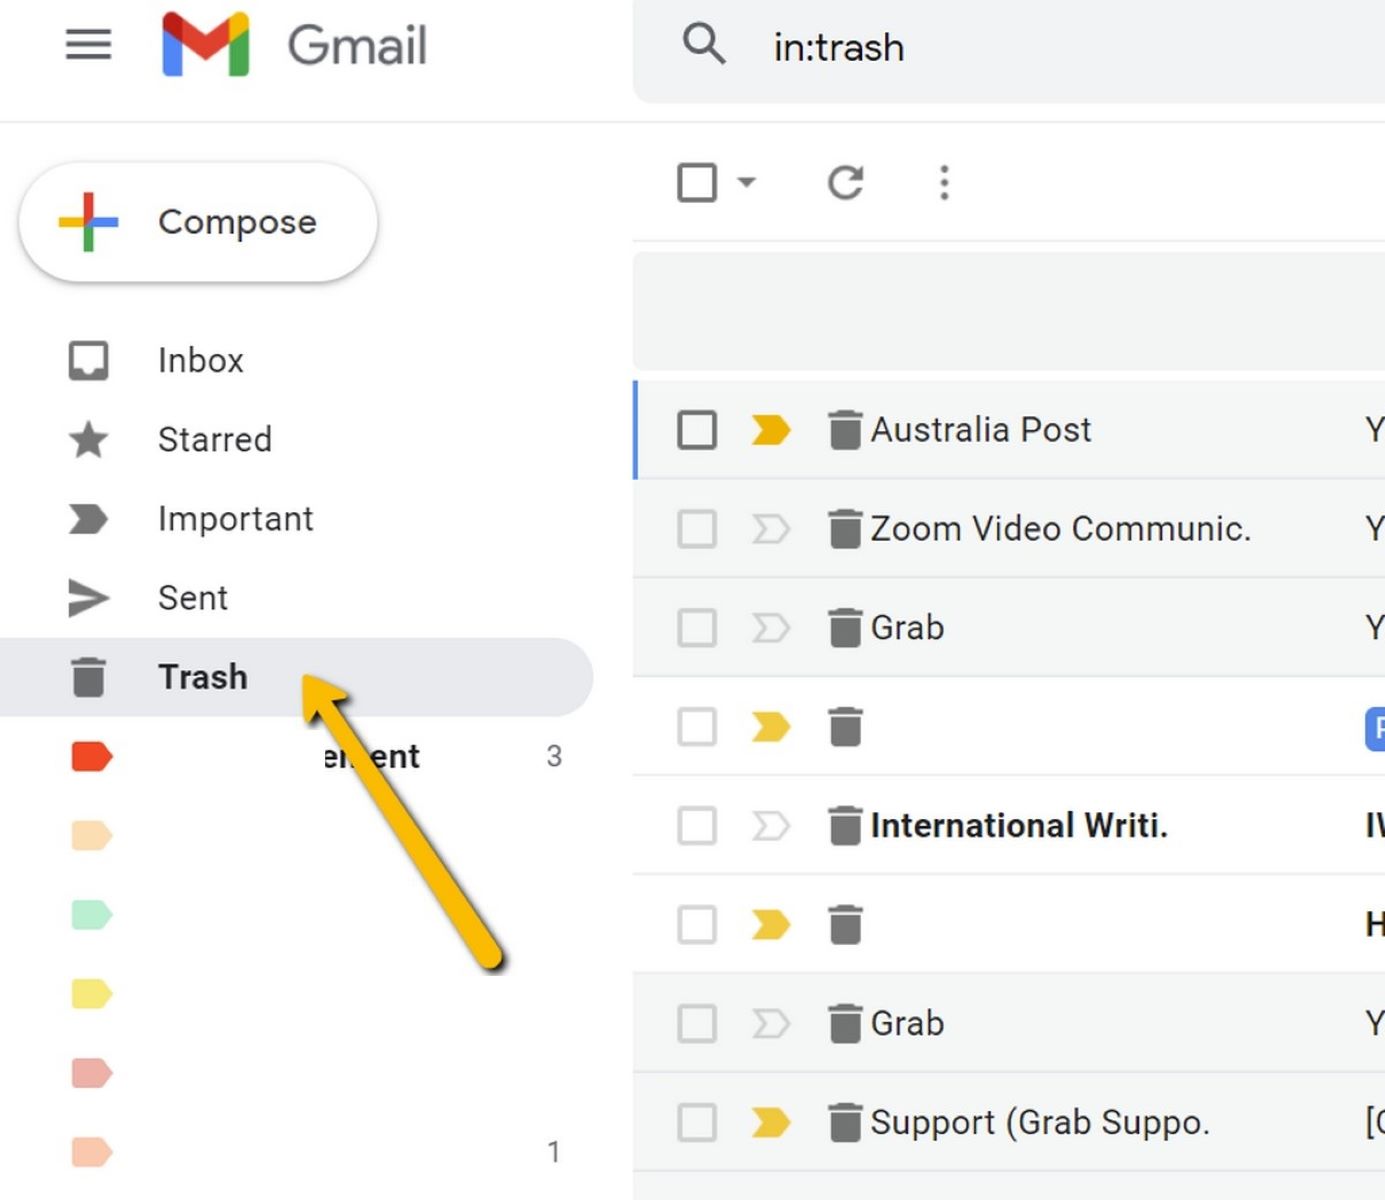
- Go to your Gmail inbox and locate the navigation panel on the left side of the screen.
- Scroll down and click on the “Sent” label to access your sent messages.
- Your sent messages will be displayed, showing the sender, recipient(s), subject, and the date and time the email was sent.
- Scroll through the list to find the specific email you want to review.
- Click on the email to open it in full view and review its content and any attachments.
- Look for any visual indicators, such as a small envelope icon with a checkmark, which confirms that the email has been successfully sent.
Checking your sent messages allows you to verify that your email has been successfully dispatched and received by the intended recipients. It gives you peace of mind, knowing that your communication has been delivered as expected.
If you notice any issues or concerns with a sent email, such as missing attachments or errors in the content, you can take appropriate actions, such as sending a follow-up email or contacting the recipients directly to rectify the situation.
Gmail also provides the option to enable “Delivery Receipts” or “Read Receipts” in certain cases. This feature informs you when the recipient has received or opened your email, providing further confirmation and allowing you to track the status of your email communication more closely.
Now that you know how to check your sent messages in Gmail, you can stay informed about the status of your email communication and ensure that your messages reach the intended recipients successfully. In the next section, we’ll explore how to use conversations and folders in Gmail to organize and manage your email effectively.
Using Conversations and Folders
Gmail offers two powerful features, conversations, and folders, that can help you organize and manage your email effectively. Understanding how to use conversations and folders can streamline your inbox and improve your email management. Here’s an overview of these features:
Conversations:
Conversations, also known as email threads, group related messages together based on the subject line. When you receive a reply or send a reply to an email, Gmail automatically groups these messages into a conversation, making it easier to follow the flow of the discussion. Conversations help reduce email clutter and make it simpler to find past correspondence.
To view a conversation in Gmail, simply click on the most recent email in the thread. You’ll see all previous messages as part of the conversation, making it easier to track the history of communication. You can expand or collapse individual messages within the conversation for easier navigation.
Folders:
Gmail uses labels instead of traditional folders for organizing your emails. Labels function similarly to folders in that you can assign one or more labels to each email. This allows you to categorize and group emails based on specific criteria, making it easier to locate them later.
To apply a label to an email, you can either manually assign it while composing or replying to an email or do so afterward by selecting the email and choosing the desired label from the labeling options. You can create custom labels that suit your organizational needs and even nest them within other labels for a hierarchical structure.
By using conversations and labels effectively, you can keep your inbox organized and easily locate important emails. For example, you can create labels for different projects, clients, or priority levels, and assign them accordingly to keep your inbox clutter-free.
Gmail also provides a powerful search function that allows you to search for specific keywords, senders, or attachments within your inbox. This, combined with conversations and labels, makes it easy to retrieve specific emails even if they are not actively visible in your inbox.
Now that you’re familiar with using conversations and folders in Gmail, you can take full advantage of these features to keep your inbox organized and easily navigate through your emails. In the next section, we’ll explore how to undo sent emails in unfortunate situations where you need to recall or stop an email from being delivered.
Undoing Sent Emails
We have all experienced the moment of panic after hitting the “Send” button and realizing that we made a mistake or sent an email prematurely. Thankfully, Gmail offers a handy feature called “Undo Send” that allows you to recall or stop an email from being delivered. Here’s how you can undo sent emails in Gmail:
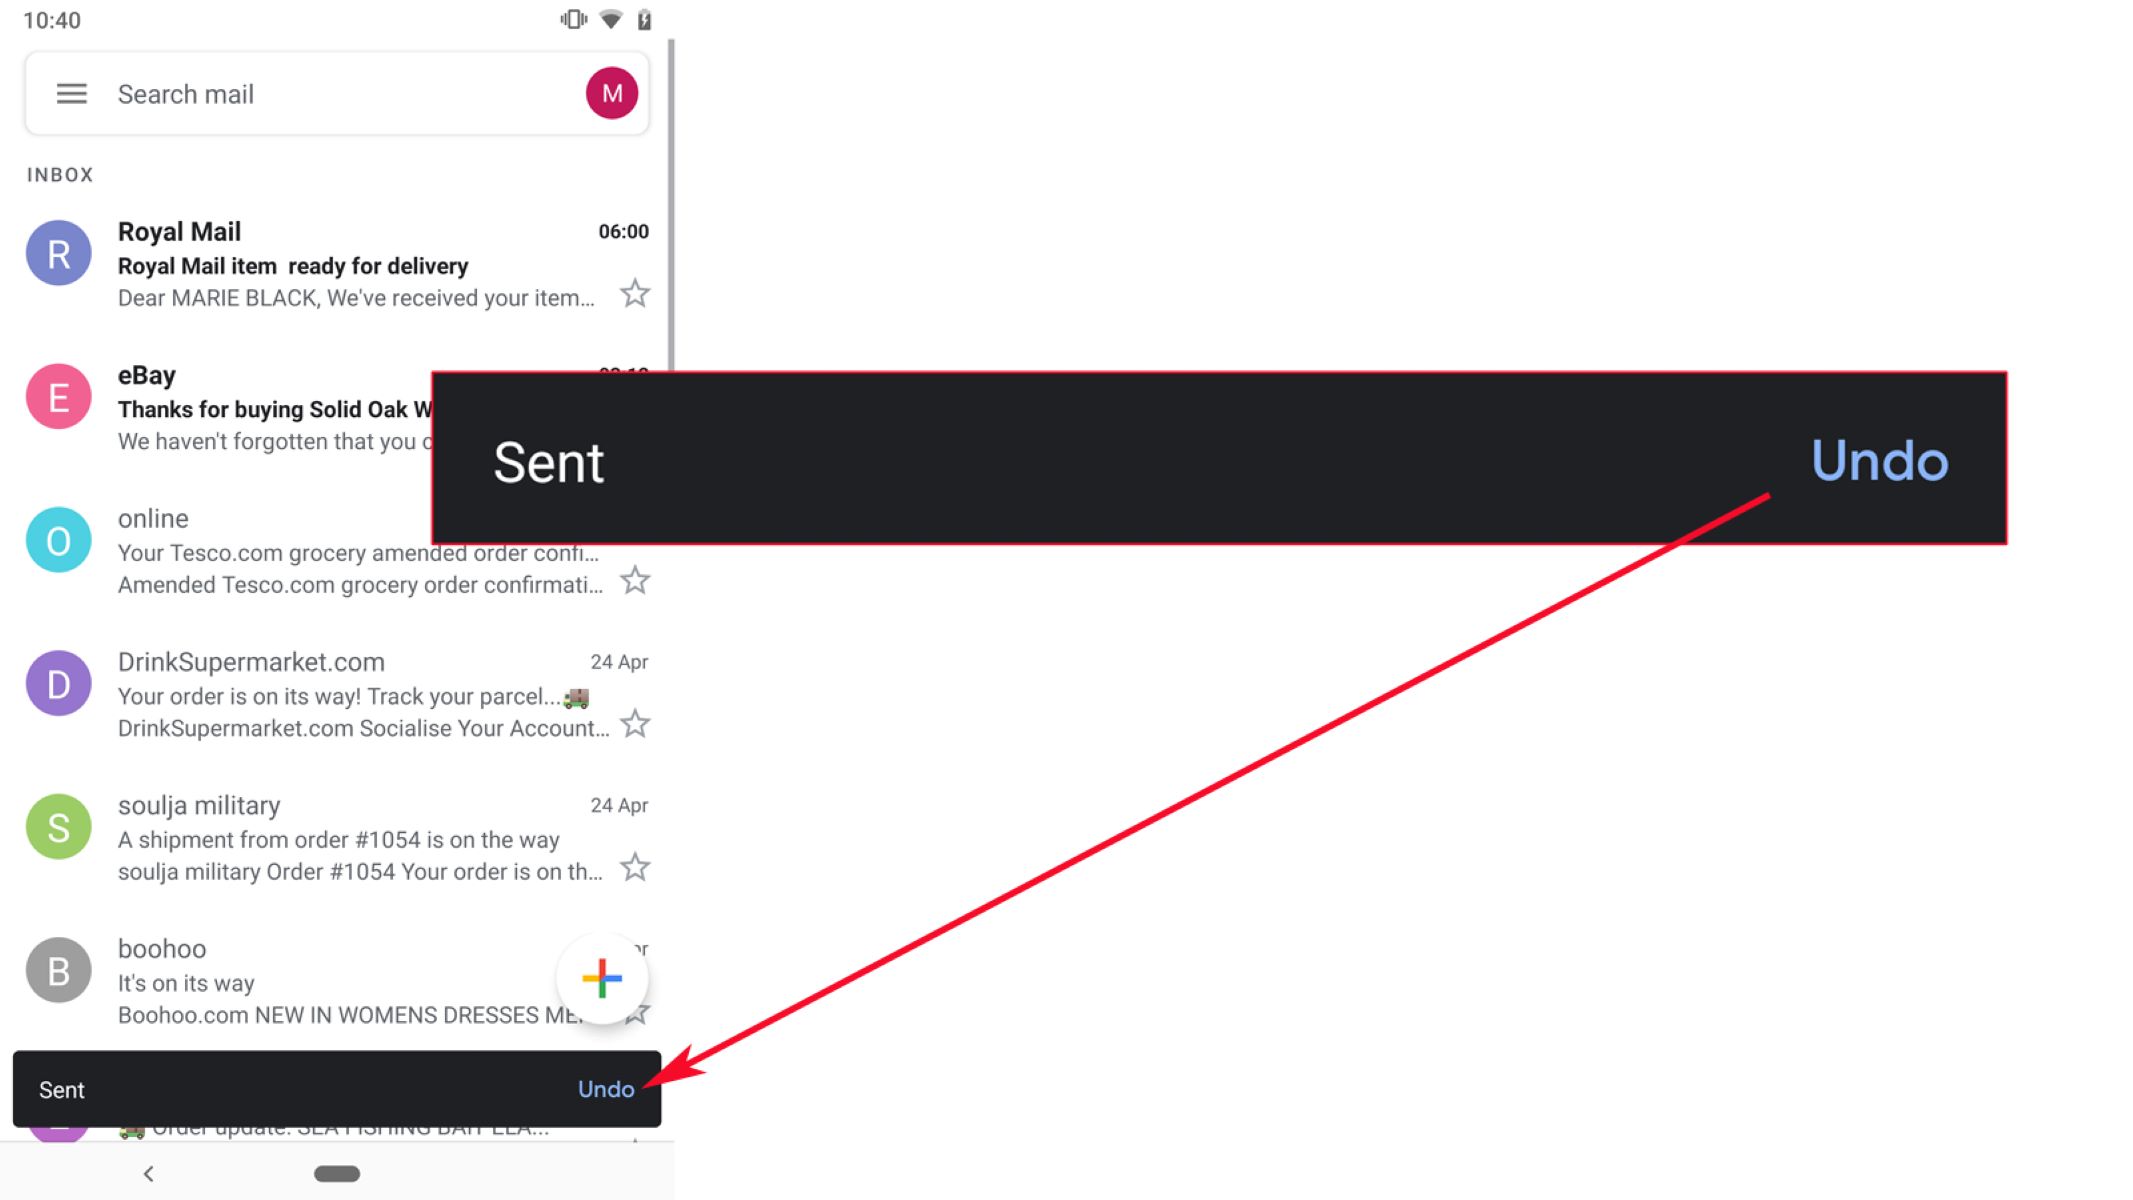
- After sending an email, look for a notification that says “Your message has been sent” at the top of the Gmail screen.
- Next to the notification, you will see an “Undo” option. Click on it immediately to halt the email from being sent.
- If you click “Undo” in time, Gmail will retrieve your message, and you’ll be able to make any necessary edits or corrections before sending it again.
It’s important to note that the “Undo Send” feature in Gmail has a time limit. By default, you have about 5 seconds to click “Undo” to recall your email. However, you can extend this time period to up to 30 seconds in Gmail settings. Take advantage of this small window of opportunity to catch errors, fix typos, or include any missing information in your email.
Keep in mind that the “Undo Send” feature works only when you are using Gmail’s web interface. If you access your Gmail account through a mobile app or an email client, this feature may not be available.
While “Undo Send” can be a lifesaver in many cases, it’s not foolproof. If the email has already been delivered to the recipient’s inbox, you won’t be able to recall it. Therefore, it’s always a good practice to double-check your emails for errors or omissions before sending them.
Now that you know how to undo sent emails in Gmail, you can feel more confident when sending important messages, knowing that you have a brief window to correct any mistakes. In the next section, we’ll discuss how to check the status of your email to confirm its delivery and ensure that it has been read.
Checking the Status of Your Email
After sending an email, you may be curious to know its status—whether it has been delivered to the recipient’s inbox or if it has been read. While Gmail doesn’t provide a built-in read receipt feature, there are a few methods you can use to check the status of your email:
1. Request a Delivery or Read Receipt:
Some email clients and systems allow you to request a delivery or read receipt for your email. When you enable this feature, the recipient is prompted to confirm receipt or opening of the email. However, it’s important to note that not all email clients and systems support this feature, and recipients have the option to decline or ignore the request.
2. Use Email Tracking Tools:
There are third-party email tracking tools available that integrate with Gmail and provide insights into the status of your emails. These tools can track when, where, and how many times an email has been opened, as well as provide notification when links within the email are clicked. Some popular options include Mailtrack, Boomerang, and Yesware.
3. Look for External Indicators:
While not foolproof, there may be external indicators that give you some clues about the status of your email. These include read receipts enabled by the recipient’s email client, email tracking pixels (small, invisible images) that send back information when the email is opened, or the use of email encryption services that require the recipient to provide confirmation before reading the email.
It’s important to respect the privacy and preferences of your recipients. Some people may disable read receipts or use privacy settings that prevent tracking. If you are unsure about the appropriateness of tracking an email’s status, it’s best to reach out directly to the recipient and inquire about their preferences.
While it can be helpful to know the status of your email, it’s essential to remember that effective communication is not solely dependent on read receipts or delivery confirmations. Clear and concise writing, proper formatting, and timely responses are key factors in ensuring your message is received and understood.
Now that you have an understanding of how to check the status of your emails, you can employ these methods if necessary. In the next section, we’ll discuss some common troubleshooting techniques to address common email issues that may arise.
Troubleshooting Common Email Issues
While email communication is generally reliable, there may be times when you encounter issues that impede the smooth sending or receiving of messages. Here are some common email issues and troubleshooting techniques to help you resolve them:
1. Email not sending:
If your email is not sending, check your internet connection to ensure it is stable. Verify that you have entered the recipient’s email address correctly. Double-check your email settings, such as SMTP server configuration, and ensure there are no firewalls or antivirus programs blocking outgoing emails.
2. Email not received:
If your recipient claims not to have received your email, start by checking your sent folder to confirm that the email was actually sent. Consider whether the email might have landed in the recipient’s spam or junk folder. Ask the recipient to add your email address to their contact list to avoid future delivery issues.
3. Attachments not opening:
If the recipient is having trouble opening an attachment you sent, ensure that the file format is compatible with their device or software. Make sure the attachment is not too large, as some email providers have file size limits. Consider compressing the file or using cloud storage services to share larger files.
4. Email formatting issues:
If your email appears differently to the recipient than it does in your composing window, consider using plain text or a simpler email format that is less susceptible to formatting issues. Ensure that the recipient’s email client can display the formatting features you used, such as images, fonts, or special characters.
5. Email bouncing back:
If your email is bouncing back to you as undeliverable, check for typos or errors in the recipient’s email address. Ensure that your email domain is not on any email blacklist. If the issue persists, contact your email service provider to understand any potential restrictions or errors.
6. Incomplete or missing emails:
If the recipient reports receiving an email with missing or incomplete content, double-check your email before sending to ensure that all the necessary information is included. Consider breaking up lengthy emails into smaller sections, as some email clients or servers have size limitations.
When troubleshooting email issues, it’s important to communicate with the recipient about the problem and work together to find a resolution. Sometimes, these issues may be beyond your control, such as problems on the recipient’s end. Patience and collaboration are key to resolving any email-related challenges that arise.
In the next section, we’ll wrap up with a summary of the key points discussed and offer some final thoughts on effective email communication.
Conclusion
Email communication has become an integral part of our personal and professional lives, and knowing how to effectively use Gmail can greatly enhance your email experience. In this article, we covered various aspects of sending emails on Gmail, from setting up your account to managing recipients, formatting emails, and using useful features like attachments and signatures.
We discussed the importance of writing a clear and compelling subject line, using proper formatting techniques to enhance readability, and following email etiquette best practices. We also explored how to check the status of your emails, troubleshoot common email issues, and utilize features like conversations and folders to better organize your inbox.
Remember, email communication is not just about the technical aspects. It’s equally important to communicate professionally, be respectful, and considerate of others’ time. Double-checking your emails for errors, sending test emails, and using the “Undo Send” feature can help ensure that your messages are well-crafted and error-free.
While Gmail provides powerful features and functionalities, it’s essential to remain adaptable as new updates and changes are introduced. Keeping yourself up to date with Gmail’s advancements can further enhance your email skills and make your communication more efficient.
By following the tips and techniques outlined in this article, you can improve your email writing skills, manage your inbox effectively, and communicate with confidence and professionalism. Remember that effective email communication is a continuous learning process, and it’s important to stay open to feedback, adapt to different situations, and strive for clear and concise communication.
We hope that this article has provided you with the necessary knowledge and insights to navigate Gmail and send emails with ease. So go ahead, craft those compelling subject lines, compose those impactful emails, and communicate effectively in the digital world!