Introduction
Welcome to this tutorial on how to attach an email in Gmail. Gmail is one of the most popular and widely used email services around the world, known for its intuitive interface and robust features. One of the key features of Gmail is the ability to attach files to your emails, allowing you to easily share documents, images, videos, and more with your recipients.
Attaching an email in Gmail involves adding a file as an attachment to your email message. This can be useful in various scenarios, such as when you need to share an important email conversation, forward an email with attachments, or simply include an email as supporting documentation. Whatever the reason may be, this tutorial will guide you through the step-by-step process of attaching an email in Gmail.
In the following sections, we will cover each step in detail, providing clear instructions and visual aids to help you easily navigate through the process. By the end of this tutorial, you will have a thorough understanding of how to attach an email in Gmail and be able to effortlessly include emails as attachments in your future communications.
Step 1: Compose a new email
The first step in attaching an email in Gmail is to compose a new email. To do this, you need to be logged into your Gmail account and access the Gmail inbox.
Once you’re logged in, you’ll see a red “Compose” button located in the top left corner of the Gmail interface. Click on this button to start composing a new email.
A new window will open, displaying the email composer. In this window, you’ll see fields to enter the recipient’s email address, subject line, and the body of the email. Fill in the necessary information according to your needs.
If you want to attach an email as a file, it’s important to note that you will need to save the email as a file first. Gmail doesn’t allow attaching an email directly from your inbox without saving it as a file.
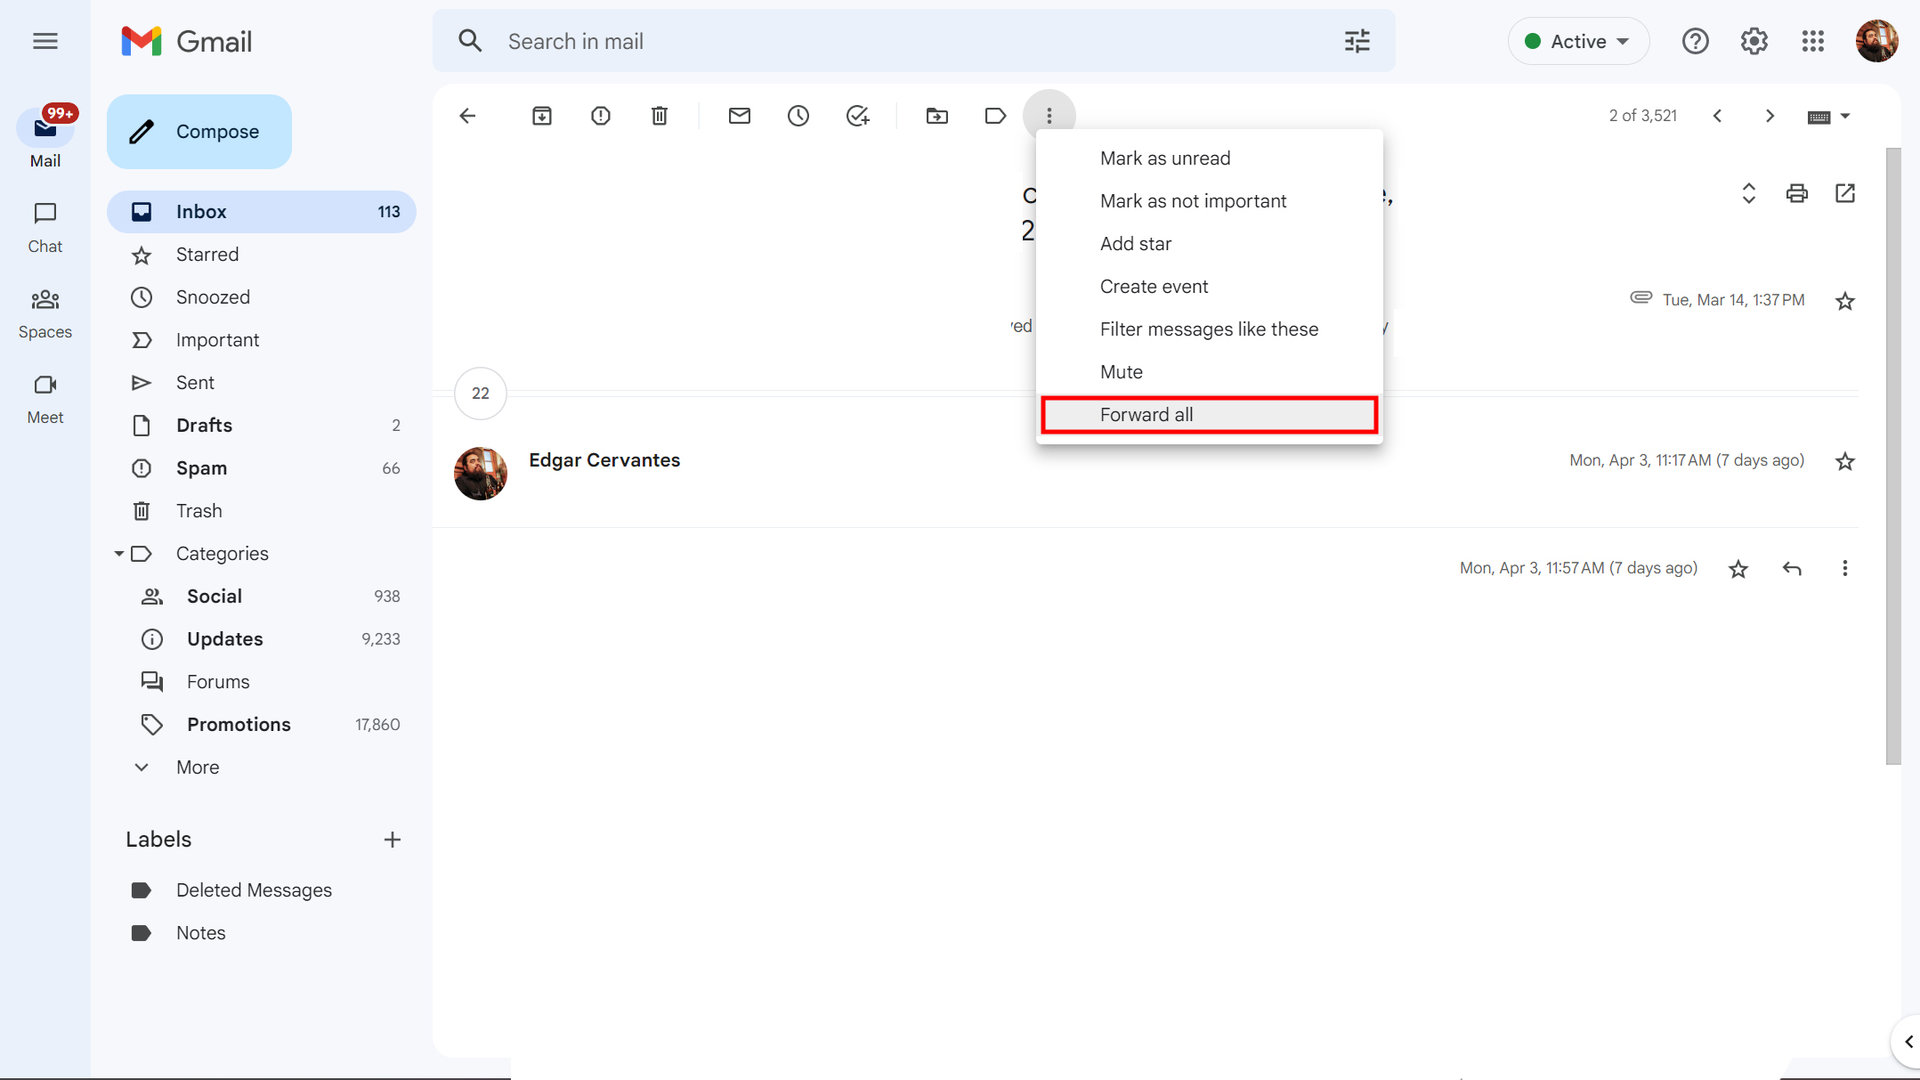
To save an email as a file, open the email you want to attach and click on the three vertical dots located in the top right corner of the email. From the dropdown menu, select “Save as” or “Save as .msg” (depending on your settings) to save the email as a file on your computer.
Once you have saved the email as a file, you can proceed to the next step of attaching it to your newly composed email.
It’s important to note that attaching an email as a file is different from forwarding or including the email as part of the body of the new email. Attaching an email as a file allows the recipient to download and view the email separately, preserving its original format and attachments.
Step 2: Click on the paperclip icon
After composing a new email and saving the email you want to attach as a file, the next step is to click on the paperclip icon to begin the attachment process.
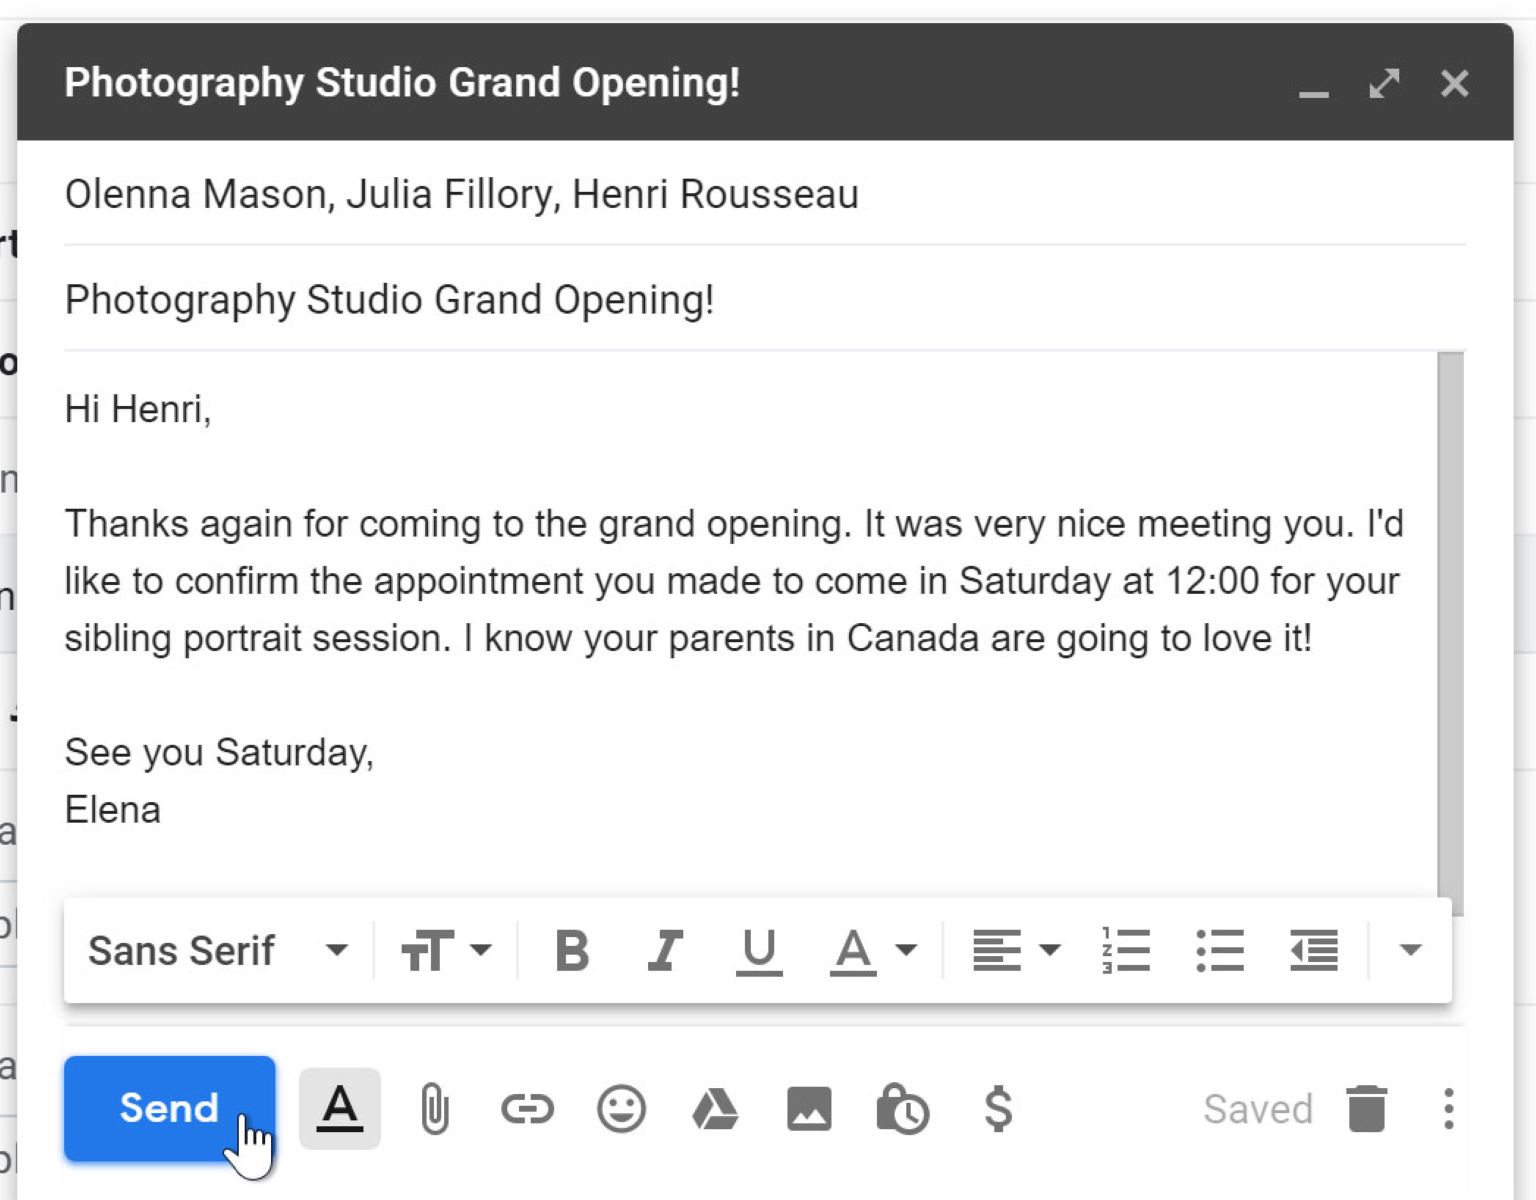
Located in the email composer window, the paperclip icon is a recognizable symbol for attaching files. It is usually located near the top of the composition window, often next to the text formatting options.
To attach the saved email file, click on the paperclip icon. A file explorer or finder window will then open, allowing you to browse and select the file you want to attach.
Take a moment to navigate to the location where you saved the email file on your computer. Once you’ve located the file, click on it to select it. You can also multi-select files by holding down the Ctrl key (on Windows) or the Command key (on Mac) and clicking on multiple files.
Once you have selected the file(s) you want to attach, click on the “Open” button (or similar) in the file explorer window. This will initiate the attachment process and add the selected file(s) to your email.
It’s worth noting that Gmail has a file size limit for attachments, which is currently set at 25 MB for free Gmail accounts. If the email file you want to attach exceeds this limit, you may need to consider compressing the file or using alternative methods to share it, such as uploading it to cloud storage and sharing the link.
With the file(s) successfully attached, you can proceed to the next steps to complete the email composition and send it to your recipient with the attached email file(s).
Step 3: Choose the file you want to attach
After clicking on the paperclip icon in the email composer window, a file explorer or finder window will open, allowing you to choose the file you want to attach to your email in Gmail.
In the file explorer window, you’ll see a list of files and folders on your computer. Navigate through the folders to find the location where you saved the email file you want to attach.
Click on the desired file to select it. You can also select multiple files by holding down the Ctrl key (on Windows) or the Command key (on Mac) and clicking on multiple files.
If the email file is located in a different folder or drive, you can use the navigation options within the file explorer window to move through the directory structure and find the file. Alternatively, you can search for the file by typing its name in the search bar, if available.
Gmail allows you to attach a wide range of file types, including documents, images, videos, audio files, and more. However, it’s important to note that certain file types may be restricted by Gmail’s security measures. If you encounter any issues attaching a particular file type, it may be due to restrictions imposed by Gmail.
Once you’ve selected the file(s) you want to attach, click on the “Open” button (or similar) in the file explorer window. The chosen file(s) will now be added to your email as an attachment.
It’s important to double-check that you’ve selected the correct file(s) before proceeding. Accidentally attaching the wrong file can lead to confusion or miscommunication with the recipient.
With the file(s) successfully chosen and attached, you can move on to the next step in the process to complete your email composition and send it with the attached email file(s).
Step 4: Attach the file to the email
After selecting the file(s) you want to attach from the file explorer window, the next step is to attach the file to your email in Gmail.
Once you have chosen the file(s), they will appear as attachments in the email composer window. You will see the file name(s) displayed below the subject line or in a designated attachment section.
Gmail allows you to attach multiple files to a single email. If you want to attach additional files, you can repeat steps 2 and 3 to select and add more files.
If you want to remove an attached file, you can click on the x icon or a similar delete button next to the file name. This will remove the attachment without affecting the rest of your email.
It’s important to be mindful of the file size and the total number of attachments you include in your email. Large files or too many attachments may increase the email size and potentially cause delivery issues, especially if the recipient’s email service has limitations.
To minimize the risk of attachment-related problems, you can consider compressing the files to reduce their size or using alternative methods such as cloud storage to share large files or multiple attachments.
Once you have attached the file(s) to your email, you can proceed with the rest of your email composition, including adding a message in the body of the email, formatting the text, and adding any additional attachments or recipients.
Take a moment to review your email and ensure that the attachment is relevant and correctly attached. This will help ensure a smooth and successful communication with the recipient.
With the file(s) attached, and your email composition complete, you are now ready to send your email with the attached file(s) to your desired recipient(s).
Step 5: Verify that the attachment is added successfully
After attaching the file(s) to your email in Gmail, it’s important to verify that the attachment(s) have been added successfully before sending the email. This step ensures that the recipient will receive the intended files along with your message.
To verify the attachment(s), take a moment to review your email composition. Look for the attached file(s) in the email body or in the designated attachment section.
If the attached file(s) are visible and correctly labeled with their respective file names, it indicates that the attachment process was successful.
You can also hover over the attached file(s) to see additional information such as file size, file type, and other details, depending on your Gmail settings and email client.
It’s recommended to click on the attached file(s) to test if they can be opened or previewed without any issues. This will ensure that the recipient will be able to access the attachment(s) without encountering any problems.
In some cases, you may find that the attachment(s) do not appear or function as expected. This could be due to various reasons, such as file corruption, restrictions in Gmail settings, or compatibility issues. In such cases, you may need to repeat the attachment process or explore alternative methods of sharing the file(s) with the recipient.
It’s also worth mentioning that some email clients or mobile devices may display the attachments differently. Although Gmail strives for compatibility across different email platforms, there may still be variations in how attachments appear or function.
After verifying that the attachment(s) are added successfully and function as intended, you can proceed to send the email to your desired recipient(s).
Ensure that you proofread your email and make any necessary revisions before sending it. This will help maintain professionalism and clarity in your communication.
By following these steps, you can confidently attach files to your emails in Gmail and ensure that the recipient receives the necessary information along with your message.
Conclusion
Attaching an email as a file in Gmail allows you to easily share important conversations, forward emails with attachments, or include emails as supporting documentation. In this tutorial, we have covered the step-by-step process of attaching an email in Gmail.
We began by composing a new email and saving the email you want to attach as a file. Then, we clicked on the paperclip icon to initiate the attachment process and chose the file(s) we wanted to attach from the file explorer window.
After selecting the file(s), we successfully attached them to the email and verified their presence. It’s important to ensure that the attachment process is carried out correctly to avoid any confusion or miscommunication with the recipient.
By carefully following the steps outlined in this tutorial, you can confidently attach email files in Gmail and enhance your communication by sharing relevant information and supporting documents in a convenient and efficient manner.
Remember to review your email composition, including the attached file(s), to ensure everything is accurate before sending it to your desired recipient(s). Additionally, be mindful of file sizes and the limitations imposed by Gmail or the recipient’s email service.
Attaching emails in Gmail is a useful feature that can greatly benefit your communication and collaboration efforts. Whether you’re sharing important information, providing document references, or collaborating on projects, the ability to attach emails as files can streamline your workflow and improve productivity.
Now that you have a thorough understanding of how to attach an email in Gmail, you can confidently utilize this feature to enhance your email communication and effectively share information with your contacts.
Thank you for following this tutorial, and we hope it has been helpful in assisting you with attaching emails in Gmail!