Introduction
In today’s fast-paced digital world, sending emails has become a fundamental part of our personal and professional lives. However, we have all found ourselves in moments of regret after hitting the “send” button too quickly. Whether it’s a typo, a critical omission, or an email sent in haste, the consequences of a poorly composed or incorrectly sent message can be daunting. But fear not! With Gmail’s “Unsend” feature, you now have a second chance to correct those email blunders and prevent potential embarrassments.
Gmail, Google’s popular email service, offers a unique feature called “Undo Send” that allows users to recall or unsend an email within a specific time frame. This feature acts as a virtual safety net, offering users a brief window of opportunity to retract a send email and make necessary adjustments before it reaches the recipient’s inbox.
In this article, we will guide you through the process of enabling and utilizing Gmail’s “Undo Send” feature effectively. Additionally, we will share some valuable tips on avoiding the need to unsend emails in the first place, saving you time, energy, and potential embarrassment.
So, if you’ve ever wished for a magical button that could undo the consequences of a poorly timed or hastily composed email, then read on to discover how to unsend emails in Gmail and take control of your digital correspondence.
Why would you need to unsend an email?
We’ve all been there – that sinking feeling in the pit of your stomach when you realize you’ve sent an email containing an embarrassing typo, sensitive information, or a message hastily written in the heat of the moment. In these moments, the ability to unsend an email becomes a lifesaver, giving you the chance to correct your mistakes and prevent potential fallout. Let’s explore a few common scenarios where you might find yourself needing to unsend an email.
Firstly, typos and grammatical errors are a common occurrence when composing emails. Despite our best efforts to proofread, it’s easy for a pesky typo to slip through the cracks. Whether it’s an embarrassing spelling mistake or a missing word that completely changes the meaning of a sentence, the “Undo Send” feature in Gmail allows you to quickly rectify the error before it reaches the recipient’s inbox.
Secondly, there are instances where you might accidentally hit the “Send” button before you’ve finished composing your email. This can result in incomplete or confusing messages being sent out. With the ability to unsend an email, you can retract the message and take the necessary time to complete it, ensuring clear communication without any fragmented thoughts or unfinished sentences.
Another scenario where the “Undo Send” feature proves invaluable is when you realize you’ve included incorrect or sensitive information in an email. This could be mistakenly attaching the wrong file, sending confidential data to the wrong recipient, or providing inaccurate details that could have serious consequences. By unsending the email, you can prevent any potential breaches of confidentiality and ensure that the correct information is shared with the intended recipients.
Lastly, the need to unsend an email may arise when you’ve sent a message in the midst of anger or frustration. It’s not uncommon for emotions to run high in certain situations, leading to regrettable words being typed out in the heat of the moment. With the “Undo Send” feature, you have the chance to retract the email and prevent any damage caused by impulsive and emotionally driven messages.
Overall, the ability to unsend an email provides us with much-needed peace of mind in a digital age where communication is instantaneous. No longer do we have to live with the fear of irreversible mistakes or embarrassing slip-ups. Whether it’s a simple typo or a more serious error, the “Undo Send” feature in Gmail offers a safety net to ensure our email communications are accurate, complete, and reflective of our intentions.
How to enable the Undo Send feature in Gmail
Enabling the “Undo Send” feature in Gmail is a straightforward process that ensures you have the option to retract emails within a specified time frame. Follow these simple steps to enable this useful feature in your Gmail account.
- Open your Gmail account and click on the gear icon located in the top right corner of the screen. This will open a drop-down menu.
- Select “Settings” from the drop-down menu. This will take you to the Gmail Settings page.
- Navigate to the “General” tab, which is usually the default tab that opens in the Settings page.
- Scroll down until you find the “Undo Send” option. It is typically located towards the middle of the page.
- Click on the checkbox next to “Enable Undo Send” to activate the feature. You will then be presented with a drop-down menu to set the cancellation period.
- In the drop-down menu, choose the cancellation period that suits your needs. You can select a cancellation period of 5, 10, 20, or 30 seconds. This time frame represents the window of opportunity you have to unsend an email after clicking the send button.
- Once you have selected the desired cancellation period, scroll to the bottom of the page and click on the “Save Changes” button to save your settings.
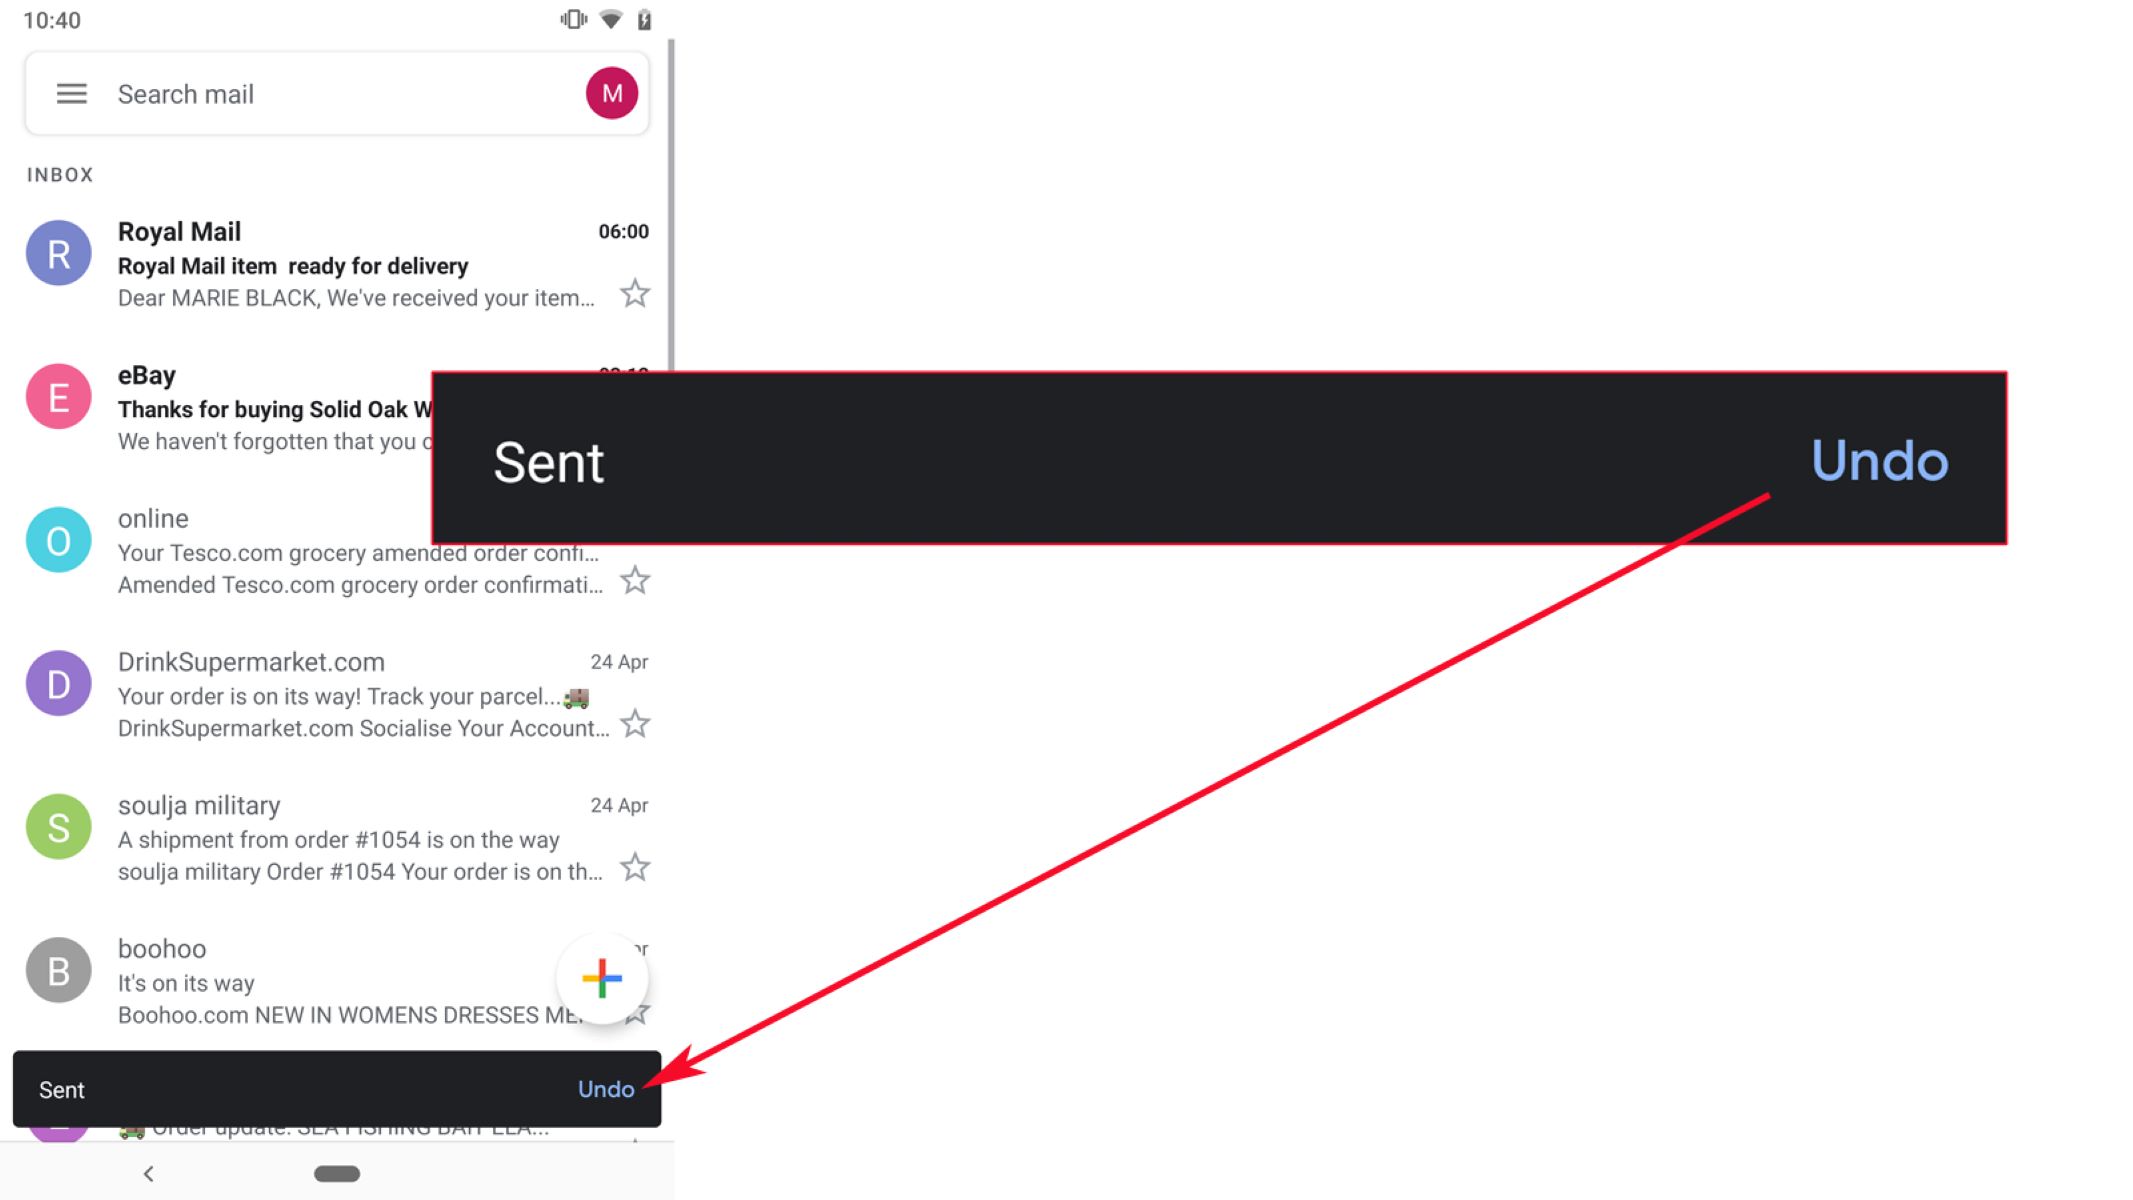
Congratulations! You have successfully enabled the “Undo Send” feature in Gmail. Now, whenever you send an email, a message will appear at the top of the screen giving you the option to “Undo” the send within the chosen cancellation period. This allows you to quickly retract and fix any errors or make any necessary changes before the email reaches its recipients.
It’s important to note that the “Undo Send” feature is only available for a brief period after hitting the send button, so it’s crucial to act quickly if you want to retract an email. Additionally, this feature is only available for emails sent from your Gmail account and not for emails sent through external email clients or services.
Now that you know how to enable the “Undo Send” feature in Gmail, you can rest assured knowing that you have an extra layer of control over your email correspondence. So go ahead, activate this feature, and bid farewell to those moments of regret after clicking send too soon.
Setting the duration of the Undo Send feature
When enabling the “Undo Send” feature in Gmail, one crucial step is setting the duration or cancellation period. This time frame determines the window of opportunity you have to unsend an email after clicking the send button. Follow these steps to customize the cancellation period according to your preferences.
- Start by accessing the Gmail Settings page. To do this, open your Gmail account and click on the gear icon in the top right corner, then select “Settings” from the drop-down menu.
- Navigate to the “General” tab, which typically opens by default on the Settings page.
- Scroll down until you find the “Undo Send” option, usually located in the middle of the page.
- Next to the “Enable Undo Send” checkbox, you will see a drop-down menu. Click on it to see the available cancellation periods.
- The drop-down menu offers four cancellation period options: 5, 10, 20, and 30 seconds. Choose the duration that best suits your needs.
- Consider your personal preferences and circumstances when selecting the cancellation period. If you want more time to review and potentially unsend an email, opt for a longer duration. Conversely, if you’re confident in your quick decision-making skills, a shorter duration may suffice.
- Once you have chosen the desired cancellation period, scroll to the bottom of the page and click on the “Save Changes” button to save your settings.
It’s essential to remember that the cancellation period you select should strike the right balance between giving yourself enough time to catch potential mistakes and not creating unnecessary delays in sending emails. Therefore, consider your workflow, email habits, and personal preferences when making this decision.
Keep in mind that the shorter the cancellation period, the quicker you need to make the decision to unsend an email. Conversely, a longer cancellation period provides more time for review and modification but may delay the delivery of your emails slightly.
Experiment with different cancellation periods to find the optimal setting that aligns with your preferences and email practices. If you find that your chosen duration is too short or long after using it for some time, you can always return to the Gmail Settings page and adjust it accordingly.
By customizing the cancellation period for the “Undo Send” feature in Gmail, you gain control over the time you have to take advantage of this helpful feature. So, choose wisely and make the most of this practical feature to ensure your email communications are accurate and error-free.
How to unsend an email in Gmail
So, you’ve sent an email only to realize moments later that you made a mistake or need to make some changes. Fear not! Gmail’s “Undo Send” feature allows you to unsend the email, giving you a chance to correct any errors or update the content. Follow these steps to unsend an email in Gmail.
- After sending an email, look for the message that appears at the top of the screen with the option to “Undo” the send. The message will display the cancellation period you have set, such as “Undo (5 seconds)” or “Undo (10 seconds)”.
- Quickly click on the “Undo” button. This will retract the email and bring you back to the draft of the message, allowing you to make any necessary changes.
- Edit the email as needed, fixing any errors or updating the content. Take your time to review and revise the email before sending it again.
- Once you are satisfied with the modifications, click the send button again to resend the corrected version of the email.
It’s important to note that the ability to unsend an email is only available within the cancellation period you have set. If you don’t click the “Undo” button within this timeframe, the email will be sent and cannot be retracted or amended using the “Undo Send” feature. Therefore, it’s crucial to act quickly if you spot an error or need to make changes to the email.
Additionally, it’s wise to review your email drafts carefully before sending them to minimize the need for utilizing the “Undo Send” feature. Taking a few extra moments to proofread and ensure your message is accurate and complete can save you time and potential embarrassment in the long run.
So the next time you find yourself in a situation where you need to make corrections or updates to an email you’ve just sent, remember the “Undo Send” feature in Gmail. Take advantage of this functionality to unsend your email, make the necessary changes, and resend it with confidence.
Tips for avoiding the need to unsend emails
While Gmail’s “Undo Send” feature provides a much-needed safety net for retracting emails, it’s always better to avoid the need to unsend emails in the first place. By following these tips, you can minimize the chances of sending out erroneous or incomplete emails, saving you time and potential embarrassment.
- Take your time: Before clicking the send button, dedicate a few extra moments to review your email carefully. Double-check for any grammatical errors, typos, or missing information. Slow down and ensure that your message accurately reflects your intention.
- Proofread: Proofreading is essential to catch any spelling or grammatical mistakes that may have slipped through. Read your email out loud, or use automated tools like spell checkers to help identify any errors.
- Use email drafts: If you’re unsure about the content or have doubts about the accuracy of your email, save it as a draft instead of sending it immediately. Take a break and come back to it later with a fresh perspective. This allows you to make final revisions before hitting send.
- Double-check recipients and attachments: Verify that you are sending the email to the correct recipients and that any attachments are the intended files. Sending an email to the wrong person or attaching the wrong document can have serious consequences.
- Avoid sending in anger: If you find yourself writing an email in a heated or emotional state, it’s best to step away and give yourself time to calm down. Sending an impulsive, angry email can damage relationships and lead to regret later on.
- Use a signature line: Including a professional signature line in your emails can help ensure that important contact information, job titles, and company details are consistently and correctly shared.
- Utilize email templates: If you frequently send similar emails, consider creating templates to minimize errors and ensure consistency. Templates can be pre-populated with the necessary information, reducing the chances of forgetting essential details.
- Request a second pair of eyes: If you’re uncertain about the content or the accuracy of an email, it can be helpful to ask a colleague or trusted friend to review it. Fresh perspectives can catch mistakes that you may have overlooked.
By incorporating these tips into your email practices, you can significantly reduce the need to unsend emails. Taking the time to be thorough, double-checking your work, and utilizing available tools and resources will help you send accurate, complete, and professional emails the first time.
Remember, prevention is better than cure, and by following these suggestions, you can enhance your email communication and avoid the potential need to utilize the “Undo Send” feature in the first place.
Conclusion
In the fast-paced world of email communication, mistakes can happen. However, with Gmail’s “Undo Send” feature, you now have the power to retract and correct those errors before they reach the recipient’s inbox. Enabling this feature is a straightforward process, and it offers you peace of mind and control over your email correspondence.
By setting a cancellation period that aligns with your workflow and personal preferences, you can determine the amount of time you have to unsend an email. This allows you to quickly make necessary revisions, fix typos, or add missing information, offering you the opportunity for more accurate and effective communication.
While “Undo Send” is a valuable tool, it’s essential to develop good email practices to minimize the need for utilizing this feature. Take your time, proofread diligently, and double-check recipients and attachments to reduce the chances of sending out erroneous or incomplete emails.
Remember, prevention is key. By incorporating tips like using email drafts, requesting a second pair of eyes, and utilizing email templates, you can enhance your email communication and decrease the likelihood of needing to unsend an email.
In conclusion, Gmail’s “Undo Send” feature delivers a second chance for sending error-free emails, allowing you to make corrections and adjustments before it’s too late. By enabling this feature, you can have more confidence in your email communications, ensuring they accurately and effectively convey your message. So why not take advantage of this powerful tool and regain control over your digital correspondence in Gmail?