Introduction
Welcome to this guide on how to securely erase a solid state drive (SSD) on a Mac. In today’s digital age, data security is of utmost importance. Whether you’re selling your old SSD, returning it for warranty purposes, or simply ensuring that your sensitive information doesn’t fall into the wrong hands, securely erasing your SSD is crucial.
Solid state drives have become increasingly popular due to their fast read and write speeds and improved durability compared to traditional hard drives. However, the process of securely erasing an SSD is different from that of a standard hard drive, and it requires specialized techniques. In this guide, we will explore various methods that you can use to securely erase an SSD on your Mac.
Before we delve into the specific methods, it’s essential to understand why securely erasing your SSD is important. When you delete files or format a drive, the data is not completely gone. Instead, it remains on the drive’s storage until it is overwritten by new data. This means that your sensitive information can potentially be recovered using specialized software, even if you can’t see it anymore.
Furthermore, due to the unique architecture of SSDs, traditional methods of data erasure like formatting or writing zeros may not be effective. SSDs use a technology called wear leveling, which spreads data across multiple memory chips to evenly distribute the usage and prolong the drive’s lifespan. As a result, erasing data on one chip won’t necessarily erase it from the entire SSD.
With these considerations in mind, it is essential to follow proper procedures to securely erase an SSD and ensure that your data is irrecoverable. In the following sections, we will discuss precautionary measures to take before erasing your SSD and provide step-by-step instructions for three different methods: using Disk Utility, using Terminal commands, and utilizing third-party software. So, let’s get started and learn how to securely erase your solid state drive on a Mac!
Understanding Solid State Drives (SSDs)
To securely erase a solid state drive (SSD) on a Mac, it’s essential to have a basic understanding of how these drives function. Unlike traditional hard drives that use magnetic storage, SSDs rely on flash memory to store data. This difference in technology brings several advantages, such as faster performance, lower power consumption, and improved durability.
SSDs are composed of multiple NAND flash memory chips, which are organized into blocks and pages. When you save data to an SSD, it is written in specific pages within the memory cells. However, data cannot be directly overwritten or modified at the page level. Instead, the SSD must perform a two-step process: erasing the old data and then writing the new data to fresh pages.
This erase-rewrite process is essential because flash memory cells can only be erased in larger units known as blocks. Typically, an SSD block consists of several pages. When you delete a file or format the drive, the SSD performs a “trim” command, marking the old data as invalid and ready for erasure. The actual erasure of data happens asynchronously during idle time or when the SSD is less active, to minimize performance impact.
One of the unique features of SSDs is that they employ a mapping table called the Flash Translation Layer (FTL) to keep track of where data is stored. This layer ensures that data is evenly distributed across the drive, optimizing performance and extending the SSD’s lifespan. However, this mapping layer also poses challenges when it comes to secure erasure.
When you use traditional data erasure methods, such as formatting or overwriting with zeros, the SSD’s FTL marks the old data as invalid but does not actually erase it. The data remains in the memory cells until new data needs to be written, which means it can potentially be recovered using specialized software.
Understanding the inner workings of SSDs helps us recognize the importance of using specialized techniques for secure erasure. In the following sections, we will explore different methods to ensure that your SSD is securely erased and that your data is irretrievable. Before we move on to the specific methods, it is essential to take some precautions to avoid any unfortunate accidents or data loss during the erasur process.
Why Securely Erasing an SSD is Important
Securely erasing an SSD is of utmost importance to protect yourself and ensure the safety of your sensitive data. When you delete files or format a drive, the data is not completely removed from the SSD. Instead, it is marked as deleted in the file system, and the space it occupies is flagged as available for new data. Until this space is overwritten by new data, the original data can potentially be recovered through various data recovery techniques.
This poses a significant risk, especially if you are selling or disposing of the SSD. Your personal or confidential data, such as financial information, passwords, or business-critical files, can fall into the wrong hands. Identity theft, data breaches, and unauthorized access to sensitive information are serious concerns in the digital age. To protect yourself and mitigate these risks, securely erasing the SSD is crucial.
Furthermore, when it comes to SSDs, traditional methods of data erasure like formatting or overwriting with zeros may not be sufficient. SSDs use wear leveling technology to distribute data across multiple memory cells evenly. This technology prevents excessive wear on any given cell and extends the lifespan of the drive. However, it also means that erasing data on one cell may not necessarily erase it from the entire SSD.
In addition to these concerns, government regulations, industry requirements, and organizational policies often require secure data disposal practices. For businesses, failure to comply with these regulations can result in penalties and legal consequences. Therefore, securely erasing your SSD not only protects your personal information but also ensures compliance with data protection regulations.
Properly erasing an SSD also provides peace of mind. Knowing that your confidential data is irretrievable and cannot be accessed gives you the confidence to replace, sell, or dispose of your SSD without worrying about the security of your information.
In the following sections, we will explore different methods of securely erasing your SSD on a Mac to ensure that your data is completely and irreversibly removed from the drive. It’s important to note that the specific method you choose may depend on your technical expertise, the sensitivity of the data, and the level of security required.
Precautions to Take Before Erasing an SSD
Before proceeding with the secure erasure of your solid state drive (SSD), it’s crucial to take certain precautions to ensure that you don’t accidentally delete important data and to prevent any potential issues during the process. Here are some key steps to follow:
1. Backup Important Data: Before initiating any erasure process, it’s essential to create a backup of your important files and folders. This ensures that you have a copy of your data in case of any unintended data loss or if you need to recover specific information later.
2. Verify your Backup: After creating a backup, take a moment to verify that you can access and restore the data if needed. This step provides an extra layer of assurance and avoids the possibility of relying on a faulty or incomplete backup.
3. Identify and Disconnect External Drives: Double-check that you have disconnected any external storage devices, such as USB drives or external hard drives, from your Mac before proceeding with the secure erasure. This ensures that you only erase the intended SSD and avoid any accidental data loss on other connected devices.
4. Log out of cloud services: If you have any cloud storage services, such as iCloud, Dropbox, or Google Drive, make sure to log out of these accounts before initiating the erasure process. This prevents any potential syncing issues or unintended deletions of files stored in the cloud.
5. Disable FileVault: If you have enabled FileVault, the built-in disk encryption feature on your Mac, it’s recommended to disable it before erasing the SSD. Disabling FileVault ensures that the erasure process is not impeded or slowed down by the encryption process, and it reduces the risk of encountering any errors during the erasure process.
6. Use Trusted Software: When selecting a method for securely erasing your SSD, ensure that you use trusted and reputable software. Doing so reduces the risk of using unreliable tools that may lead to incomplete erasure or compromise the security of your data.
7. Read User Guides and Documentation: Before proceeding with any method, carefully review the user guides and documentation provided by the software developers. Familiarize yourself with the steps involved, any specific requirements, and any potential risks or limitations associated with the erasure method.
By following these precautions, you can mitigate the risk of data loss, ensure a smooth erasure process, and have peace of mind knowing that your important data is safely backed up. With these steps in place, you’re ready to explore the different methods available for securely erasing your SSD on a Mac.
Method 1: Using Disk Utility
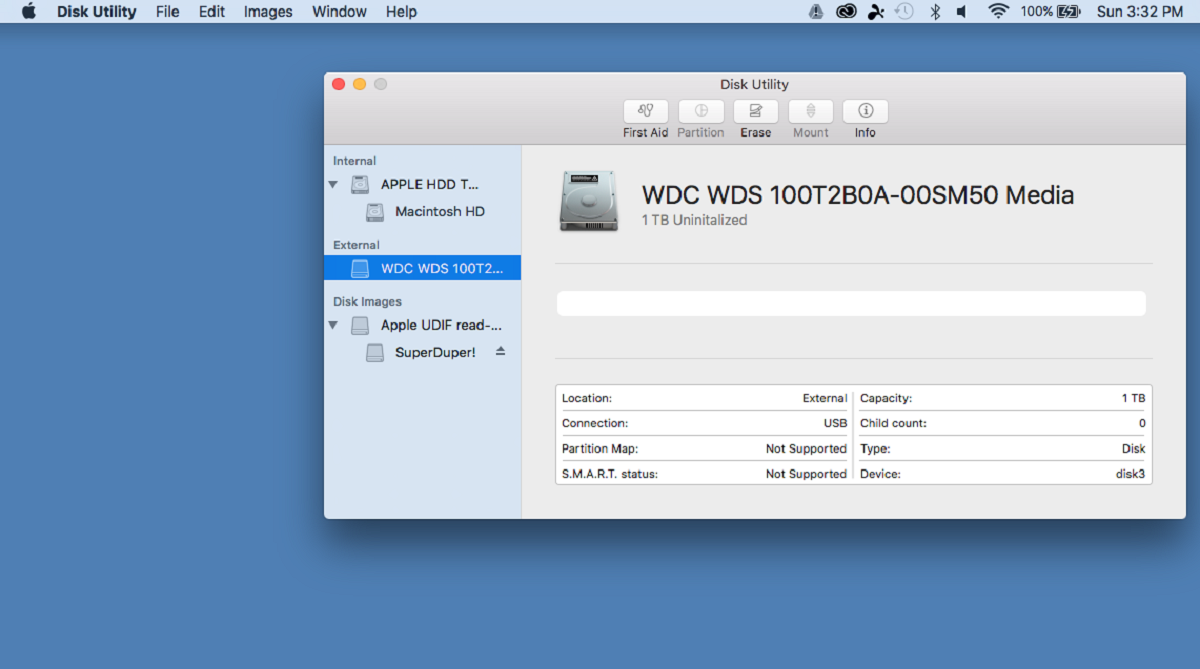
Disk Utility is a built-in utility on Mac that allows you to manage and format storage devices, including solid state drives (SSDs). It also provides a secure erasure feature that you can utilize to securely erase your SSD. Follow these steps to securely erase your SSD using Disk Utility:
- Connect your SSD to your Mac using the appropriate cable or adapter.
- Launch Disk Utility. You can find it by going to Finder, then selecting “Applications” and then “Utilities”. Alternatively, you can search for “Disk Utility” using Spotlight.
- In the Disk Utility window, select your SSD from the list of available drives on the left-hand sidebar.
- Click on the “Erase” button at the top of the Disk Utility window.
- In the Erase dialog box, provide a name for your SSD in the “Name” field. Choose a descriptive name that will help you identify the drive later.
- Next, select the appropriate format for your SSD. If you plan to use the SSD on a Mac, select “Mac OS Extended (Journaled)”. If you intend to use it on both Mac and Windows systems, choose “ExFAT”.
- In the Scheme dropdown menu, select “GUID Partition Map”. This option is necessary for bootable SSDs.
- Lastly, click on the “Security Options” button. This will open a new dialog box where you can choose the level of secure erasure. Select “Most Secure” for the strongest level of erasure.
- Click on the “Erase” button to initiate the secure erasure process.
- Depending on the size of your SSD and the chosen security level, the erasure process may take some time. During this time, ensure that your Mac remains powered on and connected to a reliable power source.
Once the secure erasure process is complete, your SSD is now securely wiped, and the data is irrecoverable. You can now disconnect the SSD from your Mac or proceed with reinstalling an operating system if needed.
It’s important to note that the secure erasure process using Disk Utility is irreversible. Therefore, it is crucial to confirm that you have backed up any important data before proceeding with this method.
Disk Utility provides a convenient and user-friendly way to securely erase your SSD on a Mac. However, if you prefer a more flexible or powerful erasure method, you can also consider using Terminal commands or third-party software, which we will explore in the following sections.
Method 2: Using Terminal Commands
If you’re comfortable using the command line interface on your Mac, you can securely erase your solid state drive (SSD) using Terminal commands. This method provides more flexibility and customization options compared to using Disk Utility. Follow these steps to securely erase your SSD using Terminal commands:
- Connect your SSD to your Mac using the appropriate cable or adapter.
- Launch Terminal. You can find it by going to Finder, then selecting “Applications” and then “Utilities”. Alternatively, you can search for “Terminal” using Spotlight.
- Type the command
diskutil listand press Enter. This will display a list of all the connected drives on your Mac. - Identify your SSD based on its size and partition scheme. Note the identifier of your SSD, which will be something like
disk2ordisk3. - Next, type the command
diskutil secureErase freespace 0 /dev/[identifier]and press Enter. Replace[identifier]with the identifier of your SSD. - The
secureErasecommand with thefreespaceoption will securely erase the free space on your SSD. The0parameter represents the number of passes, with0being the most secure option. - The secure erasure process may take some time, depending on the size of your SSD and the selected number of passes. Ensure that your Mac remains powered on and connected to a reliable power source during this process.
Once the secure erasure process is complete, your SSD is now securely wiped, and the data is irrecoverable. You can now disconnect the SSD from your Mac or proceed with reinstalling an operating system if needed.
Using Terminal commands provides you with more control and customization options for securely erasing your SSD. However, it also requires a higher level of technical knowledge and caution. Make sure you double-check the commands and identifiers to avoid any unintended erasures or data loss.
If you prefer a more user-friendly approach or want additional features, you may consider using third-party software for securely erasing your SSD, which we will discuss in the next section.
Method 3: Using Third-Party Software
Another option for securely erasing a solid state drive (SSD) on a Mac is to use third-party software. These tools offer more advanced features and customization options compared to the built-in utilities like Disk Utility or Terminal commands. Here are the general steps to securely erase your SSD using third-party software:
- Research and select a reliable third-party software for secure data erasure. Look for software that specifically supports SSD erasure and offers strong data wiping algorithms.
- Download and install the chosen software on your Mac following the provided instructions.
- Launch the software and locate the option for securely erasing your SSD.
- Read the software’s user guide or documentation to understand the available erasure methods and their associated options.
- Configure the settings according to your needs, such as the number of overwrite passes and any additional security measures.
- Select your SSD as the target drive for erasure.
- Initiate the secure erasure process and allow the software to complete the operation. Depending on the software and the chosen settings, the process may take some time.
- Once the erasure process is complete, verify that your SSD has been securely wiped and the data is irrecoverable.
- Disconnect the SSD from your Mac or proceed with reinstalling an operating system if desired.
Using third-party software for secure SSD erasure provides additional features and flexibility for customization. You can choose from a range of options and algorithms to ensure maximum data security. However, it’s important to select reputable and trustworthy software from reliable sources to avoid any potential risks or compromises.
Before proceeding with third-party software, ensure that you have read and understood the software’s documentation, including any specific instructions or precautions related to your SSD model or software version. Following the guidelines and best practices provided by the software developer is crucial for a successful and secure erasure process.
Remember to backup any important data before starting the erasure process. Securely erasing an SSD is an irreversible procedure, and once completed, the data will be permanently removed.
With the right third-party software, you can confidently and effectively erase your SSD, ensuring that your sensitive data is completely irrecoverable.
Verifying the Secure Erase Process
After securely erasing your solid state drive (SSD) using any of the methods mentioned above, it’s important to verify that the erasure process was successful and that the data is irrecoverable. Verifying the secure erase process provides peace of mind and ensures that your SSD is ready for reuse, selling, or disposal. Here are some steps to help you verify the secure erase process:
- Physically examine the SSD: Inspect your SSD to ensure that it is no longer recognizable as a storage device on your Mac. It should not be listed in the Finder or Disk Utility, indicating that the erasure process was completed and the drive is no longer accessible.
- Attempt data recovery: If you want to be absolutely certain that the data is gone, you can attempt data recovery using specialized software. Connect the SSD to another computer and use a reputable data recovery tool to scan for any recoverable files. If the process returns no recoverable data, it confirms the success of the secure erasure.
- Perform a surface test: Some SSD erasure software provides the option to perform a surface test after the erasure process. This test checks the entire SSD for any remaining traces of data. If the test returns no data, it confirms that the secure erasure was successful.
- Seek professional services: If you have doubts about the success of the secure erasure process or have concerns about the confidentiality of the data, you can seek professional data recovery services. These specialists use advanced techniques to verify that the data is irrecoverable.
It’s important to note that successfully verifying the secure erase process provides a high level of confidence that the data is irretrievable. However, it is impossible to guarantee with absolute certainty that data recovery is impossible. Advanced data recovery techniques or state-sponsored entities may still have the ability to recover data even after a secure erasure.
Once you have verified the success of the secure erasure process and are confident that the data is irrecoverable, you can proceed with your intended use of the SSD, whether it’s selling it, reusing it for another purpose, or disposing of it responsibly.
Remember to always follow best practices for data security, including securely erasing storage devices, to protect yourself and prevent unauthorized access to your sensitive information.
Conclusion
Securely erasing a solid state drive (SSD) on a Mac is essential to protect your sensitive data and ensure that it cannot be accessed by unauthorized individuals. In this guide, we explored various methods to securely erase an SSD, including using Disk Utility, Terminal commands, and third-party software.
We discussed the importance of securely erasing an SSD and the potential risks of not properly disposing of your data. We also highlighted the unique characteristics of SSDs, such as wear leveling and the need for specialized erasure techniques.
Prior to initiating the erasure process, we emphasized the importance of taking precautions, such as backing up important data, disconnecting external drives, disabling encryption, and using trusted software. These precautions help prevent data loss and ensure a smooth erasure process.
We provided step-by-step instructions for each erasure method, guiding you through the process to ensure that your SSD is securely wiped and the data is irrecoverable. Additionally, we discussed the importance of verifying the secure erase process to confirm that the data is successfully removed.
It’s crucial to select the erasure method that best suits your needs, considering factors such as technical expertise, data sensitivity, and desired level of security. Whether you choose to use the built-in Disk Utility, execute Terminal commands, or utilize third-party software, the goal is to ensure that your SSD is securely erased.
Remember, securely erasing an SSD is an irreversible process, so it’s important to double-check your backups and ensure that you have safely backed up any important data before proceeding.
By following the guidelines and instructions provided in this guide, you can confidently and effectively erase your SSD, protecting your data, complying with regulations, and maintaining data security.
We hope this guide has been helpful in gaining a better understanding of how to securely erase an SSD on a Mac. Stay vigilant with data security practices, and never underestimate the importance of properly disposing of your sensitive information. With the right precautions and methods, you can ensure the protection and privacy of your data in the digital world.