Introduction
Being able to capture screenshots on your Apple tablet is a useful skill that comes in handy for a variety of purposes. Whether you want to save a funny meme, capture an important piece of information, or share something interesting with your friends, knowing how to take a screenshot can be incredibly helpful.
Fortunately, Apple provides several methods to easily capture screenshots on their tablets. In this article, we will explore four different methods to screenshot on an Apple tablet: using the physical buttons, utilizing AssistiveTouch, leveraging the Apple Pencil, and accessing the Control Center. Each method offers its own advantages and can cater to different preferences and needs.
By familiarizing yourself with these methods, you will have the flexibility to choose the most convenient option depending on your specific circumstances. Whether you have an iPad, iPad Pro, or iPad Air, these techniques will work universally on Apple tablets.
So, whether you are a seasoned Apple user or a newbie to the iPad world, read on to discover how to capture screenshots like a pro on your Apple tablet.
Method 1: Using the Physical Buttons
One of the simplest ways to take a screenshot on your Apple tablet is by using the physical buttons on the device. This method works for all models of Apple tablets, including the iPad, iPad Pro, and iPad Air.
To capture a screenshot using the physical buttons, follow these steps:
- Navigate to the screen or content you want to screenshot.
- Press and hold the sleep/wake button (also known as the power button) located on the top or side of your tablet.
- While holding the sleep/wake button, quickly press and release the home button (the circular button on the front of the device). If you have a newer model without a home button, quickly press and release the volume up button instead.
- You will see a flash on the screen, and you will hear a camera shutter sound (if your tablet is not on silent mode).
- The screenshot will be automatically saved to your Photos app in the “Screenshots” album.
Once you have taken the screenshot, you can access it by opening the Photos app and navigating to the “Screenshots” album. From there, you can edit, share, or delete the screenshot as needed.
This method is straightforward and provides a quick way to capture screenshots on your Apple tablet. However, it requires you to press two buttons simultaneously, which can sometimes be tricky to do with one hand. If you find this method challenging or prefer a different approach, don’t worry – we have alternative methods for you to explore.
Method 2: Using AssistiveTouch
If you find it difficult to simultaneously press the physical buttons on your Apple tablet to take a screenshot, or if you have any accessibility concerns, you can use the AssistiveTouch feature to capture screenshots with ease. AssistiveTouch is a built-in accessibility feature that provides a virtual button overlay on your screen, allowing you to perform various actions with a single tap.
To enable and use AssistiveTouch to take a screenshot, follow these steps:
- Open the Settings app on your Apple tablet.
- Tap on “Accessibility” and then select “Touch” from the menu.
- In the “Physical & Motor” section, tap on “AssistiveTouch.”
- Toggle the switch to enable AssistiveTouch.
- A floating button will appear on your screen. Tap on it to open the AssistiveTouch menu.
- Tap on “Device” and then select “More.”
- Tap on “Screenshot.”
And there you have it! AssistiveTouch will now display a screenshot button in the menu, allowing you to capture screenshots with a single tap. Simply tap on the screenshot button whenever you want to take a screenshot, and it will automatically be saved to your Photos app.
AssistiveTouch provides a convenient alternative for those who struggle with the physical buttons or prefer a virtual button overlay. It allows you to take screenshots effortlessly and is especially useful if you frequently need to capture screenshots on your Apple tablet.
Method 3: Using Apple Pencil
If you own an Apple Pencil, you can take advantage of its functionality to capture screenshots on your Apple tablet. The Apple Pencil offers a precise and convenient way to mark up and annotate content on your screen, making it an excellent tool for taking screenshots.
To take a screenshot using the Apple Pencil, follow these steps:
- Ensure that your Apple Pencil is paired and connected to your tablet.
- Navigate to the screen or content you want to capture.
- Hold your Apple Pencil in your hand and position it on the screen where you want to begin the screenshot.
- Gently tap the Apple Pencil on the screen and swiftly drag it across the desired area.
- Release the Apple Pencil.
- You will hear a screenshot sound (if your tablet is not on silent mode), and the screenshot will be automatically saved to your Photos app.
Once the screenshot is saved, you can access it in the “Screenshots” album within the Photos app. From there, you can edit, crop, or share the screenshot as needed.
Using the Apple Pencil to capture screenshots provides a seamless and precise experience. It allows you to precisely select the area you want to screenshot and is particularly useful when you need to highlight specific details or annotate the content.
Whether you’re using your Apple Pencil for drawing, note-taking, or general navigation, taking screenshots with this handy accessory adds another level of convenience to your Apple tablet experience.
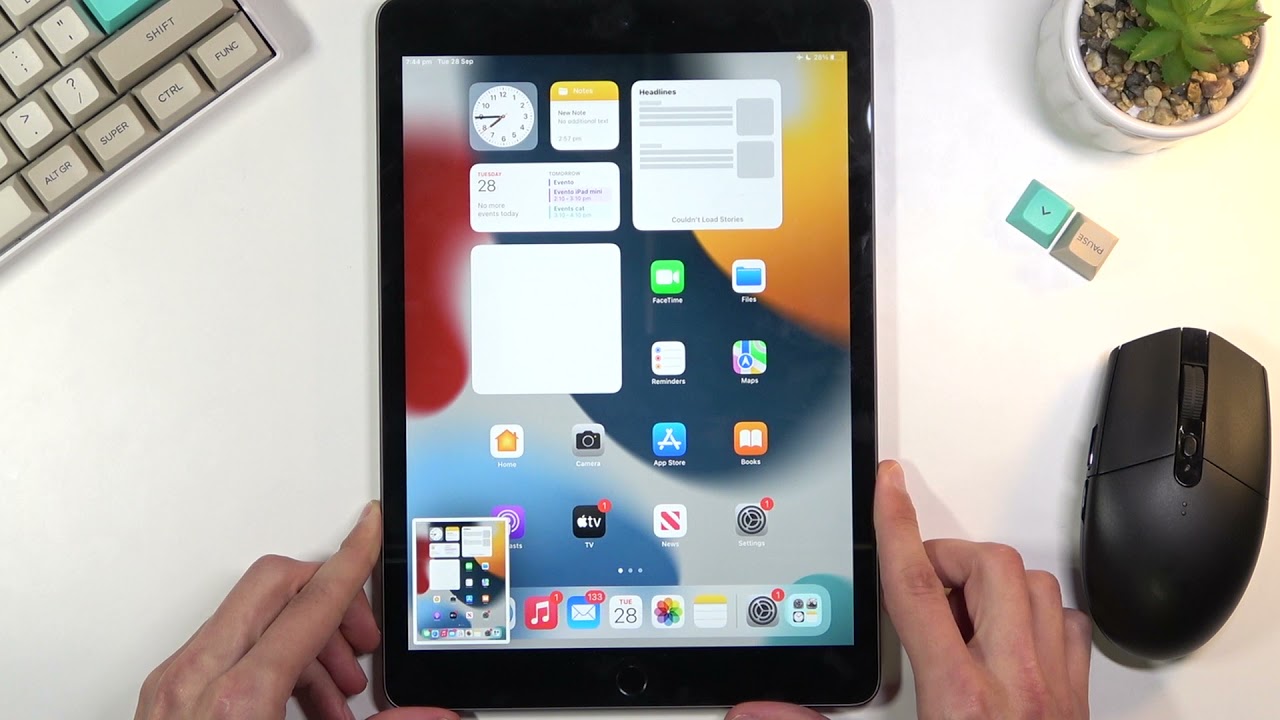
Method 4: Using the Control Center
If you prefer a quick and accessible method to take screenshots on your Apple tablet, utilizing the Control Center is an excellent option. The Control Center is a convenient feature that provides easy access to various settings and functions of your device, including screenshot capture.
To take a screenshot using the Control Center, follow these steps:
- Navigate to the screen or content you want to capture.
- Swipe up from the bottom edge or swipe down from the top-right corner of the screen (depending on your tablet model) to open the Control Center.
- Locate the “Screenshot” button, which resembles a camera, and tap on it.
- You will see a quick flash on the screen and hear the camera shutter sound (if your tablet is not on silent mode).
- The screenshot will be automatically saved to your Photos app in the “Screenshots” album.
Once the screenshot is saved, you can access it by opening the Photos app and navigating to the “Screenshots” album. From there, you can view, edit, or share the screenshot as needed.
The Control Center method offers a user-friendly and easily accessible way to capture screenshots on your Apple tablet. With just a swipe and a tap, you can capture and save important moments, interesting content, or anything else you want to preserve.
Whether you’re a casual user or a power user, utilizing the Control Center makes screenshotting a breeze and allows you to quickly capture and share moments from your Apple tablet.
Tips and Tricks for Screenshots on an Apple Tablet
Now that you know the various methods for capturing screenshots on your Apple tablet, let’s explore some tips and tricks that can enhance your screenshotting experience.
1. Editing and Annotation: After taking a screenshot, you can quickly edit and annotate it by tapping on the thumbnail that appears in the bottom-left corner of your screen. This allows you to crop, add text, draw, and even use Apple Pencil for more precise annotations.
2. Using Markup: The Markup feature, available in the Photos app, lets you add text, shapes, and other annotations to your screenshots. Simply open the screenshot in the Photos app, tap on the Edit button, and select Markup to unleash your creativity.
3. Sharing Screenshots: Apple tablets provide various sharing options for your screenshots. You can easily share screenshots directly from the Photos app via email, messaging apps, social media, and more.
4. Gestures for AssistiveTouch: If you opt to use AssistiveTouch for taking screenshots, you can customize the gestures and button assignments to suit your preferences. Spend some time exploring the AssistiveTouch settings to optimize it for your screenshotting needs.
5. Using Screenshot Markup: With iOS 15 or later, Apple introduced the Screenshot Markup feature, which allows you to edit screenshots immediately after taking them. A preview of the screenshot will appear in the bottom-right corner of the screen, and you can tap on it to access quick editing tools without opening the Photos app.
6. Organizing Screenshots: To keep your screenshots organized, consider creating albums in the Photos app. You can create custom albums for different categories or events, making it easier to locate and access specific screenshots in the future.
7. Protecting Sensitive Information: If you need to share a screenshot containing sensitive information, use the Markup feature to blur or hide the confidential data before sharing it. This ensures your privacy and security when sharing screenshots.
By utilizing these tips and tricks, you can enhance your screenshotting capabilities on your Apple tablet. Explore the features and settings available to you, and experiment with different methods to find the workflow that suits you best.
Now that you have learned how to capture, edit, and share screenshots on your Apple tablet, you can take full advantage of this feature to capture and preserve moments, important information, and anything else that catches your interest!
Conclusion
Capturing screenshots on your Apple tablet is a valuable skill that allows you to save and share moments, information, and more. With the variety of methods available, you can easily capture screenshots on your iPad, iPad Pro, or iPad Air.
In this article, we explored four different methods for taking screenshots on an Apple tablet:
- Using the physical buttons for a straightforward and universal approach.
- Utilizing AssistiveTouch for virtual button overlay convenience.
- Using the Apple Pencil for precise and annotated screenshots.
- Accessing the Control Center for quick and accessible screenshot capture.
We also provided tips and tricks to enhance your screenshotting experience, including editing and annotation options, sharing capabilities, customization of AssistiveTouch gestures, and organizing screenshots in albums. Additionally, we highlighted the Screenshot Markup feature introduced in iOS 15 and emphasized the importance of protecting sensitive information when sharing screenshots.
Now armed with these methods and insights, you can confidently capture screenshots on your Apple tablet, preserving moments and easily sharing information with others.
Remember, whether you prefer physical buttons, virtual overlays, the Apple Pencil, or the Control Center, the choice is yours. Choose the method that suits your preferences and needs, and let your Apple tablet empower you to capture, customize, and share screenshots effortlessly.
So, go ahead and explore these methods, experiment with different techniques, and make the most of your Apple tablet’s screenshotting capabilities!