Introduction
Welcome to this guide on how to root your Samsung Tablet A. Rooting your device gives you administrative privileges, allowing you to customize and optimize your tablet’s performance. By gaining root access, you can unlock the full potential of your device and enjoy additional benefits such as installing custom ROMs, removing bloatware, and tweaking system settings.
Before embarking on the rooting process, it’s important to familiarize yourself with the necessary precautions to ensure a smooth and successful rooting experience. This article will walk you through the step-by-step process, providing guidance and tips along the way.
Please note that rooting your device involves risks and can void your warranty. It’s crucial to proceed with caution and fully understand the implications of rooting. Also, keep in mind that the rooting process may vary slightly depending on the specific model of your Samsung Tablet A, so it’s important to double-check the instructions and firmware compatibility.
This guide assumes that you have a basic understanding of technical concepts and are comfortable following instructions. If you’re uncertain or hesitant about any step, we recommend seeking assistance from a knowledgeable individual or professional.
Now, let’s get started with the precautions you should take before rooting your Samsung Tablet A.
Precautions before Rooting
Before diving into the root process, it’s crucial to take some precautions to ensure a smooth and safe rooting experience. Here are a few essential steps to follow:
- Backup your Data: Rooting your Samsung Tablet A involves making changes to the system files, which can potentially lead to data loss. Therefore, it is highly recommended to back up all your important files, contacts, photos, and any other data that you do not want to lose.
- Charge your Device: Ensure that your tablet’s battery level is at least 70% to avoid any unexpected power-related interruptions during the rooting process. A low battery could potentially lead to a bricked device, so it’s better to be safe than sorry.
- Research Compatibility: Different firmware versions and device models have specific root methods. Before proceeding, verify the compatibility of the rooting method with your specific Samsung Tablet A model and the Android firmware version you are running. Using incompatible methods can result in device issues or even permanent damage.
- Read User Experiences: Forums and online communities are a valuable resource for rooting information. Explore forums and read about other users’ experiences with rooting the Samsung Tablet A. This can provide insights, tips, and potential pitfalls to avoid during the process.
- Understand the Risks: Rooting your tablet can come with certain risks. It can potentially void your warranty, and if not done correctly, it might lead to a bricked device or loss of functionality. It’s important to understand and accept these risks before proceeding further.
- Research Unrooting Methods: If you decide to unroot your device in the future, it’s essential to understand the process. Research and make note of the steps required to unroot your Samsung Tablet A if you ever need to return to the original stock firmware.
- Keep Anti-Virus Software Updated: While rooting, you might come across files or software from untrusted sources. To minimize the risk of malware or viruses infecting your device, ensure that your anti-virus software is up to date and perform a scan before starting the root process.
By following these precautions, you can mitigate potential risks and minimize the chances of encountering any issues during the rooting process. Now that you understand the importance of these steps, let’s move on to the first step: enabling Developer Options on your Samsung Tablet A.
Step 1: Enable Developer Options
Before you can proceed with rooting your Samsung Tablet A, you need to enable Developer Options on your device. Developer options provide advanced settings and debugging options that are necessary for the rooting process. Here’s how you can enable it:
- Go to Settings: Open the “Settings” app on your tablet. You can access the settings app by tapping the gear icon in the notification panel or by locating it in the app drawer.
- Find Software Information: Scroll down and locate the “About tablet” or “About device” option. Tap on it to access the tablet’s system information.
- Tap on Build Number: In the system information menu, look for the “Build Number” entry. Tap on it seven times continuously. You will see a pop-up message informing you that you are now a developer.
- Navigate Back: Go back to the main settings menu. You will notice that the “Developer Options” menu has now appeared just above “About tablet” or “About device.”
- Enable Developer Options: Tap on “Developer Options” to enter the menu. Toggle the switch or slide the button at the top of the page to enable developer options.
- Optional: USB Debugging – While in Developer Options, you can also enable USB debugging. USB debugging allows your tablet to communicate with the computer and is necessary for rooting. To enable it, simply toggle the switch next to “USB debugging.”
By following these steps, you have successfully enabled Developer Options on your Samsung Tablet A. Enabling Developer Options is a crucial first step as it unlocks the necessary settings to proceed with the rooting process. Now that Developer Options are enabled, you can move on to the next step, which is enabling USB debugging.
Step 2: Enable USB Debugging
USB debugging is a crucial setting that needs to be enabled in order to establish communication between your Samsung Tablet A and the computer. This step is essential for the rooting process. Here’s how you can enable USB debugging:
- Go to Developer Options: Open the “Settings” app on your tablet and navigate to the “Developer Options” menu. If you haven’t enabled Developer Options yet, refer to Step 1 for instructions on how to enable it.
- Enable USB Debugging: In the Developer Options menu, locate the “USB Debugging” option. Tap on the toggle switch next to it to enable USB debugging.
- Confirm the Prompt: A prompt will appear on your tablet’s screen, informing you about the potential risks of enabling USB debugging. Read the prompt carefully and tap “OK” to confirm and enable USB debugging.
Enabling USB debugging is a crucial step in the rooting process as it allows your tablet to communicate with the computer. Once USB debugging is enabled, you can proceed to the next steps of the rooting process, such as installing the necessary drivers and downloading the Odin Flash Tool.
Note that USB debugging may need to be re-enabled each time you reboot your tablet. So, if you encounter any issues with the computer recognizing your device during the rooting process, double-check that USB debugging is enabled.
Now that USB debugging is enabled, let’s move on to the next step: installing the necessary drivers for your Samsung Tablet A.
Step 3: Install the Necessary Drivers
In order for your computer to recognize and communicate with your Samsung Tablet A during the rooting process, you need to install the necessary drivers. Here’s how you can install the drivers:
- Download Samsung USB Drivers: Visit the official Samsung website or reputable third-party sources to download the appropriate USB drivers for your Samsung Tablet A model. Make sure to download the drivers that are compatible with your computer’s operating system.
- Install the Drivers: Once the drivers are downloaded, locate the file on your computer and double-click it to start the installation process. Follow the on-screen prompts to install the drivers on your computer.
- Connect your Tablet to the Computer: After the drivers are installed, use a USB cable to connect your Samsung Tablet A to your computer. Make sure to use a reliable and high-quality USB cable for a stable connection.
- Allow USB Debugging Connection: On your tablet, if a prompt appears asking for permission to allow USB debugging connection, tap “OK” to grant the permission. This will establish a secure connection between your tablet and computer.
By installing the necessary drivers, you ensure that your computer can recognize your Samsung Tablet A and establish a stable connection. This connection is essential for transferring files, executing commands, and flashing the firmware during the rooting process.
If you encounter any issues with the drivers or your computer failing to recognize your device, try reinstalling the drivers or using a different USB port. It’s also recommended to restart your computer and tablet to refresh the connections.
Now that the drivers are installed and your tablet is connected to the computer, you are ready to move on to the next step: downloading and installing the Odin Flash Tool.
Step 4: Download and Install Odin Flash Tool
The Odin Flash Tool is a widely used software tool specifically designed for Samsung devices. It allows you to flash custom firmware, root files, and other modifications onto your Samsung Tablet A. Here’s how you can download and install the Odin Flash Tool:
- Find a Trusted Source: Search for a reputable source to download the Odin Flash Tool. Make sure to download it from a trusted website to avoid any potential malware or viruses. It’s recommended to download the latest version of Odin for the most up-to-date features and compatibility.
- Extract the Files: Once you have downloaded the Odin Flash Tool, extract the contents of the downloaded file using a file extraction tool like WinRAR or 7-Zip. This will create a folder containing the necessary files for the Odin Flash Tool.
- Launch Odin: Open the extracted folder and locate the Odin executable file (.exe). Double-click on the file to launch the Odin Flash Tool application. If prompted for administrator permissions, grant them to proceed.
- Prepare for Firmware Installation: Before proceeding with firmware installation, ensure that your Samsung Tablet A is in Download Mode. You can enter Download Mode by powering off your device and then pressing and holding the Volume Down + Home + Power buttons simultaneously. Follow the on-screen instructions to enter Download Mode.
- Connect your Tablet: Now, connect your tablet to your computer using a USB cable. Once connected, the Odin Flash Tool will recognize your device and display a message indicating a successful connection.
- Select the Firmware: In the Odin Flash Tool, click on the “AP” or “PDA” button (depending on the Odin version) and browse to locate the firmware file you downloaded earlier. Select the correct firmware file for your Samsung Tablet A model.
- Start the Flashing Process: Once you have selected the firmware file, click on the “Start” button in Odin to initiate the flashing process. The firmware installation process may take a few minutes, so be patient and avoid disconnecting your tablet during this time.
- Complete the Process: After the flashing process is complete, you will see a “Pass” message in Odin, indicating a successful firmware installation. Your Samsung Tablet A will automatically reboot, and you can disconnect it from your computer.
By downloading and installing the Odin Flash Tool, you now have a powerful tool to flash firmware and custom files on your Samsung Tablet A. The next step is to find the correct firmware file for your specific device, which we will cover in the next section.
Step 5: Find the Correct Firmware
Before you can proceed with rooting your Samsung Tablet A, you need to find and download the correct firmware for your device. Installing the wrong firmware can lead to compatibility issues and potentially brick your tablet. Here’s how you can find the correct firmware:
- Identify Your Tablet Model: Start by identifying the exact model number of your Samsung Tablet A. You can usually find this information in the “Settings” app under “About tablet” or “About device.”
- Visit the Official Samsung Website: Go to the official Samsung website and navigate to the support section. Look for the “Firmware” or “Downloads” page.
- Enter Your Model Number: On the firmware downloads page, enter the model number of your Samsung Tablet A in the search bar or select it from the provided options. Ensure that you select the correct model, as even slight variations can have different firmware versions.
- Check the Firmware Version: Once you have selected your model number, you will see a list of available firmware versions for your tablet. Check the latest firmware version available and ensure that it is compatible with the rooting method you are using.
- Download the Firmware: Download the appropriate firmware file for your Samsung Tablet A. Ensure that you are downloading the correct firmware version that matches the model number of your tablet.
- Extract the Firmware: After the firmware file is downloaded, extract the contents of the downloaded file using a file extraction tool like WinRAR or 7-Zip. This will create a folder containing the necessary files for flashing.
It’s important to note that firmware files can also be found on reputable third-party websites, but exercise caution and verify their authenticity before downloading. Always prioritize downloading firmware from official sources to ensure reliability and security.
By finding and downloading the correct firmware for your Samsung Tablet A, you are now prepared to proceed with the rooting process. In the next step, we will cover how to backup your important data to ensure its safety before proceeding with rooting.
Step 6: Backup your Data
Before you begin rooting your Samsung Tablet A, it’s crucial to create a backup of your important data to safeguard against any potential data loss during the rooting process. Rooting involves making modifications to the system files, which can sometimes result in data being wiped or lost. Here’s how you can backup your data:
- Identify Important Data: Determine which data on your tablet is essential and needs to be backed up. This can include contacts, messages, photos, videos, documents, app data, and any other personal files that you don’t want to lose.
- Use Cloud Storage: Utilize cloud storage services like Google Drive, Dropbox, or OneDrive to backup your files. Upload your important documents, photos, and videos to the cloud to ensure they are safely stored online.
- Sync Contacts and Calendars: If you haven’t already, sync your contacts and calendars with your Google account or other email services. This will ensure that your contacts and calendar events are backed up and can easily be restored on a new device or after the rooting process.
- Transfer Files to Computer: Connect your Samsung Tablet A to your computer via USB cable and transfer important files to your computer’s hard drive. Create a separate folder to store these files, making it easier to restore them after rooting.
- Backup App Data: Some apps have built-in backup options that allow you to save app data, settings, and preferences. Use these options to create backups of specific apps and their data. Alternatively, you can use third-party backup apps from the Google Play Store to backup your app data.
- Take Screenshots or Write Down Settings: If you have customized specific settings on your tablet, take screenshots or manually write down those settings. This will help you easily restore them after the rooting process is complete.
Remember, the more comprehensive and frequent your data backups are, the more secure and confident you can be during the rooting process. Losing important data can be frustrating, so taking the time to create backups beforehand is strongly recommended.
Once you have successfully backed up your data, you can proceed with the next step of putting your Samsung Tablet A into Download Mode. This will be covered in the following section, so let’s continue with the rooting process!
Step 7: Put your Tablet into Download Mode
In order to proceed with rooting your Samsung Tablet A, you need to put your device into Download Mode. Download Mode allows communication between your tablet and the Odin Flash Tool on your computer, enabling you to flash custom firmware and root your device. Here’s how you can put your tablet into Download Mode:
- Power Off your Tablet: Ensure your tablet is powered off completely. Press and hold the power button until the “Power Off” or “Restart” option appears on the screen. Tap on “Power Off” to turn off your tablet.
- Enter Download Mode: Press and hold the Volume Down button and the Home button simultaneously. While holding these buttons, press and hold the Power button until your tablet vibrates and the Samsung logo appears on the screen.
- Release the Buttons: Once you see the Samsung logo, release all the buttons. Your tablet will now enter Download Mode.
- Confirm Download Mode: On the Download Mode screen, you will see a warning message. Press the Volume Up button to confirm and enter Download Mode.
Download Mode is an essential step in the rooting process as it allows the Odin Flash Tool on your computer to establish a connection with your Samsung Tablet A. Ensuring proper entry into Download Mode is important for a successful rooting procedure.
If you accidentally boot into a different mode or your tablet doesn’t enter Download Mode, restart the process and ensure you are correctly following the steps. If you still encounter issues, search for specific instructions for entering Download Mode on your specific Samsung Tablet A model.
Now that your tablet is in Download Mode, you can proceed to the next step of connecting your tablet to the computer. We will cover this in the upcoming section. Let’s continue with the rooting process!
Step 8: Connect your Tablet to the Computer
Now that your Samsung Tablet A is in Download Mode, the next step is to establish a secure connection between your tablet and the computer. This connection is necessary for transferring files, executing commands, and flashing the firmware using the Odin Flash Tool. Here’s how you can connect your tablet to the computer:
- Grab a USB Cable: Ensure you have a compatible USB cable that can establish a connection between your Samsung Tablet A and the computer. Use a high-quality cable to ensure a stable and uninterrupted connection.
- Connect your Tablet: Connect one end of the USB cable to your tablet’s charging port and the other end to an available USB port on your computer. Make sure the connection is secure on both ends.
- Check the Connection: Once the USB cable is connected, your tablet should be recognized by your computer. Look for a notification or prompt on both your computer and tablet’s screens indicating a successful connection.
- Confirm USB Debugging: If prompted on your tablet’s screen to allow USB debugging, tap “OK” to grant the permission. This will ensure that your tablet can establish a secure connection with the computer.
Ensuring a stable and reliable connection between your tablet and the computer is crucial for a successful rooting process. If you encounter any connection issues, try using a different USB port on your computer, restarting both your tablet and computer, or using a different USB cable.
If the connection is established successfully, you are now ready to proceed with flashing the firmware using the Odin Flash Tool. The next step will guide you through the process. Let’s move forward with the rooting process!
Step 9: Flash the Firmware using Odin
With your Samsung Tablet A connected to the computer in Download Mode, you can now proceed to flash the firmware using the Odin Flash Tool. Flashing the firmware will overwrite the existing system files on your tablet, enabling you to root your device. Here’s how you can flash the firmware using Odin:
- Launch Odin Flash Tool: Open the Odin Flash Tool on your computer. Ensure that your tablet is still in Download Mode and connected to the computer via the USB cable.
- Verify the Connection: In Odin, the “Added!” message should appear in the “Log” section, indicating that your tablet is successfully connected to the tool. The “ID:COM” port will also be highlighted in blue, indicating the detected connection.
- Load the Firmware File: Click on the “AP” or “PDA” button in Odin (depending on the version). Locate the firmware file you downloaded earlier and select it. This will load the firmware file into Odin, ready for flashing.
- Configure Odin Settings: Ensure that the “Auto Reboot” and “F. Reset Time” options are selected in Odin. These options allow your tablet to automatically reboot after flashing and reset the system time, respectively.
- Start the Firmware Flashing: Once all the settings and firmware file are loaded in Odin, click on the “Start” button to initiate the firmware flashing process. The process may take a few minutes, and you will see the progress in the “Log” section of Odin.
- Wait for the Flashing Process: During the flashing process, it’s crucial not to disconnect your tablet or interrupt the process. Your device may reboot multiple times, and Odin will display the progress and status of the flashing operation in the “Log” section.
- Successful Firmware Flash: Upon completion, Odin will display “Pass!” in the “Log” section, indicating that the firmware flashing process was successful. At this point, your Samsung Tablet A will automatically reboot.
It’s important to be patient during the firmware flashing process and not interrupt it. Wait for Odin to display “Pass!” and for your tablet to complete the reboot. After the reboot, your tablet will now have the new firmware that allows for rooting.
With the firmware successfully flashed, you are now ready for the final step: rooting your Samsung Tablet A. Let’s move on to the next section and complete the rooting process!
Step 10: Root your Samsung Tablet A
With the firmware successfully flashed onto your Samsung Tablet A, you are now ready to root your device and gain administrative privileges. Rooting your tablet will allow you to customize and optimize its performance according to your preferences. Here’s how you can root your Samsung Tablet A:
- Download a Rooting Tool: Search for a reputable rooting tool that is compatible with your Samsung Tablet A model and firmware version. Ensure that you download the most recent version of the rooting tool to maximize compatibility and functionality.
- Enable USB Debugging: Verify that USB debugging is still enabled on your tablet. If it’s not, navigate to the Developer Options menu in the Settings app and toggle the USB debugging switch to enable it.
- Connect your Tablet to the Computer: Use the same USB cable that was connected during the firmware flashing and ensure that your tablet is still connected to the computer.
- Launch the Rooting Tool: Open the rooting tool on your computer and follow the on-screen instructions to initiate the rooting process. The tool will communicate with your tablet and execute the necessary scripts to root your device.
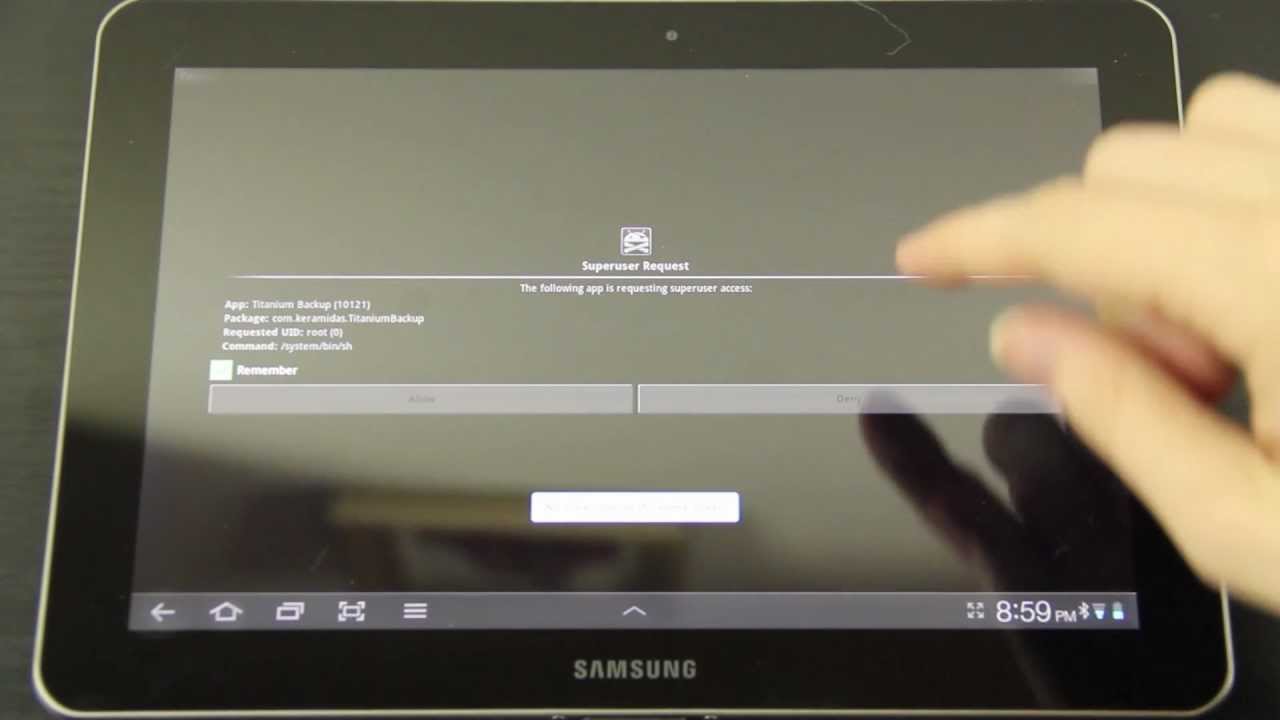
- Follow the Rooting Instructions: Pay close attention to the rooting tool’s instructions as it guides you through the rooting process. This may involve taking specific actions on your tablet or the computer, such as confirming prompts or allowing Superuser access.
- Wait for the Rooting Process to Complete: The rooting process may take a few minutes to complete. It’s important not to disconnect your tablet or interrupt the process. The rooting tool will display the progress and provide information on the completion status.
- Successful Rooting: Once the rooting process is successfully completed, your Samsung Tablet A will be rooted. You will have administrative privileges, allowing you to customize your device, install custom ROMs, and enjoy other benefits of a rooted device.
Keep in mind that rooting your tablet may void the warranty and can potentially introduce security risks if not done correctly. Ensure that you have a backup of your data and understand the implications of rooting before proceeding.
Now that your Samsung Tablet A is rooted, you can explore the wide range of possibilities and optimizations that come with root access. Enjoy the freedom to personalize your device and make the most of its capabilities!
Conclusion
Congratulations! You have successfully rooted your Samsung Tablet A and unlocked its full potential. By following the step-by-step guide provided in this article, you have gained administrative privileges, allowing you to customize and optimize your tablet’s performance to suit your needs and preferences.
Throughout the rooting process, it is important to keep in mind the precautions discussed at the beginning of this guide, including backing up your data, understanding the risks involved, and ensuring compatibility with your specific model and firmware version.
Rooting your tablet opens up a world of possibilities. You can now install custom ROMs, remove pre-installed bloatware, and tweak system settings to enhance the overall user experience. However, it is essential to exercise caution and only make changes if you are confident in what you are doing.
Remember that rooting your Samsung Tablet A can void the warranty, and improper execution can lead to device malfunctions or even permanent damage. It’s always a good idea to thoroughly research and understand the process before proceeding.
Should you ever wish to unroot your device, consider exploring methods and tools specifically designed for unrooting. These will help you revert your tablet back to its original state, allowing you to reinstate the warranty and restore the device to its factory settings.
We hope this guide has provided you with the necessary knowledge and guidance to successfully root your Samsung Tablet A. Enjoy the freedom and customization options that come with root access, and make the most of your tablet’s capabilities!