Introduction
Welcome to the world of Amazon Fire tablets! These affordable and feature-packed devices are a popular choice for people seeking a portable and versatile tablet experience. However, if you want to take full control of your device and unlock its true potential, you might be interested in rooting your Amazon Fire tablet.
Rooting your Amazon Fire tablet gives you administrator access to the device’s operating system, allowing you to customize it, remove pre-installed apps, and even install custom software. It’s like getting the keys to the kingdom, giving you the freedom to personalize your tablet to your heart’s content.
But why would you want to root your Amazon Fire tablet in the first place? The benefits are numerous. For starters, rooting allows you to install and use apps that require root access. You can also uninstall bloatware that comes pre-installed on the device, freeing up valuable storage space and improving performance. Additionally, rooting gives you the ability to tweak system settings, enhance battery life, and even install custom ROMs for a completely unique tablet experience.
However, before you dive into the realm of rooting, it’s important to understand that the process carries certain risks. Rooting your Amazon Fire tablet can potentially void the warranty and may cause unexpected issues if not done correctly. It’s essential to follow the proper procedures and take precautions to ensure a smooth and successful rooting process.
In this guide, we will walk you through the step-by-step process of rooting your Amazon Fire tablet. We will cover everything from enabling ADB debugging and installing ADB drivers to unlocking the bootloader, installing TWRP recovery, and flashing Magisk Manager for root access. By the end of this guide, you will be able to take complete control of your Amazon Fire tablet and unleash its full potential.
What is Rooting?
Rooting is the process of gaining administrative privileges or “root access” on an Android device. It allows you to have complete control over the operating system, giving you the ability to modify system files, install custom software, and perform advanced tasks that are typically restricted on a standard device.
When you root your Amazon Fire tablet, you are essentially breaking through the limitations set by the manufacturer and gaining access to the inner workings of the device. This opens up a world of possibilities and customization options that are otherwise unavailable on a non-rooted device.
Rooting can be likened to jailbreaking on iOS devices, but with more flexibility and control. It enables you to install powerful apps that require root access, giving you the ability to perform tasks such as system backup and restoration, ad blocking, advanced customization, and even overclocking the CPU for improved performance.
One of the main reasons people choose to root their Amazon Fire tablet is to get rid of bloatware or pre-installed apps that cannot be uninstalled on a standard device. These apps can take up valuable storage space and run in the background, potentially affecting the device’s performance. With root access, you can remove these unwanted apps and free up space, resulting in a cleaner and more efficient device.
Rooting can also unlock the potential for customization. You can install custom ROMs (modified versions of the device’s operating system) that offer a different look and feel, additional features, and improved performance. This opens up a whole new world of possibilities, allowing you to truly make your Amazon Fire tablet your own.
However, it’s important to note that rooting your Amazon Fire tablet comes with some risks. If not done correctly, it can lead to bricking your device or rendering it unusable. It may also void the warranty, as it involves modifying the device’s software. Therefore, it’s crucial to understand the process and follow reliable instructions to ensure a successful and safe rooting experience.
In the following sections, we will guide you through the step-by-step process of rooting your Amazon Fire tablet, ensuring that you have the necessary knowledge and precautions to carry out the procedure effectively.
Why Root Amazon Fire Tablet?
The decision to root your Amazon Fire tablet is a personal one, but it can bring a range of benefits and advantages. Here are some compelling reasons why you might consider rooting your device:
Access to Root-Only Apps: By rooting your Amazon Fire tablet, you unlock the ability to install apps that require root access. These apps can offer advanced features and functionalities that are not available on non-rooted devices. From powerful system tools to customizing the appearance and behavior of your tablet, root-only apps can enhance your overall user experience.
Remove Pre-installed Apps: Amazon Fire tablets often come with pre-installed apps, also known as bloatware, that cannot be uninstalled on non-rooted devices. Rooting your tablet allows you to remove these unwanted apps, freeing up precious storage space and decluttering your device. This can lead to improved performance and a cleaner user interface.
Customization and Theming: Rooting gives you the ability to customize your Amazon Fire tablet to your heart’s content. You can install custom ROMs and themes that offer unique designs, visual enhancements, and additional features. With root access, you can personalize your tablet’s appearance and tailor it to your specific preferences, making it truly your own.
Improved Performance: Rooting opens up the possibility of optimizing your Amazon Fire tablet for better performance. You can use various tools and mods to overclock the CPU, enhance battery life, or tweak system settings to maximize efficiency. These optimizations can result in a smoother and more responsive user experience.
Advanced Backup and Recovery: Rooting provides the opportunity to perform advanced backup and recovery tasks. With root access, you can use powerful apps and tools to create full system backups, allowing you to restore your device to a specific state if something goes wrong. This level of control and peace of mind can be invaluable, especially when experimenting with custom ROMs or other modifications.
Ad Blocking and Privacy: Rooting your Amazon Fire tablet enables you to block advertisements system-wide. By installing ad-blocking apps that require root access, you can eliminate intrusive ads and enhance your browsing experience. Additionally, you can use root-exclusive privacy apps to control app permissions, monitor data usage, and protect your personal information.
These are just a few examples of the benefits you can enjoy by rooting your Amazon Fire tablet. It’s important to note that rooting does come with certain risks, such as potentially voiding your device’s warranty or causing system instability if performed incorrectly. However, with proper research, precautions, and following reputable guides, you can unlock a world of possibilities and customize your Amazon Fire tablet to meet your specific needs and preferences.
Preparations
Before you begin the process of rooting your Amazon Fire tablet, there are a few essential preparations you need to make to ensure a smooth and successful experience. Follow these steps to get everything in order:
1. Backup Your Data: Rooting your device involves making significant changes to the system, so it’s crucial to back up any important data, such as photos, videos, contacts, and documents. This way, if anything goes wrong during the rooting process, you can restore your device and not lose any valuable information.
2. Check your Amazon Fire tablet model: Different Amazon Fire tablet models may have slightly different rooting procedures. Make sure you know the exact model of your device, as well as its firmware version. This information will come in handy when searching for the appropriate rooting method and files.
3. Charge your device: Ensure that your Amazon Fire tablet is sufficiently charged before starting the rooting process. A fully charged device will help prevent any interruptions or power-related issues during the procedure.
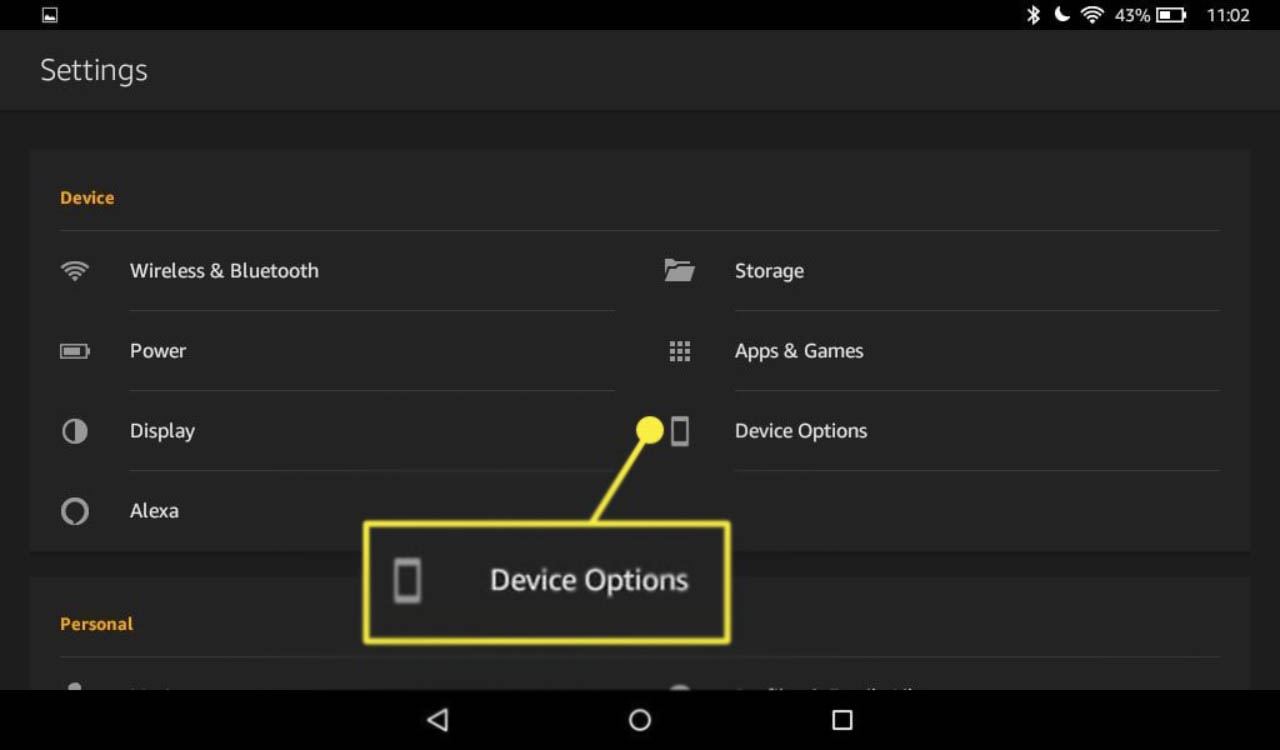
4. Enable Developer Options: To enable USB debugging and unlock the bootloader, you need to enable the Developer Options on your Amazon Fire tablet. To do this, go to “Settings,” then “Device Options,” and tap on “Serial Number” seven times. This will unlock the Developer Options menu.
5. Enable ADB Debugging: ADB (Android Debug Bridge) debugging is necessary for the rooting process. To enable ADB debugging, go to the Developer Options menu and toggle on the “Enable ADB” or “Android Debugging” option.
6. Install ADB Drivers: ADB drivers allow your computer to communicate with your Amazon Fire tablet during the rooting process. Depending on your computer’s operating system, you may need to install specific ADB drivers. This step is crucial for a successful connection between your device and computer.
7. Check for Compatibility: Before proceeding, verify that the rooting method and files you plan to use are compatible with your specific Amazon Fire tablet model and firmware version. Ensure that you download the correct files to avoid any compatibility issues or potential bricking of your device.
8. Gather Required Files: Research and collect the necessary files for the rooting process. This typically includes the rooting tool, TWRP recovery, and the Magisk Manager apk file. Ensure that you download these files from reputable sources and double-check their integrity using checksums, if available.
By completing these preparations, you are setting yourself up for a successful rooting experience. Taking the time to backup your data, check compatibility, and gather the required files will help ensure a smooth and hassle-free process. Once you have everything ready, you’re ready to move on to the next steps of enabling ADB debugging and installing ADB drivers.
Part 1: Enabling ADB Debugging
Before you can root your Amazon Fire tablet, you need to enable ADB (Android Debug Bridge) debugging. ADB debugging allows your computer to communicate with your device and carry out various commands during the rooting process. Follow these steps to enable ADB debugging on your Amazon Fire tablet:
1. Go to Settings: Open the Settings app on your Amazon Fire tablet. You can access the Settings app from the device’s home screen or the app drawer.
2. Open Developer Options: Scroll down and select the “Developer Options” menu. If you cannot find this option, you need to unlock it first. To unlock Developer Options, go to “Device Options” in the settings, then tap on “Serial Number” seven times. This will unlock Developer Options.
3. Enable ADB Debugging: Within the Developer Options menu, locate the “USB Debugging” or “ADB Debugging” option. Toggle it on to enable ADB debugging. You may see a warning message, but you can safely proceed by selecting “OK” or “Allow” to grant permission for USB debugging.
4. Enable ADB over Network (Optional): If you want to use ADB debugging wirelessly over your local network, you can also enable the “ADB over Network” option within the Developer Options menu. This will allow you to connect to your device without the need for a physical USB connection.
5. Confirm ADB Debugging: Once you have enabled ADB debugging, ensure that the toggle switch remains in the “On” position. This will ensure that ADB debugging stays enabled throughout the rooting process.
By enabling ADB debugging on your Amazon Fire tablet, you are allowing your computer to establish a connection with your device. This connection is crucial for carrying out various commands and procedures during the rooting process. Now that you have enabled ADB debugging, you can move on to the next step of installing ADB drivers, which will facilitate the connection between your device and computer.
Part 2: Installing ADB Drivers
In order to properly connect your Amazon Fire tablet to your computer and communicate with it during the rooting process, you need to install the appropriate ADB (Android Debug Bridge) drivers. These drivers will allow your computer to recognize and interact with your device. Follow these steps to install the ADB drivers:
1. Download ADB Drivers: Visit the official Android Developers website or other reliable sources to download the ADB drivers for your specific computer operating system. Ensure that you download the correct drivers compatible with your Windows, macOS, or Linux system.
2. Extract the Driver Files: Once the ADB driver zip file is downloaded, extract its contents to a dedicated folder on your computer. This will make it easier to locate and install the drivers when needed.
3. Connect your Amazon Fire tablet: Use a USB cable to connect your Amazon Fire tablet to your computer. Ensure that the USB debugging option (enabled in the previous step) remains active on your tablet during the entire process.
4. Open the Device Manager: On your computer, open the Device Manager. You can access this by right-clicking on the Start button and selecting “Device Manager” from the context menu.
5. Locate the Amazon Fire tablet: In the Device Manager window, look for your Amazon Fire tablet under the “Portable Devices” or “Other Devices” section.
6. Update the drivers: Right-click on your Amazon Fire tablet and select “Update driver” from the drop-down menu. Choose the option to browse your computer for driver software.
7. Select the driver folder: When prompted to select the location of the driver software, navigate to the folder where you extracted the ADB driver files in step 2. Select the appropriate driver file for your computer’s operating system.
8. Install the drivers: Follow the on-screen instructions to complete the installation of the ADB drivers. Once the installation process is complete, your computer should recognize your Amazon Fire tablet and establish a proper connection.
9. Verify the driver installation: To ensure that the ADB driver installation was successful, open a command prompt or terminal window on your computer and enter the command “adb devices.” If your device is listed, it means the ADB drivers are installed correctly, and you are ready to proceed with the rooting process.
By installing the ADB drivers, you have ensured that your computer can communicate effectively with your Amazon Fire tablet during the rooting process. This step is vital for establishing a reliable connection and carrying out the necessary procedures to root your device.
Part 3: Downloading Required Files
To successfully root your Amazon Fire tablet, you need to download a few essential files that will be used in the subsequent steps of the rooting process. These files include the rooting tool, TWRP (Team Win Recovery Project) recovery, and the Magisk Manager apk file. Follow these steps to download the required files:
1. Research and Find Reliable Sources: Start by researching and finding reliable sources to download the required files. Look for reputable websites, forums, or official developer platforms that are known for providing trustworthy and up-to-date files.
2. Rooting Tool: Find a reliable rooting tool compatible with your Amazon Fire tablet model and firmware version. Some popular rooting tools include KingRoot, SuperSU, or Magisk. Download the necessary file from a reputable source.
3. TWRP Recovery: Look for the appropriate version of TWRP recovery for your specific Amazon Fire tablet model. TWRP recovery is a custom recovery that allows you to perform various advanced tasks on your device, including flashing custom ROMs and managing system backups. Download the TWRP recovery file from a trusted source.
4. Magisk Manager: Magisk Manager is a powerful tool used to manage and control root access on your Amazon Fire tablet. It allows you to grant or deny root access to apps, effectively managing the privileges granted to each application. Locate the Magisk Manager APK file for download, ensuring it is compatible with your tablet’s requirements.
5. Verify File Integrity: Before proceeding, it is essential to verify the integrity of the downloaded files. Check for the file’s correct size and compare its checksum against the official checksum provided by the source. This ensures that the file has not been tampered with or corrupted during the downloading process.
6. Store Files in a Dedicated Folder: Create a dedicated folder on your computer to store all the downloaded files for easy access. It is recommended to keep these files organized in one place, as they will be needed in the subsequent steps of the rooting process.
By downloading the necessary files from reliable sources and verifying their integrity, you have prepared yourself for the next steps in rooting your Amazon Fire tablet. These files will be used to unlock the bootloader, install TWRP recovery, and ultimately gain root access, giving you complete control over your device’s operating system and customization options.
Part 4: Unlocking the Bootloader
Unlocking the bootloader is a crucial step in the rooting process as it allows you to install custom recoveries, flash custom ROMs, and gain root access on your Amazon Fire tablet. However, it’s important to note that unlocking the bootloader will perform a factory reset on your device, erasing all data. Follow these steps to unlock the bootloader:
1. Download and Install Android SDK (Software Development Kit): To proceed with unlocking the bootloader, you need to have the Android SDK installed on your computer. This toolkit provides the necessary tools and platform-specific commands to interact with your Amazon Fire tablet.
2. Enable Developer Options and USB Debugging: Before proceeding further, ensure that Developer Options and USB Debugging are enabled on your device. Go to the device’s Settings, navigate to Developer Options, and toggle on USB Debugging. This will allow your computer to communicate with your tablet during the bootloader unlocking process.
3. Connect your Amazon Fire tablet to your computer: Use a compatible USB cable to connect your Amazon Fire tablet to your computer. Ensure that the USB Debugging option remains enabled on your device throughout this process.
4. Open a command prompt or terminal window: On your computer, open a command prompt or terminal window in the folder where you installed the Android SDK.
5. Boot your tablet into Fastboot mode: To access Fastboot mode, power off your Amazon Fire tablet completely. Then, press and hold the Power button and the Volume Down button simultaneously until the Fastboot mode screen appears.
6. Verify the tablet is connected: In the command prompt or terminal window, enter the command “fastboot devices” to verify that your device is recognized by the Fastboot tool. If your device appears on the list, it means the connection is successful.
7. Unlock the bootloader: Enter the command “fastboot oem unlock” in the command prompt or terminal window. This command will initiate the bootloader unlocking process. Follow the on-screen instructions and use the Volume buttons to navigate and the Power button to confirm your selection.
8. Confirm the bootloader unlock: Once you confirm the bootloader unlock, your device will undergo a factory reset, erasing all data. This process is irreversible, so make sure you have backed up any important files or data beforehand.
9. Reboot your device: After the bootloader unlock process completes, enter the command “fastboot reboot” to reboot your Amazon Fire tablet. The device will now start up with an unlocked bootloader.
By successfully unlocking the bootloader, you have laid the foundation for further customization and modification of your Amazon Fire tablet. This step allows you to install custom recoveries like TWRP and unlock the potential for custom ROMs, system tweaks, and gaining full root access. With a properly unlocked bootloader, you are ready to proceed to the next step of installing TWRP recovery.
Part 5: Installing TWRP Recovery
Installing TWRP (Team Win Recovery Project) recovery is an important step in the rooting process as it provides a custom recovery environment that allows you to perform advanced tasks and modifications on your Amazon Fire tablet. Follow these steps to install TWRP recovery:
1. Download the TWRP Recovery Image: Visit a trusted source or the official TWRP website to download the appropriate TWRP recovery image for your Amazon Fire tablet model. Make sure to download the correct version to avoid compatibility issues.
2. Connect your Amazon Fire tablet to your computer: Use a compatible USB cable to connect your Amazon Fire tablet to your computer. Ensure that USB Debugging is enabled on your device. You should also have already unlocked the bootloader, as mentioned in the previous steps.
3. Boot your tablet into Fastboot mode: Power off your device completely, then press and hold the Power button and the Volume Down button simultaneously until the Fastboot mode screen appears.
4. Verify the tablet is connected: Open a command prompt or terminal window and enter the command “fastboot devices” to confirm that your device is recognized by the Fastboot tool.
5. Flash the TWRP Recovery Image: In the command prompt or terminal window, enter the command to flash the TWRP recovery image onto your device. The specific command may vary depending on your device model and TWRP image file, but it generally follows the format: “fastboot flash recovery [path/to/twrp.img]”.
6. Wait for the process to complete: The flashing process should take a few seconds. Once it finishes, enter the command “fastboot reboot” to reboot your Amazon Fire tablet.
7. Boot into TWRP Recovery: After the device reboots, press and hold the Power button and the Volume Up button simultaneously until the TWRP recovery screen appears. Release the buttons when you see the TWRP logo.
8. Verify the TWRP installation: In the TWRP recovery menu, use the touch screen or physical buttons to navigate. If you can successfully access the TWRP recovery menu, it means that the installation was successful.
By installing TWRP recovery on your Amazon Fire tablet, you have gained access to a powerful tool that allows you to perform various advanced tasks. TWRP recovery provides a touch-based interface that enables you to flash custom ROMs, create system backups, wipe device partitions, and install root-access management tools like Magisk. With TWRP recovery installed, you are now ready to proceed to the next step of flashing Magisk Manager for root access.
Part 6: Flashing Magisk Manager
Flashing Magisk Manager is a crucial step in the rooting process as it allows you to gain root access on your Amazon Fire tablet and manage root permissions for apps and system modifications. Follow these steps to flash Magisk Manager:
1. Download the Magisk Manager APK: Visit a trusted source or the official Magisk Manager website to download the Magisk Manager APK file. Make sure to download the latest and compatible version for your Amazon Fire tablet.
2. Transfer the Magisk Manager APK to your tablet: Connect your Amazon Fire tablet to your computer using a USB cable, and transfer the downloaded Magisk Manager APK file to the internal storage or SD card of your device.
3. Boot your tablet into TWRP Recovery: Power off your device completely, then press and hold the Power button and the Volume Up button simultaneously until the TWRP recovery screen appears. Release the buttons when you see the TWRP logo.
4. Tap on “Install” in TWRP Recovery: In the TWRP recovery menu, tap on the “Install” button and navigate to the location where you transferred the Magisk Manager APK file on your device.
5. Select the Magisk Manager APK file: Once you locate the Magisk Manager APK file, tap on it to select it for installation.
6. Swipe to confirm flash: Swipe the button to confirm the flash process and proceed with the installation of Magisk Manager on your Amazon Fire tablet.
7. Wait for the installation to complete: The installation process will take a few seconds. Once it finishes, you will see a message indicating that the installation was successful.
8. Reboot your device: Tap on the “Reboot System” button in TWRP recovery to restart your Amazon Fire tablet. After the device boots up, you should see the Magisk Manager app among your installed apps.
9. Open Magisk Manager and verify root access: Launch the Magisk Manager app on your device. If it opens without any issues and displays the root status as “Rooted,” it means that you have successfully flashed Magisk Manager and gained root access on your Amazon Fire tablet.
By flashing Magisk Manager, you have successfully gained root access on your Amazon Fire tablet, providing you with extensive control and customization options. With root access, you can now use root-enabled apps, customize system settings, and fully optimize your device according to your preferences. Make sure to exercise caution when granting root permissions to applications and only use trusted sources for root-related modifications.
Part 7: Verifying Root Access
After completing the previous steps of the rooting process for your Amazon Fire tablet, it’s essential to verify that root access has been successfully achieved. Verifying root access ensures that your device has gained administrative privileges and is ready to take advantage of the benefits that come with rooting. Here’s how you can verify root access:
1. Open Magisk Manager: Launch the Magisk Manager app on your Amazon Fire tablet. If you don’t find it in your app drawer, ensure that you have successfully installed and flashed Magisk Manager as instructed in the previous steps.
2. Check Root Status: Once inside Magisk Manager, you should see a message indicating that your device is rooted. This confirms that root access has been successfully granted to your device.
3. Test Root Applications: To further verify root access, you can install and use root-enabled applications from the Play Store or other reliable sources. These apps typically require root access and allow you to perform advanced tasks that are not possible on non-rooted devices. If you can successfully use such apps without encountering any issues, it confirms that root access has been successfully achieved.
4. Use Root Checker Apps: Another method to verify root access is by using root checker apps available on the Play Store. These apps check the root status of your device and provide a definitive answer. Download a reputable root checker app, run the check, and see if it confirms root access on your Amazon Fire tablet.
5. Execute Root Commands: If you are familiar with command-line interfaces, you can also use a terminal emulator app, such as Termux, to execute root commands on your device. By running commands that require root access, you can confirm whether your device has gained the necessary privileges.
By going through these verification steps, you can ensure that root access has been successfully achieved on your Amazon Fire tablet. With root access, you can now enjoy the freedom to customize your device, install powerful root-enabled apps, and tinker with various system settings to enhance your user experience. Remember to exercise caution when using root access and only grant root permissions to trusted apps and sources to ensure the security and stability of your device.
Conclusion
Congratulations! You have successfully rooted your Amazon Fire tablet and gained full control over its operating system. Rooting your device opens up a world of possibilities, allowing you to customize and optimize your tablet according to your preferences. By following the step-by-step process outlined in this guide, you have unlocked the true potential of your Amazon Fire tablet and can now enjoy the benefits that come with root access.
Rooting your Amazon Fire tablet gives you the ability to install root-only apps, remove unwanted bloatware, and customize the device’s appearance and behavior. With root access, you can enhance performance, extend battery life, and experiment with custom ROMs for a unique user experience. Additionally, you can enjoy ad-blocking, advanced backup options, and heightened control over privacy settings.
It’s important to note that rooting your Amazon Fire tablet comes with certain risks. You may void the device’s warranty, and there is a possibility of encountering system instability or bricking the device if not performed correctly. Therefore, always follow reliable instructions, do proper research, and exercise caution during the rooting process.
Remember to regularly update your apps and devices, as well as keep backups of your important data. Stay informed about the latest security practices and only download apps and files from trusted sources to ensure the safety of your rooted Amazon Fire tablet.
Now that you have successfully rooted your device, the possibilities are endless. Explore the world of root-enabled apps, mods, and customizations to create a truly personalized and optimized experience on your Amazon Fire tablet. Enjoy the freedom and flexibility that root access provides, and make the most of your device’s capabilities!