Introduction
Welcome to the world of cryptocurrency trading! As a cryptocurrency enthusiast, you may have chosen Binance as your preferred exchange platform. Binance offers a secure and user-friendly environment for buying, selling, and trading digital assets.
One of the key security features offered by Binance is Google Authenticator. Google Authenticator adds an extra layer of protection to your account by requiring a unique verification code generated on your mobile device each time you log in. This ensures that only you can access your Binance account, providing peace of mind against potential unauthorized access or hacking attempts.
However, there may be situations where you need to reset Google Authenticator on your Binance account. This could be due to losing your mobile device, getting a new phone, or simply wanting to modify your security settings.
In this article, we will guide you through the process of resetting Google Authenticator on Binance. We will provide step-by-step instructions to help you regain access to your account and ensure a smooth transition to your new device or security settings.
It is important to note that resetting Google Authenticator on Binance involves a few precautions and security measures to protect your account. Following the correct procedures will help you avoid any potential issues or complications during the reset process.
So, if you find yourself in a situation where you need to reset Google Authenticator on Binance, don’t worry. We’ve got you covered. Let’s dive into the details and get you back in control of your Binance account!
What is Google Authenticator?
Google Authenticator is a two-factor authentication (2FA) app developed by Google. It adds an extra layer of security to your online accounts, including cryptocurrency exchanges like Binance. With Google Authenticator, you can enhance the protection of your account by requiring a unique verification code in addition to your regular login credentials.
Once you have set up Google Authenticator on your mobile device, it generates a new verification code every few seconds. This code is used together with your Binance login credentials to verify your identity and grant access to your account. Since the code changes frequently, it is virtually impossible for anyone to access your account without physical possession of your mobile device.
To set up Google Authenticator, you first need to download and install the app from the app store on your smartphone. Once installed, you will need to link your Binance account to the app by scanning a QR code provided in the Binance settings. After the setup is complete, you will begin receiving unique verification codes within the Google Authenticator app.
Using Google Authenticator adds an extra layer of security to your Binance account. Even if someone manages to obtain your login credentials, they will still need physical access to your mobile device to generate the correct verification code. This significantly reduces the risk of unauthorized access and protects your funds and personal information.
It is important to note that Google Authenticator works offline, which means that it does not require an internet connection to generate the verification codes. This adds another level of security because it minimizes the possibility of your verification codes being intercepted by hackers or stored on potentially vulnerable servers.
In summary, Google Authenticator is a powerful security measure that helps protect your Binance account by generating unique verification codes that must be entered along with your regular login credentials. It adds an extra layer of security by requiring physical possession of your mobile device to authenticate your identity. By using Google Authenticator, you can trade cryptocurrency on Binance with peace of mind, knowing that your account is well-protected.
Why Reset Binance Google Authenticator?
There are several reasons why you might need to reset Google Authenticator on your Binance account. These can include:
- Lost or Damaged Device: If you have lost your mobile device or it has been damaged beyond repair, resetting Google Authenticator is necessary to regain access to your Binance account. Since Google Authenticator is tied to your specific device, you will need to set it up on a new device to continue using it.
- Upgrading to a New Device: If you have upgraded to a new smartphone, you will need to reset Google Authenticator to link it to your new device. This ensures the continued security of your Binance account while using the latest technology.
- Changing Security Settings: You may also want to reset Google Authenticator if you wish to modify your security settings on Binance. This could involve increasing or decreasing the level of security required for accessing your account.
- Revoking Access: In some cases, you may want to reset Google Authenticator to revoke access for a specific device or application. This can ensure that only authorized devices can generate the verification codes and access your Binance account.
- Recovering from a Security Breach: If you suspect that your Binance account has been compromised or there has been a security breach, it is highly recommended to reset Google Authenticator. This helps to enhance the security of your account and prevent any unauthorized access.
Regardless of the reason, resetting Google Authenticator on Binance is a straightforward process. By following the correct steps, you can regain access to your account and ensure that your transactions and funds remain secure.
It is important, however, to exercise caution when resetting Google Authenticator to prevent any unauthorized access to your account. Always follow the recommended security precautions and keep your authentication codes confidential. By doing so, you can maintain a high level of account security and confidently trade cryptocurrency on Binance.
Precautions Before Resetting Binance Google Authenticator
Resetting Google Authenticator on your Binance account is a process that requires careful attention to security measures. Before proceeding with the reset, it is important to take the following precautions:
- Backup Recovery Key: Before resetting Google Authenticator, ensure that you have a backup of your recovery key. The recovery key is a unique code provided by Binance during the initial setup of Google Authenticator. This key is essential for restoring access to your account in case you lose your device or encounter any issues during the reset process. Keep the recovery key stored in a safe and secure location.
- Verify Account Information: Double-check your account information, including your email address and phone number, to ensure that they are up to date. This will help in the verification process and prevent any delays or complications during the reset process.
- Secure Your Email Account: Make sure that your email account associated with your Binance account is secure. Use a strong, unique password and enable two-factor authentication on your email provider for an added layer of security. This will help prevent unauthorized access to your email, which could potentially compromise the reset process.
- Clear Browser Cache: Clear your browser cache and cookies before starting the reset process. This ensures that there are no conflicting or outdated login credentials stored in your browser, which could cause issues during the reset process.
- Keep Communication Secure: During the reset process, be cautious of phishing attempts or scam emails. Binance will never ask you to provide sensitive information such as your recovery key or login credentials through email or any other means. Always access the official Binance website directly and avoid clicking on suspicious links or sharing personal information with unverified sources.
- Ensure Stable Internet Connection: Make sure you have a stable and secure internet connection throughout the reset process. This will help prevent any interruptions or errors during the verification and setup steps.
By taking these precautions, you can ensure a smooth and secure reset of Google Authenticator on your Binance account. It is crucial to prioritize account security and protect your personal information throughout the process.
Step-by-Step Guide to Reset Binance Google Authenticator
If you need to reset Google Authenticator on your Binance account, follow these step-by-step instructions:
- Download Google Authenticator: If you don’t already have it, download the Google Authenticator app from the App Store (iOS) or Google Play Store (Android).
- Disable Two-Factor Authentication on Binance: Log in to your Binance account and navigate to the “Security” section. Find the “Two-Factor Authentication” option and click on “Disable”. You will be prompted to enter your Binance account password and the code generated by your current Google Authenticator app.
- Submit Binance Reset Request: After disabling two-factor authentication, go back to the “Security” section and click on “Two-Factor Authentication” again. This time, select “Reset Google Authenticator”.
- Complete Identity Verification: Binance may require additional identity verification steps to ensure the security of your account. Follow the instructions provided and provide any necessary documents or information to complete the verification process.
- Enable Two-Factor Authentication on Binance: Once your identity is verified, go back to the “Security” section and click on “Two-Factor Authentication” once more. Select “Enable” and choose the option to set up Google Authenticator.
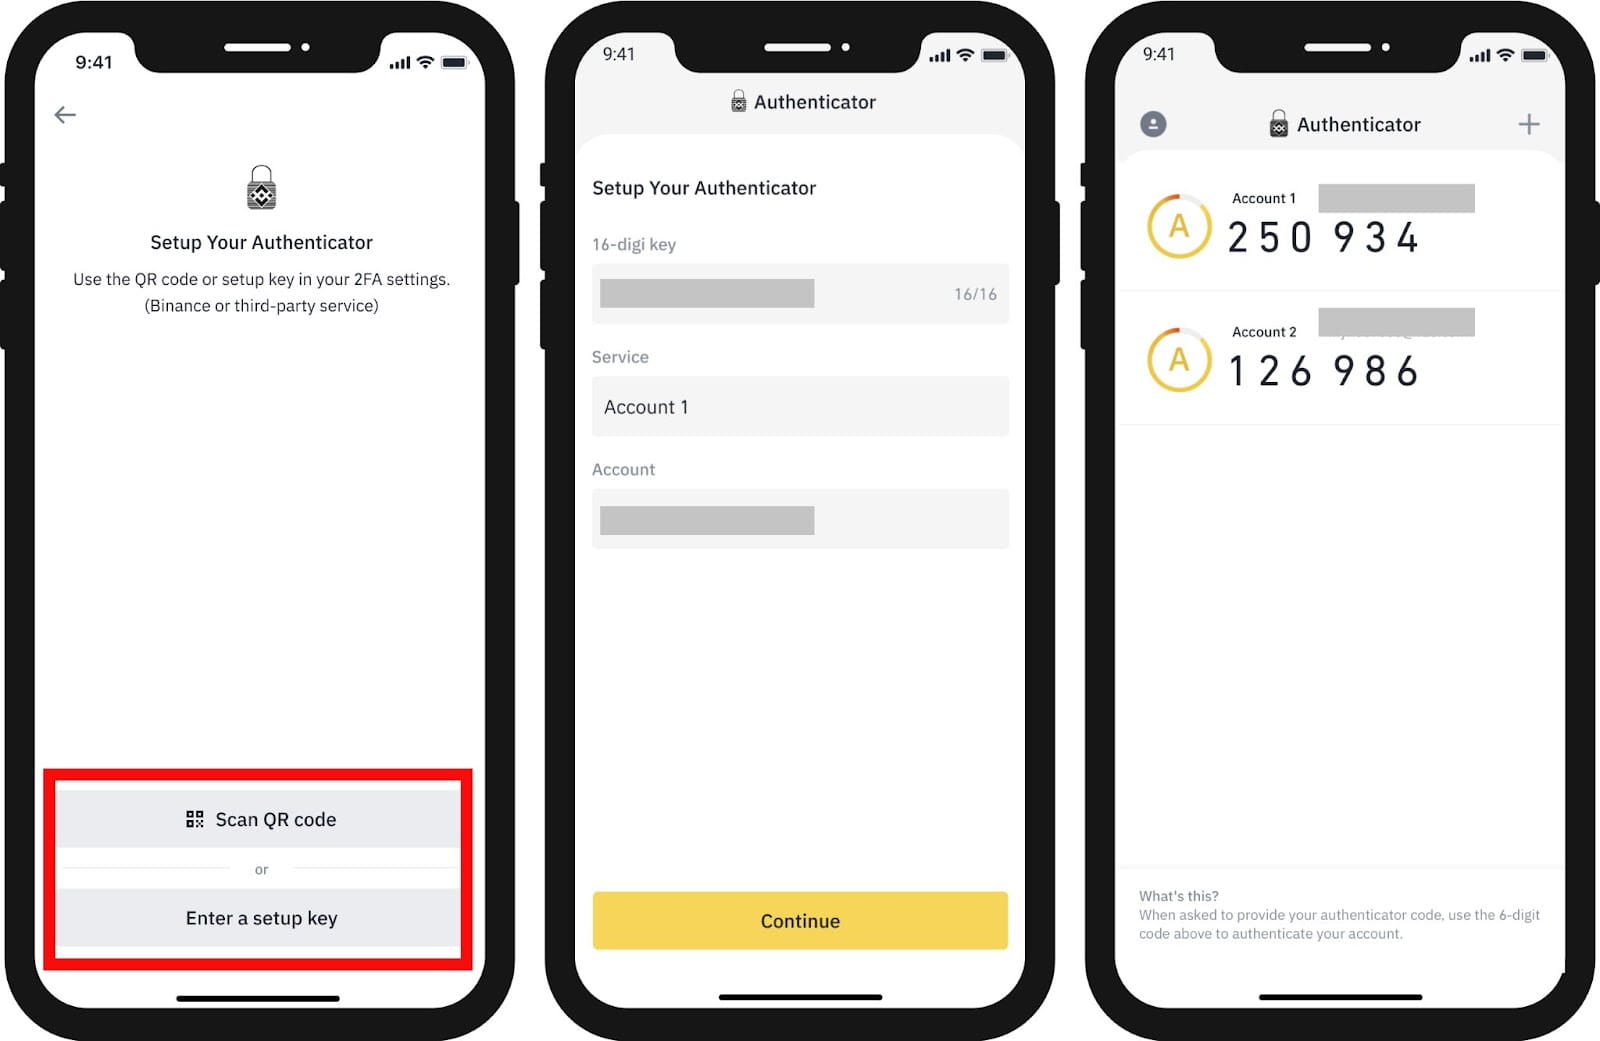
- Scan the QR Code: Open the Google Authenticator app on your mobile device and select the option to scan a QR code. Point your device’s camera at the QR code provided on the Binance website to link your Binance account to the Google Authenticator app.
- Enter Verification Code: After scanning the QR code, the Google Authenticator app will generate a verification code. Enter this code into the corresponding field on the Binance website to complete the setup process.
- Backup Recovery Key: Binance will provide you with a new recovery key. Make sure to securely store this key in a safe place. It is crucial for future account recovery purposes.
- Test the New Google Authenticator: To ensure that the reset was successful, try logging out of your Binance account and logging back in using your new Google Authenticator app. Enter the verification code generated by the app to confirm that everything is functioning correctly.
By following these steps, you can successfully reset Google Authenticator on your Binance account and regain access to your account with enhanced security measures. Remember to keep your recovery key and login credentials secure to protect your account from unauthorized access.
Download Google Authenticator
The first step in resetting Google Authenticator on your Binance account is to download the Google Authenticator app on your mobile device. Follow these instructions:
- Open App Store or Google Play Store: Depending on whether you are using an iOS or Android device, open the respective app store on your smartphone.
- Search for Google Authenticator: Use the search bar within the app store to search for “Google Authenticator”.
- Select the App: From the search results, choose the official Google Authenticator app developed by Google Inc.
- Download and Install: Tap on the “Install” or “Get” button to begin the download and installation process. The app will automatically install on your device.
- Open the Google Authenticator App: Once the installation is complete, locate the Google Authenticator app on your device’s home screen and open it.
After downloading and installing the Google Authenticator app, you are now ready to proceed with the next steps of resetting Google Authenticator on your Binance account. This app will generate the verification codes necessary to access your Binance account securely.
It is essential to ensure that you download the official Google Authenticator app from a trusted source. There may be other apps with similar names, but it is crucial to choose the one developed by Google Inc. to guarantee its authenticity and security.
By following these instructions, you have successfully completed the first step in the process of resetting Google Authenticator on your Binance account. Now, let’s move on to the next step of disabling two-factor authentication on Binance.
Disable Two-Factor Authentication on Binance
Now that you have downloaded the Google Authenticator app, the next step to reset Google Authenticator on your Binance account is to disable two-factor authentication. Follow these instructions:
- Log in to Your Binance Account: Using your web browser, go to the official Binance website and log in to your account using your registered email address and password.
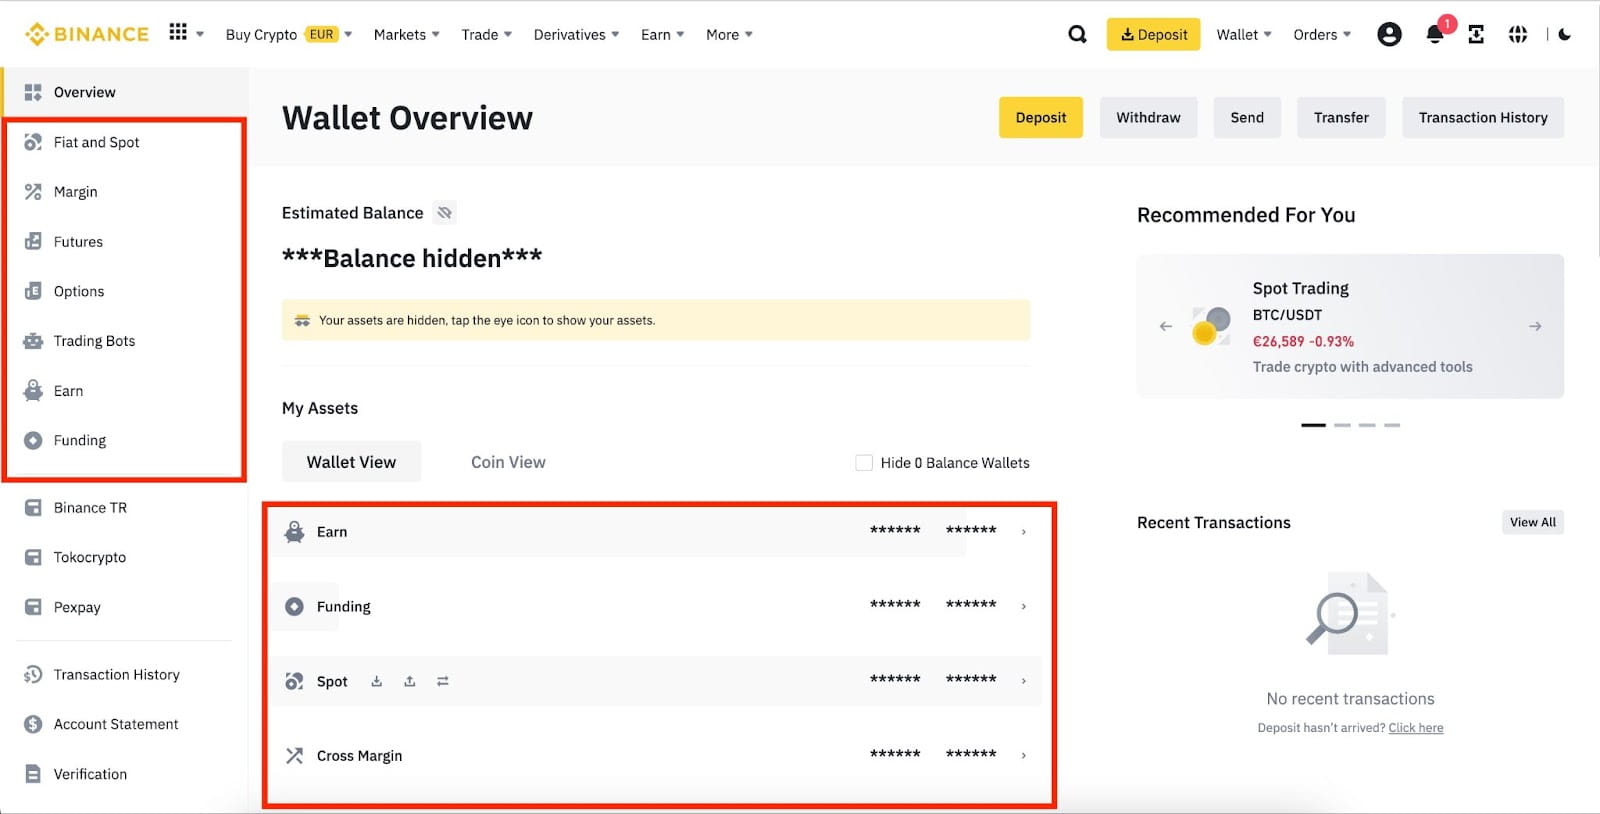
- Navigate to the “Security” Section: Once logged in, locate the “Security” tab on the top navigation menu and click on it. This will take you to the security settings section of your Binance account.
- Find “Two-Factor Authentication” Option: Within the “Security” section, look for the “Two-Factor Authentication” option. It is usually located towards the top of the page.
- Disable Two-Factor Authentication: Click on the “Disable” button next to the Two-Factor Authentication option. You may be prompted to enter your Binance account password and the verification code generated by your current Google Authenticator app.
- Confirm the Disable Process: After entering the required information, click on the confirmation button to disable two-factor authentication on your Binance account. This will remove the link between your Binance account and the current Google Authenticator app.
By following these instructions, you have successfully disabled two-factor authentication on your Binance account. This step is necessary to unlink your Binance account from the current Google Authenticator app, allowing you to reset and set up Google Authenticator on a new device or with updated settings.
Remember to keep your Binance account password confidential and avoid sharing it with anyone. Disabling two-factor authentication temporarily removes an additional layer of security, so it is important to proceed with caution and complete the reset process as quickly as possible.
Now, let’s move on to the next step of submitting a reset request to Binance.
Submit Binance Reset Request
After disabling two-factor authentication on Binance, the next step in resetting Google Authenticator is to submit a reset request. This process notifies Binance of your intention to reset and link Google Authenticator to your Binance account. Follow the steps below:
- Access the “Two-Factor Authentication” Option: Log in to your Binance account and navigate to the “Security” section as described in step 2.
- Select “Reset Google Authenticator”: Within the “Two-Factor Authentication” section, look for the option to “Reset Google Authenticator” and click on it.
- Confirm the Reset Request: Binance will present a prompt asking you to confirm your request to reset Google Authenticator. Take a moment to review your decision before proceeding.
- Enter Your Binance Account Password: As an added security measure, you will be prompted to enter your Binance account password to authenticate your identity.
- Complete any Additional Verification Steps: Depending on your account and security settings, Binance may require additional identity verification steps. Follow the on-screen instructions and provide any necessary documents or information to complete the verification process.
- Submit the Reset Request: Once all the required information is provided, submit the reset request to Binance. A confirmation message will be displayed, indicating that your request has been received.
By following these steps, you have successfully submitted a reset request to Binance. This informs Binance of your intention to reset Google Authenticator and sets the stage for the next step in the process: completing the identity verification.
Keep in mind that Binance takes security seriously, and additional verification steps may be necessary to ensure the safety of your account. Stay patient and provide the requested information promptly to expedite the process.
Now, let’s move on to the next step of completing the identity verification process required by Binance.
Complete Identity Verification
After submitting a reset request to Binance, the next step in resetting Google Authenticator is completing the identity verification process. Binance may require additional verification to ensure the security of your account. Follow the steps below to complete the identity verification:
- Follow Binance’s Instructions: After submitting the reset request, carefully read and follow the instructions provided by Binance. They will guide you through the identity verification process.
- Provide Requested Information: Binance may request additional documentation or information to verify your identity. This can include personal identification documents, proof of address, or other relevant details.
- Upload Documents: If needed, scan or take clear photos of the required documents. Follow Binance’s guidelines for file format, size, and resolution. Then, upload the documents securely through Binance’s designated platform.
- Verify Your Identity: Binance will review the information and documents you have provided. The verification process may take some time, so be patient during this stage.
- Check Verification Status: Monitor your Binance account for updates on the verification process. Binance will notify you once your identity verification is complete.
- Follow Additional Steps, if Necessary: In some cases, Binance may require additional steps to finalize the identity verification process. This can include responding to specific requests or providing additional details.
Binance’s identity verification process is designed to protect your account from unauthorized access and ensure the security of your funds. It is important to provide accurate and valid information during the verification process to avoid delays or complications.
Remember, the time it takes to complete the identity verification process can vary depending on factors such as the volume of requests. Stay attentive to any communication from Binance and promptly respond to any further inquiries to expedite the process.
By following these steps, you will successfully complete the identity verification process required by Binance. Now, let’s move on to the next step of enabling two-factor authentication on your Binance account.
Enable Two-Factor Authentication on Binance
Once your identity verification is complete, the next step in resetting Google Authenticator on Binance is to enable two-factor authentication. This additional security measure will help protect your account from unauthorized access. Follow the steps below:
- Access the “Two-Factor Authentication” Option: Log in to your Binance account and navigate to the “Security” section, as described in step 2.
- Select “Enable”: Within the “Two-Factor Authentication” section, locate the option to “Enable” and click on it.
- Choose Google Authenticator: Binance will present you with different options for two-factor authentication. Select Google Authenticator as your preferred method.
- Scan the QR Code: Open the Google Authenticator app on your mobile device and choose the option to scan a QR code. Point your device’s camera at the QR code displayed on the Binance website to link your Binance account to the Google Authenticator app.
- Enter Verification Code: After scanning the QR code, the Google Authenticator app will generate a verification code. Enter this code into the corresponding field on the Binance website to verify the successful connection between Binance and the Google Authenticator app.
- Backup Your Recovery Key: Binance will provide you with a new recovery key. It is crucial to securely store this key in a safe place. The recovery key will be necessary if you ever need to recover your account in the future.
- Test the New Google Authenticator: To ensure that the reset process was successful, log out of your Binance account and log back in using your new Google Authenticator app. Enter the verification code generated by the app to confirm that everything is functioning correctly.
By following these steps, you have successfully enabled two-factor authentication on your Binance account using Google Authenticator. This enhances the security of your account by requiring an additional verification code generated by the app during the login process.
Remember to keep your recovery key secure and confidential. In the event that you lose your device or need to recover your account in the future, the recovery key will be essential.
Congratulations! You have successfully completed the process of resetting Google Authenticator on your Binance account. Your account is now secured with two-factor authentication, providing an additional layer of protection to safeguard your funds and personal information.
Conclusion
Resetting Google Authenticator on your Binance account may become necessary due to various reasons such as a lost device, an upgrade to a new device, or a desire to change security settings. It is an essential process to ensure the security of your account and protect your funds from unauthorized access.
In this article, we provided you with a step-by-step guide to reset Google Authenticator on your Binance account. We emphasized the importance of taking precautions, such as backing up your recovery key and securing your email account. We also highlighted the significance of completing the identity verification process and following the correct instructions provided by Binance.
By following our guide, you successfully downloaded the Google Authenticator app, disabled two-factor authentication on Binance, submitted a reset request, completed the identity verification process, and enabled two-factor authentication using Google Authenticator on your Binance account.
Throughout the reset process, it is crucial to prioritize the security of your Binance account. Be cautious of phishing attempts, keep your recovery key confidential, and follow Binance’s instructions and security guidelines to protect your personal information.
Now that you have successfully reset Google Authenticator, you can trade cryptocurrency on Binance with confidence, knowing that your account is well-protected. Remember to periodically update your security settings and remain vigilant against potential security threats.
We hope that this guide has been helpful in assisting you with resetting Google Authenticator on your Binance account. Should you encounter any issues or have further questions, we encourage you to reach out to Binance’s customer support for assistance.
Thank you for choosing Binance as your cryptocurrency exchange platform and taking the necessary steps to protect your account. Happy trading!