Introduction
Welcome to the world of cryptocurrency! If you’re interested in trading or investing in digital currencies, you may have heard of Coinbase and Binance. These two popular platforms offer a convenient way to buy, sell, and store cryptocurrencies.
However, before you can start trading on Binance, you’ll need to transfer your cryptocurrency from Coinbase. This process can seem daunting at first, especially if you’re new to the world of crypto. But fear not! In this guide, we’ll walk you through the step-by-step process of transferring your crypto from Coinbase to Binance.
Transferring your cryptocurrency between exchanges is essential if you’re looking to take advantage of a wider range of trading options or if you simply prefer the features offered by Binance. By following these steps, you’ll have your crypto safely and securely transferred to your Binance account in no time.
Just bear in mind that the process involves several steps and requires a basic understanding of how these platforms work. But don’t worry – we’ll break it down for you in simple terms so that even if you’re a beginner, you’ll be able to follow along.
So, whether you’re a seasoned trader looking to expand your options or a crypto enthusiast exploring different platforms, let’s dive into the process of transferring your crypto from Coinbase to Binance!
Step 1: Sign up with Coinbase
The first step in transferring your crypto from Coinbase to Binance is to sign up for an account with Coinbase if you haven’t already done so. Coinbase is one of the most popular cryptocurrency exchanges and provides a user-friendly platform for buying, selling, and storing cryptocurrencies.
To sign up, visit the Coinbase website and click on the “Sign Up” button. You’ll be prompted to enter your email address and create a password. Make sure to choose a strong and secure password to protect your account.
After entering your email and password, click “Create Account.” Coinbase will send you a verification link to the email address you provided. Click the link to verify your email and proceed with the account setup.
Once your email is verified, Coinbase will ask you to provide some personal information, such as your name, date of birth, and address. This information is required for account verification and security purposes.
After submitting your personal information, Coinbase may ask you to verify your identity. This typically involves uploading a photo ID, such as a passport or driver’s license. Coinbase takes user safety seriously and follows strict “Know Your Customer” (KYC) regulations to prevent fraud and ensure the security of the platform.
Once your identity is verified, you can proceed to set up additional security measures for your Coinbase account. It is highly recommended to enable two-factor authentication (2FA) for an extra layer of security. With 2FA enabled, you’ll need to provide a unique code generated by a mobile app, in addition to your password, whenever you log in.
Once you’ve completed the account setup process, you’re ready to start using Coinbase. You can explore the platform to familiarize yourself with its features, such as buying and selling cryptocurrencies, viewing your portfolio, and managing your account settings.
Now that you have a Coinbase account, let’s move on to the next step: enabling 2FA on your Coinbase account to enhance the security of your funds.
Step 2: Enable Two-Factor Authentication (2FA)
Security is of utmost importance when it comes to handling cryptocurrencies. One crucial step to protect your Coinbase account is to enable two-factor authentication (2FA). 2FA adds an additional layer of security by requiring a second verification method in addition to your password during the login process.
To enable 2FA on your Coinbase account, follow these steps:
- Log in to your Coinbase account using your email and password.
- Click on your profile icon in the top right corner of the page, then click on “Settings.”
- On the “Settings” page, click on the “Security” tab.
- Scroll down to the “Two-factor authentication” section and click on “Enable” next to “Authenticator App.”
- Choose whether you want to use Google Authenticator or another authenticator app of your choice, and follow the instructions provided to set it up.
- Once the authenticator app is set up, you’ll see a QR code on the screen. Open the authenticator app on your mobile device and scan the QR code.
- Once the QR code is scanned, the authenticator app will generate a unique six-digit code that refreshes every 30 seconds.
- Enter the current code from your authenticator app into the field on the Coinbase page, then click “Verify.”
- After successful verification, 2FA will be enabled for your Coinbase account.
From now on, whenever you log in to your Coinbase account, in addition to entering your password, you’ll need to enter the current six-digit code shown in your authenticator app. This extra layer of security significantly reduces the risk of unauthorized access to your account.
It’s essential to enable 2FA to protect your funds on Coinbase. Losing access to your account due to inadequate security measures can be devastating. By taking this simple step, you’ll ensure that your account remains secure and your cryptocurrencies are safeguarded.
Now that 2FA is enabled on your Coinbase account, you’re ready to move on to the next step: verifying your identity on Coinbase to unlock additional features.
Step 3: Verify Your Identity
As an important security measure, Coinbase requires users to verify their identities before they can access certain features on the platform. Verifying your identity not only increases the security of your account but also ensures compliance with regulatory requirements.
To verify your identity on Coinbase, follow these steps:
- Log in to your Coinbase account using your email and password.
- Click on your profile icon in the top right corner of the page, then click on “Settings.”
- On the “Settings” page, click on the “Security” tab if you’re not already on that page.
- Scroll down to the “Identity Verification” section and click on “Get Started.”
- Follow the on-screen instructions to provide the requested information, such as your full name, date of birth, and residential address.
- You may be required to upload a photo ID, such as a passport or driver’s license, to verify your identity. Make sure the photo is clear and all the details are legible.
- Once you’ve provided all the necessary information and uploaded the required documents, click “Submit.”
After submitting your identity verification information, Coinbase will review the documents and information provided. This process may take a few minutes to several days, depending on the volume of applications and other factors.
Once your identity is verified, you’ll receive an email notification from Coinbase confirming the successful verification. You’ll then have access to additional features on the platform, such as higher transaction limits and the ability to withdraw funds to external wallets.
It’s important to note that completing the identity verification process is crucial for the security of your Coinbase account and compliance with regulatory requirements. Coinbase takes these steps to ensure the safety of its users and the integrity of the platform as a whole.
Now that your identity is verified on Coinbase, you’re one step closer to transferring your cryptocurrency to Binance. The next step is to add a payment method to your Coinbase account so that you can purchase cryptocurrencies.
Step 4: Add a Payment Method
In order to purchase cryptocurrencies on Coinbase and facilitate the transfer to Binance, you’ll need to link a payment method to your Coinbase account. Coinbase offers various payment options, including bank transfers and credit/debit cards, depending on your location.
Here’s how you can add a payment method to your Coinbase account:
- Log in to your Coinbase account using your email and password.
- Click on your profile icon in the top right corner of the page, then click on “Settings.”
- On the “Settings” page, click on the “Payment Methods” tab.
- Click on the “Add a Payment Method” button.
- Choose your preferred payment method option from the available choices. This can be a bank account or a credit/debit card.
- Follow the on-screen instructions to connect your payment method. You’ll need to provide the necessary information, such as your bank account details or your card information.
- Once you’ve entered the required information, click “Add Payment Method.”
After successfully adding a payment method, you’ll be able to use it to purchase cryptocurrencies on Coinbase. Keep in mind that there may be additional verification steps or limits depending on the payment method you choose.
It’s important to note that Coinbase prioritizes security when it comes to handling payment information. All sensitive data is encrypted and stored securely to protect your information from unauthorized access.
Having a payment method linked to your Coinbase account will allow you to easily purchase cryptocurrencies, which will be necessary for the upcoming steps of transferring your funds to Binance.
Now that you have a payment method added to your Coinbase account, you’re ready to move on to Step 5: purchasing cryptocurrency on Coinbase to begin the transfer process.
Step 5: Purchase Cryptocurrency on Coinbase
Once you have a payment method linked to your Coinbase account, you can start purchasing cryptocurrencies. Buying cryptocurrencies on Coinbase will provide you with the funds that you can transfer to your Binance account.
Follow these steps to purchase cryptocurrency on Coinbase:
- Log in to your Coinbase account using your email and password.
- Click on the “Buy/Sell” tab in the top navigation menu.
- Select the cryptocurrency you want to buy from the list of available options. Coinbase supports a wide range of cryptocurrencies, such as Bitcoin (BTC), Ethereum (ETH), Litecoin (LTC), and more.
- Enter the amount of cryptocurrency you want to buy or the amount of your local currency you want to spend.
- Review the transaction details, including the exchange rate and any fees associated with the purchase.
- Click “Buy” to confirm the transaction.
- Depending on your payment method, you may be prompted to complete additional steps, such as authorizing the transaction with your bank or entering a verification code sent to your mobile device.
Once the purchase is completed, the cryptocurrency you bought will be added to your Coinbase account balance. You can view your balance on the “Portfolio” tab in your Coinbase account.
It’s worth noting that Coinbase charges fees for buying and selling cryptocurrencies. The fees vary depending on the transaction size and payment method used. Make sure to review the fee schedule on the Coinbase website to understand the costs associated with your transactions.
Now that you have purchased cryptocurrency on Coinbase, you’re ready to move on to the next step: signing up with Binance to create an account where you can transfer your funds.
Step 6: Sign up with Binance
To transfer your cryptocurrency from Coinbase to Binance, you’ll need to create an account on the Binance platform. Binance is one of the largest and most popular cryptocurrency exchanges in the world, offering a wide range of trading options and features.
Follow these steps to sign up for a Binance account:
- Visit the Binance website (www.binance.com) in your web browser.
- Click on the “Register” button located at the top right corner of the page.
- Enter your email address and create a strong password for your account.
- Read and agree to the Terms of Use and Privacy Policy.
- If desired, you can enter a referral ID of someone who referred you to Binance.
- Complete the security verification process by solving the puzzle or entering the requested captcha.
- Click on the “Create account” button to proceed.
- Binance will send a verification email to the email address you provided. Open the email and click on the verification link to activate your Binance account.
Once your account is verified, you can log in to Binance using your email and password.
Binance takes security seriously and provides additional security features to protect your account. It is highly recommended to enable two-factor authentication (2FA) for an added layer of security. You can set up 2FA by downloading the Google Authenticator app or using another compatible authentication app.
Now that you have successfully signed up for a Binance account, you can proceed to the next step: enabling two-factor authentication (2FA) on your Binance account for enhanced security.
Step 7: Enable Two-Factor Authentication (2FA) on Binance
In order to further secure your Binance account, it is strongly recommended to enable two-factor authentication (2FA). 2FA adds an extra layer of protection to your account by requiring a second verification method in addition to your password during the login process.
Here’s how you can enable 2FA on your Binance account:
- Log in to your Binance account using your email and password.
- Click on your profile icon at the top right corner of the page and select “Account” from the drop-down menu.
- In the Account section, click on “Security” in the left-hand side menu.
- Scroll down to the “Two-factor Authentication (2FA)” section and click on “Enable” next to Google Authentication.
- Download the Google Authenticator app on your mobile device if you haven’t already done so.
- Open the Google Authenticator app and click on the “+” icon to add a new account.
- Choose the “Scan Barcode” option and scan the QR code displayed on the Binance website. Alternatively, you can manually enter the provided “Key” into the Google Authenticator app.
- Once the QR code is scanned or the key is entered, the Google Authenticator app will generate a unique six-digit code that updates every 30 seconds.
- Enter the current six-digit code from the Google Authenticator app into the “Google Authenticator Code” field on the Binance website.
- Click “Enable Google Authentication” to complete the process.
Now, whenever you log in to your Binance account, you will need to enter both your password and the current six-digit code from the Google Authenticator app. This additional layer of security significantly reduces the risk of unauthorized access to your Binance account.
It is important to note that after enabling 2FA, you should keep your backup key in a safe place. This backup key can help you regain access to your account if your device gets lost or reset. Make sure to write down the backup key and store it securely.
Now that your Binance account has 2FA enabled, you can move on to the next step: obtaining your Binance wallet address to initiate the transfer from Coinbase.
Step 8: Obtain Your Binance Wallet Address
In order to transfer your cryptocurrency from Coinbase to Binance, you’ll need to obtain your Binance wallet address. This wallet address serves as the destination where you’ll send your funds from Coinbase. Follow these steps to find your Binance wallet address:
- Log in to your Binance account using your email and password.
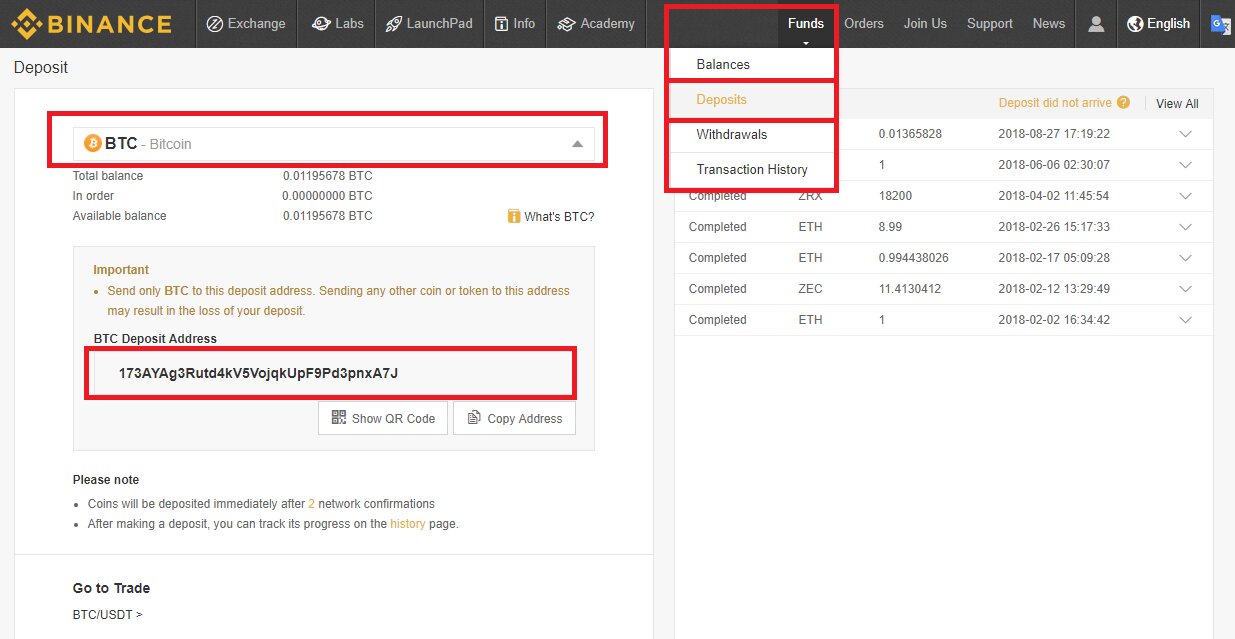
- Click on “Wallet” at the top menu and select “Overview.”
- Under the “Wallet” section, search for the cryptocurrency you want to transfer from Coinbase. For example, if you want to transfer Bitcoin, search for “BTC.”
- Click on “Deposit” next to the cryptocurrency you selected.
- A unique wallet address for the selected cryptocurrency will be displayed. This is your Binance wallet address.
- You can either copy the wallet address or use the provided QR code to initiate the transfer from Coinbase.
It is important to ensure that you are copying the correct wallet address for the specific cryptocurrency you intend to transfer. Sending funds to the wrong address may result in permanent loss of your funds.
Take note that different cryptocurrencies have different wallet addresses. Therefore, if you plan to transfer multiple cryptocurrencies from Coinbase to Binance, make sure to obtain the wallet address for each specific cryptocurrency.
After obtaining your Binance wallet address, keep it handy as you’ll need to provide it in the next step when initiating the transfer from Coinbase.
Now that you have your Binance wallet address, you’re ready to proceed to the next step: transferring cryptocurrency from Coinbase to Binance.
Step 9: Transfer Cryptocurrency from Coinbase to Binance
Once you have your Binance wallet address, you can now initiate the transfer of your cryptocurrency from Coinbase to Binance. Follow these steps to transfer your funds:
- Log in to your Coinbase account using your email and password.
- Click on the “Accounts” tab in the top navigation menu.
- Search for the cryptocurrency you want to transfer from Coinbase. For example, if you want to transfer Bitcoin, search for “BTC.”
- Click on the “Send” button next to the cryptocurrency you selected.
- In the “Recipient” field, paste the Binance wallet address that you obtained in the previous step.
- Enter the amount of cryptocurrency you want to transfer to Binance. Make sure to double-check the amount and ensure it is within the available balance in your Coinbase account.
- Review the transaction details, including the recipient address and the amount.
- Confirm the transaction by clicking on the “Send now” or “Confirm” button.
- Wait for the confirmation of the transaction. The time it takes for the transfer to be completed can vary depending on the network congestion and the cryptocurrency being transferred.
During the transfer process, it’s important to be patient and avoid any interruptions or disruptions that may affect the completion of the transaction.
Once the transfer is successful, the cryptocurrency you sent from Coinbase will appear in your Binance account balance. You can verify the transaction by checking your Binance account under the respective cryptocurrency’s wallet.
It’s worth noting that different cryptocurrencies may have different confirmation times, so it’s normal for some transfers to take longer than others.
Now that you have successfully transferred your cryptocurrency from Coinbase to Binance, you’re one step closer to accessing a wider range of trading options and features on the Binance platform.
The final step in this process is to confirm the transfer on Binance, which we will cover in the next step.
Step 10: Confirm the Transfer on Binance
After transferring your cryptocurrency from Coinbase to Binance, it is important to confirm the transaction on the Binance platform to ensure that the funds have been successfully received. Here’s how you can confirm the transfer on Binance:
- Log in to your Binance account using your email and password.
- Click on “Wallet” at the top menu and select “Spot Wallet” from the drop-down menu.
- Under the “Spot Wallet” section, search for the cryptocurrency you transferred from Coinbase.
- Click on the cryptocurrency to expand the options, then click on “Deposit.”
- Verify that the deposited amount matches the amount you transferred from Coinbase.
- Double-check that the transaction status is marked as “completed” or “success.”
- If the transaction is marked as “completed” or “success,” this means that the transfer was successful and the funds are now available in your Binance account.
It’s important to note that the confirmation process may vary slightly depending on the specific cryptocurrency you transferred. However, the core steps outlined above should apply to most cryptocurrencies on the Binance platform.
By confirming the transfer on Binance, you can be confident that your funds have been received and are ready to be used for trading or other cryptocurrency-related activities on the platform.
Now that you have confirmed the successful transfer of your cryptocurrency on Binance, you can explore the various trading options, investment opportunities, and other features that Binance offers.
Congratulations! You have successfully completed the process of transferring your cryptocurrency from Coinbase to Binance. Remember to always practice proper security measures and stay informed about the best practices for managing your cryptocurrencies.
Conclusion
Congratulations on successfully transferring your cryptocurrency from Coinbase to Binance! By following the step-by-step process outlined in this guide, you have gained the knowledge and skills necessary to navigate these popular cryptocurrency platforms.
We started by signing up with Coinbase, a user-friendly platform for buying, selling, and storing cryptocurrencies. We then enabled two-factor authentication (2FA) and verified our identity to ensure the security of our Coinbase account.
Next, we added a payment method to our Coinbase account, allowing us to purchase cryptocurrency. We then signed up for a Binance account, another renowned exchange offering a wide range of trading options.
To enhance the security of our Binance account, we enabled two-factor authentication (2FA) and obtained our Binance wallet address for the transfer process. We proceeded to transfer cryptocurrency from Coinbase to Binance, followed by confirming the transaction on the Binance platform.
Now that you’ve successfully completed these steps, you can take advantage of the features and opportunities offered by both Coinbase and Binance. You have the ability to trade cryptocurrencies, explore various investment options, and take part in the exciting world of digital assets.
Remember to always keep your account information, including passwords and wallet addresses, secure. Regularly review and update your security measures to protect your valuable digital assets from potential threats.
As the cryptocurrency landscape continues to evolve, stay informed about the latest developments, market trends, and best practices for managing your cryptocurrencies. This will empower you to make informed decisions and navigate the dynamic world of digital currencies with confidence.
Thank you for choosing this guide to assist you in the transfer process, and may your cryptocurrency journey be filled with success!