Introduction
Welcome to our guide on how to remove a Microsoft account from Windows 10. Microsoft accounts offer a variety of benefits, such as syncing data across devices and accessing Microsoft’s suite of online services. However, you may find yourself in a situation where you no longer want or need to use a Microsoft account on your Windows 10 device. Whether you’re switching to a local account or simply want to remove your Microsoft account altogether, we’ve got you covered.
In this article, we will walk you through several methods that will help you remove a Microsoft account from your Windows 10 device. You don’t need any advanced technical skills to follow these instructions, so don’t worry if you’re not a tech whiz. Just make sure you have administrative privileges on your computer, and you’re ready to get started.
Please note that removing a Microsoft account from your Windows 10 device will affect certain functionalities. For example, you will lose access to synced data and services such as Microsoft Office 365, OneDrive, and the Microsoft Store. If you’re comfortable with this, let’s dive into the different methods for removing a Microsoft account.
Prerequisites
Before you proceed with removing your Microsoft account from Windows 10, there are a few prerequisites you should be aware of:
- A Windows 10 computer: You will need a computer running Windows 10 operating system.
- Administrative privileges: To remove a Microsoft account, you will need to have administrative privileges (or be logged in as an administrator) on your Windows 10 device. If you’re not sure whether you have admin rights, contact your system administrator.
- Back up your data: It’s always a good idea to back up any important files or documents before making any significant changes to your system. This will help ensure that you don’t accidentally lose any important data during the account removal process.
- Create a local account (optional): If you want to switch from a Microsoft account to a local account, you can do so before removing the Microsoft account. This will allow you to keep your personal settings, files, and folders intact on your Windows 10 device.
By taking these prerequisites into consideration, you will be well-prepared to proceed with removing your Microsoft account from Windows 10. It’s always better to be safe than sorry when making changes to your computer, so don’t skip these important steps.
Method 1: Remove Microsoft Account using Settings
If you want to remove your Microsoft account from Windows 10 without switching to a local account, you can do so easily using the Settings app. Follow these steps:
- Open the Start menu and click on the “Settings” gear icon to open the Settings app.
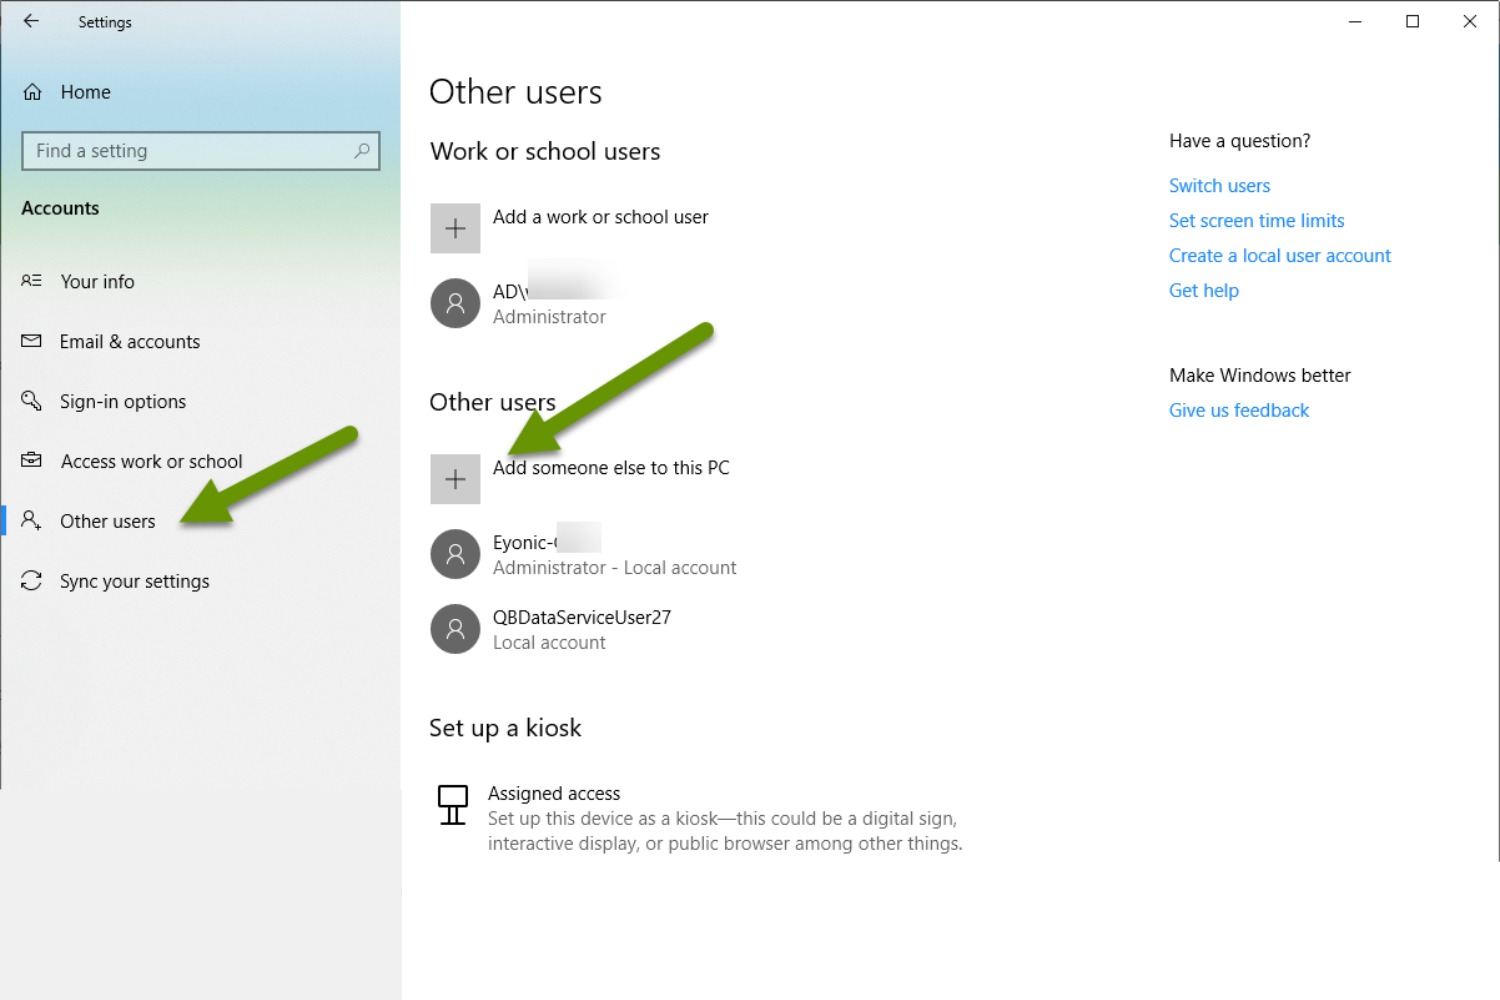
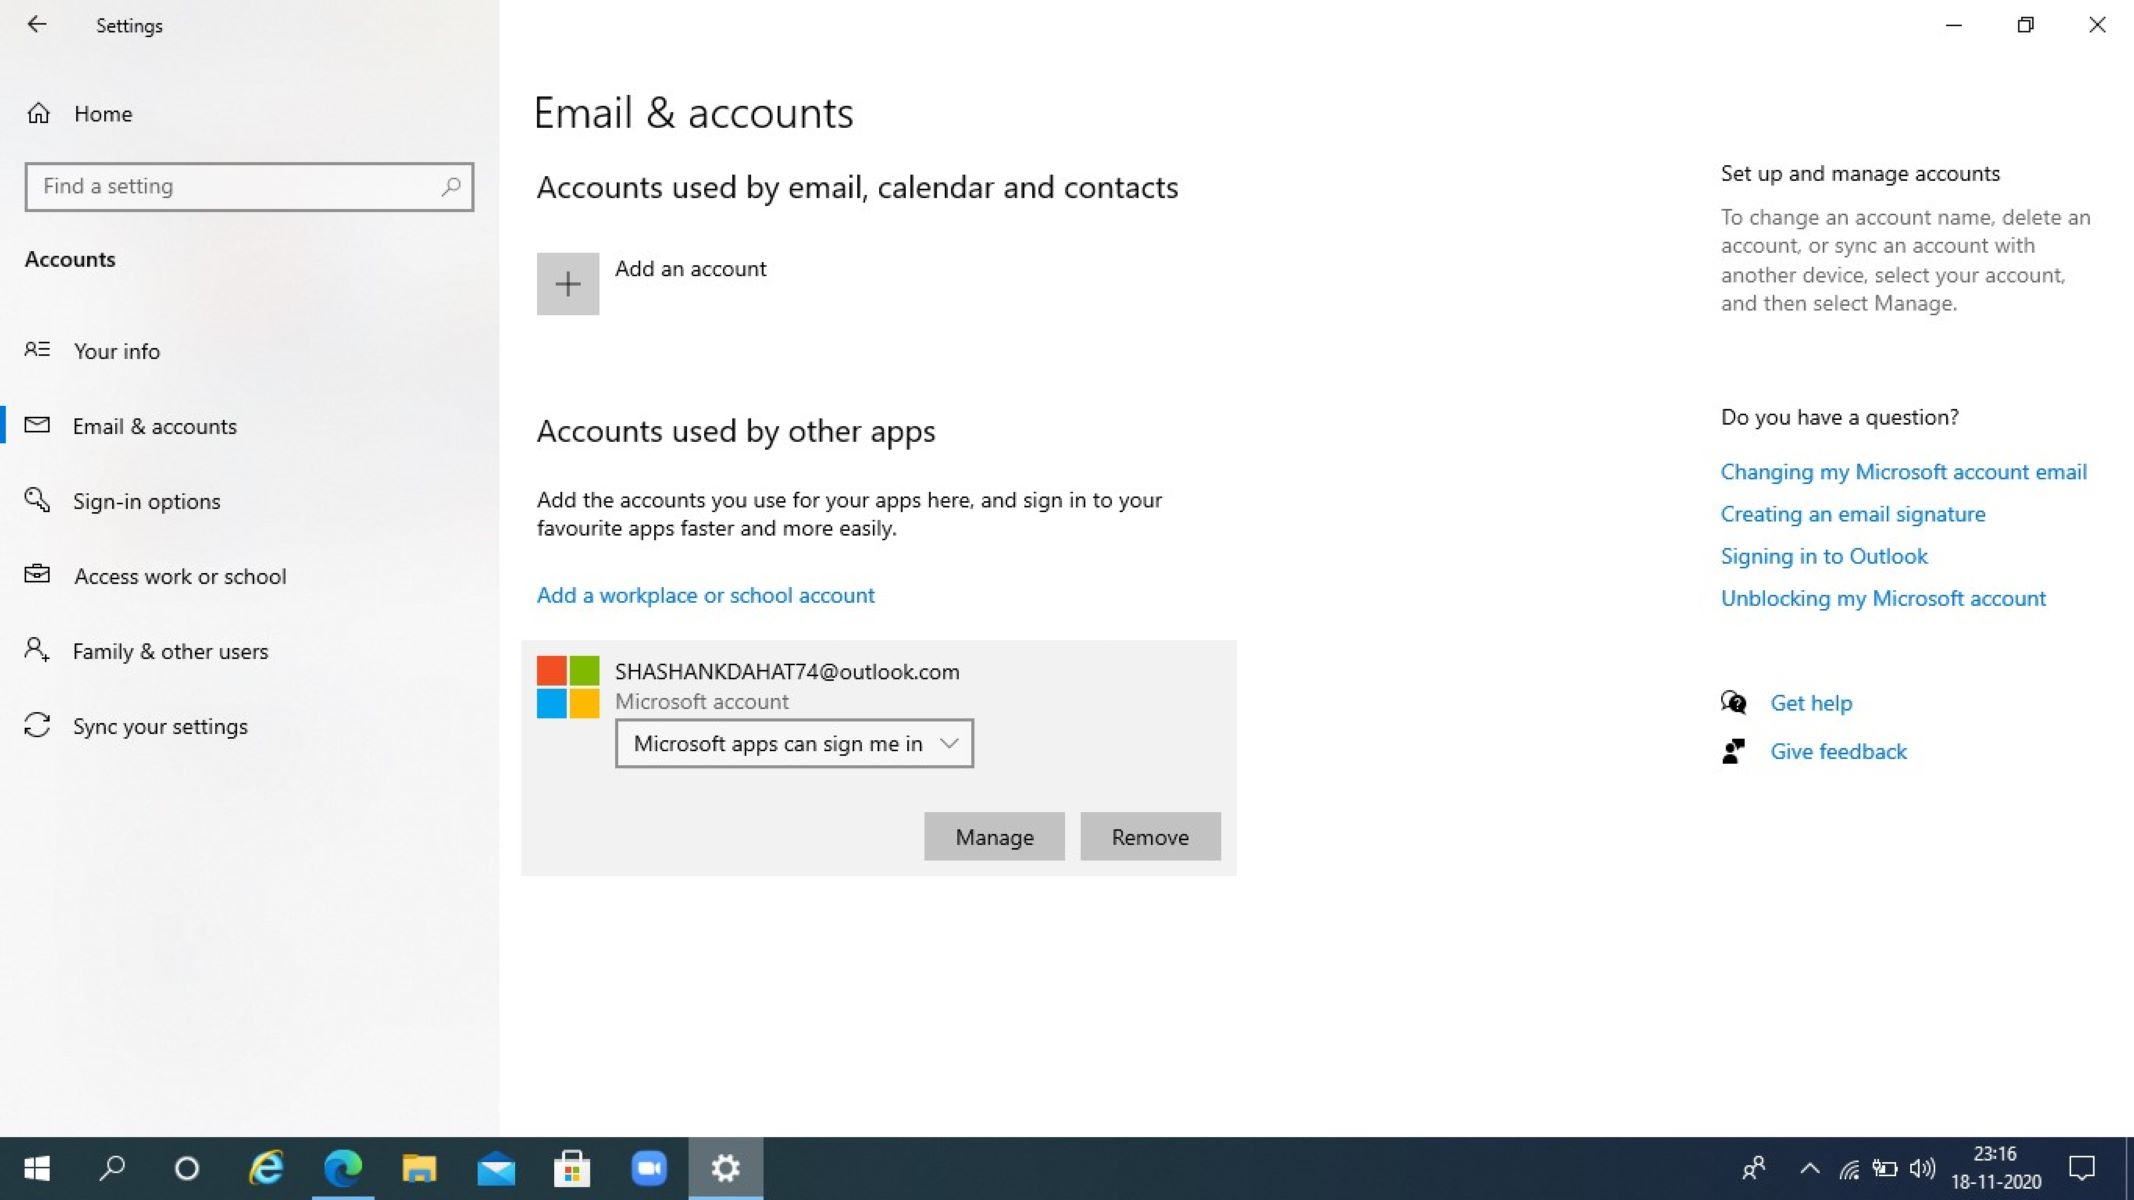
- In the Settings app, click on the “Accounts” option to open the accounts settings.
- On the left side of the window, select the “Your info” tab.
- Under the “Your email and accounts” section, click on the “Manage my Microsoft account” link. This will open your Microsoft account settings in a web browser.
- Sign in to your Microsoft account, if prompted.
- In your Microsoft account settings, click on the “Security” tab on the top menu.
- Scroll down to the “More security options” section and click on the “Remove my account” link.
- Follow the on-screen instructions to confirm the removal of your Microsoft account.
- Restart your computer for the changes to take effect.
After restarting your computer, your Microsoft account will no longer be associated with your Windows 10 device. You will now be prompted to sign in with a local account or create a new account. Keep in mind that any files, settings, and apps tied to your Microsoft account will no longer be accessible on this device.
This method is straightforward and removes your Microsoft account while keeping you logged into your Windows 10 device. If you prefer using a local account, proceed to the next method.
Method 2: Disconnect Microsoft Account from Windows 10
If you want to keep using a Microsoft account but disconnect it from your Windows 10 device, follow these steps:
- Open the Start menu and click on the “Settings” gear icon to open the Settings app.
- In the Settings app, click on the “Accounts” option to open the accounts settings.
- On the left side of the window, select the “Your info” tab.
- Under the “Your email and accounts” section, click on the “Manage my Microsoft account” link. This will open your Microsoft account settings in a web browser.
- Sign in to your Microsoft account, if prompted.
- In your Microsoft account settings, click on the “Devices” tab on the top menu.
- Under the “Manage devices” section, select your Windows 10 device.
- Click on the “More actions” button (represented by three dots) next to your device and select “Remove from account”.
- Follow the on-screen instructions to confirm the disconnection of your Microsoft account.
Once you have disconnected your Microsoft account from your Windows 10 device, you will still be able to sign in using your Microsoft account credentials. However, your device will no longer synchronize settings and data with your Microsoft account.
This method allows you to maintain the convenience of using a Microsoft account while disconnecting it from your specific Windows 10 device. If you prefer switching to a local account, proceed to the next method.
Method 3: Switch to a Local Account from Microsoft Account
If you prefer to use a local account instead of a Microsoft account on your Windows 10 device, you can easily switch between the two. Follow these steps to switch from a Microsoft account to a local account:
- Open the Start menu and click on the “Settings” gear icon to open the Settings app.
- In the Settings app, click on the “Accounts” option to open the accounts settings.
- On the left side of the window, select the “Your info” tab.
- Under the “Your email and accounts” section, click on the “Sign in with a local account instead” link.
- Enter your current Microsoft account password to verify your identity.
- Click on the “Next” button.
- Provide a username, password, and password hint for the new local account.
- Click on the “Next” button, followed by the “Sign out and finish” button.
Once you have completed these steps, your Windows 10 device will be switched to a local account. This means that you will no longer be tied to a Microsoft account and can use the new local account credentials to sign in to your device.
Keep in mind that switching to a local account will result in the disconnection of your Microsoft account, which means you will lose access to synced data and services tied to that account.
This method is ideal if you want to maintain a separate local account for your Windows 10 device and have more control over your data and settings.
Method 4: Delete Microsoft Account
If you have decided to completely remove your Microsoft account and no longer want to use it with any Windows 10 devices, follow these steps to delete your Microsoft account:
- Visit the Microsoft account closure page using a web browser and sign in to the account that you want to delete.
- Read through the important information displayed on the account closure page to understand the consequences of deleting your Microsoft account. Make sure to review the list of important things to know before proceeding.
- Scroll down and click on the “Next” button.
- Read the list of things you should do beforehand, such as downloading any important data and canceling any subscriptions tied to your Microsoft account.
- If you are ready to proceed, check all the boxes to confirm that you have understood the implications and completed the necessary steps.
- Click on the “Mark account for closure” button.
- You will receive a confirmation email from Microsoft to the email address associated with your account. Follow the instructions provided in the email to complete the account closure process.
Once you have completed the account closure process, your Microsoft account will be permanently deleted. This means that you will no longer be able to sign in to any Microsoft services or use the email address associated with the account.
Deleting your Microsoft account is a significant decision, so make sure you have backed up any important data and understand the consequences before proceeding. It is irreversible, and you will lose access to all the data and services associated with the account.
It is recommended to evaluate your need for a Microsoft account thoroughly before choosing this method.
Conclusion
Removing a Microsoft account from Windows 10 can be necessary for various reasons, such as switching to a local account or discontinuing the use of that account on your device. In this guide, we have provided you with four methods to accomplish this task.
We started by explaining how to remove a Microsoft account using the Settings app. This method allows you to remove the account without switching to a local account. Next, we covered the process of disconnecting a Microsoft account from your Windows 10 device, which allows you to keep using the account but stops synchronization.
If you prefer to switch to a local account, we provided step-by-step instructions on how to do that as well. This method allows you to maintain a separate account for your device while still being able to sign in without a Microsoft account.
Lastly, we discussed the option of deleting a Microsoft account entirely. This is a more permanent step and should be taken with caution, as it will result in the loss of access to all associated services and data.
Before making any changes, it is important to consider the implications and ensure you have proper backups of any important files or data. We recommend reviewing our prerequisites and evaluating your specific needs before proceeding with any of the methods outlined in this guide.
We hope this article has provided you with the necessary information and guidance to remove a Microsoft account from your Windows 10 device. Whether you choose to switch to a local account or delete the account completely, the decision is ultimately yours.
Remember, taking the time to understand the process and consider your options will help ensure a smooth transition and a more personalized experience on your Windows 10 device.