Introduction
When it comes to managing users on your Windows 10 computer, there may be times when you need to remove a user account. Whether it’s because a user no longer needs access to the computer or you simply want to clean up your user accounts, Windows 10 provides several methods for removing a user.
In this article, we will explore four different methods to remove a user from Windows 10. These methods include using the Settings app, the Control Panel, the Command Prompt, and the Computer Management tool. Each method offers a different approach to removing a user account, so you can choose the one that suits your needs and preferences best.
Before we delve into the methods, it’s important to note that removing a user account will permanently delete all the data associated with that account. Therefore, make sure to back up any important files or data beforehand to avoid any unintended loss.
Now, let’s explore each method in detail to learn how to remove a user from Windows 10.
Method 1: Using the Settings App
The Settings app in Windows 10 provides a straightforward and user-friendly way to manage user accounts, including removing them. Here’s how to do it:
- Open the Start menu by clicking on the Windows icon in the bottom left corner of the screen, and then click on the Settings gear icon.
- In the Settings app, click on the “Accounts” option.
- In the left sidebar, click on “Family & other users.” This will display a list of user accounts on the right side of the window.
- Scroll down to the “Other users” section and locate the user account you want to remove.
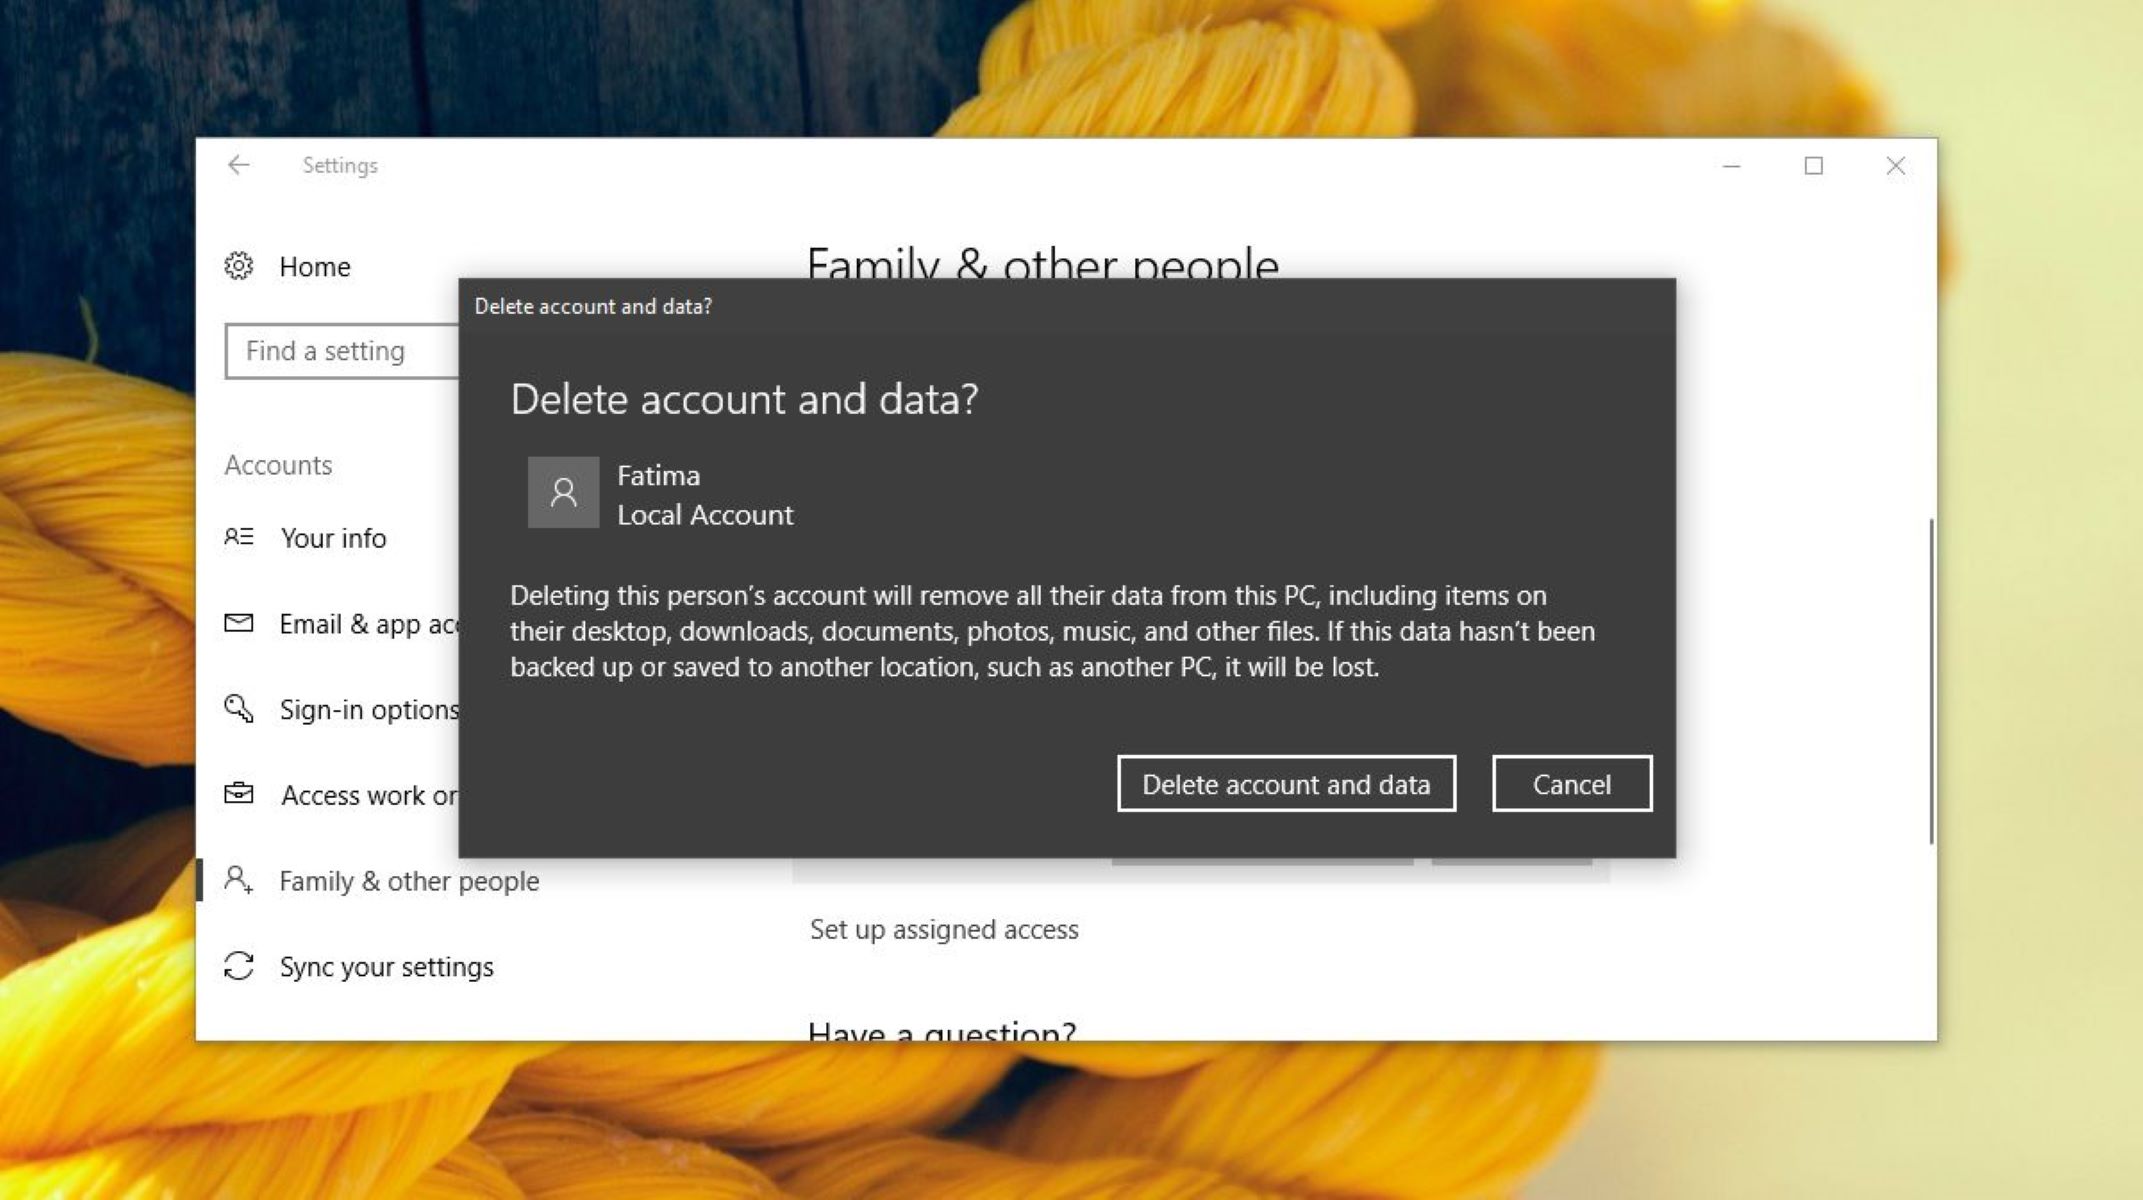
- Click on the user account to expand its options, and then click on the “Remove” button.
- A confirmation prompt will appear. Click on the “Delete account and data” to permanently remove the user account from your Windows 10 computer.
Once you’ve completed these steps, the user account will be removed from your Windows 10 computer, along with all its associated data.
It’s worth mentioning that this method is suitable for removing individual user accounts. If you want to remove a Microsoft account or a user account linked to a domain, you may need to use a different method, which we will explore later.
Now that you’ve learned how to remove a user account using the Settings app, let’s move on to the next method: using the Control Panel.
Method 2: Using the Control Panel
If you prefer using the traditional Control Panel interface, you can also remove a user account from Windows 10 through the Control Panel. Here’s how:
- Open the Run dialog box by pressing the Windows key + R on your keyboard.
- Type “control” in the Run dialog box and hit Enter. This will open the Control Panel.
- In the Control Panel, set the “View by” option to “Large icons” or “Small icons” to see all the available options.
- Click on the “User Accounts” option to access the User Accounts settings.
- Within User Accounts, click on the “Manage another account” option.
- A list of user accounts will be displayed. Locate the user account you want to remove.
- Click on the user account to expand its options, and then click on the “Delete the account” option.
- A confirmation prompt will appear. Select the “Delete Files” option if you want to delete the user account’s files as well. Otherwise, choose “Keep Files.”
- Click on the “Delete Account” button to remove the user account from your Windows 10 computer.
Once you follow these steps, the user account will be successfully removed from your Windows 10 computer.
Please note that this method is suitable for removing both local user accounts and Microsoft accounts. However, if you want to remove a user account linked to a domain, you may need to consult your system administrator or use an alternative method.
Now that you know how to remove a user account using the Control Panel, let’s move on to the next method: using the Command Prompt.
Method 3: Using the Command Prompt
If you are comfortable with using the command line interface, you can also remove a user account from Windows 10 using the Command Prompt. Here’s how:
- Open the Command Prompt by pressing the Windows key + X on your keyboard and selecting “Command Prompt” from the menu.
- Once the Command Prompt window opens, type the following command:
net user username /delete, replacing “username” with the name of the user account you want to remove. - Press Enter to execute the command.
- If the command is successful, you will see a message confirming that the user account has been removed.
It’s important to note that this method is suitable for removing local user accounts, and it may not work for removing Microsoft accounts or user accounts linked to a domain. Additionally, you need to have administrative privileges to execute this command successfully.
Now that you know how to remove a user account using the Command Prompt, let’s move on to the final method: using the Computer Management tool.
Method 4: Using the Computer Management Tool
If you prefer a more comprehensive approach to managing user accounts, you can utilize the Computer Management tool to remove a user account from Windows 10. Here’s how:
- Right-click on the Start menu button and select “Computer Management” from the context menu. Alternatively, you can press the Windows key + X and choose “Computer Management” from the menu.
- In the Computer Management window, expand the “Local Users and Groups” section in the left sidebar.
- Click on the “Users” folder to display a list of user accounts in the main panel.
- Locate the user account you want to remove and right-click on it.
- From the context menu, select the “Delete” option.
- A confirmation prompt will appear. Click “Yes” to proceed with the removal of the user account.
By following these steps, the user account will be successfully removed from your Windows 10 computer using the Computer Management tool.
It’s important to note that this method is suitable for removing local user accounts and user accounts linked to a domain. However, it may not work for removing Microsoft accounts. Additionally, you need to have administrative privileges to perform these actions.
Now that you know how to remove a user account using the Computer Management tool, you have explored all the methods available in Windows 10.
Conclusion
Removing a user account from Windows 10 can be necessary for various reasons, whether you are tidying up your computer or no longer need certain accounts. In this article, we explored four different methods for removing user accounts: using the Settings app, the Control Panel, the Command Prompt, and the Computer Management tool.
The Settings app provides a simple and user-friendly way to remove individual user accounts. If you prefer the traditional interface, the Control Panel allows you to manage and remove both local and Microsoft accounts. For those comfortable with the command line, the Command Prompt offers a quick method to remove local user accounts. And if you prefer a more comprehensive approach, the Computer Management tool provides a solution for removing both local and domain-linked user accounts.
Regardless of the method you choose, it’s important to remember that removing a user account will permanently delete all associated data. Therefore, it’s crucial to back up any important files or data before proceeding with the removal.
Now that you have learned how to remove a user account using these different methods, you can effectively manage the user accounts on your Windows 10 computer. Whether you opt for the simplicity of the Settings app or the versatility of the Command Prompt, you have the tools at your disposal to keep your user accounts organized and tailored to your needs.