Introduction
Windows 10 offers the convenience of setting up a password to secure your computer and protect your personal information. However, there may be instances where you want to turn off the password requirement, especially if you are the only user of your computer or if you find it cumbersome to enter the password every time you log in. Whatever your reason may be, disabling the password on Windows 10 is a straightforward process.
In this guide, we will explore different methods to turn off the password on Windows 10. From using the settings menu to accessing the command prompt or utilizing local users and groups, we will cover various approaches to suit different preferences and skill levels. Whether you are a novice user or an advanced tech enthusiast, you will find a method that works for you.
It is important to note that disabling the password on your Windows 10 account poses a security risk, as anyone with access to your computer can log in without requiring a password. Therefore, it is recommended to use this feature in instances where you have a trustworthy and secure environment. Additionally, proceed with caution and only disable the password if you are confident in your computer’s security measures.
Now, let’s dive into the different methods that will guide you on how to turn off the password on Windows 10. By following these steps, you can streamline the login process, making it faster and more convenient for you to access your computer.
Method 1: Turn Off Password Using Settings
One of the simplest ways to disable the password on Windows 10 is by using the system settings. Follow the steps below to turn off the password requirement:
- Open the Start menu and click on the Settings icon (the gear-shaped icon) to access the Windows 10 settings.
- In the Settings window, click on the “Accounts” option.
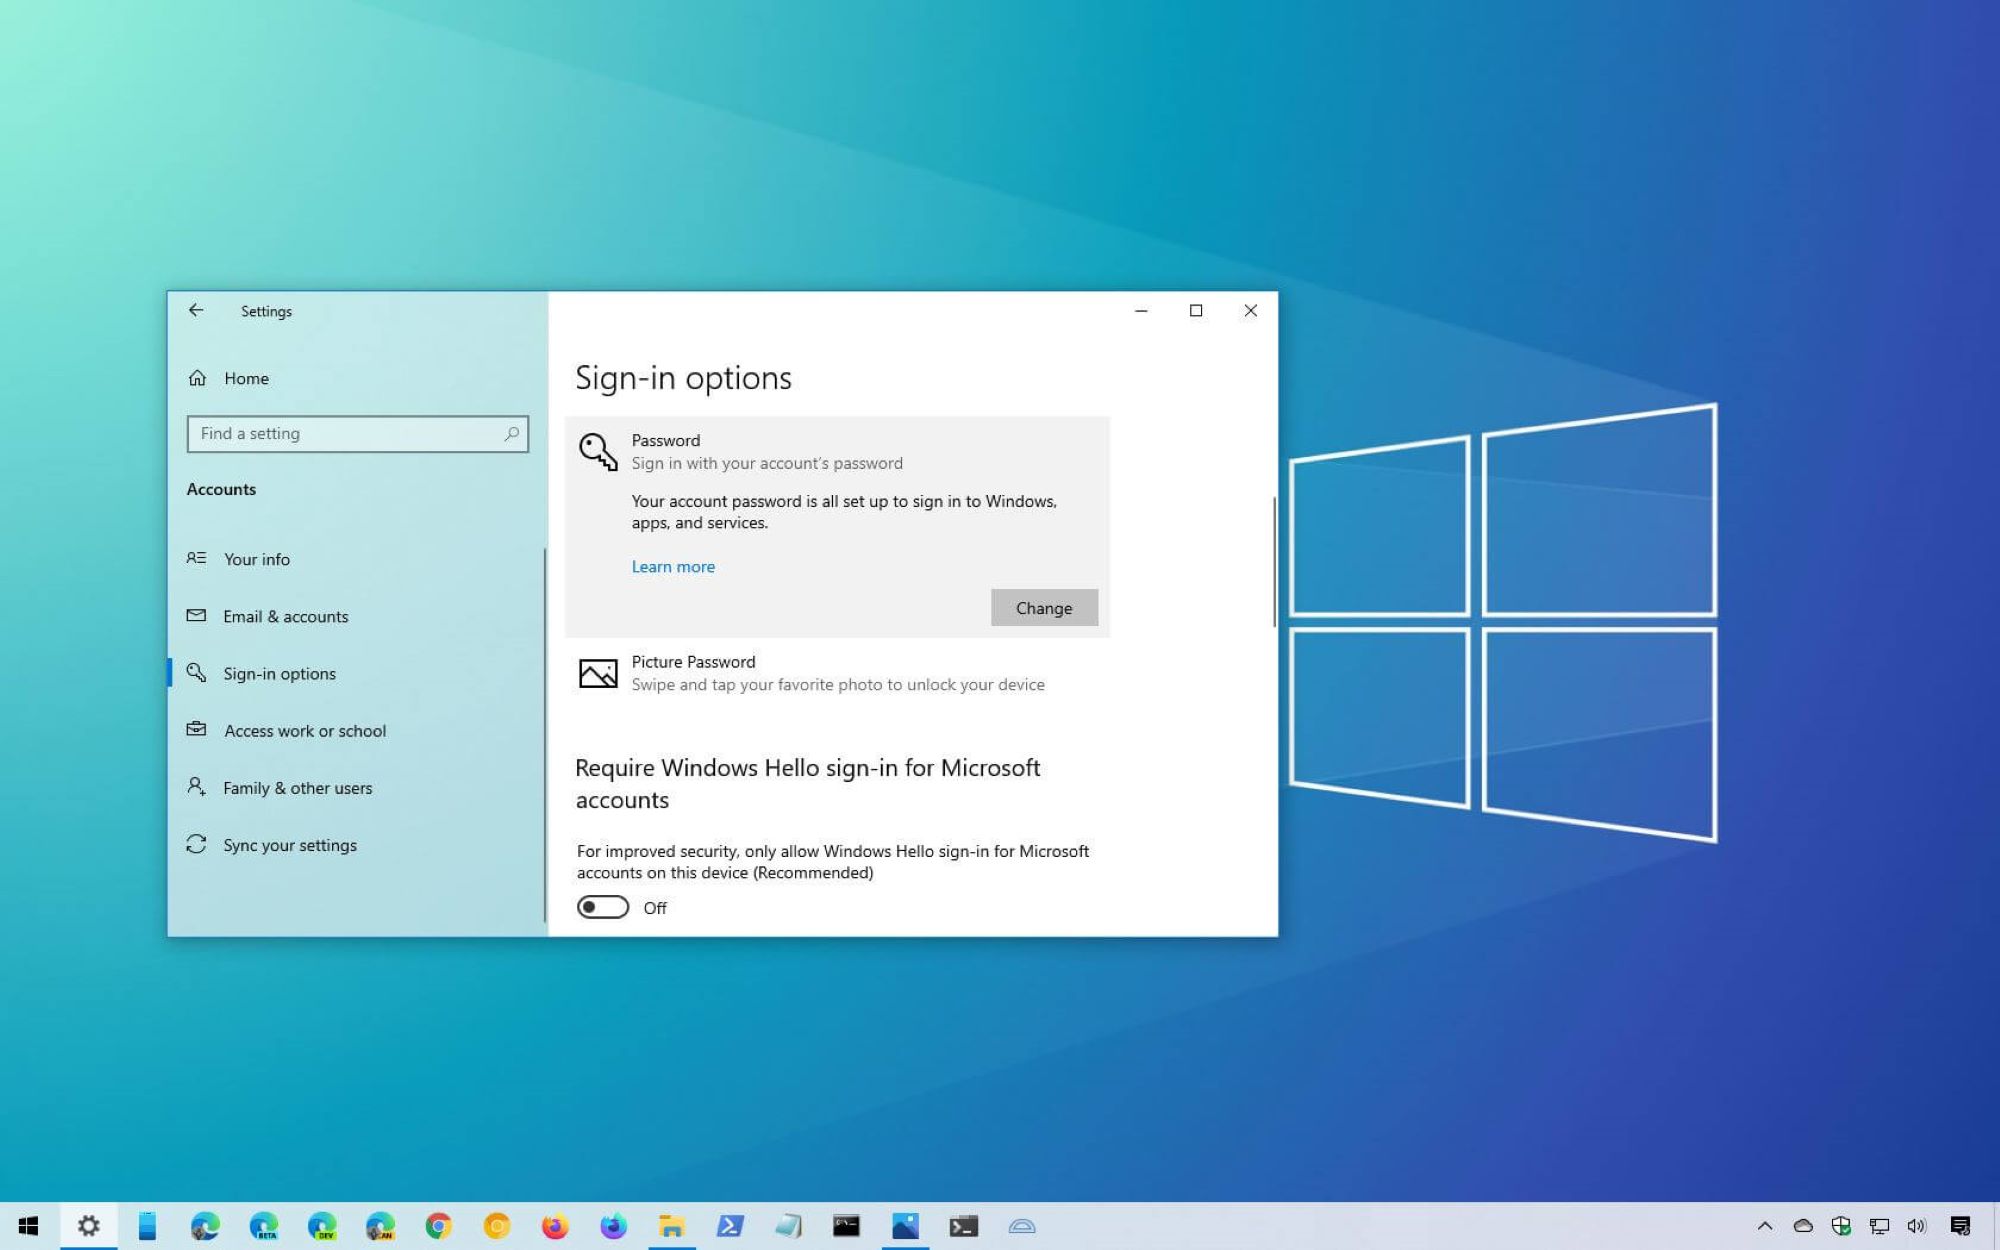
- On the left panel, select “Sign-in options.”
- Scroll down on the right panel until you find the “Password” section.
- Click on the “Change” button.
- You may be prompted to enter your current password for security purposes. Provide the password and click “OK.”
- In the new window, leave the “Old password” field blank.
- Enter a new password in the “New password” field, and leave the “Confirm password” field blank. This step is necessary to satisfy the password security requirements.
- Click on the “Next” button.
- In the final window, click on the “Finish” button.
By completing these steps, you have successfully turned off the password requirement for your Windows 10 account. From now on, when you start or wake up your computer, you will not be prompted to enter a password. Keep in mind that this method only works if you are using a local account. If you are using a Microsoft account to log in to your Windows 10, you will need to use a different method.
Remember, disabling the password through the settings menu makes it convenient to access your computer, but it also removes a layer of security. Only choose this method if you are confident in the security of your computer and the environment it is used in. Consider combining it with other security measures, such as a strong antivirus software or restricted physical access to your device, to ensure the safety of your personal information.
Method 2: Use Command Prompt to Disable Password
If you prefer using the command line interface, you can disable the password requirement on Windows 10 by utilizing the Command Prompt. Follow the steps below to disable the password using this method:
- Open the Start menu and type “Command Prompt” in the search bar.
- Right-click on the Command Prompt app and select “Run as administrator.”
- When the Command Prompt window opens, type the following command and press Enter:
netplwiz - The User Accounts window will appear, displaying a list of user accounts on your computer.
- Select the user account for which you want to disable the password.
- Uncheck the option that says “Users must enter a user name and password to use this computer.”
- Click on the “Apply” button.
- You will be prompted to enter the password of the selected user account. Enter the password and click on the “OK” button.
- In the User Accounts window, click on the “OK” button.
By following these steps, you have successfully disabled the password requirement for the chosen user account. The next time you start or wake up your computer, you will no longer be prompted to enter a password for that account.
It is important to note that this method only disables the password for the selected user account. Other user accounts on the same computer will still require a password, if applicable. Additionally, it’s crucial to consider the security implications of disabling the password. Use this method with caution and ensure that you have appropriate security measures in place to protect your computer and personal information from unauthorized access.
Method 3: Remove Windows 10 Password with Local Users and Groups
Another method to disable the password on Windows 10 is by using the Local Users and Groups feature. This method requires accessing the computer’s management console. Follow the steps below to remove the password using this method:
- Open the Start menu and type “Computer Management” in the search bar.
- Click on the “Computer Management” app to open the management console.
- In the left panel of the console, expand “Local Users and Groups” and click on “Users.”
- In the middle panel, find and double-click on the user account for which you want to remove the password.
- In the user account properties window, uncheck the box that says “User must change password at next logon.”
- Check the box that says “User cannot change password” to prevent the user from creating a password again.
- Click on the “Apply” button.
- You will be prompted to confirm the changes. Click on the “OK” button.
- Close the computer management console.
By following these steps, you have successfully removed the password requirement for the selected user account. This means that the user can now log in to their account without entering a password.
It is important to note that this method only removes the password for the selected user account. Other user accounts on the same computer will still require a password, if applicable. Additionally, keep in mind the security implications of removing the password. Only use this method in situations where you have a secure and trusted environment, and ensure that you have other security measures in place to safeguard your computer and personal information.
Method 4: Disable Windows 10 Password with Netplwiz
If you are looking for a simple and efficient way to disable the password on Windows 10, you can use the “netplwiz” command. This method allows you to configure your computer to automatically log in to your user account without requiring a password. Follow the steps below to disable the password using the “netplwiz” command:
- Open the Start menu and type “netplwiz” in the search bar.
- Click on the “netplwiz” app that appears in the search results.
- The User Accounts window will open, displaying a list of user accounts on your computer.
- Uncheck the option that says “Users must enter a user name and password to use this computer.”
- Click on the “Apply” button.
- In the Automatically sign in window, enter the username and password for the account you want to automatically log in to.
- Click on the “OK” button.
- You will be prompted to confirm the changes. Enter the password for the selected account and click on the “OK” button.
- Close the User Accounts window.
By following these steps, you have successfully configured your computer to automatically log in to the selected user account without requiring a password. From now on, when you start or wake up your computer, it will directly log in to the specified account.
It is important to note that by disabling the password using the “netplwiz” command, you are removing a security layer on your computer. This can make your computer vulnerable to unauthorized access if it is not used in a secure environment. Therefore, exercise caution and consider the security implications before disabling the password using this method. Additionally, ensure that you have other security measures in place, such as antivirus software and restricted physical access to your device, to protect your computer and personal information.
Conclusion
Disabling the password on Windows 10 can be a practical solution for users who find it cumbersome to enter their password every time they log in or prefer a more streamlined login experience. However, it is essential to consider the security implications and only disable the password in a trusted and secure environment.
In this guide, we explored four different methods to turn off the password on Windows 10. From using the system settings and command prompt to accessing local users and groups or utilizing the netplwiz command, each method offers a unique approach to disable the password requirement. By following these methods, you can tailor your Windows 10 login experience to suit your preferences and needs.
When disabling the password, it is important to remember that you are removing a layer of security from your computer. Take additional precautions to ensure the safety of your personal information, such as using a strong antivirus software, enabling firewall protection, and limiting physical access to your device.
It’s also worth mentioning that if you decide to re-enable the password in the future, you can easily do so by following the same methods and selecting the option to require a password during the configuration process.
Ultimately, the decision to disable the password on Windows 10 lies with you as the user. Consider your individual circumstances and take into account the balance between convenience and security. Choose the method that aligns best with your needs, and remember to implement additional security measures to ensure the protection of your personal information.