Introduction
Windows 10 is a popular operating system used by millions of users worldwide. One of the great features of Windows 10 is the ability to change the language settings to match your preferences or requirements. Whether you’re learning a new language, live in a country where another language is primarily spoken, or simply prefer using your computer in a different language, Windows 10 allows you to seamlessly switch between languages.
Changing the language on Windows 10 may seem like a daunting task, but it’s actually quite straightforward. In just a few simple steps, you can navigate through the settings menu and make the desired language adjustments. This flexibility makes Windows 10 accessible and user-friendly for a diverse range of language speakers and learners.
In this article, we will guide you through the process of changing the language on your Windows 10 operating system. We will provide step-by-step instructions and highlight important points along the way. Whether you’re a novice computer user or a tech-savvy individual, this guide will help you navigate the language settings with ease.
Step 1: Open the Settings menu
The first step to changing the language on your Windows 10 operating system is to open the Settings menu. To do this, click on the “Start” button located at the bottom left corner of your screen. In the Start menu, you will find the gear-shaped icon labeled “Settings”. Click on this icon to open the Settings menu.
Alternatively, you can also use the keyboard shortcut by pressing the “Windows” key and the “i” key simultaneously. This will directly open the Settings menu without having to go through the Start menu.
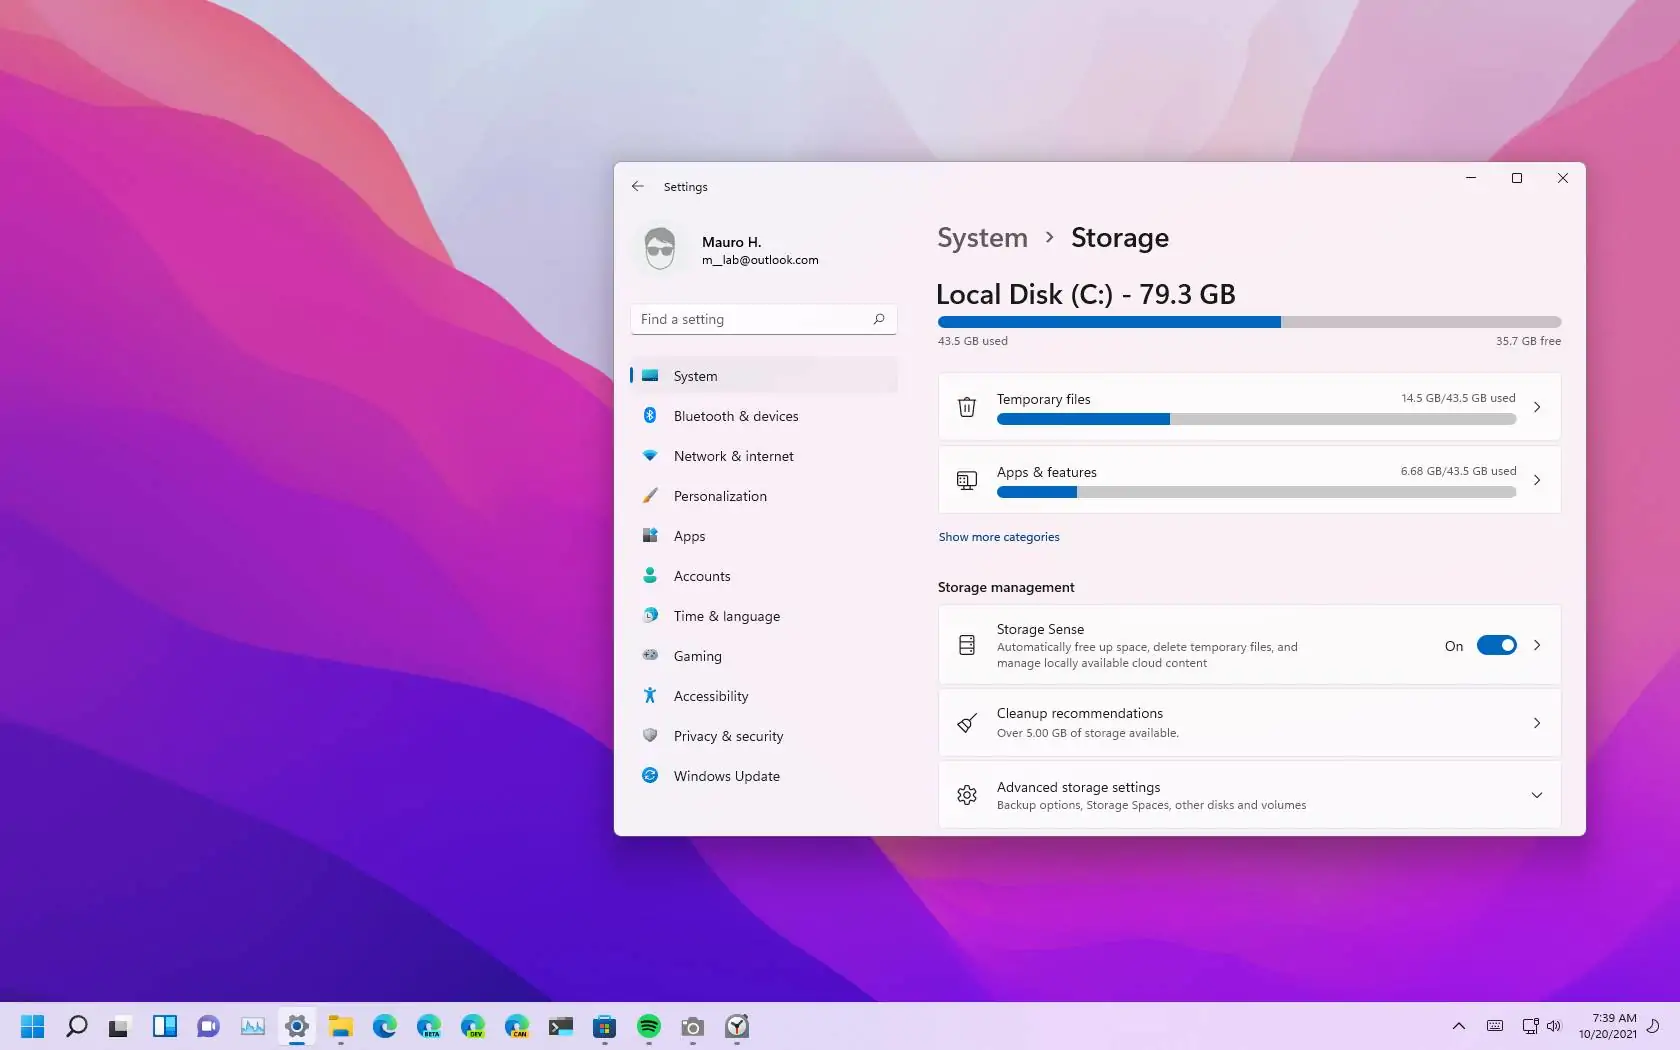
Once the Settings menu is open, you will see a variety of options categorized into different sections. These sections include System, Devices, Network & Internet, Personalization, and more. Look for the section labeled “Time & Language” and click on it.
The Time & Language section contains all the settings related to language, region, date, and time. By accessing this section, you can make changes not only to the language but also the time zone, date format, and more. Let’s proceed to the next step to continue with the language change process.
Step 2: Click on “Time & Language”
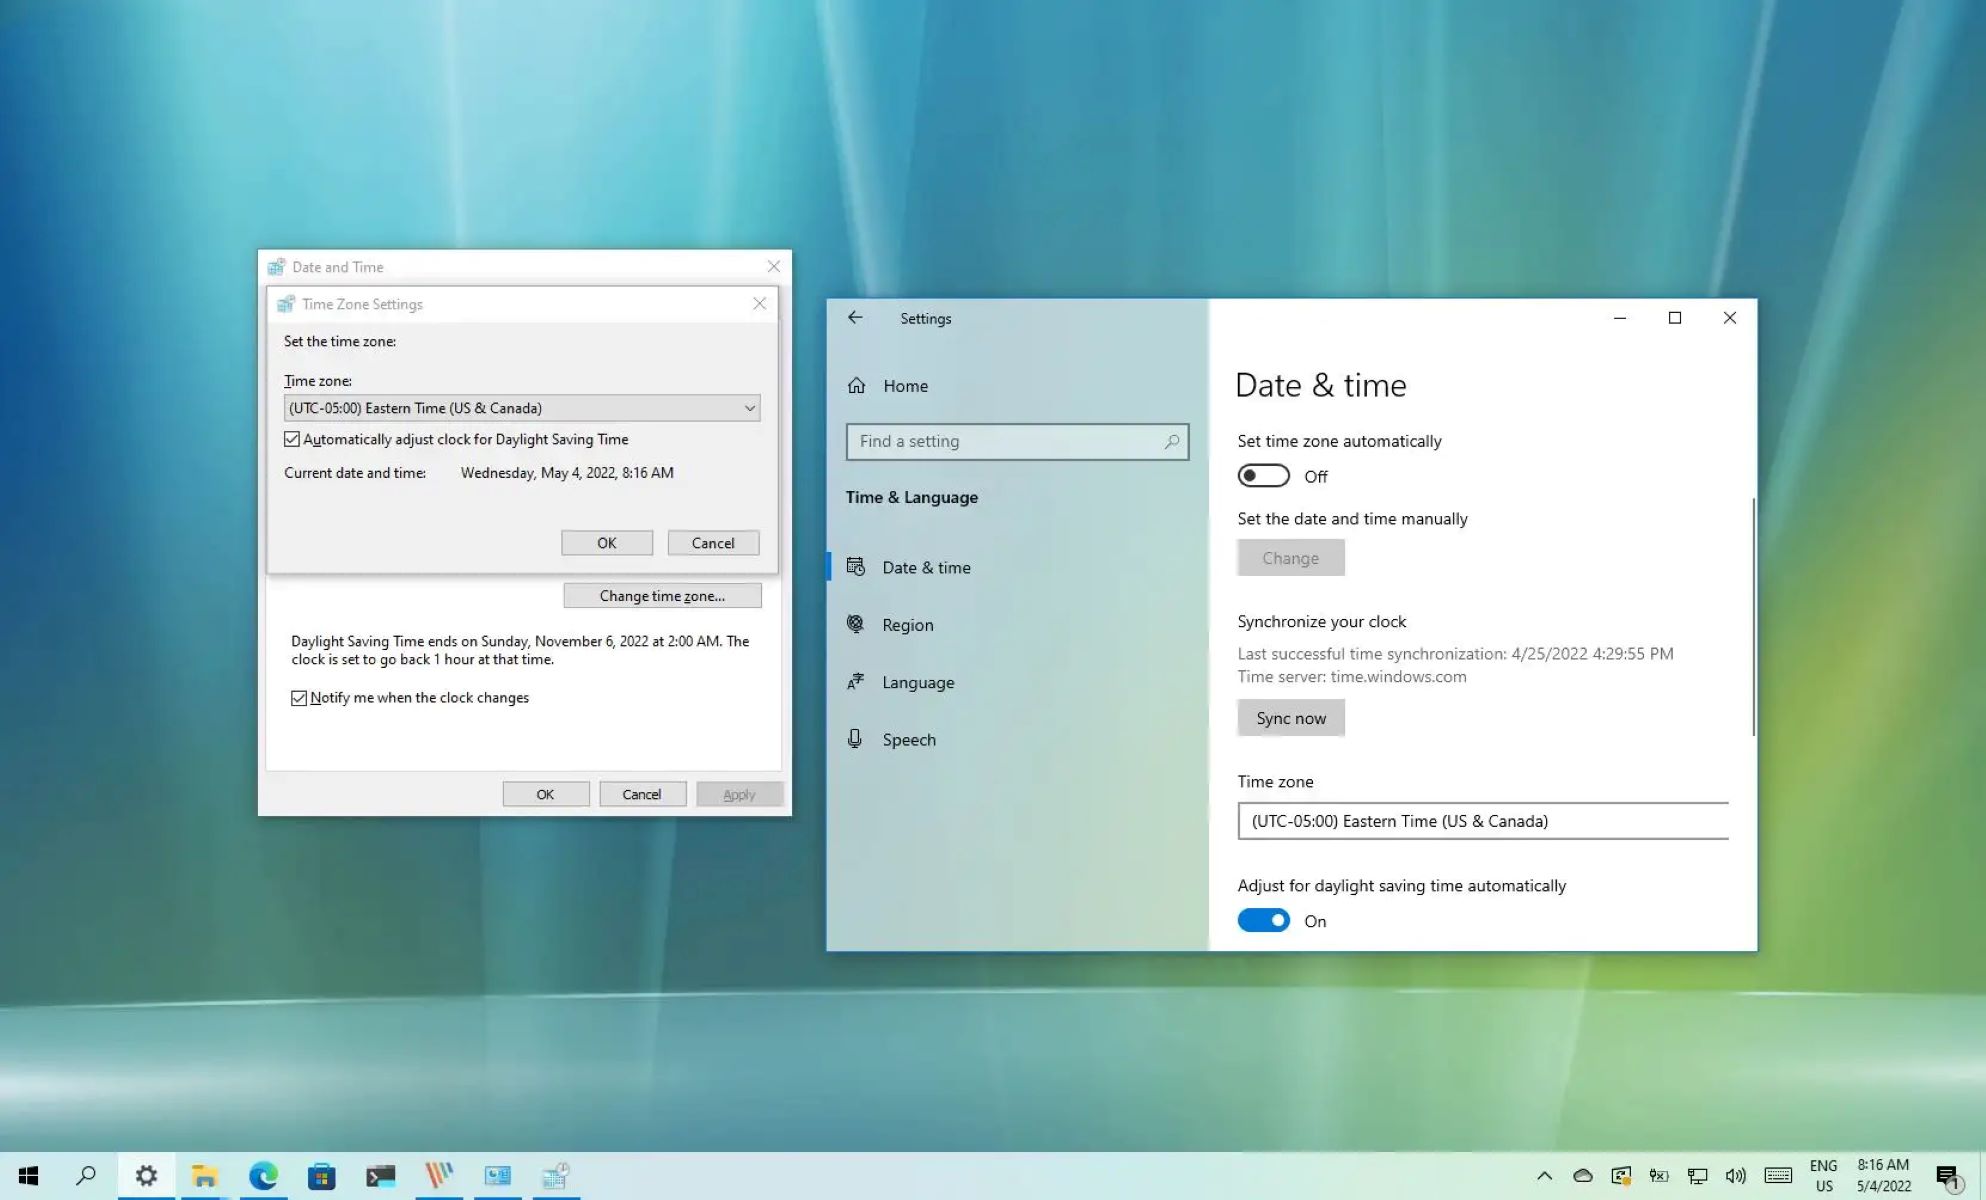
After opening the Settings menu in Windows 10, you will now need to locate and click on the “Time & Language” option. This section houses all the settings related to language, region, date, and time.
Scroll down the left-hand side panel of the Settings menu until you find the “Time & Language” option. It is usually represented by an icon depicting a clock and globe. Click on this option to access the language settings.
Upon clicking on “Time & Language,” the right-hand window will display various options related to language and region settings. Here, you can customize how your Windows 10 system displays the date, time, and language preferences.
This section also allows you to add or remove languages, change the default language, and set region-specific options. It provides a comprehensive range of language-related settings to cater to diverse user needs.
Once you have successfully accessed the “Time & Language” section, you are ready to proceed to the next step, which involves selecting the “Language” option to change the language settings on your Windows 10 operating system.
Step 3: Select “Language”
Now that you have accessed the “Time & Language” section in the Settings menu, it’s time to move on to the next step: selecting the “Language” option. This option allows you to make changes to the language settings of your Windows 10 operating system.
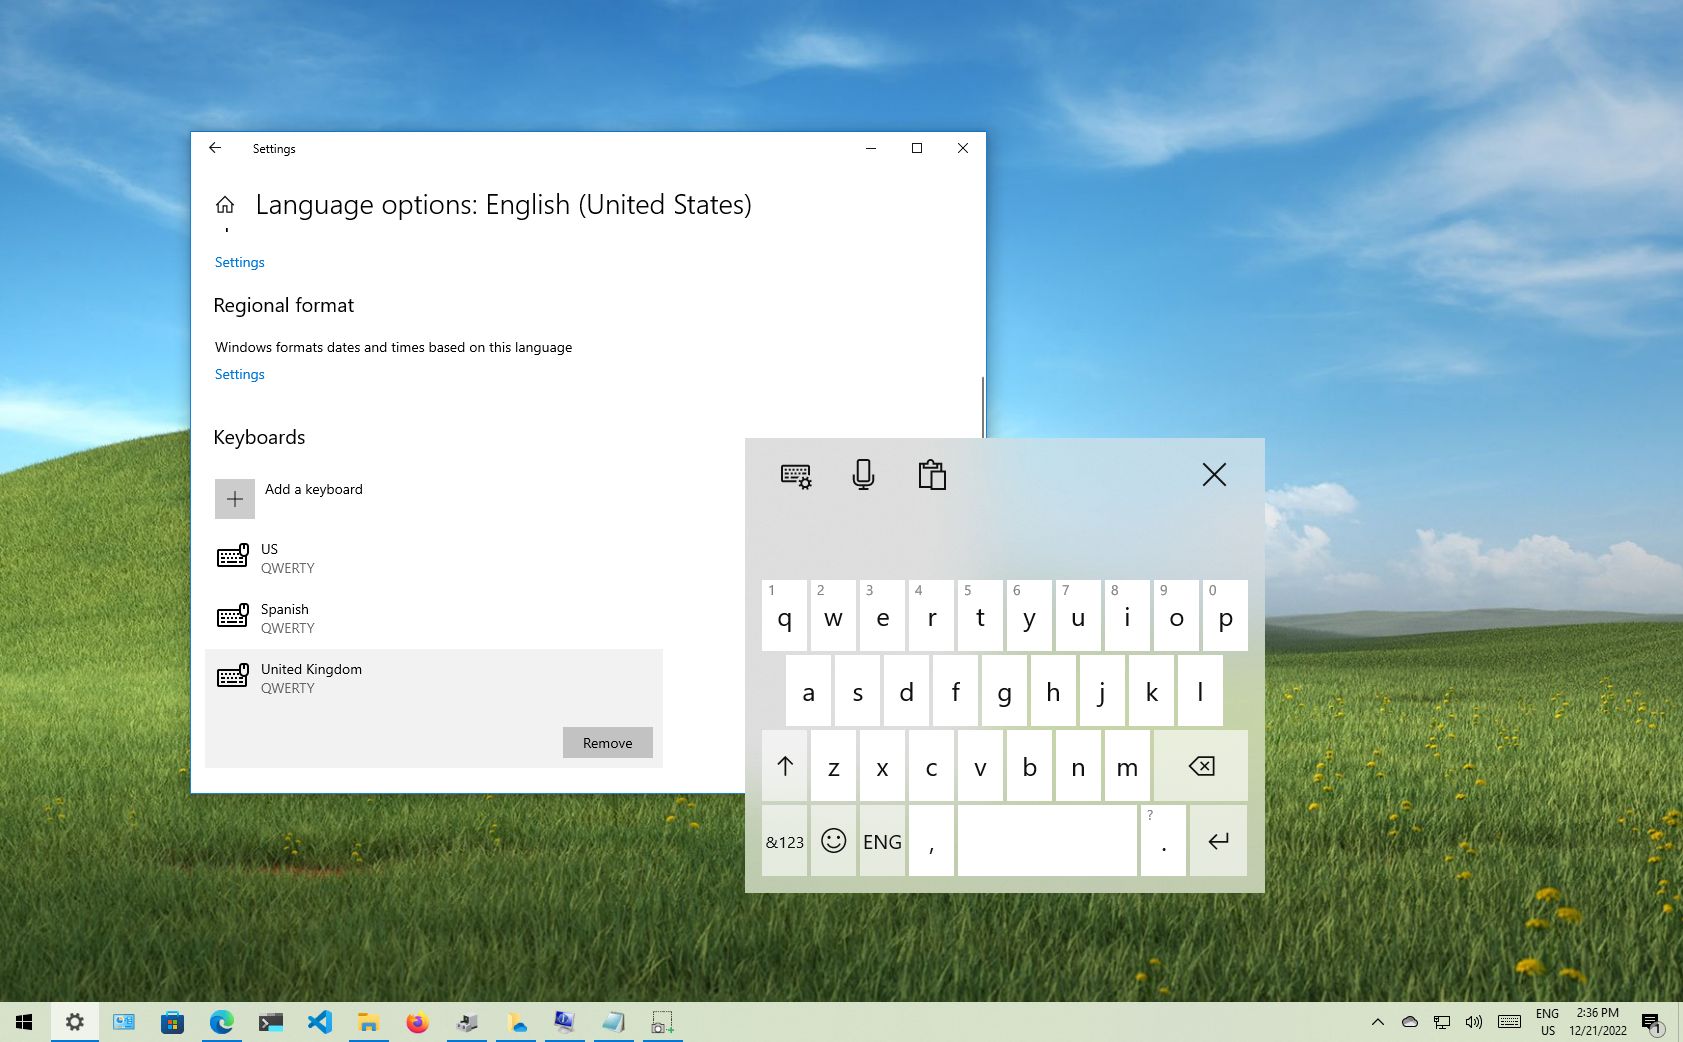
In the “Time & Language” section, you will find a list of options on the left-hand side panel. Look for the option labeled “Language” and click on it. This will bring up the language settings page, where you can add or remove languages and customize your language preferences.
On the language settings page, you will see a list of languages that are currently installed on your Windows 10 system. The default language will be listed at the top. If you have previously added additional languages, they will appear below the default language.
To make changes to the language settings, click on the language that you want to modify or add a new language. This will open up a submenu with various options related to the selected language.
From this submenu, you can choose to set the selected language as the default display language, remove it, or even download additional language features like text-to-speech and handwriting recognition. You can also change the order of the languages to prioritize your preferred language.
Once you have made the necessary changes to the language settings, you can proceed to the next step, which involves adding a new language if desired or setting the newly selected language as the default for your Windows 10 operating system.
Step 4: Click on “Add a language”
After selecting the “Language” option in the “Time & Language” section of the Windows 10 Settings menu, you have the option to add a new language to your system. This is particularly useful if you want to use your computer in a language other than the default language.
To add a new language, click on the “Add a language” button. This will open a list of available languages that you can choose from. The list is organized alphabetically, making it easy to navigate and find the desired language.
You can use the search bar provided at the top of the list to quickly locate a specific language. Simply type in the name of the language you want to add, and Windows will filter the results accordingly.
Once you have found the language you want to add, click on it to select it. Windows will then initiate the process of downloading and installing the language pack. The duration of this process may vary depending on the size of the language pack and the speed of your internet connection.
Once the language pack is successfully downloaded and installed, it will appear in the list of installed languages. You can now select it as your default language or switch to it whenever you want to use your computer in that language.
If you ever wish to remove a language from your Windows 10 system, you can do so by clicking on the language in the list and selecting the “Remove” option. However, please note that removing a language will also remove all related language-specific settings and data.
Now that you have successfully added a new language to your Windows 10 operating system, you can move on to the next step – setting the new language as the default language for your system.
Step 5: Choose the desired language from the list
After clicking on the “Add a language” button in the “Language” section of the Windows 10 Settings menu, you will be presented with a list of available languages. This step involves selecting the desired language from the list and customizing it according to your preferences.
Scroll through the list of installed languages until you find the one you want to choose. The list is organized alphabetically, making it easy to find the desired language. You can also use the search bar at the top of the list to quickly locate a specific language by typing its name.
Click on the language you wish to set as the display language for your Windows 10 operating system. This will open a submenu with various options related to the selected language.
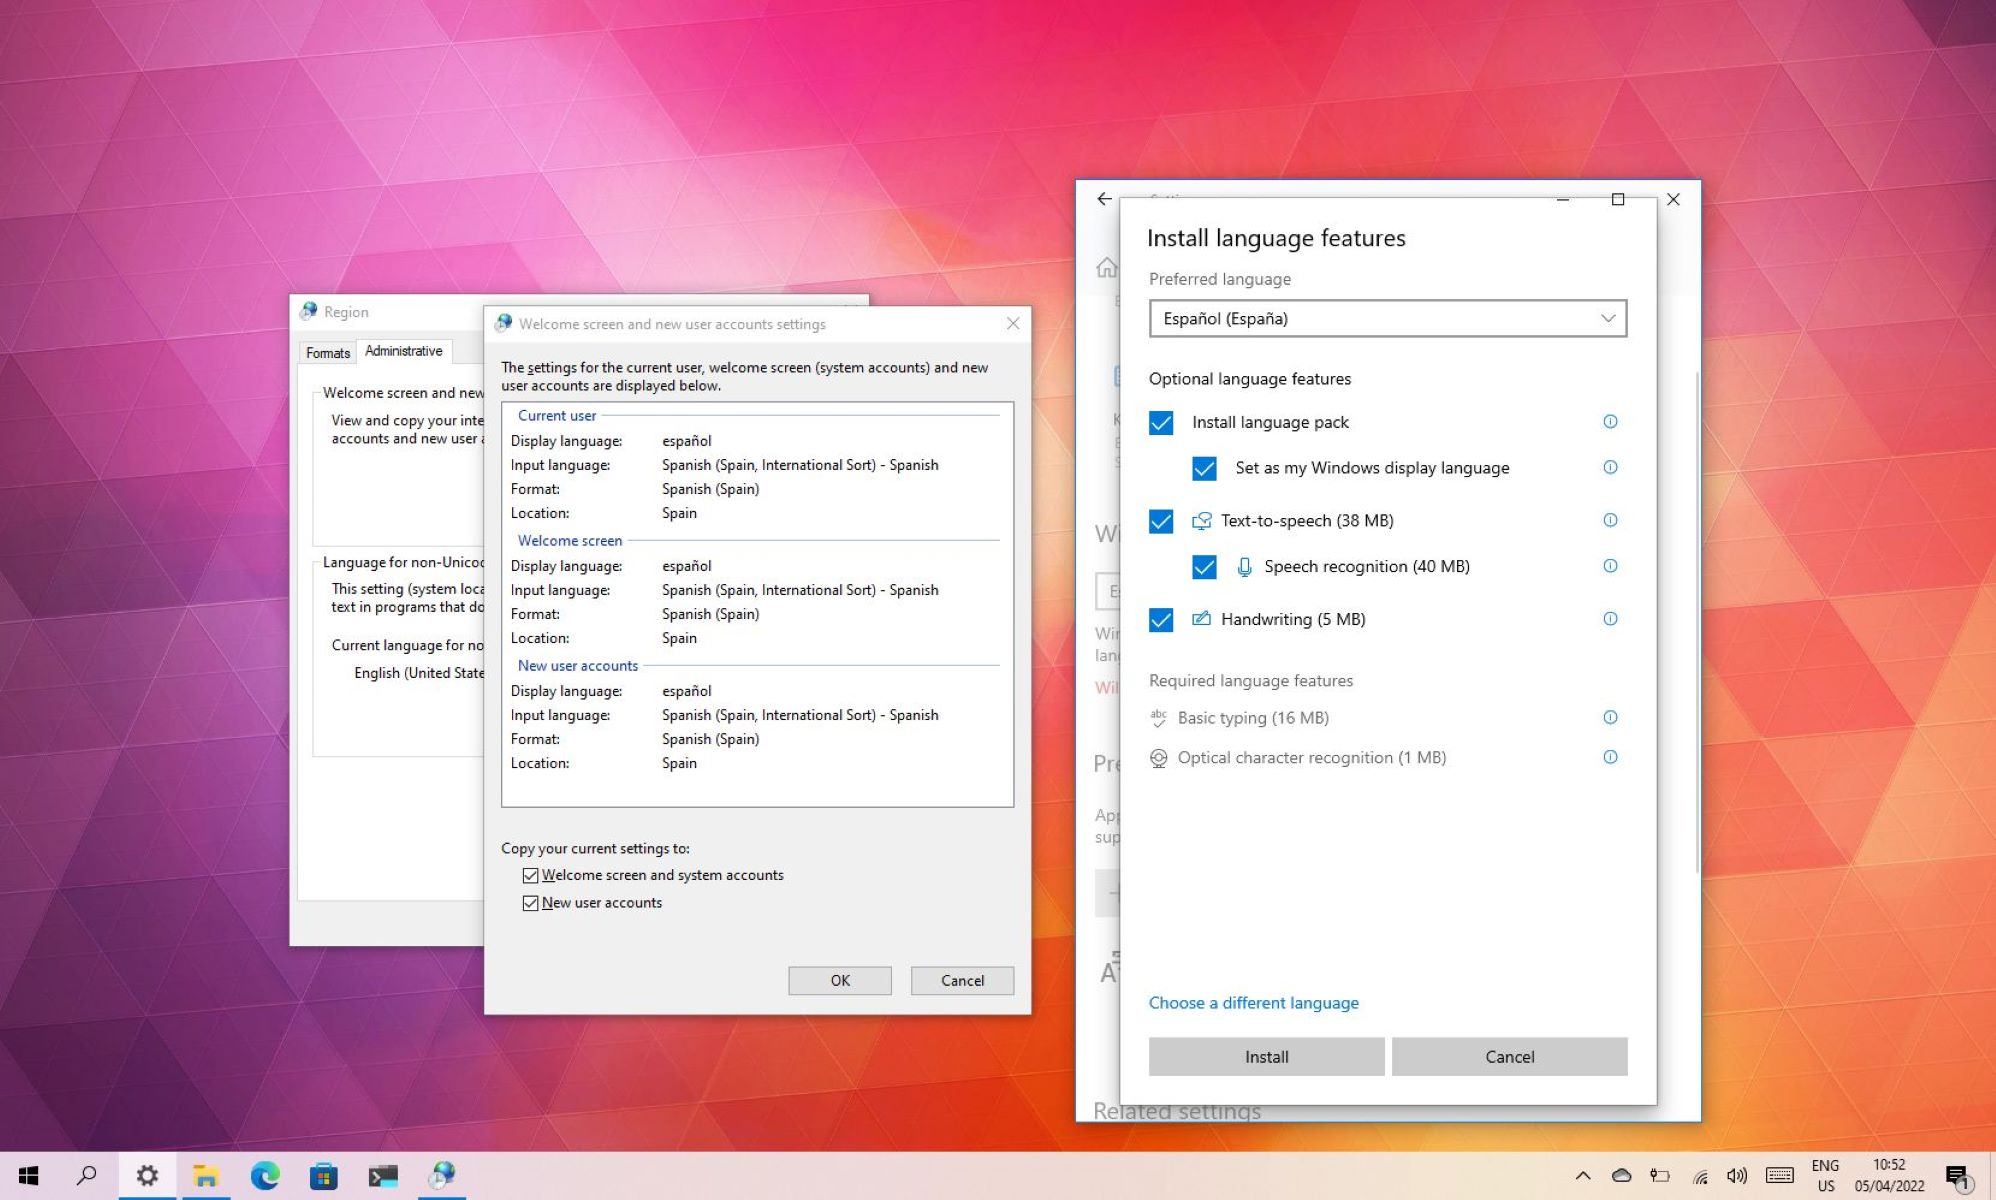
Within the language submenu, you have the option to set the selected language as the default display language. This means that all system menus, dialog boxes, and notifications will be shown in the chosen language. To do this, simply click on the “Set as default” button.
Additionally, you can click on the “Options” button within the language submenu to customize various language-specific settings. For example, you can choose to download and install handwriting recognition or speech-to-text features for the selected language.
Furthermore, you have the freedom to rearrange the order of the installed languages by clicking on the “Move up” or “Move down” buttons. This allows you to prioritize your preferred language in case you have multiple languages installed.
Once you have chosen the desired language from the list and made any necessary customizations, you are now ready to set it as the default language for your system. This will ensure that your Windows 10 operating system is displayed in the language of your choice, providing a more personalized and user-friendly experience.
Step 6: Set the new language as default
Once you have selected the desired language from the list and made any necessary customizations in the language submenu, the next step is to set the new language as the default for your Windows 10 operating system. By doing this, all system menus, dialog boxes, and notifications will be displayed in the chosen language.
To set the new language as the default, navigate back to the “Language” section within the “Time & Language” settings menu. You will see a list of installed languages, with the default language appearing at the top.
Locate the newly added language in the list and click on it to select it. Once selected, the language will be highlighted and additional options will appear below the list.
To set the selected language as the default, click on the “Set as default” button below the list. Windows will prompt you to confirm the change, as setting a new default language will replace the previous default language.
After confirming the change, Windows will automatically apply the new default language settings to your operating system. You may need to log out and log back in for the changes to take effect.
Once you have completed this step, your Windows 10 system will display all system-related information, menus, and notifications in the newly selected default language. This enhances your user experience and ensures that your computer is personalized to your language preferences.
It’s important to note that changing the default language does not affect individual applications or programs installed on your computer. Language settings for specific applications may need to be adjusted within each respective program settings.
Now that you have successfully set the new language as the default for your Windows 10 operating system, you can proceed to the next step – optionally removing any previous languages that are no longer needed.
Step 7: Remove the previous language (optional)
After setting the new language as the default for your Windows 10 operating system, you may consider removing any previously installed languages that are no longer needed. Removing unnecessary languages can help declutter your system and free up storage space.
To remove a language, go back to the “Language” section within the “Time & Language” settings menu. You will see a list of installed languages, with the default language appearing at the top.
Locate the language you want to remove from the list and click on it to select it. The selected language will be highlighted, and additional options will appear below the list.
Click on the “Remove” button located below the list of languages. Windows will prompt you to confirm the removal of the selected language, as this action permanently deletes the language files and associated settings from your system.
Confirm the removal by clicking on “Yes” in the confirmation dialog box. Windows will then proceed to remove the language from your system. The process may take a few moments, depending on the size of the language files and the speed of your computer.
Once the language is successfully removed, it will no longer appear in the list of installed languages. Any language-specific settings and data associated with the removed language will also be deleted.
It’s important to note that removing a language does not affect the default language or the language settings of other applications or programs installed on your computer. Language settings for specific applications may need to be adjusted within each respective program’s settings.
Congratulations! You have successfully removed the previous language, if desired. Your Windows 10 operating system is now streamlined with the new default language, enhancing your overall user experience.
Next, we will proceed to the final step, which involves restarting your computer to ensure that all language changes are applied and take effect system-wide.
Step 8: Restart your computer
After making changes to the language settings on your Windows 10 operating system, it is important to restart your computer to ensure that the changes take effect system-wide. Restarting your computer allows all the necessary system components and processes to update and apply the new language settings.
To restart your computer, click on the “Start” button located at the bottom left corner of your screen. In the Start menu, you will find the power button icon. Click on the power button to open a submenu with various options.
From the power button submenu, select the “Restart” option. Alternatively, you can also use the keyboard shortcut by pressing the “Ctrl”, “Alt”, and “Delete” keys simultaneously and then selecting the “Restart” option.
Windows will then initiate the restarting process. Your computer will shut down, and all the necessary system components will be refreshed when it boots back up. This ensures that the language changes are properly implemented and applied throughout the system.
Once your computer has restarted, log back in with your username and password. You will now experience the new language settings you have configured, as the default language will be used for all system menus, dialog boxes, and notifications.
It’s essential to note that some applications or programs may require additional time to update and reflect the new language settings. If you encounter any issues with language settings in specific applications, make sure to check their individual settings to ensure they are configured to use the desired language.
By restarting your computer, you have completed the final step in changing the language on your Windows 10 operating system. Enjoy using your computer in the language of your choice, and don’t hesitate to revisit the language settings in the Windows 10 Settings menu if you need to make further adjustments.
Conclusion
Changing the language on your Windows 10 operating system can greatly enhance your user experience, making your computer more personalized and user-friendly. Whether you need to use your computer in a different language for work, study, or personal reasons, Windows 10 provides a simple and efficient process for language customization.
In this article, we have explored the step-by-step process of changing the language on Windows 10. From accessing the Settings menu to selecting a new language, setting it as default, and optionally removing previous languages, the process has been detailed to help you navigate through the language settings with ease.
By following these steps, you can seamlessly switch between languages, making it convenient to use your computer in a language that suits your needs or preferences. Windows 10’s language customization feature showcases its versatility and accessibility, accommodating a wide range of users globally.
Remember that changing the default language affects the system-wide display, system menus, dialog boxes, and notifications. However, individual applications or programs may have separate language settings that need to be adjusted within their respective settings.
To ensure that all the language changes are properly applied and take effect, it is important to restart your computer. This allows all the necessary system components to update and adapt to the new language settings.
Whether you’re learning a new language, living in a different country, or simply prefer using your computer in a different language, Windows 10 provides a user-friendly and flexible environment to accommodate your language needs. Enjoy using your Windows 10 operating system in the language of your choice!